Web based School
- Chapter 24
- Making Your Knowledge Add Up
- A Calculating Class
- Creating the Interface
- Listing 24.1. The first half of MiniCalc.java.
- Responding to User Events
- Listing 24.2. The last half of MiniCalc.java.
- Solving Problems
- Trying Out the Program
- Listing 24.3. The full text of CalcApplet.java.
- Listing 24.4. The full text of CalcApplet.asp.
- Summary
- Q&A
- Quiz
- Activities
- Making Your Knowledge Add Up
Chapter 24
Making Your Knowledge Add Up
Most of the programs you created during the first 20 hours of this guide were short tutorials intended to demonstrate a specific aspect of Java programming. These types of programs can be useful when you're introduced to how a language works, but they also can be instructive in developing more sophisticated programs.
For the concluding hour of this 24-hour span, you'll create a Java class that works as a simple calculator. This project gives you a chance to design a graphical user interface, respond to user mouse clicks, and develop the calculator so that it can be used in any Java applet or application.
The following topics will be covered during this hour:
- Adding components to a window
- Arranging components with a layout manager
- Putting one grid layout inside another
- Adding components to containers
- Responding to action events
- Reading information from a text field
- Sending information to a text field
- Using your own classes in a Java program
A Calculating Class
The MiniCalc project will be a simple calculator that can handle addition, subtraction, multiplication, and division. In addition to numeric buttons from 0 to 9, there will be a clear button , a change sign key (+/-), and a decimal point key. Instead of creating the calculator as an applet, you will create it as a class called MiniCalc that is a subclass of Panel.
The advantage of making MiniCalc its own class is that you will be able to use it in other programs. If you design the calculator as an applet, it will be difficult to use in other programs without making major changes. Once you have the MiniCalc class working the way that you want it to, using it in a new program is as easy as using any other object.
The MiniCalc project can be broken down into the following five steps:
- 1. Create the components that will make up the calculator interface.
2. Put those components into containers and set them up to send out action events.
3. Lay out those containers.
4. Keep track of mouse clicks on the components.
5. Change the calculator display area based on which components were clicked.
Creating the Interface
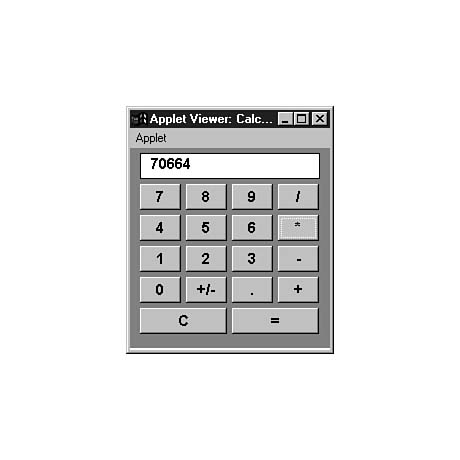
The first thing to do is develop the user interface of the MiniCalc class. Figure 24.1 shows what the calculator will look like when you're done. It's displayed at this point to give you a better feel for the steps that you'll be taking to create it.
When you are trying to create an attractive user interface for a program, one of the best layout managers to use is the GridLayout class. This manager enables you to organize components into a grid. When you use GridLayout, you decide how many rows and columns the grid should have; each component in the grid is given the same amount of space as the other components.
Figure 24.1. A calculator implemented as a Java class and displayed on an applet window.
The MiniCalc class uses GridLayout to organize components into a grid with six rows and one column. Each of these components is a Panel object. Figure 24.2 shows this grid superimposed over a calculator so you can see how it is arranged. The Panel objects have the names row1 through row6. When you add these Panel objects with the add() method, they automatically are given the same amount of space based on the layout manager being used.
Figure 24.2. Six Panel objects arranged in horizontal rows.
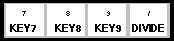
These six Panel objects will be subdivided into their own grids using their own GridLayout objects. Each Panel will be organized as a grid four columns wide and one row tall. When components are added to each Panel, they will get the same amount of space within their row. Figure 24.3 shows how the row2 object is subdivided into a four-by-one grid. Note how each of the buttons has the same size because of the use of GridLayout.
Figure 24.3. One of the rows subdivided into four vertical columns.
Using Panel objects is a good way to make part of a window follow one set of layout rules and other parts work differently. If you had used only one GridLayout class on this project, every component would have exactly the same size--even the text field where answers are displayed.
The first half of the MiniCalc class contains statements to create all of the user interface components that will be used in the program. These statements are located right after the class statement along with other variables that are needed. After all of the components have been created, they will be added to the proper place. The large Panel objects shown as rows in Figure 24.1 will be added to the main window of MiniCalc itself. Every other component will be added to one of these Panel objects.
Create a new file in your word processor called MiniCalc.java. Enter Listing 24.1 and save the file.
Listing 24.1. The first half of MiniCalc.java.
  1: import java.awt.*;
  2: import java.awt.event.*;
  3:
  4: public class MiniCalc extends Panel implements ActionListener {
  5:     char operator = 0;
  6:     float storedValue = 0;
  7:     boolean clearNext = false;
  8:
  9:     TextField display = new TextField(20);
 10:     Button key1 = new Button("1");
 11:     Button key2 = new Button("2");
 12:     Button key3 = new Button("3");
 13:     Button key4 = new Button("4");
 14:     Button key5 = new Button("5");
 15:     Button key6 = new Button("6");
 16:     Button key7 = new Button("7");
 17:     Button key8 = new Button("8");
 18:     Button key9 = new Button("9");
 19:     Button key0 = new Button("0");
 20:     Button add = new Button("+");
 21:     Button subtract = new Button("-");
 22:     Button multiply = new Button("*");
 23:     Button divide = new Button("/");
 24:     Button equal = new Button("=");
 25:     Button decimal = new Button(".");
 26:     Button plusminus = new Button("+/-");
 27:     Button clear = new Button("C");
 28:     Canvas empty = new Canvas();
 29:     Panel row1 = new Panel();
 30:     Panel row2 = new Panel();
 31:     Panel row3 = new Panel();
 32:     Panel row4 = new Panel();
 33:     Panel row5 = new Panel();
 34:     Panel row6 = new Panel();
 35:
 36:     public MiniCalc() {
 37:         Font typeface = new Font("Helvetica", Font.BOLD, 15);
 38:         setFont(typeface);
 39:         setBackground(Color.gray);
 40:
 41:         GridLayout layout = new GridLayout(6, 1, 5, 5);
 42:         this.setLayout(layout);
 43:         GridLayout grid = new GridLayout(1, 4, 5, 5);
 44:
 45:         row1.setLayout(grid);
 46:         display.setBackground(Color.white);
 47:         display.addActionListener(this);
 48:         row1.add(display);
 49:         this.add(row1);
 50:
 51:         row2.setLayout(grid);
 52:         key7.addActionListener(this);
 53:         row2.add(key7);
 54:         key8.addActionListener(this);
 55:         row2.add(key8);
 56:         key9.addActionListener(this);
 57:         row2.add(key9);
 58:         divide.addActionListener(this);
 59:         row2.add(divide);
 60:         this.add(row2);
 61:
 62:         row3.setLayout(grid);
 63:         key4.addActionListener(this);
 64:         row3.add(key4);
 65:         key5.addActionListener(this);
 66:         row3.add(key5);
 67:         key6.addActionListener(this);
 68:         row3.add(key6);
 69:         multiply.addActionListener(this);
 70:         row3.add(multiply);
 71:         this.add(row3);
 72:
 73:         row4.setLayout(grid);
 74:         key1.addActionListener(this);
 75:         row4.add(key1);
 76:         key2.addActionListener(this);
 77:         row4.add(key2);
 78:         key3.addActionListener(this);
 79:         row4.add(key3);
 80:         subtract.addActionListener(this);
 81:         row4.add(subtract);
 82:         this.add(row4);
 83:
 84:         row5.setLayout(grid);
 85:         key0.addActionListener(this);
 86:         row5.add(key0);
 87:         plusminus.addActionListener(this);
 88:         row5.add(plusminus);
 89:         decimal.addActionListener(this);
 90:         row5.add(decimal);
 91:         add.addActionListener(this);
 92:         row5.add(add);
 93:         this.add(row5);
 94:
 95:         row6.setLayout(grid);
 96:         clear.addActionListener(this);
 97:         row6.add(clear);
 98:         row6.add(empty);
 99:         row6.add(empty);
100:         equal.setEnabled(false);
101:         equal.addActionListener(this);
102:         row6.add(equal);
103:         this.add(row6);
104: }
Lines 5-34 create several variables and numerous components--buttons, six panels,
a text field, and a canvas. The constructor method MiniCalc() in Lines 36-104
will be called whenever a program creates a MiniCalc object with a statement
such as the following:
MiniCalc calculator = new MiniCalc();
The constructor method uses GridLayout objects to define the way components will be arranged, first for the entire MiniCalc window and then for each of the specific rows of the window.
Before you add a component to a row, you must set it up to send out action events. These events enable the program to respond when a user interacts with the component--by clicking a button, for example. You set up these events by using the addActionListener() method of each component.
The components are first added to each row, starting with row1. When that's done, the entire row is added to the MiniCalc window. This is all the code that's needed to create the user interface.
Responding to User Events
To make the calculator calculate, you need to make the program respond to mouse clicks on the buttons. Whenever a user clicks on a button that has been set up as a listener to action events, the actionPerformed() method automatically is called. Information about the user's action is stored as an ActionEvent object, and the actionPerformed() method responds to the action. All action events are received by the actionPerformed() method of MiniCalc itself.
Return to your word processor and insert a blank line at the bottom of the MiniCalc.java file. Continue by entering Listing 24.2, making sure to save the file when you're done.
Listing 24.2. The last half of MiniCalc.java.
 1: public void actionPerformed(ActionEvent event) {
 2:         String keyHit = event.getActionCommand();
 3:         if (keyHit == "+/-") {
 4:             float value = getValue(display.getText());
 5:             value *= -1;
 6:             clearDisplay();
 7:             addToDisplay("" + value);
 8:         }
 9:         else switch ( keyHit.charAt(0) ) {
10:             case `+':
11:             case `-':
12:             case `*':
13:             case `/':
14:                 equal.setEnabled(true);
15:                 add.setEnabled(false);
16:                 subtract.setEnabled(false);
17:                 multiply.setEnabled(false);
18:                 divide.setEnabled(false);
19:                 storedValue = getValue(display.getText());
20:                 operator = keyHit.charAt(0);
21:                 clearNext = true;
22:                 break;
23:             case `=':
24:                 equal.setEnabled(false);
25:                 add.setEnabled(true);
26:                 subtract.setEnabled(true);
27:                 multiply.setEnabled(true);
28:                 divide.setEnabled(true);
29:                 solveProblem();
30:                 storedValue = getValue(display.getText());
31:                 operator = 0;
32:                 clearNext = true;
33:                 break;
34:             case `C':
35:                 clearDisplay();
36:                 operator = 0;
37:                 storedValue = (float) 0;
38:                 break;
39:             default:
40:                 if (clearNext) {
41:                     clearDisplay();
42:                     clearNext = false;
43:                 }
44:                 addToDisplay(keyHit);
45:         }
46:     }
47:
48:     public void solveProblem() {
49:         float currentValue = getValue(display.getText());
50:         switch (operator) {
51:             case `+':
52:                 storedValue += currentValue;
53:                 break;
54:             case `-':
55:                 storedValue -= currentValue;
56:                 break;
57:             case `*':
58:                 storedValue *= currentValue;
59:                 break;
60:             case `/':
61:                 if (currentValue != 0)
62:                     storedValue /= currentValue;
63:                 else
64:                     storedValue = 0;
65:                     break;
66:         }
67:         clearDisplay();
68:         addToDisplay("" + storedValue);
69:         clearNext = true;
70:     }
71:
72:     public void addToDisplay(String keyHit) {
73:         String newText = display.getText();
74:         if (keyHit == ".") {
75:             if (newText.indexOf(".") == -1)
76:                 newText += ".";
77:         } else
78:             newText += keyHit;
79:         int newLength = newText.length();
80:              display.setText(newText);
81:     }
82:
83:     public void clearDisplay() {
84:         display.setText("");
85:     }
86:
87:     public float getValue(String argument) {
88:         if (argument.equals("."))
89:             argument = "0";
90:         Float f1 = Float.valueOf(argument);
91:         return f1.floatValue();
92:     }
93: }
The following statements from this part of the program might be unfamiliar to you:
- Line 2: This line calls the getActionCommand() method of the event
object and stores the response in the String variable keyHit. The
value stored in this variable is the label of the key that was clicked.
- Line 9: This switch statement converts the value stored in keyHit
to a single character before using it in case statements. This conversion
must be done because case can handle characters, but it cannot handle strings.
The charAt() method returns a single character at the position indicated
by the argument. 0 represents the first character, 1 the second,
and so on.
- Line 19: The storedValue variable keeps track of the first half of any
operations. For example, if you're using the calculator to work out the equation
12 plus 10, storedValue would equal 12.
- Line 20: The operator variable, used here and many places elsewhere,
stores the most recent operator key that was pressed: +, -, *, or /. The variable
has the value 0 when no operators have been pressed or the current problem has been
cleared out with the C or = keys.
- Line 21: The Boolean variable clearNext indicates when the calculator
display should be cleared out after the next key is pressed.
- Lines 74-76: These lines make sure that a user cannot enter more than one decimal point on a number.
Solving Problems
Several methods have been created in the MiniCalc class to handle specific tasks. The solveProblem() method in Lines 48-70 is called whenever the calculator display should be updated with the answer to a calculation. This occurs when the = key is pressed. The addToDisplay() method in Lines 72-81 is used to add another digit to the number that is being shown in the calculator's display area. The clearDisplay() method in Lines 83-85 clears out the calculator's display area so that the user can enter a new number. The last special method is the getValue() method in Lines 87-92. This method returns a float value, as shown on Line 91. This method converts the text shown in the calculator's display window into a floating-point number.
Trying Out the Program
Save and compile the MiniCalc class file. Before you can try it out, you need to create a MiniCalc object as a component in an applet and add it in the same way any component would be added. Create a new file with your word processor and save it as CalcApplet.java. Enter Listing 24.3 into the file.
Listing 24.3. The full text of CalcApplet.java.
 1: import java.awt.*;
 2:
 3: public class CalcApplet extends java.applet.Applet {
 4:     MiniCalc calc = new MiniCalc();
 5:
 6:     public void init() {
 7:         setBackground(Color.gray);
 8:         add(calc);
 9:     }
10: }
As you can see, the applet doesn't need to do very much because the MiniCalc
class does all of its own work. Save and compile this file.
To see the CalcApplet program on a Web page, create another file with the name CalcApplet.asp. Enter Listing 24.4 into the file.
Listing 24.4. The full text of CalcApplet.asp.
1: <applet code="CalcApplet.class" height=200 width=200>
2: </applet>
Use the appletviewer tool or a Web browser that can handle Java, and take
a look at the CalcApplet.asp page.
Summary
Once you've gotten the MiniCalc class to work in conjunction with an applet, take a long look over the program to determine what's being done at each point in the program. The MiniCalc project is a good example of how graphical programs can be written with a small amount of programming in Java. In less than 200 lines, you can implement a working calculator that handles the basic mathematic operations.
The purpose of Learn Java 1.1 Programming in 24 Chapters is to make you comfortable with the concepts of programming and confident in your ability to write your own applets and applications. Java has an approach that is somewhat difficult to master. (Feel free to scratch out the word "somewhat" in the previous sentence if it's a gross misstatement of the truth.)
If it's any consolation, as you build experience in Java, you're building experience that will be increasingly relevant in the coming years. If you become knowledgeable in object-oriented programming and distributed network computing, the MiniCalc program could be useful--there's no better afternoon for a millionaire than projecting the rate of return on your no-load mutual funds using a Java program you wrote!
You ought to read the appendixes to find out about this guide's Web site, other Java guides from Sams.net, and other useful information. Even if you don't, there's one last bit of bad news to deliver. Your 24 Chapters are up.
At the conclusion of this hour, you are contractually obligated to learn no more about Java programming. You cannot use Internet discussion groups such as comp.lang.java.misc to talk to other people who share your skills. You must not look for Java user groups in your area. You cannot search employment World Wide Web sites such as http://www.careerpath.com for companies that seek Java programmers. Under no circumstances should you send electronic mail to the author of this guide at rogers@prefect.com with questions, comments, or criticisms in regard to the past 24 Chapters.
The only legally permissible way for you to continue building your skills as a Java programmer is to read Learn Java 1.1 Programming in 21 Days or one of the other excellent Java-related guides from Sams.net Publishing. If you are caught violating these prohibitions and learning more about Java without spending another cent of your money, there's really only one thing left to be said...
I lied. There's no current law in any jurisdiction that forces you to Learn Everything only by reading our guides. You are free to learn freely. My apologies...if I sell enough copies of this guide, my name is entered into a drawing with other top Sams.net authors to win special prizes.
My heart's set on a banana-yellow Schwinn Sting-Ray bicycle.
--Rogers Cadenhead
Q&A
- Q Does a layout manager have to be specified for a program?
A If one is not used, components will be arranged on an applet window or other container in the same way words are typed onto a page--left to right until there's no more room and then down to the next line. This occurs because the default layout manager, FlowLayout, is used if no other manager is specified.
Q The CalcApplet program looks different on my version of Netscape Navigator than it does on the appletviewer tool. The most noticeable differences are the C and = buttons, which are thinner on Navigator. Why is this?
A Because Java is a language that is presented on many different platforms, some graphical elements will vary depending on the software or operating system being used. Your programs should be presentable on any implementation of Java, but if you're creating a complicated program that arranges numerous components and other visual elements, it's worthwhile to test it on several different systems and Web browsers.
Quiz
To calculate your level of knowledge about this hour's subjects, answer the following questions.
Questions
- 1. What type of class do you use to specify how components will be arranged
in a program?
(a) Arranger
(b) Composer
LayoutManager
2. What type of method is used to set up all the variables and components that need to be displayed with the MiniCalc class?
(a) an init() method
(b) a constructor method
a destructor method
3. What type of variable is used to store calculator results?
(a) String
(b) int
float
Answers
- 1. c. You can use layout styles such as GridLayout, BorderLayout,
and GridBagLayout.
2. b. Any method that is called with a new statement during variable creation is a constructor method. You can have more than one constructor if the number and type of arguments used with each constructor are different.
3. c. Because there's a decimal key on a calculator, you must use the float variable type instead of some other numeric type such as int.
Activities
If you'd like to Learn even more Java programming in hours 24 and beyond, do the following activities:
- Add a square root button to the MiniCalc class that will display the
square root of the currently displayed number.
- Visit the Gamelan Web site at http://www.gamelan.com
to see some other calculators that have been written using Java. Look over any available
source files and compare them with the MiniCalc source file.
A This method is included in the applet to override its existing behavior. The update() method automatically is called each time the screen needs to be redisplayed, either due to a repaint() statement or some other cause. Normally, update() clears the screen by filling it with the background color, and then calls the paint() method. This screen-clearing causes a large amount of flickering in an animation program, so update() is overridden to prevent it from occurring.
Q None of the graphics programs that I use has a feature for transparency in .GIF files. How is this established for an image such as samslogo.gif?
A Transparency was introduced with a version of the .GIF file format called 89a. In order to use it, you must find a graphics program that can load, edit, and save .GIF 89a files. If you don't have one of these programs and you save a .GIF file, you will wipe out its transparency information.Quiz
Don't pan past this section of the guide without testing your know-how by answering the following questions.
Questions
- 1. Why are threads helpful in controlling an animated program in Java?
(a) They give other programs that are running more time to operate.
(b) You can use the Thread.sleep method to pause between screen updates.
Loop statements don't work with animation.
2. Why is a Graphics object sent to the paint() method of an applet?
(a) This object contains the necessary information to display something on-screen or on a component.
(b) The method was set up to take an argument.
The object signifies that graphics will be used in the method.
3. What method of the Integer class is used to convert a string into an integer value?
(a) getInt()
(b) load()
parseInt()
Answers
- 1. b. Threads have the built-in ability to start, stop, and pause--abilities
that correspond well with what an animation program needs to do as it runs.
2. a. The methods of the Graphics object must be used to display text, polygons, and image files on-screen.
3. c.
Activities
Unless you're ready to Pan this hour's subject matter, do the following activities:
- Add a parameter to the Pan applet that causes the background image to
move from left to right instead of right to left.
- Using event-handling and listener classes, make it possible to switch the direction
of the Pan animation by clicking the mouse on the applet window.


- 1. Why are threads helpful in controlling an animated program in Java?
Popular Tutorials
-
 MS Access
1109
MS Access
1109
-
 C++
1222
C++
1222
-
 HTML
584
HTML
584
-
 JavaScript
616
JavaScript
616
-
 Vbscript
873
Vbscript
873
-
 Oracle
473
Oracle
473
-
 VC++
875
VC++
875
-
 SQL
2959
SQL
2959
-
 XML
514
XML
514
-
 Java
814
Java
814
-
 Perl
455
Perl
455
-
 Linux
451
Linux
451


