Web based School


- 46 — Graphical User Interfaces for End Users
- X Window
- Displays, Screens, and Windows
- Stacking Order
- Pointers in X
- Introduction to Window Managers
- Getting Started with X Window
- Working with Motif Windows in mwm
- Using the Pointer
- Icons and Windows
- Iconifying a Window
- Maximizing a Window
- Sizing a Window
- Focus and Selecting a Window
- Moving a Window or an Icon
- Adding a New Window
- Window Geometry
- Using the Window Menu
- Using the Keyboard and the Meta Key in X
- Using the root Menu
- Working with Motif Clients
- Other Types of Widgets
- Other Display Widgets
- XmArrowButton
- XmDrawnButton
- XmLabel
- XmPushButton
- XmSeparator
- XmText
- Pull-down Menus
- Pop-Up Menus
- Xmscale
- XmScrolledWindow
- XmFrame
- XmRowColumn
- Gadgets
- Customizing with Resources
- Defining Resources
- Customizing mwm
- Hard Coding Resource Setting
- Using the Command Line
- Listing an Application's Resources
- Using the .mwmrc File
- Customizing Your Desktop with Clients
- xsetroot
- Using xset
- Invoking the Screen Saver
- Using Fonts
- Getting More Information About Your Display xdpyinfo
- Help for Left-handed Users xmodmap
- Useful Command Line Options
- Logging In to Remote Machines
- Colors
- Fonts
- Future Enhancements in X11R6
- GUI Front Ends to UNIX
- COSE and CDE
- Porting Non-Motif Applications to Motif
- Where to Go from Here
- Summary
- Acknowledgements
- Learn about major components of a graphical user interface. Along the way you will get a brief history lesson on X Windows.
- Learn the major concepts required for using X Windows. This will introduce displays, windows, screens, and the client server architecture in X.
- Start an X Windows session from logging in and using the X Windows Manager (xdm) display manager.
- Get an introduction to window managers, specifically the Motif Window Manager (mwm).
- Learn to move about in mwm windows with the keyboard and mouse.
- Use widgets and the characteristics of these widgets.
- Customize your desktop with resource files and client applications.
- Understand how to set your environment to your liking.
- Use some standard tools available in X.
- See what's in the future with COSE, CDE, and X11R6, and how vendors support various interfaces for their UNIX systems.
- A screen to show the data in a textual and/or graphical form.
- A keyboard interface for the user to type in information.
- A device to control the movement of a cursor or pointing device that the user can move on the screen. The devices for this interface could be a mouse, light pen, palette, or glove.
- Standard GUI for more UNIX workstations. See Chapter 47, "Graphical User Interfaces for Programmers," which is on multiple windowing platforms and standards.
- High portability. It's written in C and is designed to be portable.
- It's highly extensible. New features can be implemented into the kernel, run as separate applications, or can use the pre-existing applications that come with X.
- It's very flexible. The number of features in X make it very complicated. However, you can do a lot more with it because you can modify it to your needs and you have access to the large collection of UNIX tools.
- If you are new to UNIX and X, contact your system administrator for help. If you are the system administrator, this chapter will only guide you in the right direction. Now would be a good time to read the hardware manual.
- Confirm that xinit exists in your PATH. Use the echo $PATH command to see if /usr/bin/X11 is in your path.
- Look for a file called Xconfig in /usr/lib/X11 or /usr/bin/X11. This file will contain hardware-specific information about your system. Contact your vendor if this file does not exist.
- Look for a file starting with the letter X with a machine name after it. This is your X server. You will usually find X386 on PCs, Xsun on Suns, and so on.
- Use the which command to find out the location of the xinit command. Use the following command on the /usr directory:
find . -name xinit -print - Type the command xinit at your prompt.
- Wait a few seconds (or minutes, depending on your hardware). You should see several messages whisk by, and the screen should change to that of a session without a window manager.
- At this point, you could run with this somewhat crippled windowing system or you could start a window manager. For the Motif Window Manager, use the command in the xterm:
mwm & - You cannot find the correct files. Ensure that the path includes /usr/bin/X11 or the like. On some systems, it could be /usr/bin/X11R4 or /usr/bin/X11R5, or something similar. Use the find command to locate it.
- When working on Suns, some of your system files may reside in the /usr/openwin directories.
- You moved the cursor into the window, but now you have to click to be able to type commands to your xterm. By itself, X Window gives the focus to a window when a cursor is moved on to it. mwm, on the other hand, requires that you actually click the
left mouse button (Button1) for that window to get focus. Focus means that all user input (keyboard and pointer) will now be sent to that window. mwm will change the color of the window border to show that it has received focus.
- You do not have enough memory to run the system. This is especially true if you are on a PC-based platform. Typically you can get away with 4 MB of dynamic RAM for a simple X Window system, but you will almost certainly require 8 MB or more to be able
to get a reasonable response time on a PC. The memory upgrade to 8 MB is well worth it, given the performance on a 4 MB machine. Those who are patient can live with 4 MB.
- The configuration does not look right. You have to modify the default start-up parameters. See the section "Customizing mwm" for more information.
- Exiting the last command in your xinit file will terminate your entire X session. If your last command was an xterm and you logged off that xterm, your entire session will be terminated.
Congratulations! You are now running Motif.
-
What Is a GUI?
46 — Graphical User Interfaces for End Users
By Kamran Husain
In this chapter you will do the following:
What Is a GUI?
UNIX's user interface was character based when it was first developed. The curses window package was somewhat of a relief but offered nothing in the way of displaying complex graphics or pictures on a monitor. Something more was needed, something that
would provide a graphical interface for the user.
This brought about the birth of the term graphical user interface (GUI). A GUI is the graphical interface to an underlying operating system.
The minimal components for a GUI are the following:
This list is by no means complete, but it illustrates some of the minimum requirements for a typical GUI.
UNIX's standard character-based interface is a reminder of its age. X Windows is UNIX's breaking into the GUI age. X Windows was developed to be a standard graphical user interface for UNIX platforms. The development work was done at the Massachusetts
Institute of Technology (MIT). The MIT project was called Project Athena and was funded by many corporations. The largest contribution came from Digital Equipment Corporation (DEC).
X Window
The first commercial release of X Windows was X10.4 in 1986 and was the basis for some commercial applications. The next release was X11R1 in 1987, followed by X11R2 in 1988. Version 11 was a complete windowing package that outperformed X10 in its
speed, flexibility of features, and styles for multiple screens. X11 and later versions have become the de facto standard GUI for UNIX systems and are therefore the focus of this chapter.
The main features offered by X Windows are the following:
Displays, Screens, and Windows
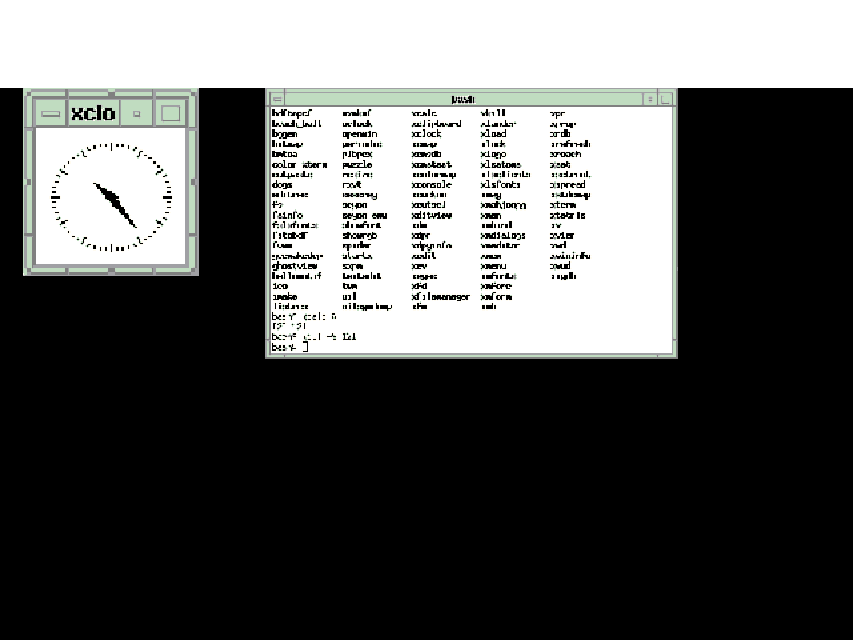
X is typically run on a large screen with special graphics capabilities. X allows you to work with multiple processes, each in its own window. Next you'll look at a screen dump of a typical window. Depending on your installation, you might see a
different screen. Figure 46.1 shows a typical X display running under Motif. The same window will look different under a different Tab Window Manager (TWM). (See Figure 46.2.) See the section "Introduction to Window Managers" for more details.
Figure 46.1. A typical X display with the Motif Window Manager (mwm).
Figure 46.2. A typical X window in the Tab Window Manager (TWM).
The operations on a particular window can vary greatly. Some windows are used only for displaying data, some for input and output of data. Some windows can be resized or moved, or they can overlap or hide contents of another window. Each window is
generally independent and contains information about its contents, including how to draw itself on the screen. The window does not have to care about itself being hidden from view by another window because its internal operations are not affected when it
is overlapped by another window.
The display in Figure 46.1 shows a clock and an xterm. A clock simply shows the time of day. An xterm is a terminal emulator and provides a window into the UNIX operating system. You can have several X Windows open at one time on a display. Each xterm
is a window independent of all other xterms on that display and contains a separate UNIX terminal session.
The fact that you can run separate processes in simultaneously displayed windows is one of the most powerful features of X. Also, since you have the full networking capabilities of UNIX, you can run remote sessions on several machines on separate
windows on the same display. In fact, you can even force a window to be displayed on a remote UNIX machine running X Windows.
The background area is referred to as the root window. All application windows are displayed on top of this window. X maintains a hierarchical tree of all the windows on the root window. All applications that reside on the root window are its children.
Their parent is the root window. The root window's parent is the root window itself. All components of windows also are child windows of the application window on which they reside.
For example, button and text widgets you see in an application are all windows on top of their controlling application's window. The depth of the tree is the number of elements in the tree and in some cases can be a very large number.
Stacking Order
The location of the windows relative to each other on the screen itself is referred to as their stacking order. You could compare this to stacking sheets of paper on a large canvas. The writing or pictures on each sheet are not changed when another
sheet is stacked on top. Some parts of the lower sheet are visible while it is overlapped by the top sheet.
When the top sheet is moved around, the writing on the lower sheets is visible again. Changing the location and order of papers is analogous to moving windows around on the display.
The paper on the top of the stack is always fully visible. The topmost window is analogous to the top sheet of paper. Knowing which window is on top is very important when working in the X Window environment. The control of the windows, their placement,
and their stacking order is handled by a special client called the window manager. See the section "Introduction to Window Managers" later in this chapter.
Pointers in X
All X displays require some sort of pointing device. This is generally a three-button mouse; however, you are not limited to a mouse. You can have many types of pointers, including pens, tablets, and so on. You can get by without a pointer in some very
limited cases, but this is not the way X was designed and is therefore not recommended practice.
A cursor represents the pointer position on the screen. The cursor follows your movement of the pointer on the screen. As you slide the pointer across the screen, you should see the cursor move with your movements. Several cursors exist in the X Window
environment for you to use in customizing. See the section "Customizing mwm" for details.
Keep in mind that Display and Screen are not equivalent in X. You can actually hook two monitors and have a screen on each of them hooked to a common display area. A display can have multiple screens. As you move the cursor to the edge of a screen, it
will appear on the other screen. Screens are numbered from 0 up. By default, your screen 0 is hooked to display 0 for normal operations. You can also define two screens on the same monitor. See the installation instructions for your hardware vendor for
more details.
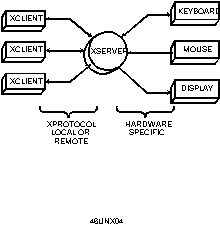
The Client/Server Architecture
X Window was designed to be platform and kernel independent. Therefore, it is not part of any formal operating system. X's architecture is based on a client—server architecture. The server in the X Window system is very different from the network
servers.
Servers provide the display capabilities to user applications clients. This is why they are referred to as display servers. The server sits between the client and the hardware. A client makes a request for display operations to the server. The server
translates these requests into hardware directives for the underlying system. Figure 46.3 shows the logical relationship between servers and clients.
Figure 46.3. The logical relationship of X servers and clients.
The requests are made via message queues, using the X protocol. The X protocol is the means of communication requests and responses between clients and servers. The X server tracks all the user input from the keyboard and pointer. It conveys this
information via the X protocol back to the clients.
The division of work between the client and server allows each to run on completely different platforms connected via a network. This provides several advantages: If most of the computationally intensive work can be done on a remote site, you could run
the server on another system to spare the already overloaded system from the overhead of graphics.
Also, only the server application has to be hardware specific. All client software can be designed to be platform independent and easier to port.
You can run several clients on several machines from your server. Each client can then take advantage of the machine on which it is running.
Clients can also communicate with other clients. The server can keep this information in a common place and have it available for all other clients. This information is referred to as properties. A property is simply a piece of information recorded by
the server for a client. Refer to the xprop program offered by the X Window system for more information.
A lot of options exist for all the options available for customizing clients. Look at the man page for xterm as an example. X also provides another way of customizing appearances, using the resources file called .Xresources. This file is usually located
in the home directory.
Introduction to Window Managers
How the windows are arranged is a function of a special program called the window manager. The window manager controls the "look and feel" of all the windows on a particular display. The window manager allows the user to move, restack, resize,
and iconify windows.
X Window comes with two window managers. These managers are called the Tab Window Manager (TWM) and the OPEN LOOK Window Manager (OLWM). The TWM is also referred to as Tom's Window Manager, after its author, Tom LaStrange. Earlier versions of X also
offered the Universal Window Manager (UWM); however, this is no longer offered since it does not conform to the X Consortium's Inter-Client Communications Conventions Manual (ICCCM) standards.
Window managers in X are different from other windowing system managers because you are allowed to choose whichever manager you like. As long as a manager follows the ICCCM standard, it can serve as your window manager.
The most prevalent window manager today is the Motif Window Manager (mwm) from the OSF/Motif distribution. The Motif window manager is now more important than ever before since being adopted by Common Open Software Environment (COSE) as the standard
interface for future UNIX GUIs. It's most famous for its borders around all the windows it displays. Figure 46.4 shows the frame mwm puts around each window.
Figure 46.4. A typical Motif Frame.
Getting Started with X Window
On some systems, you may have to start X from the command line after you log in. On other systems you may have to interface through the xdm client. The case of the xdm manager already running on your system is easy, so that's a good place to begin.
Using xdm
The xdm utility stands for X Display Manager. It manages several X displays. It is designed to provide the same services as getty, init, and login on character terminals. This is where the system verifies your password and performs the login procedure.
xdm runs in the background by default. It was first introduced in X11R4 and conforms to the X Display Manager Control Protocol (XDMCP) developed by the X Consortium.
When xdm is running on a system, a typical display would look like the one shown in Figure 46.5.
Figure 46.5. A typical xdm display.
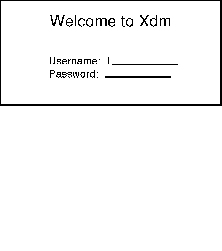
The xdm session will ask for your login id and password as with any character-based session. However, it would then bring up the X server with an xterm by default instead of just presenting the shell prompt. This guide is written with the understanding
that no customization has been done on your site or that particular machine. xdm emulates the login and getty programs and must be run from the /etc/rc system file. In UNIX, login verifies your password. Under xdm, the login and getty are replaced by xdm's
own functionality.
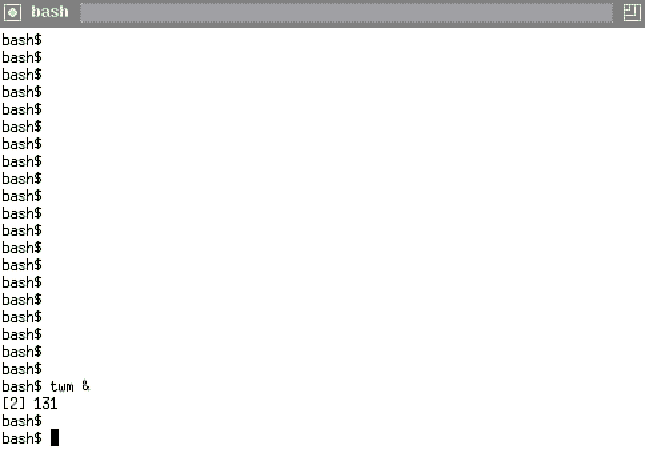
By default, the mwm window manager should be running. See if the familiar borders exist around the xterm. If mwm is not running, type mwm & on the xterm prompt to invoke it. Later in this section you will learn more about how to invoke mwm.
The Hard Way to Start X
If you do not see any windows at all and you do not see a cursor, then you do not have the X server running. In this case you have to start X server yourself.
There are several steps to take before you start X:
Note that you are running the mwm in the background. If you do not do this, you will not be able to issue any commands to the xterm.
So now you are running Motif and X Window on your system. Remember that a lot of things can go wrong while you're getting to this point. Here are a few of the most common problems:
Figure 46.6 shows a typical xterm window in Motif.
Figure 46.6. A typical xterm window.
The title bar is the wide horizontal band on the top of the window. This contains the title for the application itself. In this case, this is the application itself, xterm. You can modify it to your needs. Try this:
xterm -name "I am here" &
You can use the minimize button to iconify this xterm or the maximize button to resize the window to occupy the entire display area. The sides and corners can be used to resize the window by using the mouse. Note the pseudo-3D appearance of the borders.
The area of window that is used to display output and get input is also called the window pane.
Working with Motif Windows in mwm
This section deals with some of the Motif windows you have on the screen. Typically, you will work with a mouse for the pointer, so the text will refer to mouse devices at times. However, you can always substitute your device name for the word
"mouse" or "pointer" and not lose any meaning of the discussion.
Using the Pointer
Pointers in the mwm environment typically use three buttons, called Button1, Button2, and Button3. Button1 is the most-used button of the three and is usually referred to as the "left button." The left button on a mouse is the one that is
pressed with your righthand index finger.
When you take the pointer to an item and press a button, you are clicking the button. If you hold the pointer down with your finger and the object moves with your pointer movements, you are dragging the object. If you click twice or thrice in quick
succession, you are double-clicking or triple-clicking, respectively. Drag and drop is when you drag an object to a new location and the object stays in the new location after you release the pointer button.
If you are left-handed, you can map your mouse or pointer buttons differently. See the section "Help for Left-Handed Users" later in this chapter.
Icons and Windows
The minimize button allows you to iconify an application. An icon is a small symbol that represents an inactive window. The contents of that window are not visible, although they may be updated internally by the processes running in that window. Icons
can be moved around on a window, but they cannot be resized. Icons save you valuable screen space for applications that do not require your constant attention.
Iconifying a Window
Move the cursor to the minimize button and press the left mouse button. The window is removed from the screen and a smaller icon appears somewhere on the left of the screen.
To restore an icon to a screen, move the cursor to the icon and click on Button1 twice in quick succession. This is known as double-clicking the mouse. A typical Motif icon is shown in Figure 46.7.
Figure 46.7. A typical Motif icon.
Maximizing a Window
Move the cursor to the maximize window and press the pointer Button1. This enlarges the window to the size of the root window. This way you can have a huge clock on your screen. Some applications, such as older versions of calc, do not adjust their
internal graphic areas when their frame is resized. This leads to annoying blank space on a screen.
Use the maximize button as a toggle. Clicking on an already maximized window causes it to revert to its size and position (also known as geometry) before it was maximized. Clicking on it again maximizes it (again).
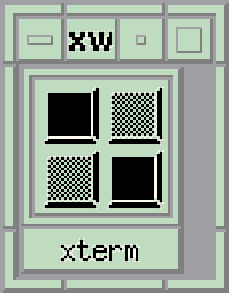
Sizing a Window
The entire frame on a Motif window is a control that allows you to resize the window. See Figure 46.8 for the size controls. You can use any of the four corners to stretch the window. You can use the mouse to move the edges of the window by dragging the
four long bars.
Figure 46.8. The eight sizing controls for windows.
To stretch the window using a corner, move the mouse to that corner. Press Button1 and while keeping it pressed, move the mouse. The cursor changes its shape to a double-headed arrow. Size the window by moving the mouse while pressing Button1. Release
the button when you have achieved the desired size.
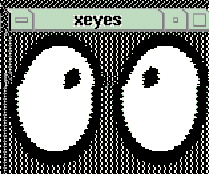
Note that some applications do not have these sizing controls enabled. An example is the cute, but not very useful, pointer tracking program called xeyes. (See Figure 46.9.)
Figure 46.9. A window of the Xeyes program without resize borders.
To move the edge of the window, move the mouse to that edge. You should see your cursor change shape to a vertical double-headed arrow if you are on a horizontal edge (top or bottom of the window). If you are on a vertical edge, the double-headed arrow
will be horizontal. Press Button1 and while keeping it pressed move the pointer around. This moves the edge along with your pointer. Release the button when you have the edge where you want it.
While you are resizing this window, you will see a small box come up in the center of the display. This box contains the size of the window in pixels if it's a graphics image or in rows and columns (in the number of characters) if this is an xterm. On
some systems you can use the arrow keys on your keyboard to achieve precision when resizing your windows. Remember to keep the button pressed while you use the arrow keys on your keyboard to do the precise adjustment.
Focus and Selecting a Window
You can select which window or icon gets focus by moving the pointer to that item and pressing the left button. This moves the window or icon to the top of the stack. This way the window or icon will not be obscured by any other screen item.
When a window has focus, it collects all the user input from the pointer and the keyboard. There are two types of focus for a window: click to type and explicit. The click to type focus requires a user to click a pointer button in a window for it to get
focus. The explicit focus requires only that the cursor be in the window for the window to get focus. Explicit focus is sometimes referred to as real estate—driven focus.
In some cases you might want to have focus where the mouse was without having to click the pointer button. Sometimes this is not useful for touch typists, because a single movement of the pointer can have the keystroke sent to the wrong window.
Once you give the focus to a client, the client window will collect all typed or graphics information until the user clicks elsewhere. It has the focus.
Getting focus also raises the window to the top of the stack. The window frame color also changes at this point. You can set the focus to an icon also by selecting it with a mouse. The name of the icon expands at that point, and you see the window menu
for that icon. You can move the mouse away from the menu, but the icon will retain the focus until you click elsewhere.
Moving a Window or an Icon
To move a window's location on the screen do the following:
- Move the cursor on top of the title bar.
- Press and hold down pointer Button1.
- Move the pointer to the desired location. You should see an outline of the window border move with your pointer.
- Move the outline to the part of the screen where you want your window to be. This is referred to as dragging the window.
- Release Button1. The window now appears at the new location. It also is the window with the focus (by default).
This procedure can be duplicated for an icon. In the case of an icon, you would click and drag with the cursor in the icon itself.
While you are moving the window, you will see a small box in the center of the screen with two numbers in it. These are positive X and Y offsets of the top-left corner of the window from the top-left corner of the screen. This is very useful information
when trying to precisely place a window on the screen.
On some workstations, you can achieve some fine precision by pressing the arrow keys on the numeric keypad to move the window one step at a time. You must keep the pointer button pressed while you use the arrow keys.
Adding a New Window
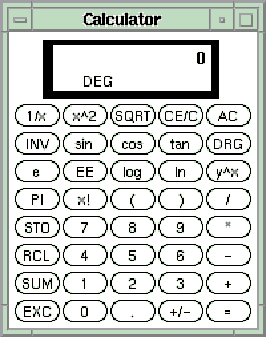
If you want to add a calculator to your screen, you can type
xcalc &
at the prompt. The calculator appears on the screen.
For an xterm, type this:
xterm &
Depending on your site, this can appear anywhere on the screen. Typically, the new window is placed in the upper-left corner (X=0,Y=0) of the root window or in the center of the root window.
The size and location of a window is referred to as the window's geometry.
Window Geometry
Almost all clients accept the -geometry command line option. This option tells the window manager where to locate the window on a screen. If you do not specify any geometry, the window manager will use its defaults.
The coordinate system for the root window is as follows:
- The origin is top left (0,0).
- The number of display units is pixels for graphics.
- The number of display units is character sizes for xterms.
A pixel is the smallest unit available on a screen. Usually screens are displayed in 1024´768 pixels, or 2048´2048 pixels, or something similar. The size of a pixel onscreen is very much hardware dependent. A 200´200
window appears as different sizes on monitors with different resolutions.
The geometry parameter is of the form
heightxwidth[{+-}xoff{-+}yoff]
The height and width is usually given in pixels. In the case of xterms it is given in lines for the height and characters per line for the width. It is common to have a 24´80 xterm.
The xoff and yoff are offsets from the start of left and top edges of the screen, respectively. These represent the location of the window on the root window. The curly braces represent either the - or the + character, but not both.
|
+xoff |
A positive offset from the left edge of the screen to the left edge of the window-xoff. A negative offset from the right edge of the screen to the right edge of the window. |
|
+yoff |
A positive offset from the top edge of the screen to the top edge of the window-yoff. A negative offset from the bottom edge of the screen to the bottom edge of the window. |
Figure 46.10 shows a visual representation of the geometry. For example,
Figure 46.10. Window geometry.
xterm -geometry -50+50 &
places the xterm on the top-right corner, 50 pixels from the right edge of the screen and 50 pixels from the top of the screen.
The following parameters specify the edges of the screen:
|
-0-0 |
Lower-right corner |
|
-0+0 |
Upper-right corner |
|
+0-0 |
Lower-left corner |
|
+0+0 |
Upper-left corner |
Using the Window Menu
Using the Window menu requires you to focus on a window. Let's look at a typical Window menu. It may be different on your screen, but the basic functionality listed here should exist for all later versions of Motif. Take the cursor to the Window menu
button and press the left button. The following menu (or something close to it) should appear:
|
|
|
|
|
|
|
|
|
|
|
|
|
|
Using the Keyboard and the Meta Key in X
It's important to bring up this point about the keyboard and its special keys under X. Keyboards come in different flavors, and the most important key for using keystrokes in X can be radically different from one keyboard to another. On the PC-based
keyboards it is usually the Alt key, on Macintoshes it is the fan-shaped key, on Suns it's Left, Right, Alternate; on other keyboards it's completely different.
In short, when this chapter refers to the Meta key, it means your special key for your special keyboard. For a PC-based keyboard, this would be the Alt key. So do not look for a key called Meta on your keyboard. Where the chapter says Meta, use Alt,
fan, or whatever your keyboard uses.
Now you can invoke any item on this Window menu one of two ways:
- Use the pointer. This is how you would click on the window menu and press Button1. Now do this:
Move the cursor to the item you want and release Button1, or
Press the Meta key and the character that is underlined in the menu. For moving a window you would press Meta+M. Note that this does not work on some Motif systems.
- While the window has focus, press the Meta+function key combination. Then use the arrow keys on your keyboard to simulate the movement of the cursor, or just use the pointer.
Note that some of these functions may not be available for a menu shown for an icon. You will not be able to size or minimize an icon. You will, however, be allowed to move, maximize, or close it.
Using the root Menu
Click Button3 while the cursor is in the root window. You will see a menu pop up on top of all the windows. This is known as the root menu. Keep in mind that this menu is very customizable and may look radically different on your machine. You will learn
all about creating your own menu later in this chapter in the section "Customizing mwm."
A typical root menu would list the following items:
"Root Menu"

New Window

Shuffle Up

Shuffle Down

Refresh

Utils >

Restart

Exit
While holding Button1 down, move the cursor down the list to the item you want to select. When you get to the menu item you want, release the button. If you do not want to select any items, move the cursor off the menu and release the button.
In the root menu list, the functionality could be as follows:
- New Window starts a new xterm and sets focus to it.
- Refresh redraws the entire screen and all windows.
- Restart kills mwm and restarts it.
- Shuffle up and down shuffles the stacking order of the windows up or down. The window with focus is moved down to the bottom when shuffling down, and the next highest window is given the focus. The last window in the stack is brought to the top and
given the focus when shuffling up.
- The Utils item brings up another sub menu with more choices to select from. See the section "Customizing mwm" for details on how to set your menu items.
- Exit kills mwm and leaves you without a window manager. If this is the last command in your start-up script, your windowing session will terminate.
Working with Motif Clients
Most programmers find the X Windows system libraries too basic to work with, so they use the next building block, called Toolkits. The most common interface toolkit is called the XtIntrinsics toolkit from MIT. This is called Xt. On top of Xt, you can
have other toolkits such as Motif or the OPEN LOOK Interface Toolkit (OLIT). When you are working with Motif, you are working with a Motif toolkit. In Motif you are working with Motif widgets.
Widgets help users program consistent user interfaces in Motif. By using widgets, users can quickly put together interfaces that have the same look and feel of all Motif applications.
Some widgets display information. Some widgets collect user input (mouse or keyboard) information. Some widgets react to user input by changing their appearance or by performing some programmed function. Some widgets are simply containers for other
widgets. All widgets can be customized in one form or another, whether it is appearance, font size or style, colors, or whatever other parameter is required.
All widgets of the same type have two data structures with information that describes their attributes: instance and class. The instance data structure contains information for a specific widget on the screen. The class information contains information
required for all widgets of the class.
Widgets are grouped into several classes. Each class depends on the type of functionality offered by the widget. Normally the internal functions of a widget are hidden from the applications programmer (encapsulation). A widget class shares a set of
functions and data structures for all widgets in that class. A new widget class can be derived from an existing widget class.
The newly derived class can inherit all the parent class' data structures and functions. A widget is created and destroyed during a Motif program execution.
This should sound familiar to C++ programmers. True polymorphism is somewhat harder to find in widgets. This is all done in C. For C++ programmers, the class data structure is to the class of an object as the instance data structure is to the instance
of an object.
A widget is really a pointer to a data structure when viewed in a debugger. This data structure is allocated on the creation of a widget and is destroyed when a widget is destroyed.
Let's look at a typical application screen to see some widgets in action. You will work with a demo application called xmdialogs, shown in Figure 46.11. The widgets shown here are described later in this chapter. The xmdialogs application can be found
in the /usr/bin/X11 directory. If you do not have this application, you can still learn about working with widgets by applying these concepts to different applications.
Figure 46.11. The xmdialogs demo application.
Figure 46.11 shows a menu bar, a file selection list with scroll bars, an option button, some radio and toggle buttons, some push buttons, labels, and a text display dialog.
The Actions and Help items are shown on a menu bar. By moving the pointer to either of these items and pressing Button1, you will be presented with a menu of options very similar in operation to the window and root menu.
Under this menu bar is a list of items in a scrollable list. This widget is of the type XmList. The XmList lets you keep a selection of items in a visible list. It has scroll bars to allow the user to scroll the list if the entire list is not visible. A
programmer can set the number of items that are visible at one time. If you resize the window and if the list box sizes itself proportionately with the window, the number of visible items in the list may change.
To select an item, move the pointer to the item of your choice and press Button1 once. The item is highlighted in a darker color. Some lists allow you to select more than one item, some just one item. In this application you select only one type of
dialog box. Figure 46.11 shows that the bulletin board item is the selected item.
The scroll bars on the side of the list widget are of the class XmScrollbar. A scroll bar is either a horizontal or vertical rectangle. There is a raised box in the rectangle, called the slider box. This slider moves within the larger rectangle. The
moveable space for the slider bar is called the scroll region. The size of the slider bar to the scroll region is proportional to the size of the work area to the total area being viewed.
The XmScrollBar rectangle has an arrow at each end. The arrows point out from the rectangle and in opposite directions. You can use the arrow keys to move the slider bar within the scroll region.
- Move the mouse to the slider bar arrow.
- Click Button1.
- The slider bar moves closer to the arrow. The slider moves as close as possible to the arrow being clicked in the scroll area.
- Release Button1.
You can also move the slider bar by dragging with the mouse:
- Move the pointer onto the slider bar.
- Press Button1.
- Move the pointer up or down for a vertical scroll bar. Move the pointer left or right for a horizontal scroll bar.
The contents of the work area as well as the slider bar should scroll with the movement of the pointer. The viewable portion is the work area.
- Release Button1 when list area contains the desired viewing data.
Now move your cursor to the selection item of the resize policy button. When you click this button, you are presented with a pop-up menu containing the types of resize policies for the dialog box you want to create. When you press the button, a menu
pops out and presents a list of options. You make the selection with your pointer by moving the pointer to that button and releasing it. The menu disappears and your selection is displayed in the box. In Figure 46.11 the resize policy is set to any. This
is known as an Option Button.
Note the diamond-shaped buttons and selections below this current menu. This is a list of one of four possible selections for the dialog box. One of the items is shown in a lighter gray color. This is known as being grayed out, and the option is a not a
valid option at the time. The option for the work area is disabled. You can select one of the other three options. These items are grouped together with a rectangular frame drawn around them. Usually buttons are grouped together in Motif this way when
their functionality falls in the same group of actions. The actions are similar to the buttons on an old radio: Push one button and the rest in the row of buttons all come up. This is why these are referred to as radio buttons.
Look at the two buttons called auto manage and default position. These are toggle buttons for this application. When you select one button, the other is not influenced at all. The functionality provided by each button is completely independent of that
of the other. Do you see the difference between radio buttons and toggle buttons?
Sometimes the scroll bar is used on either side of a drawing area. This is called a scrolled window and belongs to the XmScrolledWindow class. This widget can hold graphics instead of a list of items. The XmScrolledWindow is used primarily to view large
graphics items in a small window, whereas XmList is used to show a list of items from which the user can select.
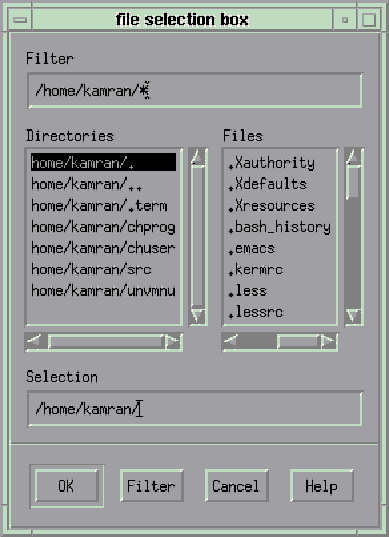
Under the toggle buttons, you will see four push buttons. When a push button is pressed, the colors on the border of the button reverse. Furthermore, the color of the pressed rec-tangle changes to show the user action. Push buttons are used to invoke
some sort of action. When you select the file selection dialog from the list and press the push button to manage it, the display shown in Figure 46.12 appears. This is the standard file selection box under Motif, and you will see it for most applications.
Figure 46.12. A typical File Selection dialog box.
Other Types of Widgets
The Motif toolkit also supplies the widgets described in the following sections.
XmDialogShell
This is a subclass of TransientShell. Instances of this class are used from modal or modeless dialog boxes. Modality refers to whether the user may interact with other windows while the dialog box is being displayed. A modal dialog box prevents you from
moving on until you are finished with the dialog box. A modeless dialog box lets you work with other boxes. A File Selection dialog box is a modeless dialog box.
XmMenuShell
Instances of this class are used to create menu panes for pop-up and pull-down menus. This is derived from the OverrideShell.
VendorShell
This is a subclass of WMShell. It provides the interface to a window manager. These are provided by specific systems vendors, hence the name.
Other Display Widgets
These display widgets are used to provide user interaction tools via buttons, arrows, scroll bars, etc. This list is by no means complete since vendors and end users can create their own versions of widgets or brand new widgets. Some examples of
commercially available widgets include spreadsheet widgets, bar chart widgets, gauges, and so forth. These widgets provide a consistent interface and are therefore easy to include in Motif applications. Some of the standard widgets are listed here.
XmArrowButton
This is a directional arrow with a border around it. A programmer can modify the direction of the arrow, as well as the thickness and color of the border, by setting the widget's parameters. If you look at the ends of a scroll bar, you will see two
examples of such a widget.
XmDrawnButton
A DrawnButton provides a rectangular area with a border for the programmer. The programmer can size, redraw, or reposition text or graphics within this window. This widget provides hooks to set parameters for its border appearance, as well as to attach
functions for accepting user inputs.
XmLabel
This is a rectangular box consisting of either text or graphics. It is instantiated but is also used as a base class for all button widgets. A label's text can be multiline, multifont, or even multidirectional. In the xmdialogs example, this would be
the labels Active Dialog and the Motif Dialog widgets.
Many features of labels can be modified such as fonts, foreground and background colors, and alignment (left, center, or right justification). In fact, this can even store a pixmap graphic image.
XmPushButton
This is a text label or pixmap with a border around it. This widget accepts keystrokes or mouse button presses. In the xmdialogs example these are the create, destroy, manage, and unmanage buttons. When a button has focus, it has a heavy border.
Press the Enter key or a pointer button when the button has focus. Move the cursor to the button. Press a key or button and hold it down. You have armed the button. The color on the button changes and the border colors reverse. This gives the impression
that the button has been pressed inward. When you release the button, the button reverts to its original state.
When a mouse button is pressed in this widget, the foreground and background colors of the widget usually invert. This simulates the pressing of a button.
XmSeparator
This is used to create a line between functional sections of a screen. There is really not much users can do with this widget except position it on the screen.
XmText
This is used to create a fully functional multiline text editor on a screen. The user can select text by dragging the mouse from one location to another while Button1 is pressed. Users can also click anywhere on the widget to mark the insertion point.
If the text widget is enabled for user input, the user can type at the insertion point and insert the text into the text widget.
Pull-down Menus
These are rectangular areas in the window that allow users to select from a group of items. The items are generally laid out in push buttons. You can select a push button either by moving the mouse to that selection or by pressing Alt+K, where K is the
letter in the menu button that is underlined. In the xmdialogs function, the Meta+F key selects the file item, and Meta+H selects the Help item.
Pop-Up Menus
The Motif root window menu is a good example of a pop-up menu. When you press the mouse button, a menu is displayed. You can select the items in the menu by moving the cursor onto the item and pressing Button1.
Xmscale
The Xmscale widget is used to display the value of a data item between two extremes. It can also be used to accept user input. A scale widget has a scroll region very similar to the scroll bar. However, it does not have the arrow buttons at either end.
XmScrolledWindow
This is a combination of a horizontal scroll bar, vertical scroll bar, and a drawing area. If the size of the drawing area fits within the window, you will not see the scroll bars. If the size of the drawing area is greater than the visible area of the
scrolled window, then you will see either the horizontal scroll bar, the vertical scroll bar, or both. You can then use the scroll bars to move the visible portion on top of the drawing area. This is known as panning the window.
XmFrame
This is a simple widget used to put a consistent border around one single widget. A frame can only hold one widget at a time.
XmRowColumn
This is a general-purpose widget organizer. The widget can lay out its widget collection in a variety of ways, including the following:
|
Row major |
This is where all widgets on the row column widget are stored until one row fills up, and a new row is created when another widget is added that will not fit on this row. The creation of a new row is sometimes called wrap around. |
|
Column major |
This is the same as a row major, but it wraps around in a columnar fashion. |
You can specify the width of each column to be that of the widest widget, the number of fixed columns, the packing (whether all widgets should be packed as closely as possible), or determined individually by each widget.
As mentioned earlier, there are several other widgets available in the Motif widget set. You can see the complete listing and their options in The Programmers' Reference Manual from the Open Software Foundation (OSF).
Gadgets
Motif widgets create a window in X Windows. A complex Motif application can create several X Windows very quickly. Each window uses X resources in the server and having many windows can slow your overall system performance.
Gadgets are windowless versions of widgets. Most gadgets have the same names as widgets but have the string gadget appended to their names. So XmLabel has an XmLabelGadget counterpart.
Gadgets do not have all the features of widgets. For example, gadgets share the foreground and background colors of their parents. Also, some gadgets actually turn out to be slower than the widgets they are trying to replace. Given the troubles you can
get into by using gadgets, you would be better off not using them.
Customizing with Resources
Now that you are familiar with widgets, you need to know the parameters that affect them: resources.
What Are Resources?
As you saw in the previous sections, you can customize some aspects of an application from the command line prompt. X allows you to modify the aspects of an existing application every time a client runs that application. X does this by setting control
variables for that client. These control variables are called resources and have a value associated with them.
For example, take the case of an xterm. An xterm's resources are its font size, its pointer shape, the foreground color for all displayed text, its background color, and so on. These are only a few of the resources for an xterm. Most of these resources
exist as predefined defaults for all the common clients in a system.
You can specify resources on an application-specific basis or for all applications on your system. These resources are normally stored in an ASCII file called .Xresources in your home directory.
This file affects only those applications that you run. This file normally contains only those options that you would customize over those in the systemwide files.
You can always override these defaults specified in the systemwide file with defaults in your .Xresources file. In turn, your command line options for a single client override those in the .Xresources file. Keep in mind that the command line default
applies only to a specific client; the .Xresources default setting becomes the default for all your clients.
Also remember that the command line operations override any default resources set in a file. Normally you set how you want your application to look under normal circumstances, then override the changes via command line options.
To make your resource specifications available to all clients, use the X resource database manager program, or xrdb. This stores the resources directly on the server and makes the resource available to all clients on the system. This step takes some
care since your change will affect all your clients, regardless of what platform they are running on.
Defining Resources
A resource definition file is basically a line-by-line list of all the resources in the file. Each line consists of two entries: one for the resource type and the other for the value for the resource. The two entries are separated by a colon.
The syntax for a resource definition is
client*variable: value
where client is the name of the client. The variable for that client is set to value. Note that the colon follows the variable without any spaces.
Now look at the resource declaration for an xterm client.
XTerm*foreground: white

XTerm*background: blue

XTerm*font: 10x20

...

aixterm*foreground: white

aixterm*background: blue

aixterm*font: 10x20
On your system, you may see declarations for cterm, or in the case of IBM's AIX machine, aixterm, instead of xterm. These are simply names for xterm in other versions. When in doubt, search for the word XTerm, xterm, or term in your .Xresources file. If
you do not already have an .Xresources file, you can create one yourself with an ASCII editor.
The values can be Boolean, numeric, or string values. They can be specified for widgets in an application, as well. For example, if you want to set the background color for all push buttons in an application called myWorld, you would set the following
resource:
myWorld*PushButton.background: red

myWorld*background: blue
Note that the asterisk is used to represent the widgets between the actual myWorld application and all push buttons in that application. Had we specified
myWorld.mainForm.PushButton: blue
then only the buttons on the widget, mainForm, which in turn had to exist on myWorld, would be affected. This would be tight binding. Using the asterisk is loose binding since it allows for multiple levels of widget hierarchy between the objects on
either side of the asterisk. If you had an application with a hierarchy of
myWorld.mainForm.subForm.PushButton
then the first two of the following declarations would affect the push buttons on the subForm, but the last one would not:
myWorld*PushButton.background: red

myWorld*background: blue

myWorld.mainForm.PushButton: blue
Another example would be the settings for an xterm. If you attempt to set the scroll bars using
XTerm.scrollbar: true
it will most likely not work. There will probably be a widget hierarchy between the top-level application and the scroll bar widgets. In this case, it will work if you use this:
XTerm*scrollbar: true
After you have modified the .Xresources file, you will probably expect to see the changes occur immediately. Not so. You now have to inform the server of your defaults by using the xrdb command. Use the command
xrdb -load .Xresources
This will reflect the changes for all subsequent executions of your client. These changes will remain in effect until they are overridden or until your session terminates. If you saved your .Xresources file in your login directory, these changes will be
loaded whenever you start X in the future if you run this:
xrdb -load .Xresources
This command is useful when creating .Xresources for the first time in a session. That is why in most cases this command is run when the windowing system is first created. If you want to keep the previous settings, use the -merge command option instead
of -load, as in
xrdb -merge .myOwnResources
Also, you can use the exclamation point as the comment character at any point in the input line before any text begins. Therefore, the following lines are comments:
! This is a comment

! another one

! commented*labelString: This resource is not used.
You can also use the cpp preprocessor's directives #if, #ifdef, #else, and #endif. This is running through xrdb only. cpp is not run when the .Xresources file is parsed. You can override the run through cpp by using the -nocpp parameter on the command
line. No other parameters are required. If you want to remove a resource, use the -remove operation:
xrdb -remove myOldResources
User and Class Resource Files
There are two types of resource files: user and class.
User files apply to each instance of all applications. These are the resources you would set in the .Xresources file.
Class files pertain to all the instances of a particular class. These will exist in files usually in your home directory or in your path. The name of the class file is the name of the class. The class name is the name of the application class with the
first letter capitalized.
For example, all xterms belong to the class XTerm. Note that the class name is the name of a type of an application, with the first letter capitalized. XTerm is an exception in this regard since it has XT capitalized instead of only X.
Now look at setting the resources for a particular class of an application. The command line
*labelString: Hello World
will set the labelString resource for all widgets in every application in your session to Hello World. This may not be exactly what you want. The command line
Xapp*labelString: Hello World
will set the labelString resource for all widgets in every Xapp application in your session to Hello World. This will not affect widgets within other applications. This effect would be desirable if you were trying to set only one type of application
resource.
You can also specify your own class for setting resources. This would be via setting the -name option on a client. For example, you could define all the resources for an xterm with 10 x 20 font to be of class hugeterm. Then whenever you run
xterm -name hugeterm &
it will use the resources in the class hugeterm. So now you can set the foreground color to whatever you want for terminals, with a name of hugeterm.
Note that the name of a resource cannot contain the * or . characters. These values will cause your resource setting to be ignored. mwm simply ignores bad syntax rather than informing the user to make corrections.
Customizing mwm
Customizing mwm is very similar to customizing the X resources. However, mwm offers a far greater set of features and allows the user to customize just about every item on the screen. The resources here can be set to maintain a consistent set of
interfaces for all applications, without changing a line of code. For example, it's easy to change the background color of all the forms in your applications by simply editing the resources file rather than editing each source file individually. Here are
some more methods for setting resources:
- Use hard code resource settings.
- Set command line parameters.
- Use the environment variables to specify class files.
Hard Coding Resource Setting
You can set resources by hard coding the values in your application source code. See Chapter 47.
Hard coding resource settings is justifiable in the following situations:
- When you do not want to give control to the end user for application-critical resources. A good example is the locations of all buttons on a data entry form. An end user is liable to shuffle them around to the point where the entry application may
become unusable.
- When you do not have to worry about locations of resource files. The application is completely stand-alone.
- When you do not want user intervention in your program code.
- When you want to shield users from modifying their UNIX environment variables and having to learn the customization syntax.
Using the Command Line
You saw an example of this earlier when the chapter talked about customizing X applications and listed some of the resources that can be set from the command line. Motif applications usually list their options in man pages.
Use the -xrm command line option to set or override a particular resource. The syntax for this option is
xclient -xrm "resource*variable: value"
Note that you can concatenate several resource settings using the \ operator.
xclient -xrm "resource*variable: value" \

        -xrm "resource*variable: value"    \

        -xrm "resource*variable: value"
So, how do you know which resources to set? Look in the OSF/Motif Programmers' Reference Manual for the description of a widget's resources.
Looking at the Label widget, you will see resources grouped by the class and all its inherited resources. Some of the resources would be declared under the class Core, some under Manager, and so on. Now look at some of the resources for an XmPushButton
widget. You will see these listed with the letters XmN in front of them. These letters signify that it is a Motif resource.
XmNinputCallback XcCallback   XtCallBackList NULL      C

XmNarmColor    XmCarmColor    Pixel     Dynamic        CSG

XmNarmPixmap   XmCArmPixmap   Pixmap    XmUNSPECIFIED_PIXMAP

CSG

XmNdefaultButtonThickness

XmCdefaultButtonShadowThickness Dimension 0 CSG

....
Note the letters CSG for the access description. The C signifies creation. This tells that the resource can be set upon creation. The S signifies that this value can be set at runtime. The G signifies that it can be read (get) at runtime.
In the case of the push button widget, the XmNinputCallback class can be set only at the time when it is created (that is, once at runtime). This is usually done in the code section where an address to a pointer is set for this widget.
The other values can be set at runtime. For example, the XmNarmColor can be set from a resource file since it does have the S set for it. Likewise, when programming widgets, this resource can be read from an application since the G value is specified
for this resource.
Using Environment Variables
Motif uses several environment variables to hold its pointers to locations for resource files.
The XENVIRONMENT environment variable can hold the complete path to a file that holds the resource file. This must be the complete path of the application. If this variable is not set, then the Xt toolkit will look in .Xresources-HostName in the
application's home directory.
The XUSERFILESEARCHPATH is a pointer to the locations of application resource files. This is a colon-delimited string. Each field is expanded into meaningful names at runtime. Some of the most common fields are these:
- %C Customize color
- %l Language part
- %L Full language instruction
- %N Application class name
- %S Suffix
The RESOURCE_MANAGER variable is set by xrd. This xrd is executed at runtime. This usually happens at start-up.
The XFILESEARCH environment variable holds a colon-delimited list of directories for the app-defaults file. Usually these defaults are in the /usr/lib/X11/app-defaults directory. The files in this directory are interesting to see. See Listing 46.1.
Bitmap

Bitmap-color

Chooser

Clock-color

Doc

Editres

Editres-color

Fileview

Ghostview

Mwm

Neko

Periodic

Viewres

X3270* XCalc

XCalc-color

XClipboard

XClock

XConsole

XDbx

XFontSel

XGas

XLess

XLoad

XLock

XLogo

XLogo-color

XMdemos

XMem

XMtravel

XTerm

Xditview

Xditview-chrtr

Xedit

Xfd

Xgc

Xmag

Xman

Xmh

Xtetris

Xtetris.bw

Xtetris.c
Note that some of the classes listed here have the first two letters of their names capitalized instead of just one (XTerm, XDbx, XMdemos). So if your class resource settings do not work as expected, look in this directory for some hints on what the
resource class name might look like. Again, the contents of this directory depend on your installation of Motif and X.
The search for the missing .Xresources occurs in the following order:
- Check in XUSERFILESEARCHPATH.
- If not successful or if XFILEUSERSEARCHPATH is not set, check in XAPPLRESDIR.
- If not successful or if XFILESEARCHPATH is not set, check user HOME directory.
Keep this advice in mind: In all but the most unavoidable cases you should not rely on environments to set your application resources.
The methods are too complicated to learn, especially for the end user. However, they can be a very powerful customization tool. Editing resource files is hard enough on the programmer, but it's even worse on the user. However, in order to be a good
Motif user, you should know about the environment variables that affect applications that come from other vendors.
Listing an Application's Resources
There are two Motif applications that can assist you in determining an application's resources: appres and editres.
The appres program's syntax is this:
appress Class application
This will list all the resources in a given class for the named application.
The second command is a menu-driven GUI program, editres, that allows you to edit the given resources for an application. This is available for X11R5 and later. The program displays a tree-like representation of all the widget classes in a program and
allows the user to move through the tree node by node. Search your release for this file. If you do not have this file, do not despair, contact your local hardware vendor for a complete X installation.
Using the .mwmrc File
Create this file from the system.mwmrc file by copying it into your $HOME directory as .mwmrc, and then edit it. (Look in the /usr/bin/X11 directory and search for the file system.mwmrc using the find command.)
Listing 46.1 on the CD-ROM shows a sample .mwmrc file. As stated earlier, when working with .Xresources, you start a comment with a ! character.
!!

!!        $HOME/.mwmrc

!!   Modified system.mwmrc for personal changes. kh.

!!

!!

!! Root Menu Description

!!

Menu DefaultRootMenu

{

     "Root Menu"         f.title

     "New Window"        f.exec "xterm &"

     "Shuffle Up"        f.circle_up

     "Shuffle Down"      f.circle_down

     "Refresh"      f.refresh

     "Pack Icons"        f.pack_icons

!    "Toggle Behavior..."     f.set_behavior

      no-label      f.separator

     "Restart..."        f.restart

!    "Quit..."      f.quit_mwm

}

Menu RootMenu_1.1

{

     "Root Menu"         f.title

     "New Window"        f.exec "xterm &"

     "Shuffle Up"        f.circle_up

     "Shuffle Down"      f.circle_down

     "Refresh"      f.refresh

!    "Pack Icons"        f.pack_icons

!    "Toggle Behavior"   f.set_behavior

     no-label       f.separator

     "Restart..."        f.restart

}

!!

!! Default Window Menu Description

!!

Menu DefaultWindowMenu

{

     Restore        _R   Alt<Key>F5     f.restore

     Move      _M   Alt<Key>F7     f.move

     Size      _S   Alt<Key>F8     f.resize

     Minimize  _n   Alt<Key>F9     f.minimize

     Maximize  _x   Alt<Key>F10    f.maximize

     Lower          _L   Alt<Key>F3     f.lower

     no-label                 f.separator

     Close          _C   Alt<Key>F4     f.kill

}

!!

!! Key Binding Description

!!

Keys DefaultKeyBindings

{

     Shift<Key>Escape    window|icon         f.post_wmenu

     Alt<Key>space       window|icon         f.post_wmenu

     Alt<Key>Tab         root|icon|window    f.next_key

     Alt Shift<Key>Tab   root|icon|window    f.prev_key

     Alt<Key>Escape      root|icon|window    f.circle_down

     Alt Shift<Key>Escape     root|icon|window    f.circle_up

     Alt Shift Ctrl<Key>exclam root|icon|window   f.set_behavior

     Alt<Key>F6          window              f.next_key transient

     Alt Shift<Key>F6    window              f.prev_key transient

     Shift<Key>F10       icon           f.post_wmenu

!    Alt Shift<Key>Delete     root|icon|window    f.restart

}

!!

!! Button Binding Description(s)

!!

Buttons DefaultButtonBindings

{

     <Btn1Down>     icon|frame     f.raise

     <Btn3Down>     icon|frame     f.post_wmenu

     <Btn3Down>     root      f.menu    DefaultRootMenu

}

Buttons ExplicitButtonBindings

{

     <Btn1Down>     frame|icon     f.raise

     <Btn3Down>     frame|icon     f.post_wmenu

     <Btn3Down>     root      f.menu    DefaultRootMenu

!    <Btn1Up>  icon      f.restore

     Alt<Btn1Down>  window|icon    f.lower

!    Alt<Btn2Down>  window|icon    f.resize

!    Alt<Btn3Down>  window|icon    f.move

}

Buttons PointerButtonBindings

{

     <Btn1Down>     frame|icon     f.raise

     <Btn3Down>     frame|icon     f.post_wmenu

     <Btn3Down>     root      f.menu    DefaultRootMenu

     <Btn1Down>     window         f.raise

!    <Btn1Up>  icon      f.restore

     Alt<Btn1Down>  window|icon    f.lower

!    Alt<Btn2Down>  window|icon    f.resize

!    Alt<Btn3Down>  window|icon    f.move

}

!!

!!  END OF mwm RESOURCE DESCRIPTION FILE

!!
There are several key features here: key bindings, button bindings, and menu items.
A binding is a mapping between a user action and a function. The key bindings map keystrokes to actions, and the button bindings map button presses and releases to actions. Menus display the menu items and let you organize action items into sections.
The format for the all items is
Section_type Section_Title

{

.. definitions..

.. definitions..

}
where Section_type could be Menu, Keys, or Buttons. The Section_Title is a string defining the variable name. It's a name that can be used to refer to this section in other portions of the file.
The functions shown in the sample file begin with an f. keyword. Some actions are fairly obvious: f.move, f.resize, f.maximize, f.minimize, f.title, f.lower, and so on. Some actions are not: f.separator (displays a line on the menu item), f.circle_up
(shuffles the window stacking order up), f.circle_down (shuffles the window stacking order down). Remember how windows are like sheets of paper stacked on a canvas. (See section "Stacking Order.")
See Table 46.1 for all the features available.
Function |
Description |
|
f.menu mm |
Associates mm with a menu. |
|
f.minimize |
Changes the window to an icon. |
|
f.move |
Enables the interactive movement of a window. |
|
f.nop |
No operation—it's a filler only. |
|
f.normalize |
Restores a window to its original size. |
|
f.pack_icons |
Rearranges the icons on a desktop. |
|
f.pass_keys |
Toggles enabling and disabling key bindings. |
|
f.quit_mwm |
Terminates mwm. |
|
f.raise |
Raises a window to the top of the stack. |
|
f.refresh |
Redraws all windows. |
|
f.resize |
Enables the interactive sizing of a window. |
|
f.restart |
Restarts mwm. |
|
f.separator |
Draws a line. |
|
f.title nn |
Names the menu. |
Adding Your Own Menu Items
Now you're ready to define your own menu items. Here are some examples of menu item names:
Menu MyGames

     {

     "Kamran Games" f.title

     no-label       f.separator

     "Tetris"       f.exec "xtetris &"

     "Mahhjong"     f.exec "xmahjong &"

     "Chess"        f.exec "xchess &"

     }
The f.title action specifies a heading for the submenu. The f.separator action draws a line under the title. The f.exec action fires up the command shown in double quotes.
Now you can add this new menu to the root menu by adding the line
"Utils" f.menu MyGames
in your DefaultRootMenu definitions.
More on Button and Key Bindings
The key and button bindings work in the same way as menus. The first obvious difference is the extra column with the words icon, frame, window, and root in it. These words force the bindings on the context. The root applies to any location of the
pointer on the root window, the frame or window keywords apply binding only when the pointer is in a window or its frame, and the icon bindings apply to icons.
In your .Xresource or .Xresources file, you will refer to these key bindings for the class mwm as follows:
Mwm*keyBindings: DefaultKeyBindings
Here are some of the descriptions in the key bindings:
|
|
|
|
|
|
|
|
|
The syntax for a keystroke binding is
modifier<Key>key
where modifier is Alt, Control, or Shift. The key can be a keystroke or function key. The first two declarations describe the same action—Show the window menu—but use different keystrokes. The third key, binding, shows a method for displaying
the root menu.
The button bindings are the bindings for your buttons. These are the three important bindings to remember:
Buttons DefaultButtonBindings

Buttons ExplicitButtonBindings

Buttons PointerButtonBindings
In your .Xresource or .Xresources file, you will refer to one of these button bindings for the class mwm in one of the following ways:
- Mwm*buttonBindings: DefaultButtonBindings
- Mwm*buttonBindings: ExplicitButtonBindings
- Mwm*buttonBindings: PointerButtonBindings
Customizing Your Desktop with Clients
You can customize your desktop using some of the client software that comes with your X11R5 distribution. This chapter covers the following applications:
- xsetroot
- xset
- xdpyinfo
- xmodmap
There are several more utilities in the /usr/bin/X11 directory for you to play with: bitmap, xmag, xcalc. Check each one out to customize your desktop. This chapter describes the ones that are not intuitively obvious.
xsetroot
This client customizes the root window characteristics. Some of the options available are the following:
- -cursor cursorfile maskfile. Changes the cursor to a displayed mask value. See the sidebar for creating your own cursor using bitmap.
- -cursor_name name. This is the name of the standard cursors in the X11 protocol.
- -bitmap filename. This creates a tiled surface on the root window with a bitmap. Check the /usr/lib/X11/bitmaps directory for a list of the standard bitmaps.
- -fg color foreground. The color for the bitmap on the root display.
- -bg color background. The color for the bitmap on the root display.
- -gray or -grey. Sets the background to a pleasant (for some) gray background.
- -rv. Reverses the foreground and background colors.
- -solid color. Sets the root window to a solid color.
Look in the /usr/lib/X11 directory for the file called rgb.txt for a list of files and look at the section called "Colors" in this chapter for more information.
See the man pages for additional features for xsetroot.
The cursorfile is an ASCII file with arrays of characters. You create a bitmap using the bitmap utility. You then run this bitmap through bmtoa to convert a bitmap to an array. There is a reverse utility called atobm to convert a pre-existing array to bitmaps for use with the bitmap editor.
Using xset
The xset command sets up some of the basic options on your environment. Some of these options may not work on your particular system. It's worth it to check these out.
You can set the bell volume:
xset b volume frequency durationInMilliseconds.
For example, the command line
xset b 70 4000 60
sets the keyboard bell to about 70 percent of the maximum, with a frequency of 4,000 Hz, lasting 60 milliseconds.
To turn on the speaker, use xset b on. To turn it off, type xset off. Use xset c volume to set the keyclick volume in percentages. A volume setting of 0 turns it off. Any other number (1—100) turns it on at that percentage. Of course, for this
command to work, you have to have your speaker turned on.
To set the mouse speed, type xset m acceleration threshold at the prompt.
The acceleration is the number of times faster to travel per mouse movement that is greater than the threshold. If your movement is below the threshold, the mouse will not accelerate. If the movement is greater than the threshold, each pointer movement
on the screen will be greater than the physical movement by this accelerated factor. This way you can zip across the screen with a twitch. Use care in setting this feature unless you are very adroit.
Invoking the Screen Saver
Use xset s seconds to enable the screen saver. You can turn off the screen saver with the off option. The default option reverts to system default time for blanking the screen.
For more options type in xset q.
Using Fonts
To load your own fonts, use
xset fp /user/home/myfont,/usr/lib/X11/fontsdir

xset fp rehash
The rehash command forces the server to reread its system files for your command to take effect.
To restore to normal, use
xset fp default

xset fp rehash
See the section called "Fonts" later in this chapter.
Getting More Information About Your Display xdpyinfo
The xdpyinfo utility gives you more information about your X server. It is used to list the capabilities of your server and all predefined parameters for it. Some of these capabilities include the following:
- Name of display
- Version number
- Vendor name
- Extensions
The list is too exhaustive to include here and will be different for your installation. Pipe its output to a file and review it for information about the server.
Help for Left-handed Users xmodmap
If you are a left-handed user, it might a bit uncomfortable to use the left mouse button with your third or second finger. The X designers kept you in mind. If you want to swap the functionality of the pointers on your mouse, or pointer, use the
xmodmap command. First, display the current mappings with
xmodmap -pp
You will see the following display:
|
|
|
|
|
|
|
|
|
|
This shows you that Button Code 1 is mapped to Physical Button 1, Button Code 2 is mapped to Physical Button 2, and Button Code 3 is mapped to Physical Button 3.
Now issue the command
xmodmap -e 'pointer = 3 2 1'
to reverse the mappings on the buttons. Now Physical Button 1 will be mapped to Button Code 3, and so forth. To confirm this, retype the xmodmap -pp command, and you'll see this:
|
|
|
|
|
|
|
|
|
|
You can always revert to the default with xmodmap -e 'pointer = default'.
Useful Command Line Options
Some other standard input parameters that can be used from the command line to change the behavior of a window are the following:
- -borderwidth or -bw. The border width of the frame, in pixels. This may not be available for all clients.
- -foreground or -fg. The foreground color. For example, this could be the text color for an xterm.
- -background or -bg. The background color. For example, this could be the text color for an xterm.
- -display. The display on which the client will run.
- -font or -fn. The font to use for a particular text display.
- -geometry. The geometry of the window. See the section called "Geometry" earlier in this chapter.
- -iconic. Start the application in an iconic form.
- -rv or -reverse. Swap the foreground and background colors.
- -title. The title for the title bar.
- -name. The name for the application.
For example, you can make one terminal name, editor, and set your resources in the .Xresources file for the name editor. When you then invoke a new term with the xterm -name editor command, the server will apply the resources for editor to this xterm.
Logging In to Remote Machines
You can log in to remote machines using the xterm -display option. The remote system must allow you to open a display on its machine. This is done with the xhost + command on the remote machine.
-display nodename:displayname.ScreenName
This starts up a remote session on another node. displayname and ScreenName are optional and default to zero if not entered.
When you want to open an xterm on the remote machine, alma, you run the following command:
xterm -display alma:0.0 &
The format for the option into the display parameter is this:
[host]:[server][:screen]
If you are given permission to open a display, you will be logged in to the remote machine. You can verify this with the uname command. Check the DISPLAY with the echo $DISPLAY command.
When you log out with the exit command, the remote session and the xterm are terminated.
Colors
All the colors in the X Windows system are located in the /usr/lib/X11/rgb.txt file. This file consists of four columns: the first three columns specify red, green, and blue values, and the last entry specifies the name that you can use in your
parameters.
A partial listing of the rgb.txt file is shown in Listing 46.3.
255 250 250         snow

248 248 255         ghost white

248 248 255         GhostWhite

245 245 245         white smoke

245 245 245         WhiteSmoke

220 220 220         gainsboro

255 250 240         floral white

255 250 240         FloralWhite

253 245 230         old lace

253 245 230         OldLace

250 240 230         linen

250 235 215         antique white

255 239 213         PapayaWhip

255 235 205         blanched almond

255 235 205         BlanchedAlmond

255 218 185         peach puff

255 218 185         PeachPuff

255 222 173         navajo white

255 228 181         moccasin

255 248 220         cornsilk

255 255 240         ivory

255 250 205         lemon chiffon

255 250 205         LemonChiffon

255 245 238         seashell

240 255 240         honeydew

245 255 250         mint cream

255 240 245         LavenderBlush

255 228 225         misty rose

255 228 225         MistyRose

255 255 255         white

  0   0   0         black

 47  79  79         dark slate grey

 47  79  79         DarkSlateGrey

105 105 105         dim gray

105 105 105         DimGray

105 105 105         dim grey

105 105 105         DimGrey

112 128 144         slate gray

112 128 144         SlateGray

112 128 144         slate grey

112 128 144         SlateGrey

119 136 153         light slate gray

119 136 153         LightSlateGray

119 136 153         light slate grey

119 136 153         LightSlateGrey

190 190 190         gray

190 190 190         grey

211 211 211         light grey
Since the red, green, and blue have 256 values each, the number of possible colors is 16,777,216. Not many workstations can display that many colors at one time. Therefore, X uses a facility to map these colors onto the display, which is called a
colormap. A color display uses several bits for displaying entries from this map. The xdpyinfo program gives you the number of bits for the display. This is a frame buffer. A 1 bit frame signifies a black-and-white display. An 8 bit frame buffer signifies
28 entries, or 256 possible colors.
Unfortunately, due to different phosphors on different screens, your color specification on one monitor may be completely different on another monitor. Tektronix provides a tool called xtici, an API and docs to counter such problems by using the
international CIEXYZ standard for color specifications. This is called the Color Management System (CMS), which uses a model called HVC (hue-value-chroma). In the X11R5 (or later) release look for Xcms for more details, or contact Tektronix.
Fonts
Fonts in the X Windows system are designed for maximum flexibility. There are two good utilities to help you sift through some of the 400 or so font types on a basic system:
- xlsfonts. Lists the fonts in your system.
- xfontsel. Allows you to interactively see what fonts are available on your system and to see what they look like on the screen.
Using xlsfonts
First, let's examine the font names themselves. Use the xlsfonts command to list the fonts on your system. Type the command on an xterm, and since the listing from xlsfonts is very long, be sure to pipe to a text file for review. You should get a
listing in which each line is of the form
-foundry-family-wt-sl-wd-p-pts-hr-vr-sp-ave-charset-style
The foundry is the company that first developed the font. The most common foundries are misc., Adobe, Bitstream, and B&H. You may see more on your system from the results of your xlsfonts command.
A font of the misc. foundry has a fixed width and height per character type of font; the rest of the fonts were donated by their respective manufacturers.
The family is the general type of font: Courier, Helvetica, New Century Schoolguide, Lucida, and so on. Some families are monospaced (that is, all their characters have the same width). The other families are proportionally spaced (that is, each
character has a separate width). Courier and Lucida are monospaced fonts. New Century Schoolguide is proportionally spaced.
You would use monospaced information for tabular information or running text. This makes your text line up cleanly in running displays. Proportionally spaced fonts are helpful for text in buttons or menu items.
The wt and sl parameters are for weights and slants, respectively. The common weights are bold and medium. Bold text is drawn with a pen thicker than the normal pen. The common slants are roman (r), oblique (o), and italic (i). Roman text is upright,
oblique text has characters sheared to the right. Italic text is similar to oblique text, but the characters show a smoother effect. You may also have a reverse oblique (ro) and reverse italic (ri) when the text leans to the left instead of to the right.
The p stands for the point size, which has traditionally been 1/72 inch. Most monitors traditionally support only 75 or 100 dots per inch (dpi) resolution. Since X fonts are bitmaps, it seems logical that the most common fonts within X are of two
flavors: 75 dpi and 100 dpi. This is the number that is found in the two fields hr and vr, which stand for the horizontal and vertical resolution, respectively. In almost all cases you will specify either 75 or 100 in each of these fields.
The sp refers to the spacing between two characters on the screen. This could be m for monospaced, p for proportional, and c for fixed fonts where each character occupies a fixed box.
The ave is the 1/10 average width of all the characters in the set.
The character set and style is usually set to ISO8859-1. This refers to the ISO Latin-1 character set, which includes characters found in the ASCII and other European character sets.
Now that you have seen the large number of options just to define a font, you can rely on using wildcards to specify most of the options for a font. The server will match the first font name that matches your specification with a wild card. In other
words, you only have to specify the parameters you want to change and use the asterisk for the rest.
For example, *courier-roman will get the first specification for the roman-weighted Courier font. However, *courier will get the bold Courier font. This is because the bold specification exists before the Roman specification in the fonts file.
The font search path is the path used by the server to search for the fonts in your system. This path is usually set to the following value:
/usr/lib/X11/fonts/misc,/usr/lib/X11/fonts/75dpi,/usr/lib/X11/fon

ts/100dpi,
In each of these directories is a file called fonts.dir. This is a listing of all the fonts in the directory and has two entries per line. The first entry gives a font filename, the second entry gives the complete font description. The first line in the
file gives the number of entries in the file.
You can create another file in the font path to alias your own font names. This file is called fonts.alias. The server uses only the first one it finds in its path, so just keep one such file in the first directory in your font path. The fonts.alias
format is very similar to the fonts.dir file, except that the first entry is not a filename, it is an alias for a font name. So if you want to specify a special font type for all your editor xterms, you would have a line such as this:
editterm *lucida-medium-r-*-100*
Then you can invoke your xterm with the command
xterm -fn editterm &
to get an xterm window with the desired font. This is a lot better than typing in the full font specification. Also, by changing the alias once, you can change it for all scripts that use this alias, rather than modifying each script individually.
A good place to start is the /usr/lib/X11/fonts/misc directory, where a fonts.alias exists from your initial X installation. This file has the fixed and variable aliases defined for you to work with.
Using xfontsel
The xfontsel program helps you get a better feel for some of the parameters of a particular font. (See Figure 46.13.)
Figure 46.13. Using xfontsel.
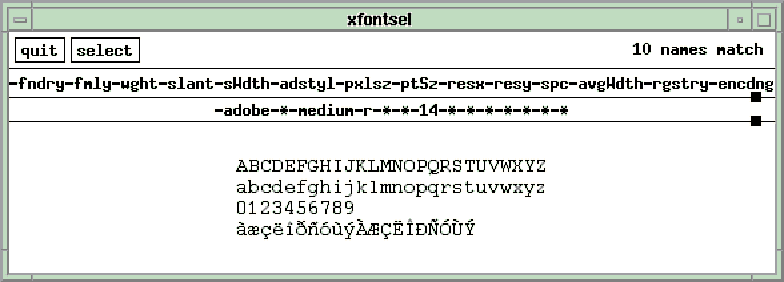
You can move your pointer to any one of the parameters in the first line, and click Button1. As you move the pointer on a field, the field will draw a box around itself to show that it has focus.
If any font options exist for your selection, you will be presented a pop-up menu to select from. Move the mouse to a selection and click on the selection. You will see your selection displayed in the font specification string, as well as a sample of
what the font will look like on the fonts display screen below that.
Future Enhancements in X11R6
This guide covers features up to X11R5. At the time of writing, X11R6 is about to be released. Here are some of its expected features:
- Enhanced support for serial lines with serial line protocol (SLIP) and low bandwidth (LBX) features. This involves removing unused bytes from messages, compressing images, and sending only differences across the network to the server.
- X image extensions (XIE). This includes compressed images being transmitted between the client and server.
- Support for Microsoft Windows NT. Most client applications will run, but not xterm or xdm. The server also will not be supported.
- Fresco, a C++ toolkit for developing object-oriented applications. This will support both X and Microsoft Windows.
- A session manager to record the status of all windows on a screen so that a user can return to the state they were in when they last exited X.
- Enhanced support for 2D fonts. This will include shading, mirroring, rotating, and variable x-heights on fonts. Also, you would be able to select subsets of an entire character set. This would reduce rasterization time, which is the means by which the
graphics routines convert text or data to pixels on the screen.
- Recording of all X requests at the server for playback when debugging applications.
- Prioritization of the execution of clients.
- Direct communication between clients instead of going through the server.
Contact the X Consortium for details on availability.
GUI Front Ends to UNIX
There are many GUI fronts to X Windows and UNIX. This section will briefly introduce you to a few of the common commercially available front ends and their window managers.
Motif
Motif applications look more like a Mayan temple than a menu system. Almost every item on the screen is rectangular. A rectangular button rests on a rectangular menu bar, which may rest on another rectangular form, which sits on a square window.
The latest version, at the time of writing, is Motif 1.2. There are several updates to Motif (1.2.1, 1.2.3, and so on), but Motif 1.2 is a major release from the last major release, 1.0. The 1.2 release includes a lot of bug fixes and adds widgets to
its list of convenience functions. Get an upgrade if you are running an older version. Some of your existing bugs may even disappear!
Sun MicroSystems OPEN LOOK and OLIT
OPEN LOOK is Sun Microsystems' windowing interface. It is perhaps the most popular interface for end users. Its Open Desktop is a set of tools for the desktop.
The most major difference between Motif and OPEN LOOK is that OPEN LOOK uses rounded corners, and in Motif almost everything is based on rectangles. See Figures 46.14 and 46.15 for xterm and menu, respectively.
Figure 46.14. An xterm in OPEN LOOK.
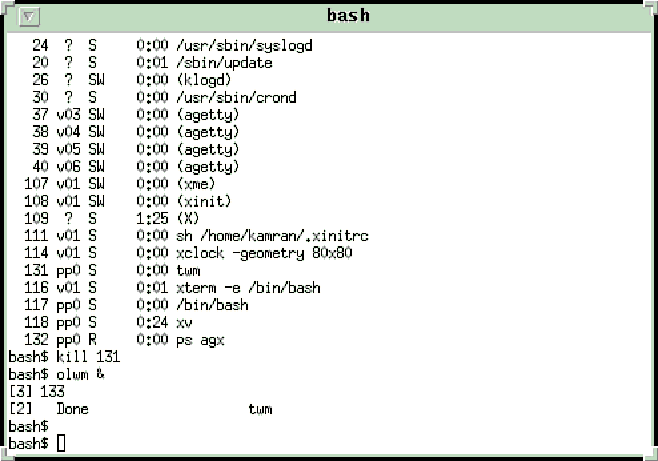
Figure 46.15. An menu in OPEN LOOK.
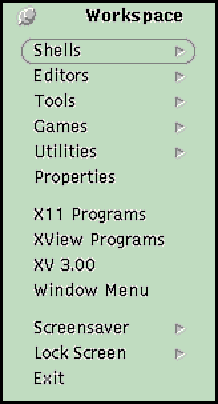
Another major difference in functionality between Motif and OPEN LOOK is the use of mouse buttons. Motif uses the left mouse button (Button1) almost exclusively for all operations. OPEN LOOK, on the other hand, generally uses the left mouse button to
select and the right mouse button to open menus.
Furthermore, the menu items offered by the window menus in OPEN LOOK give different functionality than those in Motif. See Table 46.2 for a comparison of some operations.
Operation |
OPEN LOOK |
Motif |
|
Exit application |
"Quit" |
"Close" |
|
Iconify a window |
"Close" |
"Minimize" |
|
De-iconify a window |
"Open" |
"Maximize" |
|
Restore size |
"Restore Size" |
"Restore" |
|
Push window down |
"Back" |
"Lower" |
In OPEN LOOK the buttons have rounded edges, scroll bars are shaped like elevators, and menu items are rectangular. It also offers pinnable menus, a feature that lets you "pin" a menu anywhere on the screen. Notice how the pinnable main menu
is overlapped by another window, indicating that it does not have focus but is still visible on the desktop.
Another feature carried into Motif is the ability to have a virtual backplane for all the sessions. The display manager in the common desktop environment provides the same functionality.
COSE and CDE
In March 1993, the Common Open Software Environment (COSE) was formed. Thus ended the war between OPEN LOOK and Motif, supposedly. The agreement set the basis for the common desktop environment (CDE).
CDE enables users to preserve their desktop configuration between logins. Users return to their exact user configuration when they log back in.
Online help is available with embedded graphics, multiple fonts, and hypertext capabilities. Applications are able to access the help system.
The CDE provides a standard text editing attachment widget. This provides functionality similar to the composition tool in Sun's OpenWindows mail tool. Users can drag and drop nontextual data into text, where the system will represent it as an icon.
This text widget is expected to be Multipurpose Internet Mail Extensions (MIME) capable. The MIME feature will allow users to share nontextual data via e-mail.
The print features in CDE have been greatly enhanced. Users will be able to use drag-and-drop features to print files and manage print queues. Beyond these capabilities, COSE also specifies a standard method for printing X images and screen dumps. This
is very similar to the capabilities in the now all-but-abandoned NeWS system. The standard calls for the X print server to convert the X protocol into a format acceptable to the user's connected printer. This allows users to create screen dumps and bitmap
images from X applications much more easily.
One of the most powerful features of CDE is its scripting language. This language allows users to create shell scripts that have pop-up windows, alerts, and dialog boxes. Also, hooks will be included into the mail system, so users can create consistent
help menus.
Other GUI Vendors
Hewlett-Packard (HP) calls its GUI environment the Visual User Environment (VUE). HP is perhaps the most influential corporation for the COSE user interface standard.
Unfortunately, the interface you see in Motif for a standard application may have a different look under VUE. HP has customized its Motif libraries to conform to its own way of doing things. For example, it overrides all attempts to set the background
colors for menu items. At the time of writing, there is no way to override this using the xset's background commands.
VUE uses the Broadcast Message Server to dynamically change an application's colors. You request the VUE to change the application's colors dynamically in its palette. As a rule, all X applications must conform to the window manager's preferences on a
system. The only time this causes problems is when you are porting color-sensitive non-COSE applications to an HP (or HP-conforming system).
There is a way around this problem. You can define your colors through the resource files. (See the section "Using Resources" earlier in this chapter.) This will work on HP systems with operating system Version HP9.01 or later. Contact HP for
details.
NeXT's NextStep is a completely object-oriented system that has now been released for Intel's 486+ platforms. It is based on the multithreaded Mach kernel. NeXT initially developed hardware for their operating systems, but now they are only a software
vendor.
One of the major problems with NeXTStep when it was first introduced was its lack of X Windows support. Presently, NeXT is working in conjunction with Sun on a GUI called OpenStep. This is at odds with the CDE proposed by COSE and is possibly Sun's way
of resurrecting its OPEN LOOK Interface. NeXT is also working with HP and Silicon Graphics to port to their workstations.
NextStep's GUI is based on the Adobe Display PostScript Language. This approach gives excellent graphics capabilities on displays you get with PostScript plotter. Version 3.2 was the first POSIX-compliant release, but neither Motif nor OpenWindows was
available for it.
Santa Cruz Operations (SCO) is the owner of IXI corp. IXI licenses its X.desktop product to Sun. X.desktop is the standard desktop for ODT. SCO is a founding member of COSE and supports the CDE.
IBM's AIX Windows is very similar to OSF/Motif. The later versions of AIX Windows have better icons and file management capabilities. If you use Motif, you will be able to use AIX. Some quirks exist in some AIX-specific areas. A good example is aixterm,
which is used in place of xterm. Barring these minor quirks, the transition to IBM from another Motif system is easy.
Digital Equipment Corporation (DEC) is perhaps the oldest supporter of X Windows. Its version of DECWindows runs on Ultrix, DEC's version of UNIX. Contact (800)DIGITAL for more information.
People do not think of Apple Computer's Macs as UNIX platforms. With its pre-existing GUI, the Mac is a good candidate for a UNIX platform. Apple's A/UX provides a layer for native applications to work on.
You can work in three basic environments in A/UX:
- A tty-like console
- An X11 window manager
- The Mac file finder
The first two options are almost like a UNIX and X11 session. The last option is like a Mac Finder session. Look on the desktop for a disk with a label /. Click on it to open subdirectories and applications underneath it. You can use the mouse to invoke
UNIX commands, such as ls, ps, and so on, from icons in windows.
Softland system's version of Linux is PC-based UNIX for free. Linux is a UNIX clone and comes with X11R5. You can quite painlessly and successfully port code between Linux and other Motif platforms. Contact SLS directly at (604)360-0188 for more
information.
Porting Non-Motif Applications to Motif
Moving from other windows front ends to CDE should give Sun users a strange feeling. All Sun desktop tools will be available but will look different. All OPEN LOOK applications will have to be ported over to Motif eventually. Some Sun users will have to
wait a while to get their pinnable menus back, for example. However, some relief is available in the upcoming Motif tear-away menus, which will offer about the same functionality.
Presently, some commercial vendors are working hard to get a foothold in this market. These are only a few applications of the development packages presently available for porting applications—no doubt you will find more as time passes.
For those developing applications in the xview marketplace, Qualix Corporation, San Mateo, California (800/245-UNIX), is developing a tool called XvM. This is an XView/Motif library that allows Xview-based applications to move to Motif by just
recompiling. This library maps the Xview API into Motif calls.
Another vendor, Integrated Computer Solutions (ICS), Cambridge, Massachusetts (617/621-0200), provides tools to convert existing Xview applications into Motif. The GIL to UIL conversion tool converts the existing GIL files produced by Sun's DevGuide
OPEN LOOK Interface builder into Motif UIL or directly to C or C++. You could also use their other tool, Xview/GIL, to convert the XView API into GIL. The GIL can then be moved into C, C++, or Motif UIL.
National Information Systems (NIS), San Jose, California (800/441-5758), offers a package called ACCENT consisting of four modules. The DevGuide conversion module converts DevGuide GIL files into C/C++. The XView Conversion module converts source code,
using the Xview API into source. The OLIT converts source in the OPEN LOOK Interface Toolkit API into C/C++ source. The fourth module, the GUI builder itself allows the user to build Motif interfaces interactively. They have services to convert source code
to Motif for a fixed fee, as well as training facilities.
Imperial Software Technology Ltd., Reading, England, offers a GUI builder that has built-in OPEN LOOK to Motif conversion. Its product is called X-Designer. With add-on options, users can convert DevGuide files into X-Designer files. With this
conversion, users can modify the converted graphics images to their taste. After any modifications, the interface file can be saved in Motif UIL, C, or C++. The add-on options will be a part of the new release. Their distributor is VI Corporation, North
Hampton, Massachusetts (800/732-3200).
Where to Go from Here
If you want more information about specific vendors, you can get a wealth of information from the Internet about the latest releases and sources of shareware utilities. Listed in Table 46.3 are some of the newsgroups that can provide more information
about vendors.
Function |
Description |
|
comp.os.linux |
The UNIX clone used to develop this guide. |
|
comp.sources.x |
Sources for X Windows system. |
|
comp.sys.dec |
DEC systems. |
|
comp.unix.ultrix |
DEC's Ultrix. |
|
comp.sys.next.programmer |
NeXT programming. |
|
comp.sys.next.announce |
NeXT latest news. |
|
comp.sys.mac.programmer |
Mac programming. |
|
comp.windows.x.apps |
X Windows apps. |
|
comp.windows.x.motif |
Motif programming issues. |
|
comp.windows.x.pex |
PEX, the 3D extensions to X. |
Summary
In this chapter you learned about the following:
- The major components of a graphical user interface. Along the way you got a brief history lesson on X Windows.
- The major concepts required for using X Windows: displays, windows, screens, and the client server architecture in X.
- Starting an X Windows session from the prompt as well as using the xdm display manager.
- The Motif Window Manager, mwm.
- Moving about in mwm and working windows with the keyboard and mouse.
- Customizing your desktop with resource files and client applications.
- Setting your environment to your liking with resources.
- Using some standard tools available in X to further set up your desktop.
- What's in the future with COSE, CDE, and X11R6, and how vendors support their interfaces for their versions of UNIX.
- Where to look next for more information.
- Using widgets and the characteristics of these widgets. This provides the basis for learning how to program your own applications in the Motif environment.
Acknowledgements
I am indebted to Metro Link Software (305/938-0283) for providing me with their version of Motif 1.2 for developing all the routines and testing the sources in this chapter. Their software installed cleanly with no hassles on a Linux (1.02) system
running on a 486DX. All libraries worked great at the time and presented no compatibility problems in porting sources to Sun and AIX.
Popular Tutorials
-
 MS Access
1109
MS Access
1109
-
 C++
1222
C++
1222
-
 HTML
584
HTML
584
-
 JavaScript
616
JavaScript
616
-
 Vbscript
873
Vbscript
873
-
 Oracle
473
Oracle
473
-
 VC++
875
VC++
875
-
 SQL
2959
SQL
2959
-
 XML
514
XML
514
-
 Java
814
Java
814
-
 Perl
455
Perl
455
-
 Linux
451
Linux
451