


8
Configuring and Installing Print Services
It used to be quite a challenge to get access to a good printer. It seemed the best or closest printers were always on someone else's desk, and it was always a special favor to get access to that printer. Then people started to use network printers connected to PCs that were distributed throughout the building. They were nice, but users were always confused about print queues on various servers and all of those other details. Things got easier when printers started to get connection boxes and internal cards that allowed them to be connected directly to a network.
Today, the only printer that I use that is not connected to my PC via a network is the one I have on my desk at home (and I have to share that one with my wife via an switch box). With almost all of the printers connected to the network, it is easy to find one that is close to your desk and that has the capabilities (speed, duplex, graphics resolution, and color printing) that meets your needs. Printers have become more sophisticated, offering multiple trays for different types of paper and even envelope feeders that you can select.
Now step back to just a few years ago when Windows NT was just entering the market. Novell had the file and print server market fairly well locked up. They used a combination of file servers and special print servers (PCs whose sole job was to manage print queues) to spool print jobs to both local-attached and network-attached printers. The only difficulty was running all of those special Novell utilities to figure out what printers were available and then mapping to them in your login scripts. It was not a bad solution, but Windows NT had to do it better to gain market share.
The boys in Redmond came up with a pretty good solution. Mapping to printers was just about as easy as mapping to shared network directories. Users had a browser to search the network for available printers and then clicked on them to start the selection process. If the printer owners and administrators were nice, they would even give users a hint about what type of printer it was in the name (i.e. MKTG_4SI). If it was exported and you had the right permissions, you can grab it and start using it. Windows 4.0 takes this process one step further in that it provides wizards (a series of screens that ask simple questions and provide you with lists to select from) to help ensure that you set up your printers correctly. Now if you monitor the Windows NT newsgroups (such as comp.os.ms-windows.nt.misc) on the Internet, you will find a number of old-time NT types who hate the idea of wizards and do not want to bother with a long series of questions. However, for those of you who like a series of simple questions, you'll like the new setup.
This chapter covers the basics of setting up printers in Windows NT. Let me be a little more specific- it covers setting up directly-attached printers (i.e. those connected to a port on your computer) and those on Microsoft and Novell network computers. There are two other possibilities which are covered in separate chapters. First, Macintosh printing is covered in Chapter 10. Printing to LPR/LPD (such as to UNIX TCP/IP) printers is covered in Chapter 13. I have usually found that the most useful printers are usually located on your office automation network which means that most of your printers can be set up using the techniques described in this section. These setup techniques are relatively easy and I have found them to provide reliable printing services to the people on my network.
Printing in a Network Environment
There are a few considerations that you should be aware of before you start configuring a network of printers connected to your NT servers and other workstations. The first extra consideration involves scheduling access to the printer. When you have a single tasking operating system such as DOS accessing a locally-attached printer, there is no problem figuring out who has access to the printer. You print directly to the printer with the only job that is running at the time. When you have an operating system such as Microsoft Windows, you have the possibility of queuing up several print jobs which runs effectively in the background while you are doing other processing.
Now imaging a whole network of workstations printing to a series of network printers. When you send your print job, you have no idea as to whether the printer is turned on or working. Therefore, it becomes important to have printing utilities that can determine the status of the printer and feed that back to the users if there are problems. Another issues is how do you coordinate the printing of a number of clients to a printer. If the print queue was located on each of the clients, there would be a question as to who gets the printer next when the current print job completes. This is typically solved by designating the computer to which the printer is attached as a print server which manages the print queue (a list of files waiting to be printed).
Finally, in many organizations you have to consider issues such as who gets to use a particular resource. In some organizations these limitations may be based on such real concerns as security restrictions or access to sensitive information. However, in many cases you have to deal with a group or person who does not want to share. Whatever the reason, network operating systems have to be able to control access to printer resources.
Printing in the NT World
The Windows NT environment provides a convenient set of services to allow users to access local and network printers. The thing that impresses me most about the way this environment is set up is that access to these resource is built directly into the operating system and is therefore really easy to configure and access. However, there are a few things that have to be in place to make this happen. I have come up with a simplified picture of this in Figure 8.1.
Figure 8.1
A simplified view of Windows NT printing.
The first key is having a client that is capable of generating the information to print (or plot) in the correct format for the desired printer. Printer manufacturers have come up with a number of print control languages (HP PCL, Postscript, etc.) It is therefore the client's responsibility to have the correct printer driver for the type of printer being used. Since the Windows NT Server product has to act as both a server and a client (i.e. when you want to print logged information), you need to install the printer driver for the printers that you will be using. This applies whether the printer is directly attached to your server or is accessed over the local area network. The good news is that the Windows NT Server CD comes with printer drivers for the vast majority of printers out there. You can also get printer drivers from the manufacturer for those printers that are a little less common or if you want enhanced performance.
A side note on the last paragraph concerns fonts. DOS and early versions of Windows did not store fonts or printer drivers as part of the operating system. Therefore, when you had an application such as WordPerfect for DOS, you had to get a set of fonts and printer drivers from the application vendor. If you changed printers, you often had to live with a different set of fonts which meant you had to reformat your document to look good. Windows NT, like Windows NT 3.1 and Windows 95, has fonts built directly into the operating system. The operating system therefore becomes responsible for translating the text into the appropriate control sequences to get you the look that you want (the shape of the letters, boldness, etc.) The Truetype fonts extend this further by providing an even higher degree of control over the look between different printers. While you are typically not sensitive over the font on batch printouts of audit reports from a server, you may consider installing a wider array of fonts on a server that has to serve in the dual capacity as a personal workstation.
Once the printer drivers have translated the desired information into the correct series of bits and bytes for your printer, it comes time to transfer the information either directly to the printer or to the server which controls the queue for the printer. Once again, these utilities are built directly into the operating system. Later in this chapter, I will show you how to use the printers utility to control the queue (i.e. delete jobs and stop the printer). The key to this printer setup is the ability to communicate between computers and between the print servers and the printers themselves to keep things flowing smoothly. Gone are the days when you spooled a bunch of print jobs only to stand by the printer wondering where your work is in the system.
Since Windows NT came on the market after the established vendors had a large install base, it was in Microsoft's best interest to fit in well with existing organizations. It helped eliminate the argument that a company could not start using NT because they would have to throw out a huge investment in the other vendor's products. It is impressive the way Windows NT integrates with printers on a Novell network. You log into the Novell network when you start your computer and then the Novell printers appear on the same list as the printers that are connected to computers on the Microsoft network. In addition, the Macintosh services component of Windows NT allows you to access printers on the Appletalk network. Finally, if you have UNIX resources out there, Windows NT provides LPR/LPD services which allow you to send print jobs to many different types of UNIX computer that are connected to your network.
Before I leave this section, let me throw one more thought at you. Many organizations like to name their printers cute names such as naming them after planets or Star Trek characters. While this may make it interesting to people going to select a printer, it may be more practical to name your printers with names that contain two bits of information. This is important in larger organizations which may have dozens or even hundreds of printers attached to their network. The first bit of information is the location of printer. This may include group, floor or building and floor. The next important bit of information is the type of printer. Remember, the remote user is going to have to configure the appropriate printer driver to send the appropriate job streams to this printer. An example of a good name for a larger network printer might be something like MAINT_4SI. This identifies the printer as being in the maintenance department and it is an HP Laserjet 4SI printer. You would have change the name of the printer if you moved it to reflect the new location and some organizations may not want to do this. This is just a thought, but something that you should at least consider.
Windows NT Printer Configuration Utilities
I mentioned earlier that printing is an integral part of the Windows NT operating system. As such, the logical place to look for it would be under Settings-Control Panel on your startup menu. You will also notice a direct shortcut to printers on the Settings menu. Either way, you get to the same location which is the printers control utility. Now I personally like the way things are set up under Windows NT and Windows 95. If I want to do something to a printer, I have one place to go. There is not a printer setup utility and then a printer queue management utility and a separate printer queue monitoring utility (for those Novell users who do not have administrator privileges over the printers). No, this is one stop shopping.
Figure 8.2 shows the window that will greet your when you select the Printers option from the Settings menu. It looks very much like the My Computer or Control Panel utilities, which is nice because you probably already know what each of the buttons does for you. You will always find at least one icon on this display which is the Add Printer icon. This starts the printer setup wizard (a series of panels that ask specific questions to guide you through the printer setup process).
Figure 8.2
Printers control utility.
You will also see icons for any of the printers that you have already configured. The trick to the Windows 95/Windows NT 4.0 interface is that to change the configuration of a given printer, you right click on the icon for that printers and select properties from the menu that appears. This will bring up a tabbed dialog (yes, you see a lot of this type of interface for properties settings under 95 and NT) which let you set all of the properties for this printer. Figure 8.3 shows a sample of this properties dialog for an HP Laserjet attached to my server. Notice that it lets you perform a wide range of configuration tasks (these printer drivers get more sophisticated every day) including updating the printer driver if you receive a new one. It also allows you to print a test page which can be very helpful if you are having problems.
Figure 8.3
Properties dialog for a printer.
Finally, if you double click on a printer icon on the Printers control utility, you will be given a window that allows you to control jobs and the print queue itself for that printer. Figure 8.4 shows this window. This panel allows you to stop the printer queue, delete jobs or set up which printer is the default on your system. Therefore, while the properties page lets you tell the system about the type of printer that you have and what you want your print jobs to look like, this utility lets you control the print jobs that are actually being processed by the system.
Figure 8.4
Print queue control utility.
Configuring a Locally Attached Printer
Next I want to go over the printer configuration process in a little more detail. One of the first things that hit me when reading articles on the Windows NT Internet newsgroup was the violent reaction some of the old-time NT administrators had to the use of wizards in the 4.0 version of NT. The main complaint was that they wanted to get things done quickly and that it took time to go through all of the panels in a wizard. These are probably people who are so familiar with the process that they could enter parameter settings on a DOS command line from memory. However, if you are not one of these gurus, then wizards can be a very friendly way to go through a configuration task, especially if you do not do this task every day.
You start the printer configuration wizard by double-clicking on the Add Printer icon in the printer control utility. The first wizard panel that you will see is one where you tell Windows NT whether the printer that you are setting up is attached to a port on your computer or whether it is a network resource that you are accessing. This will determine which panels you are presented with and also whether the printer queue is set up to be managed locally or transmitted to another computer on the network for printer management. Figure 8.5 shows you the Local/Network printer selection panel.
Figure 8.5
Local/Network Printer selection panel.
Because this section is devoted to configuring locally attached printers, we will assume that you selected the My Computer radio button on the Local/Network printer selection panel and clicked the Next button. Note that you can click on the Cancel button on any panel in this wizard and cancel your printer setup. The next panel that you will see after indicating that you want to configure a local printer asks you to tell Windows NT the computer port to which your printer is connected. (See Figure 8.6.) In the Intel world, these are referred to as LPT1 to LPT3 for parallel printer ports and COM1 to COM4 for serial ports. Hopefully your computer manufacturer was good to you and labeled the ports or at least documented them in one of the manuals. Anyway, all you normally have to do is check the box next to the appropriate port and click the next button. I have never had to add a port or configure the port for Windows NT, but there are option buttons for this. The configure port button lets you set the transmission retry interval which could be required for some systems, but don't worry about it unless you have problems or a manual tells you to change it.
Figure 8.6
Printer Port Selection Panel.
The next wizard screen you see allows you to specify the type of printer that you are connecting to and lets you scroll down through a list of manufacturers on the left side and select a particular model of printer made by that manufacturer. Windows NT supports a wide range of the more popular printers, but if you cannot find your printer on the list, you might be able to get a printer driver for Windows NT from the printer manufacturer. If this is the case, you would click the Have Disk button and tell NT where this driver is located (usually A: for your floppy disk drive). If you are using a printer drivers from the Windows NT CD-ROM, you should have this CD in the drive at this time. After you have selected your printer, you can click the Next button to go to the next panel. You should also note that there is a Back button at the bottom of all but the first screen in this wizard. This allows you go to the previous wizard panel if you realize that you made a mistake and need to change something.
Figure 8.7
Printer Driver selection panel.
NOTE:What do you do if you cannot find a driver for your printer on the Window NT CD or the driver has bugs or lacks some features which you desire? The best answer is to get a Windows NT (not Windows 3.1) driver disk from the manufacturer when you buy the printer. Another alternative is to see if you can download a driver from the vendor's or Microsoft's (www. Microsoft.com) Web pages. Finally, you can try drivers for older versions of the printer made by the same manufacturer (such as a Laserjet 3 driver for an HP Laserjet 4 printer).
The next panel is really pretty simple (again, this is the type of panel that some people complain about being too simple and therefore making wizards too slow). Figure 8.8 illustrates what I call the printer naming panel. It lets you enter a name for your printer. You get to pick a name that suits your local tastes and standards. I would recommend using meaningful names (location and type of printer) in large organizations, however you can name your printers after craters on the moon if that is what suits you. You also have radio buttons on this panel to indicate whether this will be the default printer for users who use the server as a workstation (like you, the administrator). When you have entered this data, you can press the next button to move onwards in this setup wizard.
Figure 8.8
Printer Naming panel.
The next (and next to last) panel in this wizard lets you set up sharing for this printer. By default, a printer connected to your server will only be available to people who log on at the console. Now with everyone conscious about capital expenditures for computer equipment, the pressure is usually on to have people share printers that are located in convenient locations (or maybe in locations that are not so convenient). Sharing a printer is easy (see Fig. 8.9).
Figure 8.9
Printer Sharing panel.
Finally, you are given the opportunity to print a test page before you commit the new printer to your system. I always like to print the test page because it does not really take all that long and it can catch little oddities with drivers or port connections. Figure 8.10 shows the panel used to print the test page. The finish button actually configures the operating system to use this new printer.
Figure 8.10
Finishing Screen for Printer setup.
Welcome to the new world of Microsoft setup wizards. There are wizards all over the place in Windows 95 and Windows NT. I have found that once you get used to them, it is relatively quick to just keep clicking next, especially on a machine that is hefty enough to act as a server (even though NT Server is optimized for background speed versus user interaction, but more on that later). Perhaps if you are an administrator for a large network of servers, it could get tedious to set up two dozen printers on ten servers. There are a few key points about this printer setup wizard that I would like to reiterate to make sure they are clear:
- You can use the back button up to the point where you click the finish button to go back to previous screens that you may want to change some of your input on
- You can use the cancel button to stop the setup process without creating a printer that is half set up (it is only collecting information and executes the setup commands when the finish button is clicked)
- In most cases, the defaults are usually good to follow (except, of course, when selecting printer models)
Every now and again, you will need to set up some of the fancier features of your printers (i.e. special trays for envelopes) or change some of the settings that you made (I have a printer with limited memory that I had to reduce the resolution down to 150 dots per inch to print graphics). Remember from the discussion around Figure 8.3 that you could call up property pages for an existing printer by right clicking on the icon for that printer and selecting the properties option (right clicking is another one of those new interface standards that you have to get used to). This property sheet contains six tabs that give you an amazing amount of control over your network printer.
The first property page shown in Figure 8.3 is the general property page. Some of the key items is that this page lets you install a new, updated driver for your printer. Also, it lets you set up separator pages for printers that handle jobs from a number of different users. Finally, a button that I am personally looking forward to is the test page print button. As I will discuss in the section on printer problem resolution, I like to try to work the problem in a systematic manner and the ability to print test pages directly from the server utilities is a good start.
The next property page is ports used for locally-attached printers. Figure 8.11 shows this tab dialog. It looks very much like the wizard page and is pretty self explanatory. About the only thing that I could think of that would cause you to use this is if you want to switch ports say to locate your printer farther than traditional parallel port connections support and therefore you switch to a serial cable.
Figure 8.11
Ports Tab dialog.
The next panel reminds me of the print queue setup utilities on larger computers such as mainframes. As you can see in Figure 8.12, you can activate printers at only certain times. This can be very useful to prevent people spooling sensitive information to a printer and the printout sitting out all night where prying eyes could look at it. This panel even present you with the option to speed up printing from the program's point of view and other advanced controls. With panels like this, you are finally starting to get the control over your computer environment that you have had in older computer environments.
Figure 8.12
Job Scheduling Tab dialog.
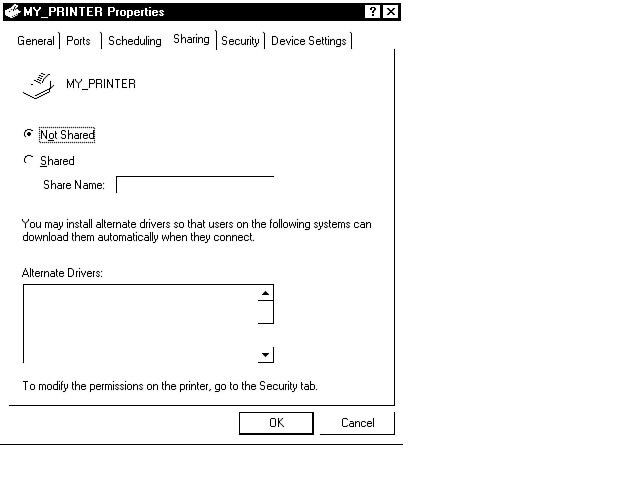
The next tab dialog is another simple one (see Fig. 8.13). It just lets you determine whether you are going to share your printer with other users. If you choose to share the printer, you get to give it a text name that hopefully makes sense to the people who might be attaching to it. This just indicates that you are planning to share the printer. The next tab dialog will let you control who is allowed to access it.
Figure 8.13
Sharing Tab dialog.
The next tab dialog allows your to control and monitor the use of your printers. (See Figure 8.14.) The concept of ownership may be foreign to some of you, especially if you do not use NTFS file systems. Basically, ownership allows a person to gain control of a set of resources under NT and be the one who must be contacted for access to those resources. This allows you to have someone in the department take ownership of the printer and coordinate access to it. Access can be granted to groups of individuals using the Permissions button on this tab dialog. Finally, you can set up auditing options to monitor usage of your printer using the Auditing button. All in all, a fairly complete set of controls for printer resources.
Figure 8.14
Security Tab dialog.
The final tab dialog under printer properties controls device options. Figure 8.15 shows a sample of how this page looks for my laser printer. The items that you can control are dependent on your printer and the printer driver that you are using. If you have features that are supported by the printer, but do not appear to you on this display, you should check for an updated NT driver from Microsoft (check their Web page) or the printer manufacturer. As you can see, there are a number of tray options for printers that support multiple trays, font cartridges, etc. I have seen some larger printers set up with multiple trays- one for normal paper, one for company letterhead and one for envelopes. All the users had to do to print on a specific type of paper was to select the appropriate printer options under printer setup in their application and send the job off. It can save a large amount of time shifting trays around, manually feeding envelopes (the wrong side up), and so on.
Figure 8.15
Device Options Tab dialog.
Configuring a Printer on Another Networked Computer
For those of you who flipped right to this section heading by looking it up in the table of contents, you need to read the section on configuring a local printer. That is because I am not going to repeat my discussion on the printer setup wizard in this section. Instead, I am going to discuss the one panel that is different between the local and network printers. This guide is already heavy enough as is without me adding unneeded pages.
This does illustrate a good point about the interface design of Windows NT. It tends to keep interface details similar between different utilities and it handles the technical details of these differences (such as the operating system software used for sending print jobs to a local printer versus that used to send to a network printer) behind the scenes. Figure 8.16 shows the key panel that is different when setting up a network printer.
Figure 8.16
Network Printer Connection dialog.
As you can see, you get an explorer-type view of the devices on your network. If you have both Novell and Microsoft network devices available, you will be able to see both networks. This and other such features let you drop an NT network in the middle of a Novell environment with relatively little pain. The convenient thing about this type of display is that you go down through the workgroups, to individual servers and finally pick individual printers all by reading their names. You are not required to know the exact name of the print server and printer. All you have to do is be able to find it on a list. Note that you will be verified to be on the list of users (or a member of the appropriate group) that has access to this printer.
Finally, there are other utilities not covered by this section that allow you to access other printers. If you have a Macintosh Appletalk network, you can access those printers using Services for Macintosh option. Macintosh connectivity is covered in Chapter 10. Also, if you have a number of useful printers on a UNIX network or other computers that support the LPR/LPD (line printer requester/line printer daemon) protocol over TCP/IP networks, you can attach to them via the Microsoft TCP/IP Printing service. The TCP/IP printing features are covered in Chapter 13.
Print Queue Management
I covered the basics of controlling a printer queue earlier in this chapter. Basically, all you have to do is select Settings-Printers from the start menu and then double click on the printer that you wish to manage. You will get a screen similar to Figure 8.4 which displays the current print queue (jobs that have been submitted for print or are in the process of being printed). While this is a good start, I wanted to point out a few additional concepts to help you manage your printers a little bit better.
Multiple queues: If you are using Windows to access a network printer, the application will actually print the job to a local print queue. The operating system will transfer this print job to the machine to which the network printer is attached. The job will then be printed from this remote print queue. It usually takes much less time to transfer a job from your computer to the network print queue than it does to actually print the job. You need to be aware that once the job disappears from your PCs print queue, you need to use the printer control utilities on the machine to which the printer is attached if you wish to stop or cancel the job.
Printer Memory: Most modern printers have a fairly significant amount of memory in them. This allows their host computers to rapidly transmit most simple print jobs to them and then get on with other tasks. When you cancel a print job in the printer control utility, you stop the server from transmitting any additional information to the printer. You do not erase what has already been transferred to the printer. Therefore, your printer may continue printing for some time unless you reset it.
Turning Printer Off in the Middle of a Job: Sometimes the only way that you can stop your printer from printing dozens of useless pages is to cycle the power switch off. You need to be aware that when you do this, you may jam paper inside the printer which you will have to remove manually (watch out for that toner getting on your clothing). Also, you need to ensure that the server is no longer sending print information. If you do, the printer will often reset to a default print (losing the font control information that you sent at the beginning of your print job) and start printing in a really strange manner (sometimes one letter per page). Also remember that you may have several other print jobs stored in memory of the printer that would be lost if you turn the printer off.
Dealing with Printing Problems
The real challenges as a system administrator come not when everything is running well, but when everything is falling down around your feet. The number of problems that can occur with printers are as varied as the printers that are available on the market. When you add in the complications of networks and a variety of operating systems, it can be downright challenging. What I propose to discuss in this section is my generic approach for investigating server printer problems that should at least narrow down where the problem is for further investigation.
The underlying concept in my approach is to understand the path that the print job follows and try to isolate where the problem is occurring first. For networked printer environments, it is useful to have a diagram of the network. This may be a trick to extract one of these from your network staff, but often they will sit down with you and draw one up on a sheet of paper if you refuse to go away until it is done. What I then like to do is mark up this drawing similar to Figure 8.17 to let me identify the places that are useful to help me determine where the problem lies.
Figure 8.17
Network printing problem isolation.
My approach to troubleshooting is usually something like this:
The first thing to check is the printer queue on the workstation creating the print . If the job is not leaving the print queue on the workstation that is generating the print job, check network connectivity to the print server using Network Neighborhood, Explorer or File Manager. See if you can connect to disk drives on the remote computer to prove that the network is correctly transmitting signals between the two computers.
If you cannot see the print server from the file connection utilities, go to other workstations that are on the same part of the network as the workstation having the problems and see if they can see the print server.
Check to see that the print server can see other resources on your network. Are there any segments of the network that you cannot see (such as all the workstations on that segment are missing). Based on these checks, you can determine if network connectivity is your problem. If you cannot see anything, you may have to check your network setup and possible reboot the print server.
Check the print queue on the print server to see if jobs are getting stuck in its queue. If so, check lights and indicators on your printer to see if any information is getting to the printer. This isolates the problem between the printer and the print server.
After you have run these basic checks, you now get into the printer specific, network specific and operating specific problems. There are any number of them, but it helps to narrow your focus. I have found the print queues to function quite reliably once they are set up correctly. Occasionally you will have to reboot machines or servers that have become confused, but this is relatively infrequent. Most of the problems that I have run across deal with the printers themselves jamming, running out of paper or just plain getting dirty.
Summary
This chapter was designed to introduce you to the basics of setting up the most common form of Windows NT printing- locally attached printers and printers accessed through Novell or Microsoft networks. The new wizard utilities make it relatively easy to set up a new printer or access a network printer. Good naming conventions, combined with the network browser interface used to attach to network printers makes it easy to figure out which of the many printers on the network you want. Finally, a disciplined approach to troubleshooting is helpful for those times when your printers are acting up.

| About us | Categories | New Releases | Most Popular | Web Tutorial | Free Download | Drivers |
|
