Web based School
Chapter 2
Understanding How the Server and Browser Communicate
- Using the Uniform Resource Identifier
- Requesting Your Web Page with the Browser
- Using the Internet Connection
- Using the HTTP Headers
- Changing the Returned Web Page Based on the User-Agent Header
- Learning Perl
- Summary
- Q&A
After reading Chapter 1 you now can install your own programs, and you know your way around your server. In this chapter, you will learn how the server and the browser (client) talk to each other. Understanding how the server and the client communicate will help you build and debug your CGI programs.
In particular, you will learn about these topics:
- Using the uniform resource identifier (URI)
- Understanding how the browser requests your Web page
- Using the TCP/IP protocol
- Using status codes in response headers
- Using HTTP request headers
- Using HTTP response headers
- Returning a Web page based on the User-Agent header
Using the Uniform Resource Identifier
First let's get some terminology straight. Requests to the server are in the form of a URI. A URI is a uniform resource indicator.
You might be familiar with the term URL, or maybe you use URN (uniform resource name). Quite honestly, there are a number of valid names for this term. The ncSA gurus who wrote the HTTP specifications use both the term URI and URL. They started out using URI, and I'm going to try to follow their convention. I will use URI throughout this guide. You can substitute whatever name you are familiar with in its place.
A URI is made up of basically three fields. You probably are familiar with at least the first two parts of a URI, and all parts are discussed in detail in the following sections. A URI has this format: protocol://<domain name>/<requested file>
The Protocol
The first field of a URI is the Protocol field. The Protocol field specifies the Internet protocol that will be used to transfer the data between the client and the server. There are many valid Internet protocol schemes: FTP, WAIS, Gopher, Telnet, HTTP, and more. For the purposes of this guide, the only protocol you will be interested in is HyperText Transport Protocol (HTTP). And, by the way, that's why the messages passed between the client and the server are called HTTP headers. HTTP is used to designate files, programs, and directories on a remote or local server.
The Domain Name
Immediately following the protocol is a :// and then the domain name. The domain name is the machine address of your server on the Internet. This name or address is between the :// and the next forward slash (/).
Following the domain name and before the trailing forward slash is an optional :port number. If no port number is given, the default port of 80 is assumed. The port number as it relates to HTTP and CGI is explained in Chapter 3 "Using Server Side Include Commands." Briefly, the UNIX server handles different services by sending messages received at different port addresses to programs registered for those ports. The default port for the HTTP daemon is 80. Other programs, such as FTP and Telnet, have different default port addresses. These system default port addresses are set in a file named services under the system directory /etc.
The Directory, File, or CGI Program
The path the server uses to find your program follows the first single forward slash (/). The server checks each element of this path to determine whether a file, a program, or a directory is being requested.
An element is a section of the path, target directory, program, or filename. Each element is separated by a beginning and ending forward slash. In the following example, you can see that element 1 is cgiguide, element 2 is chap2, and element 3 is test.asp: /cgiguide/chap2/test.asp
If the last element is a directory and no further elements follow, the server does one of three things:
- If there is an index.asp file in the directory, that file is returned. index.asp is the default home page name. (You can set the default home page name in the srm.conf file.)
- If there is not an index.asp file and Directory Listing is turned on, a Gopher-like directory listing is returned. (Directory Listing is an OPTION argument enabled in the access.conf file. This server configuration issue is discussed, along with other configuration issues, in Chapter 12, "Guarding Your Server Against Unwanted Guests.")
- If Directory Listing is turned off, error status code 404, NOT FOUND, is returned.
If the element is a directory and more elements follow, the next element is checked.
Because PATH_INFO and QUERY_STRING data can be added to the URI after the target filename or program, the execution of the program or returning of the file does not occur until the entire URI is parsed. Each element of the URI is parsed until the target filename, program, or directory is found. If the next element is a file, the file is returned to the client.
If the next element is a program, the program is executed and the data it generates is returned to the client. (As long as valid response headers are generated.)
After the target URI (file, program, or directory) is identified, the server continues looking for PATH_INFO and QUERY_STRING data. PATH_INFO is added after the target URI. Any valid text data can be added after the target URI. The PATH_INFO data is terminated by a question mark (?), as shown here, where PATH_INFO is more-information: /cgiguide/chap2/test.asp/more-information?
Before the target URI is invoked, the environment variable's PATH_INFO and QUERY_STRING data are set. So if there are any additional elements after the target URI, then any data after the file and before a trailing question mark (?) is converted to path information and made available as environment variables.
Additional data can be appended to the URI by adding a question mark to the last element instead of a forward slash. This data then is called the QUERY_STRING and also is made available as an environment variable.
QUERY_STRING data also can be any valid text data. It begins after the PATH_INFO data, as shown in the following line of code, and is limited only by the size of the input buffer-usually, 1,024 bytes: /cgiguide/chap2/test.asp/more-information?Query-name= Query-value&Q2=Joe&last=Smith
QUERY_STRING data normally follows a predefined format, which is explained in Chapter 5 "Decoding Data Sent to Your CGI Program." Environment variables are covered in Chapter 6 "Using Environment Variables in Your Programs."
Requesting Your Web Page with the Browser
So what happens when someone clicks on your URI? Figure 2.1 shows the sequence of events that occur when the browser requests and the server returns a Web page. Your CGI program and the Web page calling it are closely linked (pun intended).
Figure 2.1 : The client/server connection.
When a link to your CGI program is activated, the browser or client
generates request headers. The server receives the request headers,
which include the address to your CGI program on the server. The
server translates the headers into environment variables and executes
your CGI program. Your CGI program must generate the required
response headers and HTML for the server to return to the browser.
| When is my browser my client? |
I switch between the terms browser and client frequently throughout this guide. Strictly speaking, your browser-Netscape, Mosaic, or whatever-acts as both a client and a server. The browser is a client when the user requests Web services
(URIs) by clicking something on a Web page. The browser can be a server when the URI requests that the browser launch an application.
The basics of client/server are very simple. The client requests something, and the server satisfies the request.
Try this example. You are at a restaurant.
|
The basics of client/server are very simple. The client requests something, and the server satisfies the request.
Try this example. You are at a restaurant.
- You are the client. Your waiter, the server, takes your order.
- The waiter goes to the kitchen and gives the cook your order. The waiter is the client to the cook, and the cook is the server.
- Your order is completed. The cook (still the server) gives your order to the waiter, the client.
- The waiter, again the server, brings you-now the client-your order.
Client/server in a nutshell! For the most part, I will refer to the browser as a client and the machine that has the URI as the server.
First, the browser/client makes a connection to the receiving
program/server. The browser uses the domain name address as the
phone number or address to reach the server.
| Note |
| Remember that the server is just a computer connected somewhere at the other end of a wire. As far as the Internet is concerned, it makes no difference whether the server is in the same room or halfway across the world. There is, of course, some time delay difference between talking across the room and across the world. But think of it as similar to talking on the phone. Whether you are talking locally or across the country, you don't expect there to be any time lag in the conversation. |
The browser looks up the domain name address-the information after the http:// and before the next forward slash (/). In http://www.practical-inet.com/
for example, www.practical-inet.com
is the domain name address.
Next, the browser sends the following request headers to the identified domain:
- A request header identifying the file or service (URI) being requested
- Request header fields identifying the browser
- Additional specialized information about the request
- Any data that goes with the request
These are all called HTTP request headers. They identify to the server the basic information the client is requesting and what type of response can be accepted by the client. The server also takes all the headers sent by the client and makes them available to your CGI program in a format called environment variables (Chapter 6goes into more detail about these).
If the calling Web page is an HTML form that is sending data to your CGI program, that data also is included in the initial transaction.
The server looks at the first incoming header-the method request header-and tries to find the URI. It does this by starting at its top-level server root directory and searching for a file that matches the URI listing. The server looks at each pathname after the domain name looking for a valid filename.
Take a look at this example of an HTTP request. You'll use it to cement all of this theory with a concrete example of how the server finds the correct file from the incoming request header: http://www.practical-inet.com/cgiguide/chap2/test.asp/more-information
First, the server checks the element name cgiguide. Then, because this is a directory, the server continues to chap2, another directory.
Next, the server finds that test.asp is a filename. So the server examines the file extension. Because the file extension identifies this as a valid text type, the server begins the job of sending the requested URI back to the client.
One more thing before leaving the URI in the example-more-information is after test.asp. This information is called extra path information and is saved and made available to the requested URI as an environment variable.
Now the server must respond with the response headers. The first response header is a status line, which tells the client the result of the search for the requested URI. This response can range from Success to Authorization Required or even Location Moved. If the status is Success, the contents of the requested URI usually are returned to the client/browser and displayed on the client's computer screen.
The next section discusses in further detail what the request and response headers look like and when and how they are sent.
Using the Internet Connection
All your request headers, the response headers, your status lines, and other data are sent over the Internet. That always seemed like a giant mystery to me, but it certainly is part of the common gateway interface (CGI). So just how does it work?
On the Internet, the connection is made using TCP/IP connecting to a public socket over a predefined port. Did I lose you? If I didn't, you can skip this section. For everyone else-that's almost everybody, folks-I'll break that sentence down into parts so that you can make some sense of what's going on.
TCP/IP, the Public Socket, and the Port
On the Internet, the connection is made using TCP/IP… TCP/IP stands for Transport Control Protocol/Internet Protocol. That means that the method for transporting your request for a Web page is controlled by some dry technical document that begins with RFCs and defines the specifics of transferring Internet messages. (RFCs are Requests for Comments. RFCs are the means the Internet community uses to publish new ideas and protocols. Comments are accepted for up to six months after an RFC is published.) In short, your request message is bundled up into a language that every machine connected to the Net understands.
connecting to a public socket… Think of the public socket as the Yellow Pages phone number of the server on which your Web page is located. A socket is a software network address that networked UNIX machines use to talk to each other.
over a predefined port. A file named (services) in the directory (/etc) on your server contains the ports assigned for all the common services on the Internet-services such as FTP, Gopher, and HTTP connection. The default port for the HTTP connection is 80. So if you see an :80 (or any other number) appended to the end of the URI you clicked on to get a Web page, you now know that's the port being used to connect the client to the server.
One More Time, Using the Switchboard Analogy
The topic of Internet connections seems to confuse lots of people, and it's important that you begin to grasp this concept. If you can begin to understand how the client and the server communicate, writing your CGI programs and the forms that support them will be much easier.
So I would like to present you with this analogy to help you understand this concept. Think of your server as an old-fashioned switchboard with an operator waiting for incoming calls. You probably have seen an old-fashioned switchboard in some old, black-and-white films or maybe on a Saturday Night Live skit.
You Make the Call
- You look up the phone number of someone in the phone guide. This is the Web page with a URI on it.
- You dial the number. This is you clicking on the URI.
The Operator Receives the Call
The operator receives a call on the switchboard and then gets the name of the person you want to talk to.
- The operator makes the connection to the correct person.
- The last thing the operator does is remove the original connection.
This is what is happening over the Internet. The next time you click on a Web page, watch the transaction occur. You can see this on Netscape browsers on the bottom of the screen. The first thing that happens is a connect message: Looking up Host, like a search for a Yellow Pages phone number. Next, you should see Host contacted: Waiting for reply. This is the phone ringing at the other end, waiting for the operator to answer. Finally, you should see a reading file or a transferring data message. Just before that last message, the server-or operator-at the other end was looking up the specific file (or person, to remain with the operator analogy) you requested. When the file is found, it is transferred back to the requesting client.
That's how it works by analogy and TCP/IP. After the connection is made, the server receives a bunch of information in the HTTP request headers telling it what type of response is re-quested. This is important to you as a CGI programmer; you will use the headers later in the guide to send back information to your client and to decode what the client wants from you.
Using the HTTP Headers
HTTP headers are the language your browser and server use to talk to each other. Think of each of the HTTP headers as a single message. In the client and server sense, first there are a bunch of questions (which are the request headers) and then the answers to those questions (which are the response headers).
To use the operator analogy again, think of the request headers-which come from the client-as you asking to speak to Mr. Thae. The response headers can be the operator, responding with "Mr. Thae is in Room 904, I'm connecting you now." From there, if you have a good operator, the operator stays on the line and gives you the status of your connection request.
Status Codes in Response Headers
When the operator responded with "Mr. Thae is in Room 904," the caller got a Status response header. The first HTTP response header sent in response to any HTTP request header is a status line. The status line is made up of status codes.
The status codes in the response header tell the client how well your request for a URI went. The status codes are discussed throughout this guide; they are included in Appendix C, "Status Codes and Reason Phrases."
Here's an overview of status codes so that you can recognize them throughout the remainder of the guide:
- Information status codes are for experimental purposes and only provide information. These status codes are in the 100s. If, instead of connecting you to Mr. Thae's room, the operator had responded with "Mr. Thae is in Room 904, would you like me to connect you?" this would be considered an informational message.
- Success status codes are in the 200s. Consider if the operator first had called Mr. Thae, confirming that he was in the room and willing to talk to you. A status code of 200 (OK) would correspond to the operator saying, "Mr. Thae is on the line now."
- Redirection status codes are in the 300s. The operator could have said "Mr. Thae is in a meeting in Room 908." This corresponds to a status code of 302, which states that the URI temporarily moved.
- Client error codes are in the 400s. They are the most useful and the most complex of the status codes. Client error codes can be used to demand payment before answering the phone. Maybe Mr. Thae operates a 900 number. If the operator responded with "Mr. Thae is not at this number," this would correspond to a 400, Bad Request, status code.
- Server error codes are in the 500s. If your operator had apoplexy because you wanted to talk to Mr. Thae and said, "Who do you think you are asking me to let you talk to-MR. Thae?!" This would correspond to a status code of 503, Service Unavailable.
In summary, 100s are informational, 200s indicate success, 300s are redirection codes, 400s are client error codes, and 500s are server error status codes. Refer to Appendix C for a complete definition of the status codes.
There are two basic types of headers: request and response headers. The client makes the request of the server, and the server builds the response headers. The most common request header is the Get method request header.
The Method Request Header
The client sends to the server several request headers defining for the server what the client wants, how the client can accept data, how to handle the incoming request, and any data that needs to be sent with the request.
The first request header for every client server communication is the method request header. This request header tells the server what other types of request headers to expect and how the server is expected to respond. Two types of method headers exist: The simple method request and the full method request.
The simple method request header is used only to support browsers that accept only HTTP/0.9 protocol. Because HTTP/0.9 is no longer the standard and the full method request header duplicates the definition of the simple method request header, an explanation of the simple method request header is not included here.
The simple method request header is made up of two parts separated by spaces: the request type, followed by the URI requested: Request_Method URI \n
The most common request methods are Get, Post, and Head. The HTTP specification also allows for the Put, Delete, Link, and Unlink methods, along with an undefined extension method. Because you mainly will be dealing with the Get and Post methods, this chapter concentrates on those.
Each of the request headers identifies a URI to the server. The difference between Get and Post is the effect on how data is transferred. The Head request method affects how the requested URI is returned to the client.
The next section covers the full method request line. This is the request header that includes the type of access (Get, Post, Head, and so on) that the client is requesting. Of all the request headers, this is the one that really makes things work. This is the request header that tells the server which Web page you want returned to the browser. Without this header, no data can be transferred to the calling client.
The Full Method Request Header
The full method request header is the first request header sent with any client request. The full method request line is made up of three parts separated by spaces: the method type, the URI requested, and the HTTP version number.
Here's the syntax of the full method request header illustrated logically and by a syntactically correct example: Request_Method URI HTTP_Protocol_Version \n GET http://www.accn.com/index.asp HTTP/1.0
Explanations for each part of the full method request header follow:
- Request_Method can be any of the following method types: Get, Post, Head, Put, Delete, Link, or Unlink.
- URI is the address of the file, program, or directory you are trying to access.
- HTTP_Protocol_Version is the version number of the HTTP protocol that the client/browser can handle.
The Get HTTP Header
The Get method is the default method for following links and passing data on the Internet. After you click on a link, your browser sends a Get method request header. When you click the Submit button on a form, if the method is undefined in the Action field of the form, the Get method request header is used to call the CGI program that handles the form data. Chapter 4 "Using Forms to Gather and Send Data," covers forms and this method of sending data in detail.
When you click on a URI, it usually is of the form http://www.somewhere.com/filename.asp
A Get method request header is generated along with any other request header the browser might want to send. The URI is located and returned by the browser, unless an If-Modified-Since request header was sent along with the other request headers.
When the If-Modified-Since header is included in the request headers, the server checks the modification date of the requested URI and returns a new copy only if it has been modified after the date specified.
When you click on a URI and that URI is a request for another Web page, you send a Get method request header and lots of other headers to your server.
The Requested URI
The second field in the first line of the request header of the full method request header is the requested URI. The URI tells the server what file or service is requested.
Normally, the full method request header is for a file on the
server. When this is the case, the absolute path of the file/URI
is included in the method request header. An example Get
method request header is GET / HTTP/1.0.
| Tip |
| Notice that an HTML file is not identified for this Get method. The default home page or starting Web page is index.asp. If you're lazy like me and don't want to type a Web page URI for the home page, make your home page index.asp, and your Web server automatically goes to that page. |
The format of the requested URI is the absolute pathname of the server root. This sentence has always confused me, so I'm going to explain it here so that I can always remember what an absolute pathname of the document root is. Take a look at a Get method request header of /~yawp/test/env.asp/ as an example:
- The absolute pathname is the directory and filename of the URI, beginning at the / directory. For this example, I show the absolute pathname to my personal directory ~yawp with a subdirectory of test and a filename of env.asp.
- This / directory is defined by your Server Administrator as the starting location for all Web pages or URIs on the server. This also is called the server root.
- In my case, the Server Administrator has defined a public-web directory in every user's home directory. So the actual path to the env.asp file is yawp/public-web/test/env.asp
The Proxy Get Method Request Header
If the target of the URI is a proxy server, it should send an absolute URI. An absolute URI includes the domain name and the full pathname to the requested URI. The domain name in this example is www.w3.org: GET http://www.w3.org/hypertext/WWW/TheProject.asp HTTP/1.0
The HTTP Version
The last field in the full method request header is HTTP version. Currently, the only valid values are HTTP/1.0, followed by a CRLF. If the request is for an HTTP/0.9 server, a simple method request header should be used. If you're interested in keeping up with the latest HTTP protocol, you can find a hypertext version of the HTTP RFC at http://www.w3.org/pub/WWW/Protocols/HTTP1.0/draft-ietf-http-spec.asp
Table 2.1 summarizes the request/response headers used by the server and client to communicate with each other. They are defined completely in the HTTP specification. I have included some of the more obscure ones. I will discuss several of the more common headers in more detail.
The most important thing to remember is that the request/response
headers are the means by which your client and browser tell each
other what is needed and what is available.
| Request/Response Header | Function |
| Accept | Tells the server what type of data the browser can accept. Examples include text, audio, images, and so on. |
| Accept-Charset | Tells the server what character sets the browser prefers. The default is US-ASCII. |
| Accept-Encoding | Tells the server what type of data encoding the browser can accept. Examples are compress and gzip. |
| Accept-Language | Tells the server what natural language the browser prefers. The default is English. |
| Allow | Tells the browser what request methods are allowed by the server. Examples are Get, Head, and Post. |
| Authorization | Used by the browser to authenticate itself with the server. It usually is sent in response to a 401 or 411 code. |
| Content Encoding | Identifies the type of encoding used on the data transfer. An example is compressed. |
| Content Language | Identifies the natural language of the data transferred. |
| ContentLength | Identifies the size of the data transfer in decimal bytes. |
| Content Transfer Encoding | Identifies the encoding of the message for Internet transfer. The default is binary. |
| Content-Type | Identifies the type of data being transferred. An example is Content-Type: text/html \n. |
| Date | Identifies the GMT date/time at which the data transfer was initiated. |
| Expires | Identifies the date/time at which the data should be considered stale. This header often is used by caching clients. |
| Forwarded | Used by proxy servers to indicate the intermediate steps between the browser and server. |
| From | Contains the Internet e-mail address of the client. This header is no longer in common use. |
| If-Modified-Since | Makes the request method a conditional request. A copy of the requested URI is returned only if it was modified after the time specified. |
| Last-Modified | Identifies the date/time when the URI was last modified. |
| Link | Describes a relationship between two URIs. |
| Location | Defines the location of a URI. Typically, this header is used to redirect the client to a new URI. |
| MIME-Version | Indicates what version of the MIME protocol was used to construct the transferred message. |
| Orig-URI | Used by the client to specify to the server the original URI of the requested URI. |
| Pragma | Specifies special directives that should be applied to all intermediaries along the request/response chain. This header usually provides directives to proxy servers or caching clients. |
| Public | Lists the set of non-standard methods supported by the server. |
| Referer | Identifies to the server the address (URI) of the link that was used to send the method request header to the server. |
| Retry-After | Identifies to the client a length of time to wait before trying the requested URI again. |
| Server | Identifies the server software used by the server. |
| Title | Identifies the title of the URI. |
| URI-Header | Specifies a uniform resource identifier. |
| User-Agent | Identifies the type of browser making the request. |
| WWW-Authenticate | Required when status response headers of Unauthorized (401) or Authorization refused (411) appear. This header is used to begin a challenge/response sequence with the client. |
The Accept Request Header
After the initial method request header, one of the more common and useful request headers is the Accept request header. This header tells the server what type of response the client can handle.
The Accept request header has this format: Accept: media-type; quality
Table 2.2 lists the basic media types, which are of MIME format.
A complete list of MIME types is included in Appendix A, "MIME
Types and File Extensions."
| MIME Type | Definition |
| Application | Tells the server what application to run based on the file extension. |
| Audio | Specifies the type of audio that can be handled by the browser. Commonly includes basic, x-aiff, and x-wav. |
| Image | Specifies the type of image that can be handled by the browser. Commonly includes gif and jpeg. |
| Text | Specifies the type of text that can be handled by the browser. Commonly includes html, plain, rich text, and x-setext. |
| Video | Specifies the type of video that can be handled by the browser. Commonly includes mpeg and quicktime. |
Media Type
The first field of the Accept request header is the type of media that can be handled by this browser. That field is followed by a semicolon and then the quality factor. The quality factor is usually a request to not send 100 percent of the data associated with the URI. Adjusting the quality factor can speed up downloads; in most cases, the quality of the sound, image, or video is greater than the quality required for viewing or listening from your computer, as illustrated here: Accept: audio/*; q=0.5
This means that I can accept any type of audio, and please degrade the audio data by 50 percent. Degrading the audio means less data transfer. You can use this to speed up audio transfers-for example, when you are receiving only voice and don't care about full-quality sound.
The * in this example can be used on either side of the media-type designator. The default for the Accept media type is */*. Because the Accept header should be used only for restricting the types of media the client can receive, Accept */* is redundant, not required, and not recommended.
The common media types are text, image, and audio. Some of the text types are html, plain, x-dvi, and x-c. The standard text media types used on the Net are html and plain. For image, jpeg and gif are the two standards right now. Because of its smaller data size, jpeg is becoming the new preferred image format.
Quality
If you are not concerned about losing some detail, you can use the Quality field to speed up the downloading of files. The image format jpeg is an example in which a degradation in data, by removing detail, produces an image that is almost as good as the original and much smaller in data size. Because a large portion of the Net is connected by limited speed connections (modems and such), you should always consider data transfer when developing your Web page.
The default quality factor is 1, which translates to 100 percent. The format is q=factor. The factor can be any number from 1 to 0 and usually is expressed in tenths. An example is q=0.8.
The Get method request header and Accept request header are the most common request headers. Your browser may send more information to the server, but these two define to the server what the request is and the fundamentals of how to respond to your request.
The HTTP Response Header
After the server receives the request headers, it begins to generate the correct response. The server starts by looking up the URI in the Get method and then generates the response headers. The Get method request tells the server what URI is desired. The other request headers tell the server how to send the data back to the client. The Accept request header with its Quality field, for example, tells the server how much to degrade the returned data.
So, in short, the response headers are the server's response to the client's URI request. This is the operator's chance to tell you to take a flying leap or to politely satisfy your every request.
In this case, assume that you have a polite operator and a valid request. In Chapter 7 "Building an Online Catalog," you will deal with some of the more persnickety operators-the kind who want to know your username, password, and other stuff like that.
After the server receives a request, it must choose a valid response. It starts with a response status line. This line gives the protocol version, followed by a status code. The format of a response status line follows: PROTOCOL/Version_Number Status_Code Status_Description
The only valid protocol right now is HTTP, and version 1.0 is the standard at the moment. Notice how I add all those qualifiers; the Net moves so fast that fixed rules are sure to be overrun by some wild-and-crazy, new idea. Of course, that's what makes the Net so neat.
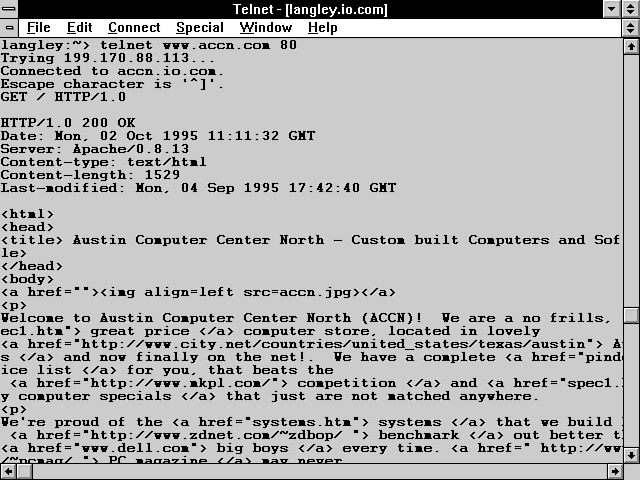
Figure 2.2 shows the response headers generated when the server receives a Get method request header.
Figure 2.2 : The server response headers to a Get method request header.
Now take a moment to go through the response headers shown in Figure 2.2. These are the basic ones that will be returned from almost any request header.
The Status response line follows: HTTP/1.0 200 OK
Nothing to write home about in this response header. Nice, simple, and straightforward. The HTTP version number is 1.0. The status is 200. The status description is OK. This means that your server found your requested URI and is going to return it to the browser.
The Date Response Header
The next line is the Date response header: Date: Mon, 02 Oct 1995 11:11:32 GMT
This is the time at which the server generated the response to the request header. The date must be in Greenwich Mean Time (GMT). The date can be in one of three formats (see Table 2.3).
| Example | Description |
| Wed, 06 Nov 1996 06:15:10 GMT | Originally defined by RFC 822 and updated by RFC 1123, this is the preferred format Internet standard. |
| Wednesday, 06-Nov-96 06:15:10 GMT | Defined by RFC 850 and made obsolete by RFC 1036, this format is in common use but is based on an obsolete format and lacks a four-digit year. |
| Wed Nov 6 06:15:10 1996 | This is the ANSI standard date format represented in C's asctime() function. |
Only one Date response header is allowed per message, and because it is important for evaluating cached responses, the server always should include a Date response header. Cached responses are beyond the scope of this guide, but, in short, they can be part of a request/response chain used to speed up URI transfers.
The Server Response Header
The Server response header field contains information about the server software used to create the response: Server: Apache/0.8.13
If you are having problems with your CGI working with a particular site, this can identify the type of server software with which your CGI is failing.
The Content-Type Response Header
The Content-Type header field tells your browser what type of media is appended after the last response header: Content-type: text/html
Media types are defined in Appendix A, "MIME Types and File Extensions."
The Content-Length Response Header
The Content-Length header field indicates the size of the appended media in decimal numbers in 8-bit format (referred to in the HTTP specification as octets): Content-length: 1529
This header often is used by the server to determine the amount of data sent by the client when posting form data.
The Last-Modified Response Header
Because you are passing a file URI that is a text/html type, the Last-Modified field is the time the file was last modified. This field is used for caching information: Last-Modified: Mon, 04 Sep 1995 17:42:40 GMT
If an If-Modified-Since request header was sent, it is used to determine whether the data should be transferred at all.
The Enclosed URI
The last line of the response headers is blank, and, after that, the requested URI is shipped to the client. This is the blank line in Figure 2.2 just before the opening <html> tag.
This is one of the most common reasons for response headers not working. Don't make this CGI newbie mistake. All your HTTP response and request header chains must end with a blank line.
The last print statement of an HTTP header program you write should print a blank line: print "Last-modified: $last_modified_variable\n\n";
Notice in this example that two newlines (\n) are printed. One always is required for every HTTP header, but the second newline indicates to the server or client the end of any incoming or outgoing HTTP headers. Everything after that first blank line is supposed to be in the format defined by the Content-Type header.
So now you know all about request and response headers. You know that the browser and the server use them to transfer data back and forth. So now that you know about request/response headers, what can you do with that knowledge?
Certainly there are all types of choices, but here is a real-world example that you just might have to deal with.
Changing the Returned Web Page Based on the User-Agent Header
One of the things I do to make a living is build Web pages. One of the most frustrating experiences I have is building a great-looking Web page that uses all the great features of HTML+ and then hearing from my customer that his Web page looks awful. What happened? Well, the most common problem is that my client does not have the latest and greatest Netscape version. The browser he is using just doesn't deal with the latest HTML enhancements.
That's the pits. My view of the page is great. He thinks it stinks. I'll never convince him that what is out there looks good. And to him, it certainly doesn't. Have you ever seen table data when your browser doesn't support tables? UGLY!!
So what do I do about it? Well, I don't experience that frustration anymore. I build two Web pages: one for browsers that handle the latest HTML enhancements and one for browsers that don't.
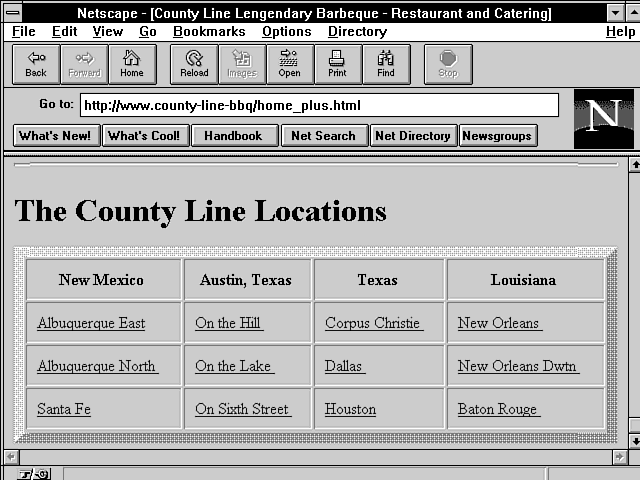
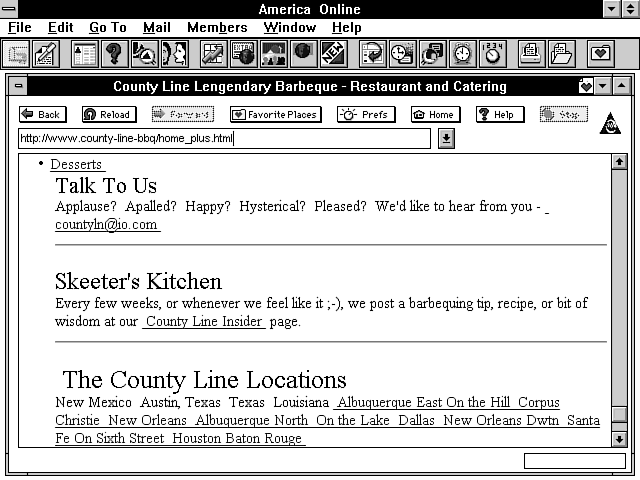
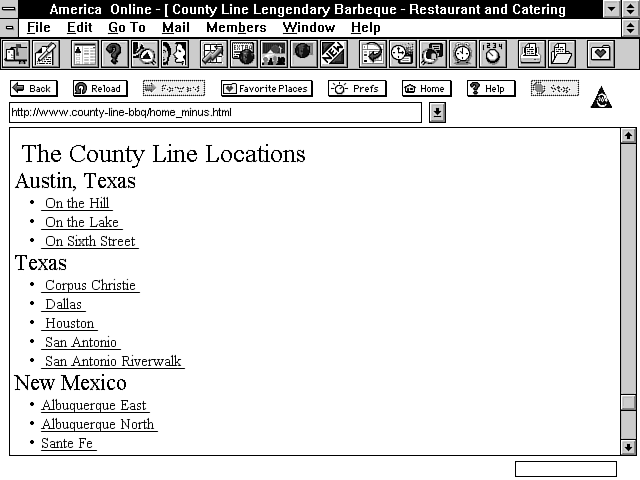
This means more work for me but a more versatile page for my clients. It's not too difficult a task to take advantage of the incoming request headers and then send back a Location response header that redirects the client to the correct page for his browser. Just to show what a difference this can make, the next two figures show an HTML+ page with table data. Figure 2.3 shows the data when it is understood by the browser. Figure 2.4 shows the same page when the browser doesn't handle tables. Notice that the table data of County Line locations shown in Figure 2.3 is a jumbled list at the bottom of the Web page in Figure 2.4. And finally, Figure 2.5 shows that page rebuilt without tables.
Figure 2.3 : A working HTML + page for County Line Barbecue.
Figure 2.4 : A broken HTML + page for County Line Barbecue.
Figure 2.5 : An HTML 1.0 page for County Line Barbecue.
If you're curious, you can see the difference between HTML+ tables and HTML 1.0 in Figures 2.3 and 2.5. Listing 2.1 is the HTML fragment for Figure 2.3. Listing 2.2 is the same data reformatted for HTML 1.0, as shown in Figure 2.5. My main complaint with list-data formatting is that I can't get enough data on a computer screen. There is just too much wasted space in the HTML 1.0 version. There are other options, but none of them presents the data as neatly formatted as the HTML+ tables.
Listing 2.1. An HTML+ fragment using tables to present County
Line locations.
01: <h1 > <a name="loc"> The County Line Locations </h1>
02: <center>
03: <table border=10 cellpadding=10 width=100%>
04: <th align=center> New Mexico
05: <th align=center> Austin, Texas
06: <th align=center> Texas
07: <th align=center> Louisiana
08: <tr>
09: <td align=left> <a href="New-Mexico-albq-e.asp"> Albuquerque East</a>
10: <td align=left> <a href="Austin-hill.asp"> On the Hill </a>
11: <td align=left> <a href="Texas-corpus.asp"> Corpus Christie </a>
12: <td align=left> <a href="Louisiana-new-orleans.asp"> New Orleans </a>
13: <tr>
14: <td align=left> <a href="New-Mexico-albq-n.asp">Albuquerque North </a>
15: <td align=left> <a href=" Austin-lake.asp "> On the Lake </a>
16: <td align=left> <a href=" Texas-dallas.asp "> Dallas </a>
17: <td align=left> <a href="Louisiana-new-orleans-dtwn.asp"> New Orleans
Dwtn </a>
18: <tr>
19: <td align=left> <a href=" New-Mexico-sante-fe.asp"> Santa Fe</a>
20: <td align=left> <a href=" Austin-sixth.asp "> On Sixth Street </a>
21: <td align=left> <a href=" Texas-houston.asp "> Houston</a>
22: <td align=left> <a href="Louisiana-baton-rouge.asp">Baton Rouge </a>
23: <tr>
24: </table>
Once you see how easy it is to direct the browser to the correct Web page, you'll agree that this is a reasonable solution, even if it does require extra work. In addition, it isn't too difficult to create a second Web page for the HTML 1.0 browsers. The HTML 1.0 fragment in Listing 2.2 shows the changes required to reformat the Web page to HTML 1.0 lists.
Listing 2.2. An HTML 1.0 fragment using lists to present County
Line locations.
01: <h1 > <a name="loc"> The County Line Locations </h1>
02: <h3> Austin, Texas </h3>
03: <ul>
04: <li><a href="Austin-hill.asp"> On the Hill </a>
05: <li><a href=" Austin-lake.asp "> On the Lake </a>
06: <li><a href=" Austin-sixth.asp "> On Sixth Street </a>
07: </ul>
08:
09: <h3>Texas </h3>
10: <ul>
11: <li><a href="Texas-corpus.asp"> Corpus Christie </a>
12: <li><a href=" Texas-dallas.asp "> Dallas </a>
13: <li><a href=" Texas-houston.asp "> Houston </a>
14: </ul>
15:
16: <h3> New Mexico </h3>
17: <ul>
18: <li> <a href="New-Mexico-albq-e.asp">Albuquerque East </a>
19: <li> <a href=" New-Mexico-albq-n.asp">Albuquerque North </a>
20: <li> <a href=" New-Mexico-sante-fe.asp">Sante Fe </a>
21: </ul>
22:
23: <h3> Louisiana </h3>
24: <ul>
25: <li><a href="Louisiana-new-orleans.asp"> New Orleans </a>
26: <li><a href="Louisiana-new-orleans-dtwn.asp"> New Orleans Dwtn</a>
27: <li><a href="Louisiana-baton-rouge.asp">Baton Rouge </a>
28: </ul>
The following section describes the steps required to test for the browser type and then send back the correct HTTP response headers to the server.
Your CGI program will test for the browser type and then generate a Location response header. The Location response header tells the browser/client to get the Web page from a different location. The browser will get the correct Web page, and your Web client will never see an UGLY-looking page.
How can you tell which browser is accessing your Web page? Well, the server does a lot of initial work for you.
The server is a wonderful, overworked, underpaid machine. One of the great things that it does for you is convert a lot of the useful header fields into environment variables. The server converts the User-Agent request header into the environment variable HTTP_USER_AGENT.
The Perl script in Listing 2.3 uses the HTTP_USER_AGENT
environment variable to determine the browser type and then return
an HTTP Location command
to point the client to the correct Web page.
| Note |
| Perl is a really fantastic, easy-to-use, easy-to-learn scripting language. It also can be very cryptic. It has lots of special predefined variables that you can use to shorten your code and make it more efficient. In general, I don't use those shortcuts in this guide, and I often don't use them in my own code. I have found over the years that I forget what I was trying to do in each line of code. At the moment when you're writing a script, you know what you're trying to do. When you have to look at the code three months later, however, it can be really hard to figure out what you've done. Especially if you take advantage of all the special variables and shortcuts. |
| Do &nbs p; Don't |
|
DON'T use cryptic variable names. DO use variable names that you can understand. DON'T do more than one thing with a line of code DON'T code for efficiency. Ooooh, I bet I'll get some e-mail on this one. The connect time and the data-transfer time are hundreds of times greater than the length of time it takes your Perl code to execute. One-hundredth of a second or even one-tenth of a second is not going to be noticeable to your client. DO code for understandability and maintainability. If you really need efficiency, you always can go back in and modify the inefficient parts. Trust me on this one-it will make a big difference in how long it takes you to get your code working and how much time you spend keeping it working. DO remember that guidelines are only meant for the common and general cases. Each time you write a program, you must evaluate what criteria your program should follow. |
Exercise 2.1. Reading and decoding the User-Agent field
The CGI program to determine which browser is calling your Web page has two basic steps. First, it must figure out which browser is accessing it. Then, it must return the correct Location headers based on the information figured out in step 1.
Because Netscape is the offending browser by going off on its own and implementing all those cool extensions that are so much fun to use, let's just deal with the Netscape browser. If Netscape were the only browser that could handle tables, this program would be complete. In practice, this code should deal with all the browsers that can and can't handle the HTML+ extensions.
The format of HTTP_USER_AGENT is illustrated by how these two popular browsers define their User-Agent request header:
- Mozilla/1.1N (Windows; I; 16bit)
- AIR_Mosaic (16bit)/v1.00.198.07
You can find out what types of browsers are looking at your Web page by looking in the server log files. These log files are discussed in further detail in Chapter 10, "Keeping Track of Your Web Page Visitors."
The easiest thing to do is to split HTTP_USER_AGENT into fields and then compare them against browsers you know will work for your enhanced Web page. Listing 2.3 contains the Perl code to do this. As with all the code in this guide, I step through the new and relevant Perl code. You are not expected to know Perl. However, I hope you will feel comfortable enough with Perl by the time you complete this guide to write CGI programs of your own.
Listing 2.3. Perl code to return a Web page based on a browser.
01: #!/usr/local/bin/perl
02
03: @user_agent = split(/\//,$ENV{'HTTP_USER_AGENT'});
04:
05: if ($user_agent[0] eq "Mozilla"){
06: @version = split(/ /,$user_agent[1]);
07: $version_number = substr($version[0], 0, 3);
08: if ($version_number < 1.1){
09: print "Location: http://www.county-line-bbq/clbbq-plus.asp.com\n\n";
10: }
11: else{
12: print "Location: http:// www.county-line-bbq/clbbq-minus.asp.com \n\n";
13: }
14: }
15: else{
16: print "Location: http:// www.county-line-bbq/clbbq-minus.asp.com \n\n";
17: }
It takes several steps to get the data in the HTTP_USER_AGENT environment variable into a format your CGI program can use. First, you need to separate out the browser type. This is the part of the HTTP_USER_AGENT field before the first forward slash (/).
Line 3 uses the split function to separate the HTTP_USER_AGENT variable into parts wherever it finds a forward slash (/). The split function in Perl is really powerful, and because each portion of line 3 is important and possibly new to you, definitions of each element of line 3 follow:
- @user_agent defines a new array variable.
- = says to assign any matches in the variable on the right side to the variable on the left side. In this case, the left-hand side is an array, so each different match makes a new element in the array.
- /\// is the pattern to
look for and perform the splits on. Unfortunately, this is a really
hard pattern for Perl to deal with. And, as a human, I find it
a bit confusing also. A pattern is formed of /pattern/.
In this case, the pattern is \/.
The first \ is called an
escape character. It tells Perl not to interpret the next
character as a special character. So the real pattern to match
on is the / character. If
you didn't add the escape character (\)
in the pattern, Perl would see three forward slashes, as you see
in this Perl fragment:
split(///,$ENV{'HTTP_USER_AGENT'})
Looking at it this way, maybe you can see why Perl would get confused. Perl expects a pattern to split on between the first two forward slashes (//). Unless you tell Perl to not interpret the forward slash (/) in the pattern you are looking for, it just gives up and says I don't know what to do. So help out your Perl interpreter. When you have a special character in your search patterns such as a quotation mark ("'`), percent sign (%), or forward slash (/), use the escape character (\) before the special character so that Perl knows not to try to interpret the special character. You and your Perl interpreter will be much happier.
This means that the first element in the User-Agent array is set to Mozilla or AIR_Mosaic (16bit) for the purpose of this example.
So now you have the name of the browser in the first element of the @user_agent array. The next thing to do is find out which browser is calling you.
Line 5, if ($user_agent[0] eq "Mozilla"){
compares the first element of the array @user_agent with the string Mozilla. If they match, you take the if path. If they don't, you take the else path. The CGI program uses the comparison operator eq because it is comparing strings instead of numbers. In Perl, strings are compared with eq and numbers are compared with ==.
The next thing to do is to figure out what version of the browser is accessing your Web page. Even Netscape couldn't read HTML tables before version 1.1. So you need to look at the rest of the data in the @user_agent array and separate that out to get the version number.
Line 6, @version = split(/ /,$user_agent[1]);
examines the second field returned from the last split command and splits it based on any spaces it finds.
So now the first field in the @version array, $version[0], should contain the Mozilla version number 1.1N. The next step is to turn this into a number so that you can decide whether it is version 1.1 or greater.
The version returned from the split function includes an ASCII character in it-the N, to be exact. This means that the program can't compare it against a number. If you leave the N in the version, the code must check for every version of Netscape because string comparison is an exact match, unlike numbers that you can compare against a range. A string comparison would require the code to check for versions 1.1N, 1.0N, 1.0B, and so on.
If you turn the version into a number, the code can look for all versions that are earlier than version 1.1. Version 1.1 of Netscape is the first version number that handles tables.
Examine line 7: $version_number = substr($version[0], 0, 3);
- The substr function here takes the first three characters from the $version variable. It starts at the 0 character and goes to the third character.
- The substr command in Perl can be used to do much more complex things than this, but there just isn't enough guide here to go through the really complex functions in detail. In this case, I want to get the first three characters from my string, and this works just fine.
Now the CGI program can check for old Mozilla version numbers.
Line 8, if ($version_number >= 1.1){
shows that any Mozilla version that is equal to or greater than 1.1 will pass this test. Notice that this is a numeric test against something removed from a string. That's what makes Perl so popular. It does the right thing, even for me.
That completes step 1: finding out what type of browser is calling your Web page. Now all the code has to do is tell the browser which Web page you really want it to access.
This part is amazingly straightforward! Just print the Location response header with the URI of the correct Web page.
Lines 9-16 print the correct headers. Line 9, print "Location: http://www.county-line-bbq/clbbq-plus.asp.com\n\n";
redirects the client to the HTML+ enhanced page.
Line 12, print "Location: http:// www.county-line-bbq/clbbq-minus.asp.com\n\n ";
redirects the client to the HTML 1.0 page.
Before the response headers are sent to the browser, the server steps in and generates any additional required response headers.
The program told the server that it wanted the browser to go to a different location. The server parsed the response header's output and added the required response headers for me. In particular, the first header of every response message must be a Status response header. In this case, that means a Status header giving the client a redirection response such as this: HTTP/1.0 302 Redirection
Then the Location command is included in the response headers, and the client goes to the correct location.
Now your browser will retrieve the correct Web page for its capabilities. I will continue to refer to the HTTP headers throughout this guide. This is just one simple example of how you can use these headers to make your Web pages more effective for your clients. In Chapter 7, where you put everything together, you will see HTTP headers as part of a complete online catalog application.
Learning Perl
In this afternoon's Learning Perl lesson, you'll learn about the second and third major storage containers in Perl: the regular array and the associative array. You learned about scalar variables and variables in general in Chapter 1. In this lesson, you should type in both exercises as they are presented in Listings 2.4 and 2.5. The examples are included on the CD-ROM, but you'll learn a lot more if you type in the exercises yourself. The examples are not complex so that you can focus on how Perl manages data in arrays. I recommend that you spend some time experimenting with these exercises. Modify the data that is stored in each of these arrays and see how Perl handles different data formats.
Exercise 2.2. Using the Perl regular array
In Exercise 1.2, "Using the Scalar Variable," you learned that Perl contains three basic storage containers:
- The scalar variable
- A regular array
- The associative array
In this exercise, you will learn about the Perl regular array storage container. Arrays enable you to store multiple items in a single, named area. The array is basically a file box. You can store all kinds of different things in an array, but in Perl you cannot store other arrays in an array. Listing 2.4 illustrates saving string or character data to a regular array. Take the time to type in this short program and, after you work through this lesson, spend some time modifying the data stored in the array. Try storing numbers and see what happens.
Listing 2.4. Perl's array storage container.
01: #!/usr/local/bin/perl
02:
03: @my_name = ("Eric","C.","Herrmann");
04:
05: $myName[0] = "Scott";
06: $myName[1] = "E.";
07: $myName[2] = "Herrmann";
08:
09: print "Hello World @my_name wrote this\n";
10: print "Really @myName wrote this\n";
11: print "No Kidding $my_name[0] $my_name[1] $my_name[2] wrote this!\n";
On line 3 in this listing, you store your entire name in the file box or array @my_name. The double quotation marks are required. Perl has a little fun with the novice programmer when printing arrays. If you print this array like this,
print @my_name;
you get the following: ERIcc.HERRMANN
If you use this format,
print "@my_name";
you get ERIC C. HERRMANN
Perl puts spaces around names in arrays when the array is printed inside double quotation marks.
Remember that, in Perl, all arrays start with the at (@) sign. So you should be confused by lines 5-7. These lines do exactly the same thing as line 3, except they store the data one piece at a time. Each piece of data is stored in an array cell. You can think of each array cell as a shoe box or some type of scalar object.
Only one piece of information can be stored in an array cell at a time. Or, in programming tech speak, An array cell is a scalar variable; therefore, only one data object can be stored in it at a time. I really don't think tech speak is intended to make things impossible for the novice to understand. It helps those trained in the field to speak more precisely, but it sure is a pain if someone tries to explain a concept in a language you don't understand. I must admit, however, to knowing a few self-important people who use tech speak to keep their egos inflated. Here, I'm really trying to be precise about a very important concept.
The storage of data on lines 5-7 is the storing of one piece of data at a time. The name or string on the right side of the assignment statement is a single piece of data, and $my_name[n] is the location or scalar variable into which that data will be stored. Just like regular scalar variables ($variable_name), array cells are created when you store something in them. The special variable $#array_name keeps track of how many array cells an array currently has. The next array cell to be created always will be $#array_name + 1. Chapter 6includes a section called "Using Perl's Special Variables," where you can learn more about some of Perl's more important special variables, such as $#array_name.
On lines 9-11, you use some of the ways to get at array data. Line 9 shows how you can access the entire contents of an array just by using the at (@) sign. Line 9 prints the entire array just like it was defined on line 3. Line 10 prints the array created on lines 5-7. This should help you understand that there is no real difference in the way the two variables (@my_name and @myName) or arrays are created.
Finally, line 11 shows you the most common way to get data out of an array. Line 11 prints the array created on line 3 one array cell at a time.
Hopefully, seeing the same data being stored and accessed in different ways will help you understand how arrays work. Because each array cell is really a scalar variable, you can access the data just like any other scalar data. First, you begin the scalar variable name with a dollar sign ($), just like any other scalar variable. Next, because the data is stored in an array, you need to tell Perl that the variable is an array. You do this by adding the square brackets ([]) to the variable name. Finally, you must tell Perl which array cell contains the scalar variable. This is done by putting a number between the square brackets. The number defines a particular scalar variable or array cell for Perl.
So when you want to use the data stored in an array, put a dollar sign before the array name, square brackets after the array name, and the array cell number between the square brackets.
Remember that arrays generally start storing data at array cell 0. This means that if there is one piece of data in the array, it will be at $array_name[0]. The $#array_name variable will be set to 0. If there were two pieces of data stored in the first two array cells, they would be stored at $array_name[0] and $array_name[1], and $#array_name would be equal to 1. This usually confuses anyone who isn't familiar with this convention, so don't be upset if it messed you up the first few times. Arrays generally start counting from 0, so $#array_name contains one less than the number of array cells but can be used to access the last array cell.
Exercise 2.3. Using Perl's associative array
The associative array is the third major Perl data storage container (scalars and regular arrays are the other two). It's one of Perl's powerful characteristics and is different from most other language storage types. In this exercise, you'll learn how to use the associative array, and you'll look at the difference between a regular array and an associative array. Listing 2.5 shows an associative array.
Listing 2.5. Using associative arrays.
01: #!/usr/local/bin/perl
02:
03: %names = ("FIRST", "Jessica ", "MIDDLE", "Ann ", "LAST", "Herrmann");
04: $full_name{'first'} = "Steven ";
05: $full_name{'middle'} = "Michael ";
06: $full_name{'last'} = "Herrmann";
07:
08: print "Howdy my name is $names{'FIRST'}";
09: print "$names{'MIDDLE'}$names{'LAST'}\n";
10:
11: print "And my mixed up name is ";
12: foreach $name (keys(%full_name)){
13: print "$full_name{$name}";
14: }
15: print "\n";
Associative arrays might be a little confusing to start with. Probably more so if you have done any programming. So here is a feature where everyone who is new to programming gets a head start on the experienced gang.
Associative arrays always begin with a percent sign (%).
The associative array is similar to the array you learned about
in Exercise 2.2, except that the array cell is identified by a
string value instead of an integer value.
| Note |
| Identifying an array cell is called indexing into the array. |
There are more differences between regular arrays and associative arrays, but the way you index into them is the most important one. You index into a regular array like this: $array_name[number]
You index into an associative array by referencing the array cell like this: $array_name{"cell_name"}
Line 8 in Listing 2.5 is a good example of indexing into an associative array. Each array cell of the %names array is referenced by using the array cell name. The names of the cells of the %names array are FIRST, MIDDLE, and LAST. The values placed in each named cell of the %names array are Jessica, Ann, and Herrmann. Just because I like repeating myself, let me restate that: FIRST is the name of the array cell of the %names array; the value, or data, stored into that array cell is the string "Jessica". The associative array is referred to by using the percent sign (%) like this: %names
and a cell in the array is referred to by using the dollar sign like this: $names{'FIRST'}
When you try Listing 2.5 for this exercise, note the different ways illustrated on lines 3-6 to put information into an associative array
.
| Note |
| Putting information into any variable is called assigning data to that variable or storing data in a variable |
.
Now take some time to look at the way Listing 2.5 assigns data to the associative arrays %names and %full_name. On line 3, the associative array %names is assigned three values and three array cell names. Array cell names and array cell values must be paired together, as shown on line 3. Line 3 performs the same work on the %names array as lines 4-6 perform on the %full_name array. Each array cell name and value pair on line 3 (FIRST, Jessica, for example) is equivalent to one of the assignments on lines 4-6 ($full_name{'first'} = "Steven ", for example).
On line 4, a new cell named 'first' is created in the associative array %full_name, and the value "Steven" is placed or stored in that array cell. Lines 5-6 just repeat the process.
Line 8 shows you one common way of getting the data out of associative arrays. Each array cell is referenced by its array cell name. The single quotation marks around the array cell name help keep Perl from getting confused about where the print command ends. If you used double quotation marks here, Perl would try to match them up with the previous double quotation marks that match the beginning of the print command. You must use single quotation marks (') or double quotation marks (") when using a string to name the array cell. Otherwise, Perl tries to interpret the name as some type of Perl command. Instead of using a string to name the cell, line 13 uses a variable to name it.
Lines 11-14 are part of a programming construct called loops. Each line is repeatedly executed by the computer based on the conditions set on line 11. You'll learn about loops in Chapter 3, "Using Server Side Include Commands." On line 12, each name of the associative array cells is returned by the function keys.
Perl provides a special function called keys()
to retrieve the names or keys to each array cell of associative
arrays. The keys() function
is used on line 12 as part of the foreach
statement: keys(%full_name).
You will learn about using or calling functions and subroutines
in Chapter 5 "Decoding Data Sent to Your CGI Program."
The keys(%array_name) function
uses the %array_name inside
the parentheses and gives back (returns) the name of each array
cell in the %array_name passed
to it.
| Note |
| Using a subroutine or function is known as calling the subroutine. The value between the parentheses after the subroutine name is called a parameter. This is often referred to as passing the parameter or data to the subroutine When the subroutine gives back information, it is returning data.. |
The returned data is saved in the variable $name. This is the name of an array cell of %full_name. So now you can use this array cell name to retrieve the value from the array cell. This is done on line 13: print "$full_name{$name}";
The array cell is referenced by using the array name $full_name and then enclosing the array cell name in curly braces ({})-for example, {$name}. This looks like $full_name{$name} when you put it all together.
So line 11 prints And my mixed up name is. Line 12 gets each of the names of the associated array cells in %full_name. Line 13 prints the value of each of the array cells.
When you complete this exercise and run it on your computer, you will see that the names might not come out in order for lines 11-14. This happens because data is stored into associative arrays for efficiency. You cannot count on the original order of assigning data to the array to be the order in which the data is retrieved from the associative array.
This is the other main difference between associative arrays and regular arrays. Because regular arrays are indexed by numbers, the data usually is stored sequentially and always can be retrieved sequentially.
Because the associative array's data is stored in association with strings, it cannot be retrieved in the same order in which it was stored. You always will be able to retrieve the data using the array cell name, however.
Summary
This chapter introduced you to client/server architecture. The browser and your CGI program are a classic example of the client/server architecture. The client requests some service of your CGI program. Your CGI program, the server, responds or services the client's request.
You also learned that the request and response system is initiated using HTTP headers. These headers are called request/response headers. The HTTP request/response headers are sent through the Internet using the TCP/IP message protocol.
The first header of every HTTP request/response sequence is the method request header. And the first response header always will be a Status response header. The method response header defines what the server is expected to do with any additional data and how that data might affect the URI in the method response header. The Status response header from the server defines the success or failure status of the method response header.
This basic knowledge is the foundation for many future applications-one of which is redirecting your Web page client based on the User-Agent HTTP header. Tomorrow you will learn the fundamentals of how to build an interactive Web site. In Chapter 3 you will learn all the details you need to know to implement Server Side Include commands, which enable you to build interactive Web pages with very little programming knowledge. In Chapter 4 you learn how to send data to your CGI program-the basis for making any interactive CGI application.
Q&A
| What are the basic headers required for returning a Web page? | |
| The question seems to boil down to what you have to do to return HTML from your CGI program. The answer is not very much!
First and most common is the Content-Type response header. Use this when your CGI program is going to return some MIME-compliant data. Remember that the Content-Type header tells the browser what type of data to expect so that it can launch the proper application to receive it. The server will do any remaining work required to go with the returned data. Next, you could send a Location response header. The browser will receive, along with the Location response header, a Status response header of 301, telling the browser about the moved URI. Your server generates the Status response header. The Location response header tells the browser that the request URI is at another location. Finally, your CGI code could return one of the many status codes describing to the browser the status of the URI request. If you do this, you need to return the Status response header from a non-parsed header (NPH) CGI program. The NPH-CGI program doesn't get any help generating response headers from the server. If your program is generating the Status response header, however, you don't want help from the server because the server's response will conflict with your Status response header. Chapter 4discusses NPH-CGI programs. These three response headers-Content-Type, Location, and Status-are the basic response headers that your CGI program will use to return information to your client. One Last Note: Always Always Always remember to send two newlines (\n) after outputting the last response header from your CGI program. This is such an easy thing to do and is often the source of broken CGI programs. | |
| How did you get that screen capture of the response header in Figure 2.2? | |
| This one is kinda easy and therefore fun to play with. Remember that section on TCP/IP and how the connection is to a public socket over a predefined port? Well, that port for the HTTP server is number
80. So if you first log onto your server, you then can Telnet to port 80.
Take a look at the way I did this in Figure 2.2. First, I did a regular Telnet connection to my Internet provider. After I logged onto my provider's UNIX machine, I Telneted to one of the Web servers I'm responsible for. I did this from the command line by typing > telnet www.accn.com 80. The 80 also could be replaced with http. http is the name of the program or daemon that is assigned to listen for and interpret connections on port 80. The default port for HTTP's Internet connection is 80. Using 80 in this command always works. Using http usually works. Next, I just typed a valid Get method request header. I could have requested a CGI program. I even could have sent PATH_INFO and QUERY_STRING data. This is a great way to see what the server does with your request headers. You can send as many valid request headers as you want this way; just end the sequence of request headers with a blank line. The server will process the typed request headers just as if it had received them in the "normal" TCP/IP manner. As far as the server is concerned, it has received the request headers in a normal manner. It can't tell that these request headers were typed from the command line. Gook luck and have fun with this one. It's a great learning tool! | |
| There seem to be a lot of HTTP headers. How do you tell the request headers from the response headers? | |
| Well, for the most part, you can't. Remember that HTTP headers can be used as both client and server HTTP headers. There are a few headers that describe just the server; these are always response
headers. The other headers can be used as both response and request headers, however. Think of the Content-Length header. This header is used by both the client and the server for most transactions. When the client is sending Post data, a
Content-Length request header is sent to the server. When the server is returning an HTML file, a Content-Length response header is sent to the client.
As you can see, whether an HTTP header is a request or response header is based on the sender. Request headers are sent by the client. Response headers are sent by the server. |


Popular Tutorials
-
 MS Access
1109
MS Access
1109
-
 C++
1222
C++
1222
-
 HTML
584
HTML
584
-
 JavaScript
616
JavaScript
616
-
 Vbscript
873
Vbscript
873
-
 Oracle
473
Oracle
473
-
 VC++
875
VC++
875
-
 SQL
2959
SQL
2959
-
 XML
514
XML
514
-
 Java
814
Java
814
-
 Perl
455
Perl
455
-
 Linux
451
Linux
451


