Web based School
Chapter 3
Using Server Side Include Commands
- Using SSI Negatives
- Understanding How SSIs Work
- Automatically Adding the Last Modification Date to Your Page
- Examining the Full Syntax of SSI Commands
- Using the SSI config Command
- Using the include Command
- Examining the flastmod Command
- Using the fsize Command
- Using the echo Command
- Looking At Security Issues with SSIs
- Learning Perl
- Summary
- Q&A
In the preceding chapter, you learned about the environment of CGI programming and how the server communicates with the browser. Today, without using any special programming languages, gotos, if then else statements, or any other complex programming structures, you will learn how to build dynamic Web pages. In this chapter, you will discover Server Side Include commands (SSIs). In particular, you will look at these topics:
- Looking at the downside of SSIs
- Making SSIs work on your server
- Looking at the format of SSIs
- Changing the format of SSIs
- Including other files in your Web page
- Adding the size and last modification date of your Web files
- Executing system commands from within your parsed HTML files
- Deciding whether SSIs are a security risk
This transition from an unchanging Web page to a Web page that can interact with your Web client can begin with very little programming expertise.
Instead of writing code to perform dynamic and useful tasks, you can use commands called Server Side Includes. Server Side Includes are special HTML-like commands that your server executes for you as it parses your HTML file.
Server Side Includes probably were started to handle the desire to include a common file inside a bunch of different files. The most common use for SSIs is providing a signature file or company logo that you want to add to every file you create. The Include file resides on the server and is included whenever any HTML file that contains the include command is requested, which is where the term Server Side Include comes from.
Using SSI Negatives
As with every other neat and cool thing you can do, SSIs are somewhat of a two-edged sword. The server has to do a lot more work to process these includes. When the server returns an HTML file, it generates the appropriate response headers and sends the HTML file back to the client. No fuss and very little work.
When the server executes a CGI program, a compiler or interpreter executes your program. Your CGI program should generate some HTTP response headers, and then the HTML file server's job is to generate any additional required HTTP response headers and pass the CGI-generated HTML back to the client/browser.
When the server returns a file with SSI commands in it, however, it must read each line of the file looking for the special SSI command syntax. This is called parsing a file. SSI commands can appear anywhere in your HTML file. This means that your server must make a special effort to find the commands in your HTML file.
This parsing of files puts an extra burden on your server. That also means that SSI files are slower when returned to your Web client than regular HTML files. The more SSI files your server has to handle, the more processing load on your server, and, as a consequence, the slower your server operates. Do not let this stop you from using SSIs; just be aware of the cost and benefits of using SSI files.
At this point, you should be wondering how the server knows whether to parse a file looking for SSI commands. How does the server know what those commands look like, anyway? And do SSI commands work on every server?
First of all, special files on your server define whether SSI commands will be allowed on your system. And then other files exist that define which files will be parsed for SSI commands and which files will be treated as CGI programs.
Understanding How SSIs Work
The ncSA server-currently the most popular server on the Net-and several other HTTP servers support SSIs.
Next, SSIs have to be enabled by your System Administrator before they will work. SSIs require the server to do more work with every SSI document handled by the server. As you learned in the preceding chapter, the server is responsible for finding, reading, formatting, and outputting the headers and HTML files requested by the client. So the System Administrator for your server makes several decisions that affect whether you can use SSIs and how many of them are enabled for you.
Deciding Whether to Enable SSIs
The first decision is whether to allow SSIs at all on the server. For the most part, your local Internet provider wants to give you all the freedom it can on your server. So most System Administrators decide to turn on SSIs. Because of the extra burden placed on the server, however, limitations are placed on the types of files that can have SSI commands. This limitation is based on the ending characters of each filename, called the filename extension. Usually, it's something like .shmtl. So any file that ends in .shmtl is handled as an SSI file by the server. You can set the filename extension by using the AddType directive in the srm.conf file, which is described later in the section "Using the AddType Command for SSIs."
In order for SSIs to work, the server has to read every line of every SSI file looking for the special SSI commands. A significant extra computing and disk-access burden is placed on any server that has to parse its files before sending them back to the client. Usually, that burden is not so great that SSIs are turned off. But if a site is very, very, very busy, and it cannot handle all the traffic it is getting, one way to deal with server overload is to turn off SSIs.
Using the Options Directive
In order to enable SSI commands at all, the various directories that can use SSI commands must be enabled. This is done by modifying a file called access.conf. The access.conf file controls each directory's capability to execute different types of WWW services. In this case, you are interested in SSI commands. The access.conf file is discussed in detail in Chapter 12, "Guarding Your Server Against Unwanted Guests." Your current interest is in enabling SSI commands for your server. This is done with the Options directive.
On my server, the Options directive is set to All: Options All. This means that all features are enabled in the directory or directories identified with the Options All command. My server allows SSI commands in all directories under the document root. The document root consists of all the directories that are accessible to normal users and Web visitors. My life is a lot easier because of this, and it's one of the reasons I use this server. If your server is not enabled so that you can use SSIs, send e-mail to your System Administrator or find another server.
If you are just interested in enabling SSI commands, you should set the Options directive to Includes: Options Includes. This enables all the available SSI features.
For security reasons, you may see your server set to Options IncludesNoExec
This enables you to use SSIs but disables the SSI exec command.
The access.conf file and its directives are covered in detail in Chapter 12, so accept this outline of how to set up SSIs on your server. For a complete tutorial on setting up an ncSA httpd server, see http://hoohoo.ncsa.uiuc.edu/docs/tutorials
Using the AddType Command for SSIs
Now that you can add SSI commands to your directory, the server must decide whether to parse all files or just special files. Usually, the server limits SSI parsing to a special file type, as described previously. This is done by modifying the srm.conf file. The srm.conf file is usually in a directory named conf, below one of the top-level directories on your server. Conf stands for configuration, so all the files that manage the configuration of your server should be below the conf directory. This is not mandatory; it's just neater.
Using the srm.conf File
In the conf directory, there should be a file called srm.conf. This is the file that decides which files will be parsed for SSI commands. Remember that your goal is to allow the use of SSI commands but to limit their impact on the server. Inside this file is the command AddType. The AddType command sets the filename extension type for various applications. Listing 3.1 shows a typical srm.conf file; this is a partial listing of the srm.conf file so that you can get a good feel for how the AddType command fits into the overall srm.conf file. Only a few of the commands have been deleted. These deleted commands were adding similar types and do not change the outline of the srm.conf file.
Listing 3.1. The srm.conf
file.
01: DocumentRoot /usr/local/business/http/accn.com
02: UserDir public-web
03: DirectoryIndex blocked.asp index.cgi index.asp home.asp welcome.asp
  index.asp
04:
05: FancyIndexing on
06:
07: AddIconByType (TXT,/icons/text.gif) text/*
08: AddIconByType (IMG,/icons/image2.gif) image/*
09: AddIconByType (SND,/icons/sound2.gif) audio/*
10: AddIcon /icons/movie.gif .mpg .qt
11: [additional ADDIcon commands deleted]
12:
13: DefaultIcon /icons/unknown.gif
14: ReadmeName README
15: HeaderName HEADER
16: IndexIgnore */.??* *~ *#* */HEADER* */README*
17: IndexOptions FancyIndexing
18: AccessFileName .htaccess
19: DefaultType text/plain
20:
21: AddLanguage en .en
22: [additional ADDLanguage commands deleted]
23:
24: LanguagePriority en fr de
25:
26: AddEncoding x-compress Z
27: AddEncoding x-gzip gz
28:
29: Alias /icons/ /usr/local/www/icons/
30:
31: ScriptAlias /cgi-bin/ /usr/local/business/http/accn.com/cgi-bin/
32: ScriptAlias /mailto   /usr/local/www/cgi-bin/mailto.pl
33: [additional ScriptAlias commands deleted]
34:
35: AddType text/x-server-parsed-html .shtml
36: AddType application/x-httpd-cgi .cgi
37: AddType image/gif .gif87
38: AddType image/gif .gif89
39:
40: AddType text/x-server-parsed-html3 .shtml3
41: AddType httpd/send-as-is asis
42: AddType application/x-type-map var
43: AddType application/x-httpd-imap map
Toward the end of Listing 3.1, you can see several AddType commands. The first AddType command adds a subtype to the MIME text type. The AddType directive allows the server to add new MIME types or subtypes to its list of valid types. The MIME type tells the server what type of document it is managing. The srm.conf file is not responsible for telling the server about all the types it needs to handle. As you can see from Listing 3.1, however, several new types and subtypes have been added to the server's basic types.
You should be interested in the x-server-parsed
type. This is a subtype of the MIME text type. The beginning x
in the subtype definition defines a new or experimental type.
Any files with the extension shtml
will be managed as x-parsed
HTML files. So any file with the shtml
extension will be parsed by the server.
| Do |
| DO name all files that include SSI directives with the extension defined in your srm.conf file. This usually is shtml. DON'T use just any extension for your files that include SSI commands. DO check out the srm.conf file. Look at the AddType directive to figure out what your SSI files should be named. |
Automatically Adding the Last Modification Date to Your Page
Now that you know what it takes to make SSIs work on your server, you might be asking yourself, "What good are they?" Well, as you've surfed around the Web, I'm sure you've seen pages that include the last time they were modified, like the one in Figure 3.1.
Figure 3.1 : Including the last modified date on your Web page.
At the bottom of Figure 3.1, the date the file was last modified is printed. If you try to look at the HTML source that produced this file, you will see only normal HTML commands and the date displayed on the Web page. I have deleted most of the HTML that builds this Web page, but the HTML you should be interested in is on line 14 of the snippet shown in Listing 3.2. It sure doesn't look special, does it? You can't guarantee that the author just isn't changing the date manually, but I suspect that an SSI is responsible for the date on line 14.
Listing 3.2. HTML including the last modified date on your
Web page.
01: <hr>
02: <P>Wanna <a href="rliwd/suggest.asp">suggest</a> a topic?  Wanna be
03: <a href="notify.asp">notified</a> when new lessons are on line, or changes
04: are made?</P>
05: <hr>
06: <P><img src="/pix/paws/blue.gif" alt=" * ">Comments to Brian Exelbierd
07:(<a href="tutor.mail.asp">bex@ncsu.edu</a>)
08: <BR>
09: <img src="/pix/paws/red.gif" alt=" * ">
10: To bex's <a href="/~bex/index.asp">home page</a>
11: on the <a href="/index.asp">CATT</a> WWW Server</P>
12: <P><A HREF="http://www.halsoft.com/html-val-svc/"> <IMG
13: SRC="/pix/valid/valid_html3.0.gif" ALT="HTML 3.0 Checked!"></A>
14: Last Updated and Validated on September 17, 1995
15: </P>
16: </body>
17: </html>
The HTML that produced the line Last Updated and Validated on September 17, 1995
did not require the author to change the date every time the HTML file was modified. The SSI directive <!--#flastmod file="file.shtml" -->
checks the last modified field of the HTML file-file.shtml-and sends it to the client along with the rest of the HTML in file.shtml. So, even though I'm not responsible for the HTML in Figure 3.1, I suspect that line 14 looks something like this: Last Updated and Validated on <!--#flastmod file="index.asp" -->
Notice something very special about SSIs: When your server processes the SSI command, it includes the result of the SSI command in your HTML in place of the command itself.
That example is pretty simple, as are most of the SSI commands. And that is their purpose: to allow simple dynamic additions to your HTML files with very little effort. This example gives you a new perspective on some of the neat things you can do with your Web page without having to expend a lot of programming effort.
Examining the Full Syntax of SSI Commands
SSI commands are easy. But make sure that you pay attention to the syntax of building an SSI command. Because the server is reading through every line, your SSI syntax has to be exact. Otherwise, the server can't separate it out from the regular HTML commands. In addition, the SSI syntax uses part of regular HTML syntax. SSI commands are an extension of the HTML comment command. This wasn't just an accident. This way, if you need to move your SSI HTML to another server that doesn't support SSIs, the rest of your Web page still looks fine. HTML comment fields are not displayed. So a server that doesn't understand SSIs just ignores and does not display your SSI command. The syntax of the HTML comment line follows: <!-- Anything can go here -->
The opening <!-- and closing --> define an HTML comment.
The syntax of an SSI command is very similar. And every SSI command
follows the same format:
<!--#command cmd_argument="argument_value" -->
| Tip |
| SSI commands are easy to add to your HTML, but you must follow the syntax of SSI commands exactly. Your first SSI may have failed for lots of simple reasons. One of the first is the ending --> of the SSI command. It must have a space between it and the ending quotation mark (") of the argument_value portion of the command. So remember that when you put any SSI command in your HTML, it must always end with " -->. |
Follow these five rules when you build your SSI commands, and you'll never have any problems:
- Include your SSI commands only in files that have the correct file extension. The default file extension for SSIs is shtml. Your System Administrator can set the file extension to anything he wants. You can figure out what it is by looking in the srm.conf file. Just look in the server root directory for the conf directory, and then look at the AddType that has the x-server-parsed command. The file extension after the AddType is the file extension for SSIs.
- Begin all your SSI commands with <!--#command. No spaces are allowed anywhere in the beginning syntax. The command must be in lowercase and can be only one of the commands found in Table 3.1.
- Always include one space after the "argument_value"
before closing the SSI command with the -->
symbols. Forgetting to include this space is a very common mistake.
You must have a space before the first dash. As shown here, the
space after …html"
is required:
<!--#flastmod file="index.asp" --> - Never include pathnames to commands or files that include a ../ in the pathname. SSI commands only accept pathnames that begin at the server root or are a subdirectory of the directory in which the SSI file is located. Several of the commands take directory paths as part of the "argument_value", and you are reminded of this each time.
- Always surround argument_value with double quotation marks, as in "argument_value".
These are five rules you must follow, and there are six SSI commands
to go with these rules. Table 3.1 briefly describes each of the
SSI commands. Each command takes a different type of command argument,
and each argument takes a different type of argument value, so
I will go over each of these commands in detail.
| Command | Function |
| config | Sets the time, size, or error-message format. |
| echo | Inserts the values of SSI variables into your Web page. |
| exec | Executes a system command or a CGI program and inserts the output of that command into a Web page. |
| flastmod | Inserts into your Web page the date of the last time a file was modified. |
| fsize | Inserts the size of a file into your Web page. |
| include | Inserts the contents of HTML files into your Web page. |
| Tip |
| If everything else in your SSI command is correct, but it is not working as intended, remember that UNIX commands are case sensitive. Your server often executes UNIX commands, and Echo is not the same as echo. When you build your SSI command, keep everything in lowercase. |
Using the SSI config Command
The config command stands for configuration. You will never see this command appear anywhere on your Web page. But you will find it a very useful command for changing the look of other SSI commands on your Web page. The config command modifies the standard text output from an SSI error command. You should use the config command if you want to perform actions such as these:
- Sending back a friendlier message than
["an error occurred while processing this directive"] - Using a different date format than
Sunday, Oct 8 09:13:00 CDT 1995 - Changing the way the file size is displayed on your Web page
By now, you should be able to deduce that the config command modifies the output of other SSI commands. In particular, the config command modifies how the following are displayed on your Web page:
- The error message when an SSI command doesn't work
- The output of any command that includes a date or time
- The format of the file size returned from the fsize command
Table 3.2 summarizes the command options for the SSI config
command. The syntax of the command is similar to that of all other
SSI commands:
<!--#Command Command-Argument="Argument-Value" -->
| Command | Command-Argument | Argument-Value |
| Any ASCII text | ||
| Bytes or abbrev | ||
| Any of the date codes listed in Table 3.3 |
Why would you want to use this command? The most common use is to change the date printed when using the flastmod SSI command. The flastmod SSI command prints the last modified date of a file. If you use your SSI commands to perform more complex tasks, however, like executing a CGI or system command, you might find it useful to return a polite error message.
Perhaps the requested CGI program is available only to registered users, for example. You could change the error message to return a polite I'm sorry, this function is available only to registered users
instead of the rather cryptic default error message of ["an error occurred while processing this directive"]
If you are changing the error message to try to debug your scripting errors, however, the error log is a better tool than the config errmsg command. The error log is covered in Chapter 13, "Debugging CGI Programs."
The syntax of the config errmsg command follows: <!--#config errmsg="You can put any message here" -->
The second valid command-argument affects mainly the fsize command. It changes whether the size returned by the fsize is returned in bytes or in a rounded-up kilobyte format. The command-argument is sizefmt, which accepts the argument values of bytes or abbrev.
The syntax of the config sizefmt
command follows:
<!--#config sizefmt="bytes" --> or <!--#config sizefmt="abbrev" -->
Finally, the timefmt command
argument is quite useful. You can use this inside regular text
to return a date or time formatted to your preference. Whether
you want only the day of the week, the current hour, or a full
GMT date stamp, timefmt enables
you to format the current date to fit all your needs.
Table 3.3 shows all the possible variations for the date format.
It's amazing how many varieties of time are available to you.
The format for configuring the time follows:
<!--#config timefmt="Any valid grouping of format codes" -->
If you want to print the day of the week, followed by the month,
day of the month, and then the year, use this SSI command:
<!--#config timefmt="%A, %B %d, %Y" -->
| Specifies | |
| Abbreviated weekday name, according to the current locale | |
| Full weekday name, according to the current locale | |
| Abbreviated month name, according to the current locale | |
| Full month name, according to the current locale | |
| Preferred date and time representation for the current locale | |
| Day of the month as a decimal number (ranging from 0 to 31) | |
| Month as a decimal number (ranging from 10 to 12) | |
| Week number of the current year as a decimal number, starting with the first Sunday as the first day of the first week | |
| Week number of the current year as a decimal number, starting with the first Monday as the first day of the first week | |
| Day of the week as a decimal, with Sunday being 0 | |
| Preferred date representation for the current locale without the time | |
| Year as a decimal number without a century (ranging from 00 to 99) | |
| Year as a decimal number, including the century | |
| Hour as a decimal number using a 24-hour clock (ranging from 00 to 23) | |
| Hour as a decimal number, using a 12-hour clock (ranging from 01 to 12) | |
| Day of the year as a decimal number (ranging from 001 to 366) | |
| Minute as a decimal number | |
| Either a.m. or p.m., according to the given time value or the corresponding strings for the current locale | |
| Second as a decimal number | |
| Preferred time representation for the current locale without the date | |
| Time zone, name, or abbreviation |
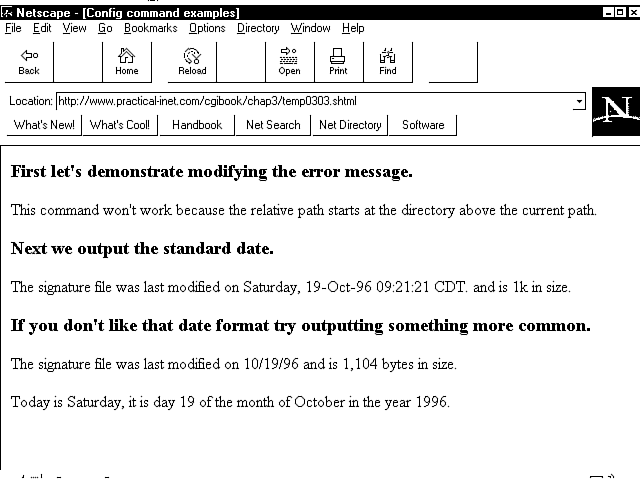
Figure 3.2 shows several uses of the config command: changing the error message, the appearance of the date, and the size of a file. Listing 3.3 shows the HTML and SSI commands used to generate this Web page.
Figure 3.2 : Using the config command.
Listing 3.3. The config
command in HTML.
01: <html>
02: <head>
03: <title>Config command examples </title>
04: </head>
05: <body>
06: <h3>First lets demonstrate modifying the error message. </h3>
07: <!--#config errmsg="This command won't work because the relative path starts
  at the directory above the current path." -->
08:
09: <!--#flastmod file="../../signatures/pi_sig.asp" -->
10:
11: <h3>Next we output the standard date. </h3>
12: The signature file was last modified on
13: <!--#flastmod virtual="/signatures/pi_sig.asp" -->.
14: and is <!--#fsize virtual="/signatures/pi_sig.asp" --> in size.
15: <h3> If you don't like that date format try outputting something more
  common. </h3>
16: <!--#config timefmt="%x" -->
17: The signature file was last modified on
18: <!--#flastmod virtual="/signatures/pi_sig.asp" -->
19: <!--#config sizefmt="bytes" -->
20: and is <!--#fsize virtual="/signatures/pi_sig.asp" --> bytes in size.
21: <br><hr>
22: Today is <!--#config timefmt="%A" --> <!--#echo var="DATE_LOCAL" -->,
23: it is day <!--#config timefmt="%d" --> <!--#echo var="DATE_LOCAL" -->
24: of the month of
25: <!--#config timefmt="%B" --> <!--#echo var="DATE_LOCAL" -->
26: in the year <!--#config timefmt="%Y" --> <!--#echo var="DATE_LOCAL" -->.
27: </body>
28: </html>
Using the include Command
The include command is where it all started for SSIs. Someone said, "I want to include another file in my HTML and I don't want to have to cut and paste every time I need to include it in my file." Of course, the signature file is the most common use for the include command and, overall, the include command can make your task as a Web page builder and Administrator much easier. Used properly, the include command can dramatically decrease the amount of HTML that you have to write and modify.
With the include command in your toolbelt, you will never type your ending notice or signature into your Web HTML again. Figure 3.3 shows the inclusion of my company's signature on a business Web page. When I added my company's tag to this Web page, I did not type it in; I used this SSI:
Figure 3.3 : Including a signature file. <!--#include virtual="/include_files/pi_signature.asp" -->
Analyzing the include Command
The SSI include command has two values for the command-argument parameter.
Remember that the syntax of all your SSI commands starts out the same: <!--#command cmd_argument="argument_value" -->
The two command arguments for the include command follow:
- file: Any path and filename that is in the current directory or a subdirectory of the current directory.
- Virtual: Any path and filename that begins at the server root.
Both the command arguments are used to tell the server how to find the file you want to include. The difference between the virtual command argument and the file command argument is the location from which the server starts its search for the include file.
Using the virtual Command Argument
When you use the virtual command argument, the server begins its search for the file from the document root directory. The document root directory is defined by your System Administrator and can be found in the srm.conf file. You also can find out what the document root is by printing your CGI environment variables. Environment variables are covered in Chapter 6 "Using Environment Variables in Your Programs."
The argument value for the virtual command argument always should begin with a forward slash (/). The complete path to the file is required when using the virtual command argument.
The syntax of the include command when using the virtual command argument follows: <!--#include virtual = "/full pathname/filename.asp" -->
Using the file Command Argument
The file command argument should be used when including files that are in the same directory the SSI file is in (the current directory) or a subdirectory of the current directory.
When using the file command,
you cannot include a pathname that begins above the current directory.
In other words, any pathname that begins with ../
is illegal.
| Tip |
| Pathnames are very particular. If you are using the file command argument, the pathname cannot begin with a forward slash (/) or a period (.). The pathname must define the location of the file to be included relative to the current directory. Relative means that if your SSI file is in the /usr/~david/public-www directory and your signature file is in the /usr/~david/public-www/include_files directory, the relative path is just include_files. The server already knows about the /usr/~david/public-www portion of the filename. Remember that filenames and pathnames in the UNIX environment are case sensitive. Signature.asp is not the same file as signature.asp. |
You cannot include CGI programs using the SSI include command, but you can include other SSI parsed files. This gives you a tremendous amount of flexibility, because your included files can execute SSI commands also, including executing a CGI program. In the next section, you will use this technique to show how each article in an electronic paper can identify when it was last modified.
Examining the flastmod Command
This chapter started out with an example of the flastmod
command. That was a pretty simple example to begin with, but the
following example, although no more complex, illustrates the utility
and power you can get with the simple flastmod
command.
| Note |
| The name flastmod uses a standard UNIX command-naming trick. It is not meant to confuse you. The command name is constructed to help you figure out the type of command it is and what it does. The f in flastmod stands for file; last, of course, is last; and mod stands for modified. Lots of UNIX, Perl, and C commands begin with f to indicate that they operate on files. So the command really says operate on a file and return its last modified date. |
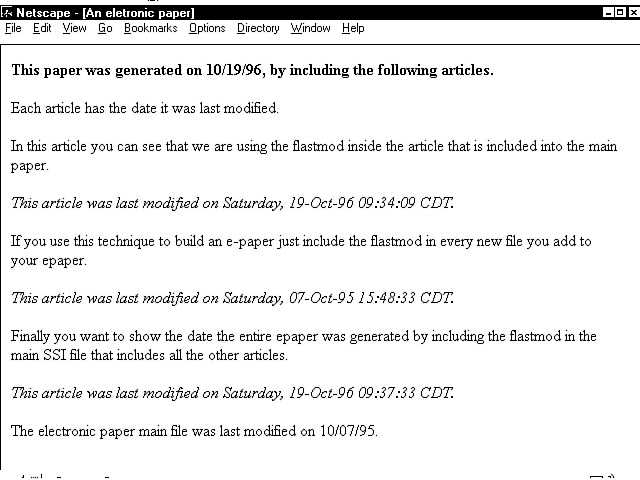
You can use the flastmod command to let everyone know that your Web page has been updated recently, or you can use it to identify the latest changes to each portion of your Web page. The following Web page uses the include command and the flastmod command to tell the reader when an article was last updated. I like this a lot more than the "new" images that have cropped up on the Net. This way, your Web visitor will know what is new to her, and you don't have to modify the main file each time you add a new article. If you're building an electronic newspaper, as illustrated in Figure 3.4, this is an excellent way to let your readers know which articles they have changed.
Figure 3.4 : Including the date the article was written using SSIs.
The HTML for this page does not contain any of the articles on the page. The HTML in Listing 3.4 is just a template for an electronic newspaper with the include directive for each article to be added.
Listing 3.4. The electronic newspaper template HTML.
01: <html>
02: <head>
03: <title>An eletronic paper </title>
04: </head>
05: <body>
06: <h4>This paper was generated on <!--#config timefmt="%x" -->
07: <!--#echo var="DATE_LOCAL" -->, by including the following articles.  </h4>
08: Each article has the date it was last modified.
09: <!--#include file="epaper-include-files/article1.shtml" -->
10: <!--#include file="epaper-include-files/article2.shtml" -->
11: <!--#include file="epaper-include-files/article3.shtml" -->
12: <hr>
13: The electronic paper main file was last modified on <!--#flastmod
 file="epaper.shtml" -->.
14: </body>
15: </html>
Notice on line 6 the setting of the date format using the config command. What's interesting here is the different date formats in Figure 3.4. The config command is supposed to affect all the SSI commands that print any type of date. It worked for line 7, where the date when the e-paper was compiled is printed. And it worked on line 13, where the date of the template is printed. Why didn't it work for the included files? Listing 3.5 shows one of the included files and the answer to the question.
Listing 3.5. An included e-article, with the flastmod
command embedded in it.
1: <p>
2: If you use this technique to build an e-paper just include the flastmod
3: in every new file you add to your epaper.
4: <p>
5: <em>
6: This article was last modified on <!--#flastmod file="article2.shtml" -->.
7: </em>
Note the flastmod command on line 6. Because the command is in a separate file, it is not affected by any previous commands from other SSI files. This works for two reasons. First, you can nest SSI files. The e-paper is an example of that type of nesting. The e-paper template is an SSI file, and each article is an SSI file. Second, when the included SSI file is parsed, the server ignores any previous config format commands. The server parses the file looking for SSI commands, and because this file doesn't set the date format anywhere, the server uses the default format shown in Figure 3.4 below each article.
If this method of building your e-paper proves to be too slow, try moving the location of the flastmod command. Remember that it takes longer to parse files, and all SSI files must be parsed. If you move the flastmod SSI command and its formatting commands to the e-paper template, the articles themselves can be straight HTML files. The server won't have to parse the article files, and that should speed up the loading of the entire e-paper a bit.
The flastmod command has basically the same syntax as the include command. It accepts two command arguments: virtual and file. And virtual and file have exactly the same meaning for the flastmod command as for the include command. The virtual command argument defines the path to the file from the document root, and the file command argument defines the path to the file relative to the current directory.
Take note of how the relative pathname works. If you look at lines 9-11 of Listing 3.4, you will notice that the included articles are in a subdirectory of the e-paper template. But on line 6 of Listing 3.5, the file command is used without indicating any directory. So when the server parses the included file and executes the flastmod command, it looks in the current directory. The server has changed directories! While the server is parsing the included articles, the current directory is the directory in which it finds the included file. In this case, this is one subdirectory below the e-paper template: the epaper-include-files directory.
This is one reason why you might want to use the virtual command argument. If you are including other files in your SSI files, when you move one file, you will have to move or copy every file that you have included. If you use the virtual command, which gives the full pathname to the file, you will only have to change any references to the file you are moving.
Using the fsize Command
The fsize command is used to insert the size of a file into your Web page. Remember that the fsize command can operate on any file-the file the SSI command is in or some other file.
This really works great when you have a Web page with a lot of images on it. Instead of putting many large images on your main page (something that I find really irritating when surfing around the Net), you can include thumbnails of each of your images on your home page. Then, beside each thumbnail image, use the fsize command to indicate how large the full-sized image is. This speeds up the loading of your Web page. First, this means that more people will wait to see what is on your Web page. Next, it lets your Web page visitor decide whether she wants to spend the time downloading the larger images. This always is considered proper etiquette on the Net. Your Web site will be a lot more successful if you use this technique.
The fsize command has basically the same syntax as the include and flastmod commands. It accepts two command arguments: virtual and file. And virtual and file have exactly the same meaning for fsize as they do for flastmod and include. The virtual command argument defines the path to the file from the document root, and the file command argument defines the path to the file relative to the current directory.
Using the echo Command
SSI commands are designed to make your Web tasks easier. Sometimes, when dealing with UNIX and programming, life can get pretty frustrating. The smallest error makes everything not work. SSI commands can seem like that sometimes. When you forget to leave a space before the closing SSI command HTML tag (-->), or when you add a space between the hash sign (#) and the SSI command (<!--# echo), nothing works and you get that silly and ever-so-helpful error message ["an error occurred while processing this directive"]
That's a lot of help!
Well, whoever wrote the code for the echo SSI command took pity on us poor, imprecise humans. Can you believe it? The five variables you can print using the echo command are not, I repeat not, case sensitive! I bet you just opened a bottle of champagne and are dancing around the room right now. Well, sit down and get back to work; you're just getting started, and this reprieve from case sensitivity only lasts for a few paragraphs. Just wait until you get to the exec command. Then you're in for it!
As I stated in the last paragraph, five variables can be used
with the echo command; these
are summarized in Table 3.4. "Why only five?" you ask.
It does seem kind of weak, doesn't it? Well, I don't really know
the answer, but it actually makes a lot of sense. Remember that
SSI commands are designed to include other files and to enable
you to do a bit of dynamic Web page work. (That's creating Web
pages on-the-fly, in Net slang.) These variables are the minimum
set of variables you need to describe files you are including
and to give you current information about the main file. Why not
provide more? Well, the more you get, the more complex things
become. Very quickly, you might as well write a CGI program and
forget about SSI commands altogether. And for the most part, you
will. But SSI commands are very handy to have around, mainly because
of their lack of complexity.
| Variable | Specifies |
| Date_GMT | Current date and time in Greenwich Mean Time. Greenwich is used by the entire Net as a common time for communications purposes. Because you can never tell who will be using your Web page, this time format makes a lot of sense. |
| Date_Local | Current date and time in the local time zone. The time zone is determined by the location of the server and the server's software. The format is visible in Figure 3.5. The output of this command is configurable by the SSI command config timefmt. |
| Document_Name | Filename of the main document. |
| Document_URI | Pathname and filename of the main document. |
| Last_Modified | Date and time the main document was modified. |
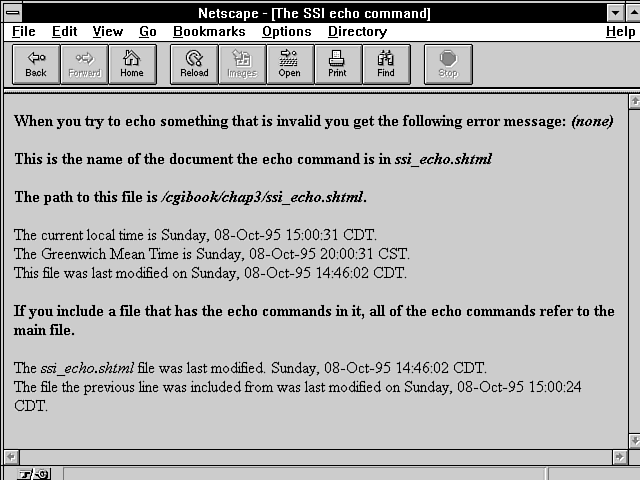
Figure 3.5 : Using the SSI echo command.
Figure 3.5 shows the use of each of the variables available to the echo command. Notice at the end of the first line the word (none). This is what happens when you try to echo an invalid variable. Because the echo command can't see the variable, it prints (none), just as if you had asked it to echo nothing (which, as far as the echo command is concerned, you have).
Listing 3.6 shows the HTML and SSI commands used to print these variables. Most of this syntax is very similar to the other SSI commands, and therefore is self-explanatory. But, as always, you should be aware of at least one trick. Notice the different dates on the last few lines in Figure 3.5. When you include files that use the echo command, the variables the echo command uses are the ones defined by the main file. So the Last_Modified, Document_Name, and Document_URI variables all refer to the first file parsed by the server.
Why does this happen? Well, all the global variables available to this process are set when the process is started. The first file opened by the server defines the environment under which all the other files will operate. The variables the echo command refers to are set when the server opens the first file for parsing. These variables are not set again, regardless of how many new files the server might need to include in the first file. Listing 3.7 shows the small include file included on line 15 of Listing 3.6. Notice that the first line prints the Last_Modified variable, which still refers to the first file opened for parsing. The last line of Listing 3.7 refers to itself and gives the date you would expect Last_Modified to print when echoed.
Listing 3.6. HTML and the SSI echo
command.
01: <html>
02: <head><title>The server side include echo command</title></head>
03: <body>
04: <h3> When you try to echo something that is invalid
05: you get the following error message:
06: <!--#echo var="$env" --></h3>
07: <h3>This is the name of the document the echo command is in
08: <!--#echo var="DOCUMENT_NAME" --></h3>
09:
10: The path to this file is   <!--#echo var="DOCUMENT_uri" -->.<br>
11: The current local time is  <!--#echo var="DATE_LOCAL" -->.<br>
12: The Greenwich Mean Time is <!--#echo var="DATE_GMT" -->.<br>
13: This file was last modified on <!--#echo var="last_modified" -->.<br>
14:
15: If you include a file that has the echo commands in it
16: all of the echo commands refer to the main file.<br>
17: <!--#include file="server side include_last_mod.shtml" -->
18: </body>
19: </html>
Listing 3.7. An include
file using the SSI echo
command.
1: The <!--#echo var="DOCUMENT_NAME" --> file was last modified.
2: <!--#echo var="LAST_MODIFIED" -->.<br>
The Syntax of the SSI echo Command
The syntax of the echo command follows the SSI command syntax, of course: <!--#command cmd_argument="argument_value" -->
The command argument is var, and the argument values are the variables listed in Table 3.4. The exact syntax is shown on lines 8-13 of Listing 3.6. Remember that, with this command, the variables of the argument_value field are not case sensitive. Document_Name is the same as DOCUMENT_NAME, for example.
Exercise 3.1. Using the exec command
The exec command gives you the power of your operating system right in your SSI HTML. Most of the system commands available to you from the command line also are available with the SSI exec command. As with SSIs themselves, the exec command can be turned off and made unavailable to you. Because the exec command opens up a variety of security issues, don't be too surprised if your System Administrator has disabled this option. SSI security concerns are discussed later in this chapter in "Looking At Security Issues with SSIs."
The exec command enables you to access the UNIX Shell or CGI scripts without requiring the client to click a button. When you go to a Web site that looks like it is immediately using a CGI script to build the page, it probably is using an SSI exec CGI command to make that happen.
With the exec command, you can do anything you can do from the command line. Now, I'm not going to teach you UNIX in this guide. (It might be fun, but both of us have our deadlines to meet.) But let's explore a few of the simple commands you can use and how you might use some of these tools.
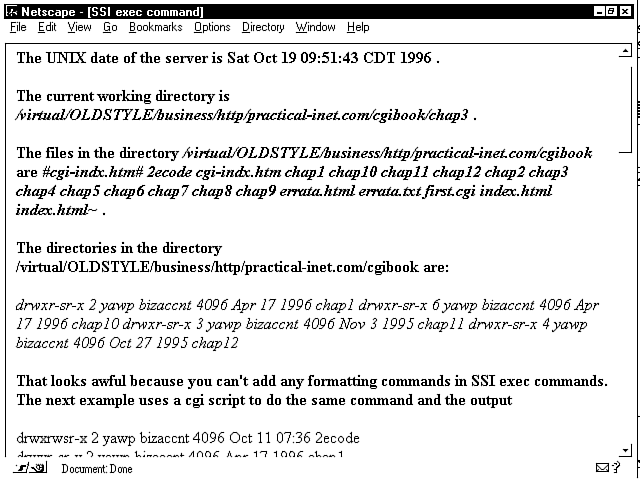
Figure 3.6 shows the output from the SSI commands in Listing 3.8. Each of these commands is a simple UNIX command that becomes available to you as soon as you understand how to use SSI commands. That should be now. The environment in which your commands will execute includes all the normal environment variables you get at login. If you are using an SSI command to execute a CGI script, you get all the environment variables normally available to your CGI programs. Environment variables are covered in Chapter 6.
Figure 3.6 : Using the SSI exec command to access the UNIX Shell.
Listing 3.8. HTML and SSI exec
commands.
01: <head>
02: <title>Server Side Include exec command </title>
03: </head>
04: </body>
05: <!--#config timefmt="%x" -->
06: <!--#echo var="date_local" -->
07: <h3> The UNIX date of the server is  <!--#exec cmd="date" -->.</h3>
08: <h3>The current working directory is <!--#exec cmd="pwd" -->.</h3>
09: <h3>The files in the directory       <!--#exec cmd="cd ..; pwd;" -->
10: are <!--#exec cmd="cd ..; ls" -->.</h3>
11:
12: <h3>The directories in the directory  <!--#exec cmd="cd ..; pwd;" -->
13: are:</h3> <!--#exec cmd="cd ..; ls -l |grep ^d" -->
14:
15: <h3> That looks awful because you can't add any formatting commands.
16: The next example uses a CGI script to do the same command </h3>
17: <!--#exec cgi="server side include_cgi_dir.cgi" -->
18:
19: </body>
20: </html>
Let's take a look at each one of these commands. Most of them are simple. The amazing thing is that you now can treat your SSI parsed file just as if you were executing from the UNIX command line. So you get the simple commands that enable you to do things like print the current date and the current working directory. You can see each of these on lines 5 and 6. You've already seen several of the date commands, but notice that the date printed from the command line is not the same date printed with the "date_local" variable on line 6. The config command has no impact on anything you do at the command line. When you execute on the command line, each new command starts a new process.
This process is shown on lines 9 and 10. Notice the semicolons between the Change Directory command (cd) and the Print Working Directory command (pwd). This lets your SSI exec command execute more than one command in a row, with the next command keeping the state created from the previous command.
Suppose that you try to execute two SSI exec commands. The first one changes directories, and the next one prints the current directory: <!--#exec cmd="cd .." -->
and <!--#exec cmd="pwd" -->
The result of the pwd command is not the cgiguide directory, as in Figure 3.6, but the same directory printed from line 8: cgiguide/chap3.
On line 13, two UNIX commands are executed at the same time without a semicolon. What happened here? Well, this takes advantage of something called a UNIX pipe. The pipe passes the output created by the first command to the next command. Let's explore this example a little closer.
The UNIX command is ls -l |grep ^d, and it can be interpreted as saying give me the listing of all the directories in this directory.
Let's break this one down into each of its parts. This is where the power of pipes and being on a UNIX machine start to become apparent:
- ls -l is the directory listing command with the argument switch -l added. The -l tells UNIX to give the long format for the directory listing.
- |is a pipe command. It tells UNIX to send the output of the last command to the next command.
- grep ^d is a search command. Its syntax follows:
grep search_string search_list The ^d is a combination search_string. The ^ tells grep to search only at the start of the line, and the d tells grep what to search for. So only search for lines that begin with d-the beginning character for all directories. The search_list is sent to grep through the pipe command | as a result of the ls -l command. That's a quick lesson on building powerful tools using a combination of simple UNIX commands.
If you want to explore UNIX further, I can recommend several guides. A good introductory guide to the UNIX C Shell, which is one of the common operating environments I recommend, is The UNIX C SHELL Desk Reference, by Martin R. Arick, published by QED Technical Publishing Group. If you are interested in learning how to create UNIX scripts, I recommend UNIX Applications Programming Mastering the Shell, by Ray Swartz, published by Sams Publishing.
The exec Command and CGI Scripts
The exec command and the UNIX Shell have lots of power, but the exec command and CGI have even more. Using the exec command and Perl CGI scripts, you can do almost anything. This is where your imagination takes over and you start to let the power of your computer and your mind work together to wow your Web page visitor.
The syntax of the command just replaces the cmd keyword with cgi. The full format of the command is shown on line 17 of Listing 3.8: <!--#exec cgi="server side include_cgi_dir.cgi" -->
There is very little that's special about CGI programs executed from within an SSI file. The server still expects your CGI program to output a Content-Type header. All the HTML tags you expect to work still do. However, you cannot execute a non-parsed-header (NPH) CGI program inside an SSI file. The NPH-CGI program tells the server to not parse the returned response headers; the NPH-CGI program is supposed to return the correct response headers. This presents a conflict to the server because it already is returning HTTP response headers for the parsed HTML file. To prevent this server conflict, NPH-CGI programs are illegal in SSI files. NPH-CGI programs are covered in Chapter 4 "Using Forms to Gather and Send Data."
Looking At Security Issues with SSIs
Is your server more secure with or without SSIs on? In short, it only matters if your server does not allow CGI programs. Most servers allow CGI programs, so if they follow the same restrictions for SSIs that are set for CGI programs, there just isn't any extra risk.
Some servers allow includes but turn off the exec command. This happens because someone thinks that the exec command gives you more power than CGI programs do. It doesn't. I can do a lot more inside my Perl script than I can with my SSI exec command.
SSIs just let me start a program without the client having to click the Submit button. This seems kind of silly because you can activate a CGI program just by creating a link to a CGI program. So if your site allows CGI programs and not the exec command in SSIs, tell your System Administrator to turn the exec command back on (unless he plans on turning off CGI altogether).
Learning Perl
Now that you know how to use variables in Perl, its time to add the remaining major programming building blocks. In this "Learning Perl" section, you'll learn about Perl's branch statements: if, else, and elsif. The if statement tells your computer to execute the next series of statements only if a particular condition is true. The if statement is one of the foundation statements required for writing useful code. Also in this section, you'll learn about the Perl loop statements. These statements enable you to execute the same code multiple times. The number of times the code is executed is based on a conditional expression at the beginning of the loop statement. When you finish this morning's "Learning Perl" section, you'll have the basics necessary to write useful Perl programs.
Exercise 3.2. The Perl conditional statement if(){} else{}
Your computer reads your Perl program one line at a time. It does exactly what each line tells it to do. Your mind often is referred to as the most complex computer imaginable. Now, for some people, that might be overly generous, but for the sake of this discussion, let's accept that the mind is like a computer.
Using that analogy, if you wrote a program to tell your body to walk, the program might be a series of instructions telling your legs to put one foot in front of the other. This simple program would work just fine if all you had to do was walk in a straight line, but occasionally you will need to stop or change directions. The conditions that cause you to change directions or stop are the conditional statements of a program. I might want to tell my program that if there is a brick wall in front of me, turn left or right, depending on other conditions; otherwise, keep going straight. Lots of different conditions can be strung together to determine whether I want to turn right or left.
That might seem like a lot of discussion without any programming information, but really you just learned about the basics of Perl programming conditional statements. The fundamental Perl conditional statement is the if statement, which looks like this when used with the walking program: if (a brick wall is in front of me) { turn left } else { keep going }
This exercise examines the if and the else statements. The if statement here contains all the parts of a complex if statement:
- The if keyword: if
- An expression of the condition: (a brick wall is in front of me)
- The block of statements to execute when the condition statement is true: {turn left}
In Perl, the statement to execute is called a block because it can include more than one statement, and each statement can be any valid Perl statement. The block of statements after the conditional expression is executed only if the conditional expression is determined by the computer to be true. The exact format of the if statement follows: if (condition expression){ block of statements }
The conditional expression must be surrounded by opening (()
and closing ()) parentheses.
The block of statements must be surrounded by curly braces ({}).
In Listing 3.9, you'll work through a complete example that uses
different combinations of the if,
else, and elsif
statements.
| Note |
You will see lots of different styles for indenting the block of statements after the if condition expression, and some people are very adamant that their way is best. This is really an argument over what is the best color for your car. If you
like blue, black, or red, it really is best for you to get that color car, but the car will run just the same.
As I have said previously and will say again: It is important to pick a style and use it. You pick the style. Here are several styles for formatting if, else statements.
|
Listing 3.9. Using the Perl if
else elsif statements.
01: #! /usr/local/bin/perl
02:
03: # some of these variables are zero based:
04: # 0-59     0-59     1-24   1-31           0-11
05: ($second, $minute, $hour, $day_of_month, $month,
06: # 0-99   0-6        1-366        0,1
07:  $year, $weekday, $day_of_year, $daylight_standard_time) = localtime(time);
08:
09: #is the month december and the day the 24th or 25th?
10: if ( ($month == 11) && ($day_of_month == 24 || $day_of_month == 25) ){
11:    print "Merry Christmas, World \n";
12:    }
13: else{
14:     # is it after 6pm
15:     if ($hour > 18){
16:         # is it after 6pm and before 9pm
17:     if ($hour < 21){
18:        print "Good Evening, World\n";
19:        }
20:         # then it must be after 9pm but before midnight
21:     else {
22:        print "Good Night, World\n";
23:        }
24:         } #end if hour > 18
25:     elsif ($hour > 12){
26:         print "Good Afternoon, World\n";
27:         }
28:     elsif ($hour > 6) {
29:         print "Good Morning, World\n";
30:         }
31:     # if is between 6am and midnight
32:     else{
33:         print "Go to BED already! \n";
34:         }
35:     }
This is a relatively long example, but you'll work through most of it one step at a time. By the time you're done with this section, you should feel comfortable with the code here.
Let's start with lines 3-7. This is really just one line of code. The lines beginning with the number sign (#) are comments and are not executed by the computer. Comments are used to help the programmer remember what is going on. Lines 3-7 could be rewritten, using shorter variable names and without comments, like this: ($sec, $min, $hr, $mntdy, $mon, $yr, $wk, $yrdy, $stm) = localtime(time);
Both this line and lines 3-7 do exactly the same thing. I have problems with this line, though. Even with more readable variable names, I would have a hard time remembering which variables start at 0 and what each variable's range is. I like comments; they help me a lot after I have slept for an hour or two. Lines 3-7 are kind of like assigning data to the array cells of a regular array, which you learned about in Exercise 2.1. In that exercise, line 3 assigned a list to a regular array: @my_name = ("Eric ","C. ","Herrmann");
The localtime function on line 7 creates a nine-element array. Instead of assigning the data to an array, however, you assign the data to a list of scalar variables: ($second, $minute, $hour, $day_of_month, $month, $year, $weekday, $day_of_year, $daylight_standard_time)
All the data returned by localtime is integer data. Most of the values start at 0. This is supposed to help you index through arrays of the names of months or days of the week. It seems kind of weird that December is the 11th month of the year. But that's how it works, because the first month of the year, January, is month zero.
The function localtime() is part of the Perl distribution library. The parameter time in localtime(time) is actually another Perl function that returns the current time in number of seconds since January 1, 1970. The function localtime() then converts that time into the nine elements of data on the left-hand side of the equal sign.
The complex if statement on lines 10 and 11 could be read as the following:
If the month is December and the day is the 24th or the 25th, then say Merry Christmas, World
The condition expression ($month == 11)
is evaluated or read first. The computer checks to see whether
the variable $month equals
11 (because the month of
December is represented by the value 11).
| Note |
| You use the double equal sign (==) to tell the computer that you want to compare the variable $month as an integer. If you want the computer to compare your variable equal to a character string, you use the eq operator, as in this example: if ($month eq "december") |
The operator && is read as AND by your computer. The operator || in the next portion of the condition expression is read as OR by your computer. There is a set of parentheses around the $day_of_month checks so that the computer evaluates the conditional expression to True only if both the month is December (11) and the day is either the 24th or the 25th. So take a moment to reread line 10. You should be able to follow it now: If the $month variable is equal to December, and the $day_of_month variable is 24 or 25. The parentheses around the $day_of_month expression can be read as the either part (either this or that).
If it is December 24th or 25th, your computer prints Merry Christmas, World. Otherwise, the condition expression on line 10 evaluates to False and the computer skips the block of statements that begins with the opening curly brace ({) at the end of line 10 and ends with the closing curly brace (}) on line 12.
If the conditional expression evaluates to False, the next block of statements the computer executes is the else block from lines 13-35. An else block does not have a condition expression; it is executed whenever the if statement evaluates to False. An if statement does not require an else block.
An if statement can look like this: if (condition expression){block of statements}
An if statement like this is evaluated and, if it is True, the block of statements is executed and then the statements following the block of statements are executed.
In an if else clause such as if (condition expression){block of statements}else{block of statements}
if the if (condition expression) evaluates to True, the computer executes the block of statements following the if (condition expression). If the if (condition expression) evaluates to False, the computer skips the block of statements following the if (condition expression) and executes the block of statements following the else statement.
So, in Listing 3.9, only one of the print statements is printed each time you run the program.
Let's assume that it is not December 24th or 25th, which means that you will skip the block of statements beginning on line 11 and begin to execute the block of statements that begins on line 14. (Actually, the block of statements begins with the opening curly brace ({) on line 13. Each of these condition expressions is very similar, so after you get the first one, you should understand the rest.
The first statement inside the else block of statements is another if statement. You can have any type of statements inside a block of statements. The if statement checks whether the $hour variable is greater than 18 by using the greater than (>) operator. The block of statements following this if statement extends from lines 16-24 and includes another if check. Read the comments that go along with the code to follow along and understand what is happening.
If the condition expression on line 15 evaluates to False, the next statement to execute is line 25-an elsif expression. elsif statements are really the equivalent of an if else statement but sometimes make your code more readable; this is a good example of such a time. In this case, the hour is not greater than 18, so it must be between 0 and 18, so now you check for each block of time that usually is associated with a greeting. Is it after noon? If not, is it after 6 a.m.? If not, it must be between 0 and 6 a.m. I usually take time to write down in English what is happening in a complex if, elsif, or else expression. It helps me make sure that my code is doing what I really want it to do.
Starting from the else block beginning on line 13, the English that describes what you want this code to do follows: otherwise if the hour is greater than 6pm then if the hour is less than 9pm print Good Evening, World otherwise the hour must be between 9pm and midnight so print Good Night, World. otherwise if the hour is greater than noon but less than 6pm print Good Afternoon, World otherwise if the hour is greater than 6am but less than 6pm and less than noon print Good Morning, World otherwise the hour must be between midnight and 6am so print Go to BED already!
If this program were written as blocks of statements and conditional expressions, it would look like this: if (condition expression) {block of statements1} else {block of statements2}
{block of statments2} looks like this: if (condition expression){block of statements3} elsif(condition expression){block of statements4} elsif(condition expression){block of statements5} else{block of statements6} {block of statments3} looks like this: if(condition expression){block of statements7} else{block of statements8}
The unexpanded {block of statements} are simple print statements with no condition expression inside them.
During this exercise, you learned about statements that cause the computer to choose between different blocks of statements to execute. The basic syntax of those statements follows:
- if (condition expression){block of statements}
- if (condition expression){block of statements} else {block of statements}
- if (condition expression){block of statements} elsif {block of statements} ...
The elsif statement can be repeated as often as desired.
- if (condition expression){block of statements} elsif {block of statements} ... else {block of statements}
Exercise 3.3. The Perl loop statements While and Until
In Perl, as in other languages, you actually can build more than the basic looping constructs, but the four basic loop constructs will satisfy all your programming needs. Even these four do basically the same thing:
- Checks for some condition
- If True, executes the next block of statements
- Repeats from step 1
You will find yourself using at least two of the four constructs on a regular basis. It's kind of like the different knifes you have in your kitchen. They all do basically the same thing, but you use different knifes to do slightly different tasks. The four basic loop control structures follow: while (conditional expression) {block of statements} until (conditional expression) {block of statements} for (conditional expression) {block of statements} foreach variable (array) {block of statements}
There is a fifth construct that really isn't a loop control construct but sometimes is used with loops to change when the conditional expression is evaluated. This fifth construct is called the do statement. In this exercise, you will learn about the while and until loops and the effect the do statement has on these two loop constructs.
The while and until loop constructs first check the conditional expression before they execute their block of statements. The do statement has the following syntax: 1: do {block of statements} while (conditional expression) 2: do {block of statements} until (conditional expression)
This makes the do looping constructs unique among the other looping constructs. The do until/while loop construct always executes the {block of statements} at least once. The (conditional expression) of the while/until statement is evaluated after the {block of statements} of the do statement. Each of the other loop control constructs evaluate the (conditional expression) first and might not ever execute their {block of statements}. The for and foreach statements are covered in the exercises in Chapter 4. Listing 3.10 illustrates using the while, until, and do statements using different looping variations.
Listing 3.10. Using the Perl while
and until loops.
01: #!/usr/local/bin/perl
02:
03: while($count < 5){
04:     print "the count is $count\n";
05:     $count++
06: }
07:
08: print "The count AFTER THE WHILE is now $count\n";
09:
10: until ($count > 9) {
11:     print "the count in the until loop is $count\n";
12:     $count++;
13: } ;
14:
15: print "The count AFTER THE UNTIL is now $count\n";
16:
17: do {
18:     print "the count in the do while loop is $count\n";
19:     $count++;
20: } while ($count < 9);
21:
22: print "The count AFTER THE DO WHILE is now $count\n";
23:
24: do {
25:     print "the count in the do until loop is $count\n";
26:     $count++;
27: } until ($count > 14);
28:
29: print "The count AFTER THE DO UNTIL is now $count\n";
30:
31: while(@pwdlist = getpwent){
32:     $user = $pwdlist[0];
33:     $shelltype = $pwdlist[8];
34:     print "$user uses the $shelltype shell\n";
35: }
In Perl, the while loop generally is used for reading files, as illustrated on line 31, but I think it's easier to understand what is happening with the four examples before line 31, so that's why you're working with them right now.
Because Perl creates your variables for you as you need them, the conditional expression on line 3 will work as expected. In other languages, using a variable before setting it creates problems. In other languages, the variable might have unknown data in it, which could result in a very large number being in $count before it is used. Perl tries to be helpful and deals with initializing the $count variable to 0 and then increments it by 1 on line 5. If you want to practice safe programming, I recommend inserting this line before line 3: $count = 0;
Initializing data is like having safe sex: You don't really see the results for the extra work, except in the bugs you don't get in your code. The opposite is also true. Not initializing your data is like unprotected sex: You can usually get away with it, but when you don't, you really regret it. You could spend hours picking the bugs out of your code only to find that your program is fine except for some corrupted initial data.
The while and until loops starting on lines 3 and 10, respectively, operate in a similar manner. First, the computer checks the conditional expression; if it evaluates to True, the {block of statements} is executed. Line 4 prints the value of counter ($count). Line 5 adds 1 to whatever was the previous value of $count. This is called incrementing the loop control variable. $count is called the loop control variable because the loop {block of statements} is executed only if $count passes the test of the conditional expression.
The syntax of line 5 might look a little strange to you. It also could be written as $count = $count +1;
This could be read as take the current value in $count, add 1 to it, and then store the result back in the $count variable.
The syntax $count++;
is shorthand for the longer assignment statement. You will see lots of code that uses the $count++ syntax, however, so it's a good idea to get used to it early in your programming experience.
Let's go back over the while and until statements. The computer always first checks the conditional expression after the while or until statement and then executes the {block of statements} if the conditional expression evaluates to True. After executing the {block of statements}, the computer returns to the while/until conditional expression and repeats the procedure of checking the conditional expression and executing the {block of statements} if the conditional expression is True. If the conditional expression evaluates to False, the computer skips the {block of statements} and executes the first line after the block of statements.
The while and until statements work exactly the way you would expect them to. If you use the while statement, the {block of statements} executes while the conditional expression is True-in this case, while $count is less than 5. If you use the until statement, the {block of statements} executes until the conditional expression is True-in this case, until $count is greater than 9.
The do while construct on lines 17-20 operates slightly differently. Because the {block of statements} follows the do statement instead of the conditional expression, the {block of statements} always executes at least once.
When you run this example, your computer prints $count equal to 10 after the until loop on lines 10-13. The until loop executes until $count is equal to 10 (greater than 9). Even though $count is obviously greater than 9, the computer first executes lines 17-19. The value of $count is printed on line 18 and then incremented on line 19. The conditional expression finally is evaluated on line 20 when $count now equals 11. The conditional expression evaluates to False and the computer moves onto the next statement on line 22. Lines 24-27 operate in a similar manner, except that the conditional expression does not immediately evaluate to False.
Most Perl programmers are used to seeing while loops that look like the example shown on lines 31-35. The conditional expression reads a line from the system password file and assigns the result of each line to the password list array. The function getpwent()returns an empty list after it has read every line from the password file, and the while loop conditional expression then evaluates to False.
The example in Listing 3.10 uses only the first and eighth entry
in the array. Table 3.5 lists each of the fields returned by getpwent.
| Value | |
| User account name | |
| User account password encrypted | |
| Numeric user ID | |
| Numeric group ID | |
| A limit on the size of a user's account | |
| A comment field-sometimes used to describe the account type | |
| Not used | |
| Home directory for the account | |
| Command shell the account uses |
Line 34 prints the user's account name and the type of shell he uses. Lines 32 and 33 could be deleted, and the array cells could be used in place of the $user and the $shelltype variables, but this seems much more readable. If you write a program like this and use only $pwdlist[0] and $pwdlist[8] as variable names, you're likely to forget what type of data they contain.
Summary
In this chapter, you got your first usable Webmaster tool. SSIs can make your job as a Webmaster much easier. No more cutting and pasting of your signature file into all the different Web pages that you have to create and maintain.
SSIs are the first step to creating dynamic documents, and they require almost no programming knowledge. With SSIs, you can include the current date, print the date when your Web page was last modified, execute system commands, and access any CGI program you normally could run through other means.
SSI commands are made available on your server through a configuration file called srm.conf. Two commands in the srm.conf file enable the SSI commands. The Options Include directive actually enables the operation of SSIs. The AddType text/x-server-parsed-html .shtml
tells the server what types of files to parse for SSI commands.
SSIs, in my opinion, create no more risk for your server than CGI programs. So if your server allows CGI programs, it should allow SSIs. However, the fact that each SSI file requires parsing is a legitimate concern of your server's System Administrator. If your server is underpowered and overworked, one way to get a little relief is to turn off SSIs. Most sites don't suffer that much from the extra burden of parsing SSIs and therefore allow their users the advantages that SSIs offer.
Q&A
| How do I test the program in Exercise 3.2 (Listing 3.9)? | |
| Using the Perl debugger is probably the easiest method to test this program. When you use the debugger, you can set the variables in the program that control the condition expression. To test this program using the debugger, let lines 5-7 execute and then change the variables to execute the different conditional expressions. Start by running the program through without any changes, and confirm that it works without changes. Next, start modifying the $hour variable so that it returns True for the different condition expressions. Unless it's Christmas eve or Christmas day, change the $month to 11 and $day_of_month to 25 to test the Merry Christmas block of statements. If it is Christmas, give it a rest and go play! | |
| Why don't the following three commands work?
Error 1: <!--#flastmod file="../cgi-bin/cgi-lib.pl" --> | |
| This file command tells the server to use a relative pathname to find the file you want to get the last modification date on. So if you are one directory down from the cgi-bin
directory, this should work. But it doesn't. This type of pathname is valid from within your CGI programs and from the command line. If you do an
ls -lat ../cgi-bin/cgi-lib.pl
you probably will get a valid response. In this case, however, the file command argument is valid only with the current directory and subdirectories. Use the virtual command to find the cgi-bin directory. Assuming that the
cgi-bin directory is just below the server root, try this command:
Error 2:
I would expect you to suspect the spaces around the equal sign (=) in this command, but that's not the problem. The opening HTML tag (<--) is missing the exclamation point (!). The command will work if you type it as the
following:
Error 3:
This is an example of spacing problems, and it is probably one of the most common mistakes made when trying to get SSI commands to work. You must include at least one space before the closing HTML tag (-->). The command will work if you type it
as the following: | |
| Why don't I see an error message from my SSI command? | |
| What is the file extension of the file that your SSI command is part of? I'll bet you it's not .shtml. It's very easy to forget that the server ignores all SSI commands not in the correct file type. And because the SSI command is enclosed in a valid HTML Comment tag (<-- Comment -->), the server sends your SSI command to the browser without trying to execute it. The browser reads the HTML, sees the HTML Comment field, and ignores the line altogether. | |
| Why can't I execute the system commands I can from the command line? | |
| When your SSI exec command is executed by the server, your user group probably is set to a restricted access user group like Nobody. Just as you have limited privileges to move around your server, when someone accesses your Web page, the same thing happens. The Web server environment usually allows your Web pages to be accessed under the process group Nobody. The process group Nobody may have fewer privileges than you do as a normal user. If some of the system commands you are using as SSI commands work from the command line, but not within your SSI exec command, first check for all the usual SSI errors, and then e-mail your System Administrator to see whether those commands are enabled for the user group Nobody. You can't test for this from the command line, because you will not be executing under the restricted Nobody process name. |


Popular Tutorials
-
 MS Access
1109
MS Access
1109
-
 C++
1222
C++
1222
-
 HTML
584
HTML
584
-
 JavaScript
616
JavaScript
616
-
 Vbscript
873
Vbscript
873
-
 Oracle
473
Oracle
473
-
 VC++
875
VC++
875
-
 SQL
2959
SQL
2959
-
 XML
514
XML
514
-
 Java
814
Java
814
-
 Perl
455
Perl
455
-
 Linux
451
Linux
451


