Web based School
|
ToChapter is going to be an exciting Chapter. You finally get to create your first project
using Visual InterDev. You have learned about many features in the last few Chapters,
and in this lesson, you will finally have a chance to experience some of these features
for the first time. You will get the most out of this lesson if you practice using the tools as you
go along. To begin the Chapter, you will explore a standard Visual InterDev project,
and take a look at its dissected components. This dissection won't be as dreadful
as your experience with a frog was in high school biology, though. In this section, you will learn the different components and parts of a project.
This knowledge should build a foundation so that you can appropriately use all of
the Visual InterDev features and technologies in developing your Web-based applications.
After looking at each of the Visual InterDev project components, you will get a brief
refresher on browser extensions and how they fit into the Visual InterDev scheme. At the end of toChapter's lesson, you will build your first Hello Web application.
For C programmers, this application will be a little more sophisticated than the
simple Hello World application that you built for your first C program. The Hello
Web application will contain most of the main project components that are the focus
of this lesson. While you won't be developing the whole application, you will be
adding some code and interacting with the components and code provided for you. This
lesson should be a very good introduction to the Visual InterDev development experience. Get a refill on that cup of coffee, and let's begin.
At this point, you have read a lot about the features of Visual InterDev as well
as the various technologies that it supports. The focus of this lesson is on assimilating
what you've read into a Visual InterDev project. If you have participated in any
type of development effort, you are familiar with the concept of a project. You know
that a project usually consists of various files that come together to build an application. Developing an application is like making pancakes. When you're making pancakes,
you have to add specific ingredients that include the pancake mix, eggs, oil, and
milk, into a bowl. The ingredients symbolize the technologies such as HTML, ActiveX,
and VBScript. The bowl symbolizes the project that provides a workspace for you to
work with the ingredients. Once you have mixed the ingredients in a bowl, you cook
the results to produce the finished product. Likewise, once you have finished cooking
up your Web pages with Visual InterDev, you will deploy them for display on your
Web server.
A Visual InterDev project consists of multiple files that integrate to form your
web site and Web-based application. During development, you can install both the
client and server portions on the same machine. YesterChapter, you learned about the
advantages and disadvantages of this approach. A more typical configuration enables
the Visual InterDev development environment on the client machine to access all of
the files on a central web server. These files are downloaded from the server to
your machine in a local working directory so you can make any changes to your code.
Possible project files include HTML files, Active Server Pages, images, and other
components that make up your web site. When you create a new Visual InterDev project, Visual InterDev builds a sub-directory
for your web within the root directory of your web server. Your project files will
be stored within this sub-directory. The name of this sub-directory assumes the name
of your project. For example, if you named your project MyFirstProject, a folder
would be created within the root directory of your Web server called MyFirstProject. You also can create sub-directory folders from within Visual InterDev to organize
your files within your project directory. An example would be the Images sub-directory
that's created by default when you create a Visual InterDev project. This directory
structure contains all of the master copies of your files. A virtual root directory
for your Web site also is created on your web server. This virtual root directory
takes on the name of your project and points to the files within your project sub-directory. The virtual root represents the directory that contains all of the files for a
project on your Web server. The virtual root is comprised of the Web server name
and the virtual root directory for your project. The Web server name also is referred
to as the domain name. The following example shows a virtual root for a sample project. In this example, you see how the name of the Web server, MyServer, and the name
of a project, MyFirstProject, join together to form a virtual root for your application.
You can see the virtual root for your application from within Visual InterDev, using
FileView. Visual InterDev saves you time by handling the creation of this virtual
directory structure. The advantage of the virtual root is that users can access your files through
a Uniform Resource Locator (URL) instead of having to search through your project
file directory structure. Taking this example a step further, a sample URL for your
project might consist of the following: where Default.asp is the name of a web page in your project. By default, a global file (global.asa) and a search file (search.asp) are created.
These files are placed in the root of your web project directory. The global file
enables you to place server-side script for initialization and termination routines
for your session and application. The search file adds full text searching capabilities
to your web pages. Visual InterDev also creates a local working directory on your
client machine. This working directory serves as a placeholder for the server files
as you access them.
The project workspace is the pane on the left-hand side of the Visual InterDev
development environment workspace. The project workspace consists of three views:
FileView, DataView, and InfoView. Each of these views appears as a tab at the bottom
of the project workspace based on what you're currently working on within Visual
InterDev. Once you have created a project, you will begin to work with the files within
that project. Some files will be created for you. You will add other files as you
design and develop your application, and use the FileView to interact with your project
files. The FileView provides a Windows Explorer-like interface, enabling you to effectively
create and maintain your files and folders. The FileView uses most of the Explorer
functions like drag-and-drop support for moving files and right mouse button support
for accessing the shortcut menu for a particular file. You can add files and create
new folders for existing files. The DataView enables you to view all of your database objects from the database
server. The DataView becomes accessible when you add a database connection to an
Active Server Page within your project. You can interact with each object and display
the results to the right of the project workspace pane. This view is very similar
to the FileView. The only difference is that you are manipulating objects in your
database as opposed to files on your web server. The InfoView enables you to view the help files and topics regarding Developer
and Visual InterDev. InfoView uses the guide metaphor that became a standard for help
files using the Windows 95 interface. You are presented topics and a table of contents
for each topic. You can then probe deeper into the contents and display the contents
to the right of this pane. When you open Visual InterDev, InfoView is displayed by
default. The other views are available as you open a workspace and files and insert
database connections into your applications. Visual InterDev provides several methods for you to open your project. You can
use the Open command from the File menu which concentrates on opening a specific
file type like HTML files and images. You also can use the Open Workspace command
from the File menu. This option focuses on a project and workspace. You will use
the Open Workspace option most of the time.
You can open a file with its native editor by double-clicking on the file. You
also can select the file and right-click the mouse to display the shortcut menu.
Then, you can select the Open menu option to open the file with its default editor. You also can choose the Open With menu option to open the file with another application,
as long as the selected program supports the file type. When you open a file in your
project, the client first attempts to get the file from the working directory on
the client machine. If no working copy exists, the client machine requests a working
copy from the server. The server machine sends a copy of the master file to the client
and places the file in the working directory of the client machine. Visual InterDev provides visual cues to indicate the status of the file. The icon
for a file that has a working copy resident on the client machine is colored, and
the icon for a file type that doesn't have a working copy resident on the client
machine or that is read-only is grayed. You can request a working copy from the server by selecting the file and choosing
the Get Working Copy option from the shortcut menu. This command retrieves the file
from the server. If you have already retrieved a working copy and made changes to the file, a warning
message is displayed, indicating that you already have a working copy of the file.
The message asks whether you want to use the local file or the copy from the server
as your working copy. The dialog window displays the file statistics for both the
server master copy and the local file, including the name, date, and time of each.
You then can choose to use the existing local file, use the master copy from the
server, or cancel the action. Figure 4.1 displays the Confirm Get dialog window for a sample project file that
already has a local file on the client machine. The Confirm Get dialog window. After you have made changes to a file, you choose the Save, Save As, or Save All
option to save your changes. This action updates the master copy on the server. The
Save command saves the current file, while the Save As command enables you to save
the file with another name. The Save All option saves all the files in your project. Visual InterDev won't inherently resolve conflicts between changes and updates
to files. When you get a working copy of a file from the server, you don't place
a lock on this file to keep others from retrieving and making changes to the file.
Also, the server won't warn you that someone has checked out this file. For big development teams, you should use a source code control package. Visual
InterDev is fully compatible with Microsoft Visual SourceSafe and can be integrated
to provide a robust option for managing your project source code. By using this combination,
you can ensure that developers can exclusively check out files from the server. When
the updates are made, a developer can send the file back to the server for others
to access. On Chapter 19, "Working Effectively in Teams with Visual SourceSafe,"
you will learn how to use and integrate Visual SourceSafe with your Visual InterDev
projects. Visual InterDev uses a client-server model for development that's very effective.
This model is similar to the interaction of a production web site. Your information
is downloaded to the client upon request. You interact with the information, and
the changes are sent back to the server.
A Visual InterDev can contain many individual files and components. In this section,
you will be guided through this maze and introduced to the most common and relevant
files that you will be working with.
These files are the main ingredients of which your web site is comprised. The
most typical files in this category include the following:
HTML files contain your HTML code and are denoted with the .asp extension. These
files also might contain objects such as ActiveX controls, Java applets, Netscape
plug-ins, ActiveX Layout files, and images and multimedia files. You can activate
the appropriate editor for most of these objects by placing the cursor over the file
reference in the HTML code and right-clicking on the mouse. This action displays
a shortcut menu containing a menu item for editing the object. You can select the
menu option, and the object will be opened in its native editor. For example, right-clicking
the mouse while your cursor is on an ActiveX control reference in your HTML file
opens the Object Editor. Your cursor must be placed between the <OBJECT>
tags for that control. On Chapter 2, "Visual InterDev: Up Close and Personal," you received a brief
overview of the HTML editors that are provided with Visual InterDev. You have two
main choices to create and edit your basic HTML code: the HTML Source Editor and
the FrontPage Editor for Visual InterDev. The HTML Source Editor provides a specialized
text editor that enables you to create and maintain your HTML code. This editor provides
some specialized features over basic text editors in that the HTML Source Editor
displays your HTML code in a color-coded fashion. This format enables you to distinguish
the different types of text within the file. For example, HTML code is a different
color than your comments within the code. The FrontPage Editor enables you to visually
create your HTML web page. You select objects and choose properties for your web
page, and this WYSIWYG editor generates the HTML for you. You still can access and
manipulate the generated HTML. You also can add your own custom HTML. If you're stubborn and want to stick with Notepad or some other editor, Visual
InterDev also enables you to use other editors to create HTML code. You then can
import this code into your Visual InterDev project. You also can create client-side script to be included in your HTML files. This
script will be downloaded from the server with the web page and will be executed
on the client machine. An example of client-side script would be providing basic
field validation for a form. You can create client-side script by using the available HTML editors within Visual
InterDev or another editor. The script code is denoted by the <% %>
delimiters and is located between the <SCRIPT> and </SCRIPT>
tags. Visual InterDev supports Microsoft's VBScript as the default scripting language,
and you also can use Microsoft's implementation of JavaScript called JScript from
within a Visual InterDev project.
This file is automatically generated when you create a new project and is denoted
by the .asa file extension. The global.asa file enables you to use server-side script
for initializing your application at start-up, handling your database connections,
and cleaning up the application when the application is finished. You can add scripting
code for the duration of both the application and the user sessions. A user session enables you to maintain state with the client machine. An example
of using the session events would be maintaining a database connection with the client
machine. This persistent state can be very useful for tasks such as high-volume sales
order entry applications where you need to make sure that the order is confirmed.
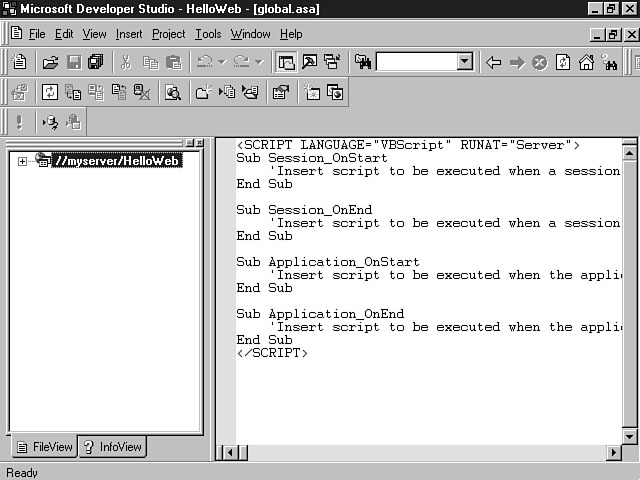
Figure 4.2 shows an example of the global.asa file that is created by Visual InterDev
when you begin a new project. The global.asa file as viewed through the HTML Source Editor. Figure 4.2 shows how Visual InterDev creates a shell for your scripting code.
The scripting code is indicated at the top of the file. This example uses VBScript
as its default scripting language. The RUNAT=Server command instructs Visual
InterDev to execute this script at the server. Comments are included to show you
where to put your application and session code. Notice the four sub-procedures that
are created for your application within this file: Session_OnStart, Session_OnEnd,
Application_OnStart, and Application_OnEnd. The Application_OnStart event is initiated when the application is first
accessed. Specifically, this code is executed when the first page of the application
is requested. You use this event to make information available to all users of your
applications. For example, if you wanted to set a variable or display a message for
all client machines that requested your application, you would populate the variable
or define the message in this event. Then, as users accessed your application, the
variable and message would be available to them. This information also is available
to any of your web pages. You can use this event to reduce redundancy in your code. The Application_OnEnd event executes when the web server is stopped.
You should include termination and clean-up routines for ensuring that the application
finishes cleanly and smoothly. Also, you might want to add checks for any unsaved
data. The Session_OnStart event is activated when the user requests a first
page. When you add database connection to your application, the scripting code for
that connection is placed in the Session_OnStart event. Each session is
unique to a user and absorbs some server overhead. Use this event wisely, and resist
the temptation to place too many objects in this event. Additional users can present
a resource nightmare and burden. You can create objects at the page level to avoid
the resource issue. A good use of the session event involves the use of Recordset
variables to store database values across your web pages. In this way, you can avoid
having to maintain access to those values across related web pages. The Session_OnEnd event executes when the user session is over. A session
can end in several ways. First, the session terminates if the user doesn't request
a page within the time period specified by the Timeout property of the Session
object. The default value for this property is 20 minutes. You can adjust this property
based on your application needs. Also, you can specifically call the Abandon
method of the Session object to end a session. Again, you would want to
include any clean-up routines for the individual user session in this procedure.
An example might include prompting for saving changes to data that was still being
processed. While adding a database connection to the Session event was touched on
here, it will be discussed in detail on Chapter 8, "Communicating with a Database."
For now, it's important that you see what a Session_OnStart procedure looks
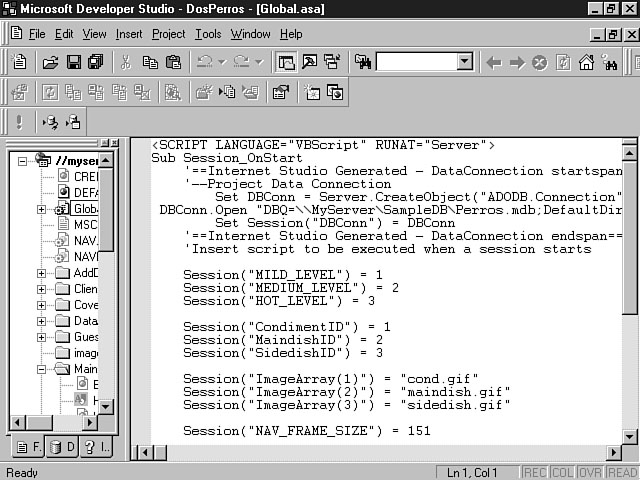
like for a database connection. Figure 4.3 depicts the Session_OnStart event
that includes script for connecting to a Microsoft Access database. Visual InterDev generated this scripting code when a database connection was selected
to be inserted into the global.asa. Although you may be unfamiliar with the code,
don't worry if you're scratching your head. The point of this illustration is to
show you what scripting code in these four events looks like. You will become very
comfortable interacting with a database during the second week. In this figure, the Session_OnStart event displays scripting code
for connecting to a database.
Visual InterDev includes several additional applications that enable you to create
and manage image and multimedia files. These files can be easily incorporated into
your project to enhance the user experience. Microsoft Image Composer, Music Producer,
and Media Manager are very robust products and are discussed in detail toward the
end of this week on Chapter 6, "Spicing Up Your Interface with Images and Multimedia."
You also can use other products to create your images and multimedia files. Visual
InterDev supports practically all of the standard Internet file formats for these
objects. You can work with these files by double-clicking on the particular file. This
action causes the file to be opened with its native application if there's a default
application associated with the file type. If no default application has been linked
with this file, you need to use the Open With dialog window to associate an application
from the listbox with this file. From this window, you can select a program from
the list and press the Default push button to make this application the default editor
for this file. You also can add applications as well as remove them from the list.
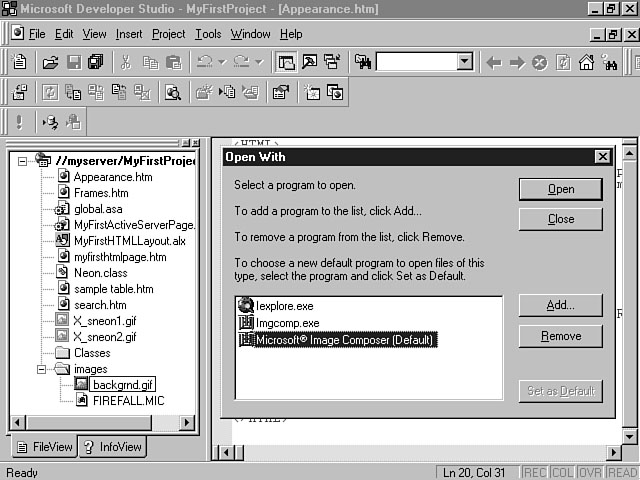
Figure 4.4 displays the Open With dialog window for a .gif image that has been selected. You also can use the Open With dialog window to open files with a different application
than the program that has been associated with that file. Both editors must support
the specified file type. For example, you can use Image Composer to open a .gif file
that had been created with another graphics application. The Open With dialog window. You also can open these files by selecting the file and right-clicking the mouse.
The shortcut menu is displayed, and you can select either the Open or Open With menu
option.
The first two Chapters gave you an introduction to Active Server Pages, which are
special HTML pages that contain server-side script and are denoted by the .asp file
extension. These files process on the server before sending the resulting HTML page
to the client machine. Your choices for scripting languages include VBScript, JScript,
Perl, and other scripting languages. Active Server Pages enable you to interface
with ActiveX Server Components and to interact with your database. You can use the HTML Source Editor in Visual InterDev to create and maintain these
pages. You can insert an Active Server Page by choosing the New menu item from the
File menu. Select the Active Server Pages option from the list and enter a filename
for this page. The Add to Project option is checked by default, and the current project
is displayed. The project directory for your files also is displayed as the default
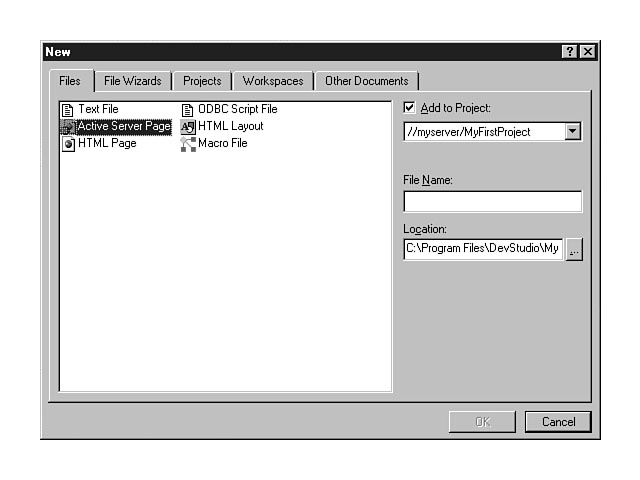
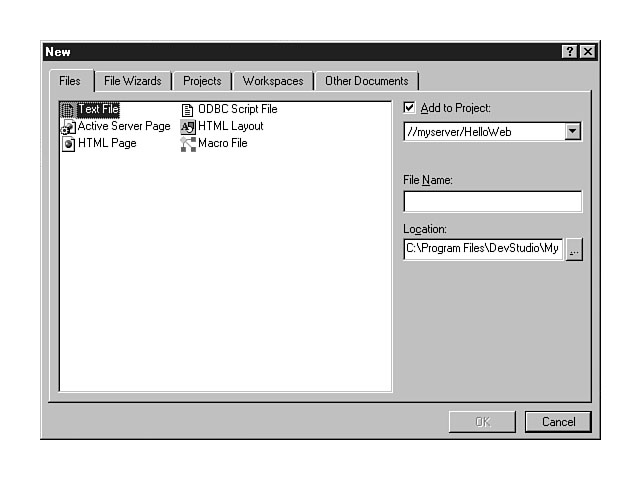
location to place your new page. Figure 4.5 shows a highlighted Active Server Page and the options for creating
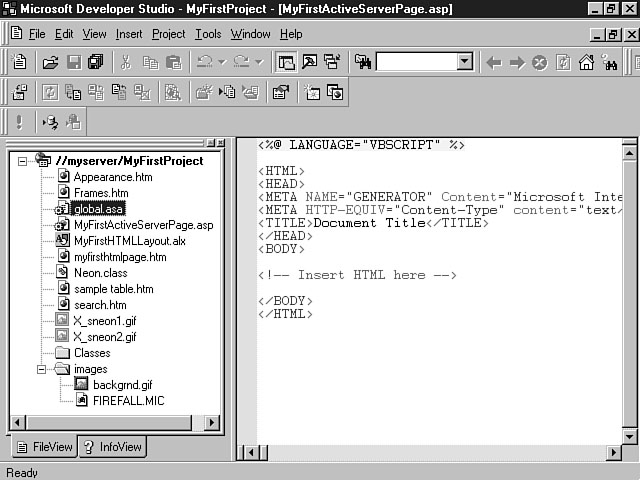
this file from the File New dialog window. Creating an Active Server Page. Figure 4.6 demonstrates the format of a newly created Active Server Page as seen
through the HTML Source Editor. The format of this page is practically the same as an HTML page. The scripting
language is denoted at the top of the document. The page contains a Header, Title,
and Body section. Comments are included so that you know where to place your HTML
code. As a general guideline, you should place your scripting code at the bottom
of this file before the </HTML> tag. You learn how to integrate Active
Server Pages into your applications on Chapter 11, "Extending Your Application Through
Active Server Script." A sample Active Server Page.
ActiveX Layout files specify the exact placement of ActiveX controls onto your
HTML pages. They are followed by an .alx extension. You can create these files with
the Visual InterDev HTML Layout Editor, which provides you with a graphical environment
to drag and drop controls in the layout and visually adjust their properties. Another
feature enables you to place controls on top of other controls, which is similar
to using a frame in Visual Basic to house a group of radio buttons or checkboxes.
Once you have created your layout, you need to reference this .alx file within your
HTML code. You can reference your layout files from either an Active Server Page
(.asp file) or an HTML page (.asp file). A single layout file can be used by multiple
web pages. A single HTML file or Active Server Page also can contain multiple layout
files.
Listing 4.1 demonstrates how to reference an HTML Layout from within an HTML web
page.
The file MyFirstHTMLLayout.alx is a separate file in your project workspace and
is referenced from the HTML file in Figure 4.6. Figure 4.7 depicts a project that contains all of the files that have been discussed
so far and how they're displayed in FileView. A typical Visual InterDev project.
During the first two Chapters you were introduced to ActiveX controls, which are another
component that you will want to use in your applications. Just as you would use graphical
controls in a client-server development tool like Visual Basic, ActiveX controls
are the next generation of objects built especially for the Internet. You will use the Object Editor as well as the HTML Layout Editor to establish
the properties, actions, and layout of these controls. Visual InterDev includes many
ActiveX controls to handle functions like database connectivity as well as the objects
that you have probably used in the past to build client-server interfaces. Examples
of these controls include checkboxes, radio buttons, push buttons, and the listbox.
More advanced controls built specifically for Web-based applications include the
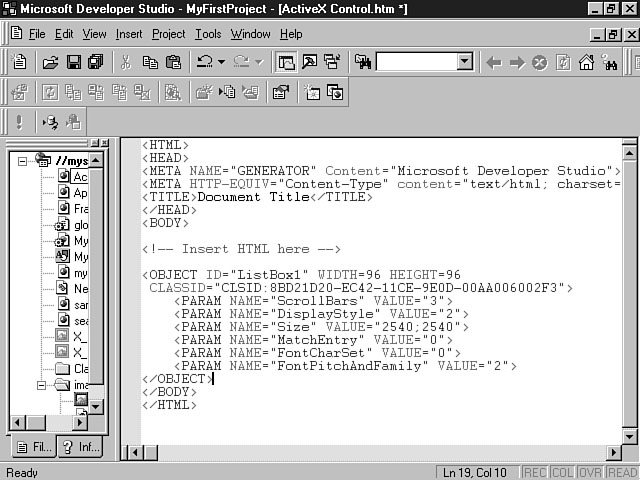
ActiveMovie control and the Marquee control. Figure 4.8 shows an HTML web page that
uses the ListBox control. An ActiveX control as displayed within the HTML code. You should notice that the attributes for the control have been placed within
the <OBJECT> and the </OBJECT> tags. To edit this control,
you place your cursor somewhere between these two tags and right-click the mouse
to display the shortcut menu. You then select Edit ActiveX control from the list
of options. This action activates the Object Editor and enables you to establish
or change the properties of this control. You will interact with ActiveX controls on Chapter 13, "Interacting with Objects
and ActiveX Controls," and you will learn how to truly integrate these objects
into your applications for the best results on Chapter 15, "Integrating Objects
into Your Applications."
You received a brief overview of Design-time ActiveX controls during the first
two Chapters, and should know that these controls enable you to automatically generate
HTML and scripting code by visually setting properties while designing your application.
You insert an ActiveX control for your application and set the properties and attributes
for the control. HTML and scripting code is generated based on the values that you
set. This code is then executed at run time without the overhead of an actual object.
Design-time controls are placed within an Active Server Page to handle actions such
as connecting to a database. Design-time controls are covered in detail on Chapter 14,
"Extending Web Pages Through Design-Time Controls."
This section focuses on the discussion on how Visual InterDev facilitates the
development process. You will see the three distinct phases of application building:
Along the way, you'll learn what each phase is comprised of and how you use Visual
InterDev to accomplish the various tasks within each phase.
This phase focuses on building the application. So far, you have seen the most
common files that you will use to design and develop your application. For a typical
development project, you first create your web pages using HTML and a scripting language,
possibly VBScript or JScript. Next, you develop an Active Server Page to handle your
needs from the server, such as creating a dynamic web page or connecting to a database.
You also might create an Active Server Page to control the flow of logic while interacting
with an Active Server Component. You should insert a database connection into your
application. For the sake of this example, the discussion is focused on using a server
database such as MS SQL Server, although the basic tenets apply to desktop databases
such as Microsoft Access, as well. At the beginning of the Chapter, you learned how to get your files from the web server
and load them into a working directory on your local machine. As you create your
files, save them on the web server machine. Use the Visual Data Tools to interact
with your database through an ODBC connection to the database server. This connection
is live, and enables you to create and maintain objects and manipulate the data.
You also can design and test your SQL calls for inserting, selecting, updating, and
deleting data in the database. Figure 4.9 gives an overview of the development architecture and process and how
Visual InterDev facilitates this process. The development process. Note that you use Visual InterDev on your development client machine to design
and build your application. You interface directly with the development web server
machine as well as the development database server. These interactions are distinct
in nature. In other words, you maintain a network connection to the web server and
interact with files on the server. You can use the Preview in Browser menu option
to view your web pages and test the look and feel of the interface. The use of this
command enables rapid application development by enabling you to test the web pages
within the confines of Visual InterDev. You also can use a commercial release of a browser to view your web pages within
the eventual production environment. For database access, you're connected through
an ODBC connection over the network. This architecture assumes that your network
contains separate database and web server machines and that these machines are on
the same network.
Once you build your application, you need to test it. This phase involves previewing
the web pages in the browser to make sure that they're visually correct. You also
need to make sure that your scripting code reacts to user events properly and creates
the dynamic effect for your web pages. You need to test your database connections
to make sure that your users are able to retrieve the correct information. On Chapter
3, "Design and Development Considerations," it was suggested that you write
scenarios of tasks that users would need to accomplish through your application.
You should use these test cycles to test specific user tasks and actions. You will use the development client machine to preview the web pages through a
browser. You can use the Preview in Browser command during the development and testing
phase to view the web pages, but during the testing phase, you should use the browsers
that will be in the production environment to test the whole application. As you view the web pages, you will be accessing the web server machine. You should
migrate your application from a development area to a separate test area, as suggested
on Chapter 3. By using separate and distinct development and testing areas, you can manage
different releases, changes, and fixes more effectively. Your developers have an
environment to test individual changes that then can be migrated and incorporated
with other developer changes to create a new release. This new release then can be
tested in an environment similar to the production environment. After the application
has been fully tested, the web site can be migrated to a separate production environment.
In the development phase, you connected directly to the database server. During
the testing phase, the client-server model changes. The web server now connects to
your database server to process your database requests. While you still can connect
to the database server directly from your client machine, you will want to simulate
the production environment process for database connectivity using the web server
as the central hub for these requests. The web server maintains an ODBC connection
to the database server and processes and database request from the client. The web
server receives the results and returns the formatted data to the client machine
browser. Figure 4.10 illustrates this process. The testing process.
Once you have thoroughly tested your application, you will deploy the web site
to a production environment. The user machine now becomes the client machine. A user
requests web pages from the web server, and the web server processes the request
by executing any server-side script and interacting with the database server to send
the resulting pages back to the user's client machine browser. As the user interacts
with a page, client-side script is executed on the client machine, based on certain
user events and actions. Visual InterDev contains some good tools for supporting these phases of developing
and deploying a web site. Many of them will be discussed in detail on Chapter 18, "Managing
Your Web Site Files with Visual InterDev." Now that you have learned the Visual InterDev architecture and process, you're
ready to develop your first application using Visual InterDev.
For the final lesson of the Chapter, you will build your first application, a Hello
Web application, using Visual InterDev. You will be provided with a list of tasks
and steps to accomplish, as well as all the code examples you need to add. Make sure
that you pay attention to the steps and code examples, and think about the tasks
as you do them so that you understand what you're doing each step of the way. Remember,
there will be a quiz at the end of the chapter, and you may be asked to accomplish
additional tasks on your own during the workshop at the end of the Chapter.
You need to see an overview of the application before you can begin the development
process. You are going to create a Hello Web application, a simple web site that
will give you an introduction to using the Visual InterDev development environment.
Although creating the application is simple, you will be learning the basic application
building techniques and how best to accomplish those tasks using Visual InterDev.
The tenets that you learn in this lesson will serve as the foundation for every other
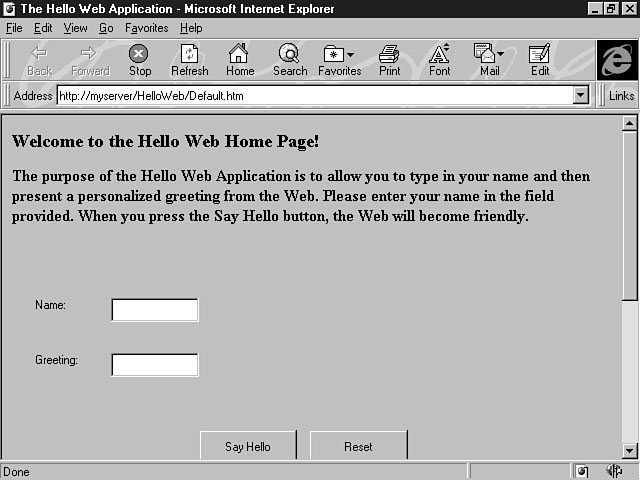
application that you construct. The Hello Web application consists of a web page that displays a personalized
Hello Web greeting. Figure 4.11 illustrates the main web page. As you can see from this figure, the Hello Web application consists of a web page
with two label controls, two text box controls, and two push buttons. The label controls
are named First Name and Greeting. These controls define the contents of the text
box controls to the right of each label. The push buttons are labeled Submit and
Reset. The objective of this application is to provide the user with a personalized
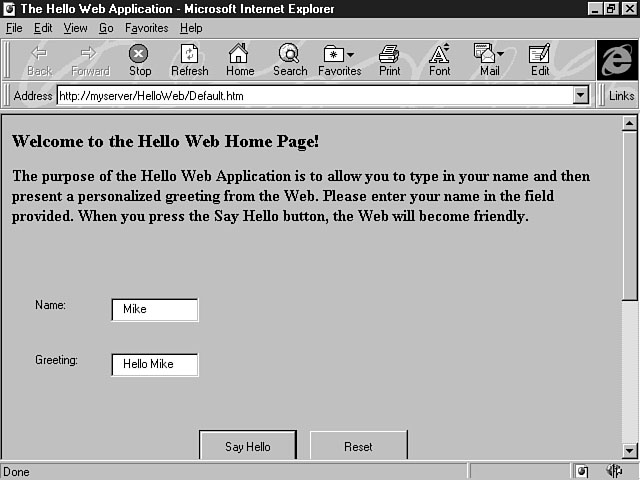
greeting when the user types in his or her name and presses the Say Hello push button.
Figure 4.12 displays the results from typing Mike in the name field and
pressing the Say Hello push button. The Hello Web application. Saying Hello Web. When the user presses the Reset push button, the greeting is cleared from the
web page, enabling the user to start over and enter a new name. This application enables you to interact with an HTML Page, an HTML Layout, an
Active Server Page, and VBScript.
Now that you have a roadmap, you can begin construction. First, if you haven't
already opened Visual InterDev, you need to do so now. The InfoView will be opened
by default. Select the New menu option from the File menu. This action will display
a tabbed dialog window with many choices. The five tabs at the top represent the
categories of new files that you can create within Visual InterDev. Figure 4.13 displays
the File New dialog window with the available categories. The File New dialog window. As you can see from Figure 4.13, the five categories are Files, File Wizards,
Projects, Workspaces, and Other Documents. The following section briefly discusses
what each of these categories represents. The Files category represents individual files. By using the tab that refers to
it, the Files tab, you can add specific file types to your Visual InterDev project.
The available choices are displayed in Figure 4.13. This dialog window was mentioned
earlier in this chapter during the discussion of the creation of Active Server Pages.
If you don't have a project opened, all of the options are grayed out. This tab will
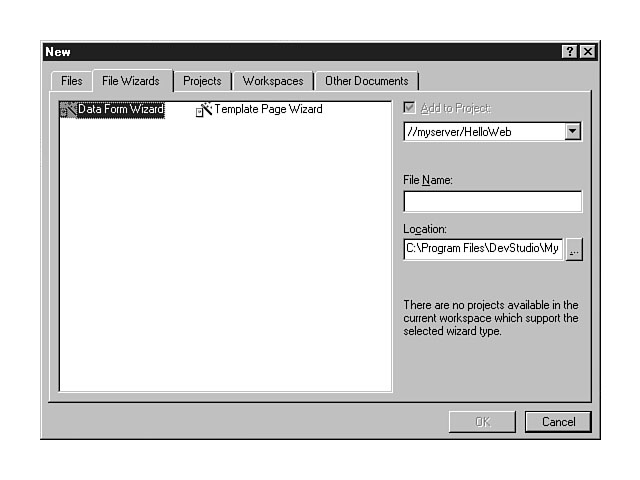
be discussed further after you create the project. The File Wizards tab is the next dialog window. The File Wizards dialog enables
you to use wizards to create certain types of files for your project. These wizards
help you create your file through a step-by-step process. The available types of
wizards include the Data Form Wizard and the Template Page Wizard. The Data Form
Wizard enables you to create an ActiveX HTML form that is bound to a database. The
Template Page Wizard enables you to create a web page based on a predefined template. Figure 4.14 shows the File Wizards tab and the wizards available for creating
files for your projects. The File Wizards tab. Visual InterDev enables you to create several types of projects with the Projects
tab. Additionally, wizards are provided to create most of the different types of
projects. Figure 4.15 displays the available types of projects that you can create. Several fields are displayed to the right of the list in Figure 4.15, including
Project Name and Location. You must enter a name for your project into the Project
Name field. The default location for your projects is the MyProjects sub-directory within
the DevStudio directory. You can change this location if you want to place your projects
in another directory.
The Projects tab. You also have two options located beneath the Location field. The first radio
button enables you to create a new project workspace. The second option enables you
to add the project to the current project workspace. You must have a project workspace
open in order for this option to be enabled. Database Project is the first choice in the list of projects to create. A database
project enables you to manage your database objects in the context of a specific
project. A live connection to the database is maintained, and you can use the Visual
Data Tools to create, edit, and manage your data and objects in the database. The Sample Application Wizard enables you to install sample applications on your
web server and database server including data that is needed by the sample application.
You have the option of installing a Visual InterDev application or a custom application. The Web Project Wizard enables you to create a new Visual InterDev web project.
You will become very familiar with this wizard and use it often to create your new
projects. In a few moments, you will use this wizard to create the Hello Web project. The New Database Wizard enables you to define and create a new MS SQL Server database.
This wizard also automatically creates a new database project for you to administrate
this new database. The Departmental Site Wizard creates an entire web site for a typical department
or workgroup, based on pre-defined templates. Web pages that are generated with the
site include a What's New page, a Feedback Form page, a Projects page, a Products
page, a Teams page, and a Department Overview page. You can select some or all of
these pages to be included in the departmental web site. The Workspaces tab is the next category of files that you can create from the
File New dialog window. You can create a blank workspace from this tab by selecting
the Blank Workspace from the list. You must enter a name for your workspace in the
Workspace Name field to the right of the list. The default location is the MyProjects
sub-directory within the DevStudio directory. You can change this field to another
directory. The Other Documents tab enables you to add other documents to your project, such
as a Microsoft Word document. For example, you might want to include design specifications
documented in Word within the confines of your Visual InterDev project. Another example
would be a Word document that you want to insert into an HTML page. Now that you have learned about all of the tabs on the File New dialog window,
it's time to create that new project. You are going to create a new Visual InterDev
project entitled Hello Web that will be created in the MyProjects sub-directory within
the DevStudio directory. The following instructions will guide you through this process.
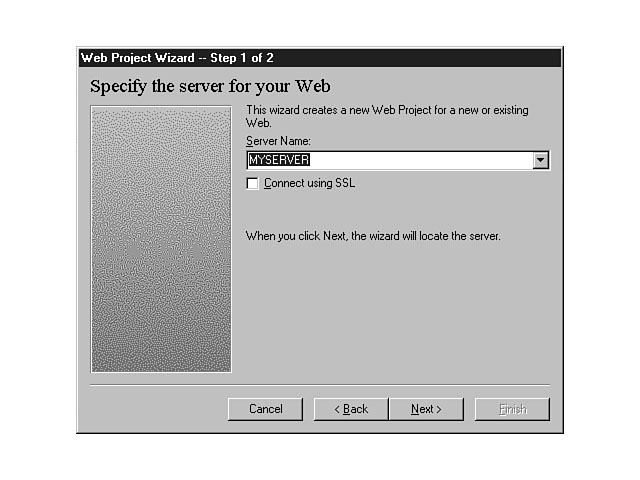
The Web Project Wizard should now be displayed. There are two steps to creating
a new web project. First, you must specify the target web server for the project.
Figure 4.16 shows the first step in creating a new web project. You must select or enter the name of your web server in the Server Name combo
box. The name of the web server is also referred to as the domain name. If you're
connected to a web server through a network, you should enter the name of that web
server. If you're running a local configuration on a standalone machine, you should
enter the name of the web server on your local machine. The Web Project Wizard--Step 1.
You also have the option of selecting the Connect using SSL checkbox. SSL stands
for Secure Sockets Layer from Netscape and enables you to connect to the server through
this Netscape standard. After you enter your server name, press the Next push button. The Web Project
Wizard contacts the web server and retrieves a list of the current webs on the web
server.
In step 2 of creating a new web project, the Web Project Wizard will prompt you
to either create a new web for your project or connect to an existing web on the
web server. Figure 4.17 shows that the Create New Web option is selected by default
on the step 2 dialog window of the Web Project Wizard. The Web Project Wizard--Step 2. The Web Project Wizard displays a web name that is the same as your project name
in the Name field under the Create New Web radio button. Your dialog window should
look the same as the window in Figure 4.17. The checkbox to enable full text searching
of the web pages within this site is selected by default. The other option on this dialog window enables you to create a project as part
of an existing web site. Use this option if you want to add new applications to your
current web site. If you select this radio button, the Name combo box will enable
you to choose from the list of web sites on your server. Choosing the root web option
places the project in the root of your web server. Make sure that the Create New Web radio button is selected and that the name of
the web is HelloWeb. Accept the default to enable full text searching of the web
site. Press the Finish push button and your new web project will be created.
You should now be looking at your project within Visual InterDev. The next section
helps you analyze the results of your actions.
The Web Project Wizard created a new web with a directory (both named HelloWeb)
for your project files on the server. Your project directory and project files are
contained within the root directory for your web server. For example, if you're using
Microsoft Internet Information Server, the folder HelloWeb is located within the
wwwroot directory. Using the Windows Explorer, Figure 4.18 shows the file directory
structure for the HelloWeb web site. The HelloWeb server files. In the preceding figure, the global.asa and the search.asp files have been created
in the root of your web directory. Also, an images folder has been created by default
within the HelloWeb directory. You can create additional folders to further organize
your files from within the Visual InterDev development environment.
The Web Project Wizard also created a HelloWeb directory on your client machine.
This working directory serves as the placeholder for server master files that you
retrieve from your web project directory. When you retrieve these files, you're making
a working copy to manipulate and then copy back to the server. This directory structure
is the same as the directory structure on the web server. A copy of the global.asa
is copied from the server. Also, several additional project files are generated in
the client working directory. Figure 4.19 shows the HelloWeb file structure for a
client machine. The HelloWeb client files. These are project files for your application. The two most notable files are HelloWeb.dsw
and HelloWeb.dsp. The .dsw suffix denotes that the file is a project workspace. The
.dsp extension indicates that the file is a project. Recall the discussion of the
File New dialog window, in which one tab enabled you to create a blank workspace
and another enabled you to create new projects. A workspace can have multiple projects, but a project can have only one workspace.
In other words, a workspace has a one-to-many relationship with a project, and a
project has a many-to-one relationship with a workspace. For example, you could have
a database project and a web project all contained within one workspace.
Now that you know what the Web Project Wizard has created behind the scenes, it's
time to take a look at these files through the eyes of Visual InterDev. Within the
Visual InterDev development environment, you should see the HelloWeb project workspace.
The HelloWeb project is displayed in File View by default. You can see that the FileView
tab has been added to the project workspace area on the right-hand side of the Visual
InterDev workspace. The virtual root for this project is displayed as the top node
within the File View. Your virtual root should be similar to the one created in Figure
4.20. Visual InterDev displays the HelloWeb project. Remember that the virtual root is the combination of y You should now see the global.asa and the search.asp files as well as the images
folder. The icon for the global and search files should be gray, which means that
you don't have a working copy of the files. Double-click on the global.asa file to
retrieve a working copy.
Two things happen as a result of this action. First, Visual InterDev will retrieve
a working copy of the file from the web server into the local working directory of
your client machine. A message is displayed beneath the tabs of the project workspace
indicating that the working copy is being retrieved from the web server. Second,
Visual InterDev displays the file's contents in the pane to the right of the project
workspace. You will be interacting with these two panes a lot, so it's important to understand
how they work. When you open a file within your project, Visual InterDev uses the
default editor for the file to display its contents. For example, when you opened
the global.asa file, the contents were displayed using the HTML Source Editor, which
is the default editor for HTML and script files. Another good example involves ActiveX and Design-time ActiveX controls. For these
controls, the Object Editor is activated to display the object's contents and settings.
You learned how to change the default editor earlier toChapter when working with images
and multimedia files was discussed. You could change the default editor for an HTML
file from the HTML Source Editor to the FrontPage Editor for Visual InterDev.
Now that you have examined the initial files for your project, it's time to construct
the main web page using basic HTML. The following instructions will guide you through
the process.
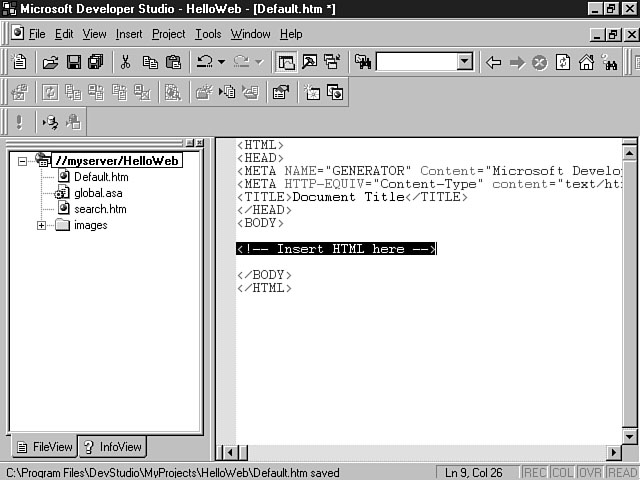
Visual InterDev creates a basic HTML page named Default.asp and adds this file
to your project workspace.
Your Visual InterDev workspace should now look like Figure 4.21. The HTML shell. Visual InterDev created a basic template for you to use while constructing your
HTML web page. Notice the format of the HTML template. You have a header section
that includes space for a title for your web page. You also have a body section for
you to place the main section of your web page. The other lines aren't important
for the purposes of this lesson. The following are your instructions for creating the content for the web page:
Now that you have entered your HTML code, you're going to preview your results
in a browser. You first need to save your project. To do this, choose the Save All
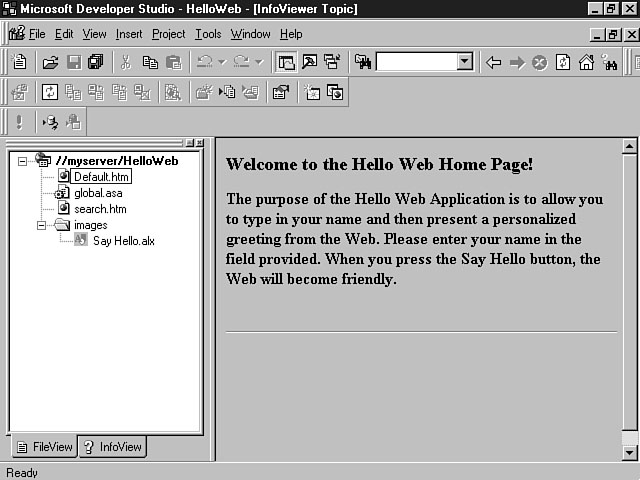
menu item within the File menu. This option saves all of the files in your project. To preview your web page, use the Preview in Browser function. Remember, this
browser is an implementation of the Microsoft Internet Explorer browser. To use this
browser, select the Default.asp file and right-click the mouse to display the shortcut
menu. Choose the Preview in Browser option. Figure 4.22 shows what your web page
should look like using this option. The Preview in Browser view. Now select your HTML file again and this time choose the Browse With option from
the shortcut menu to see the difference between the two options.
You are now going to construct the HTML Layout file to be included on your main
web page. The HTML Layout enables you to precisely position your controls on the
web page. The following are the instructions for constructing your HTML Layout:
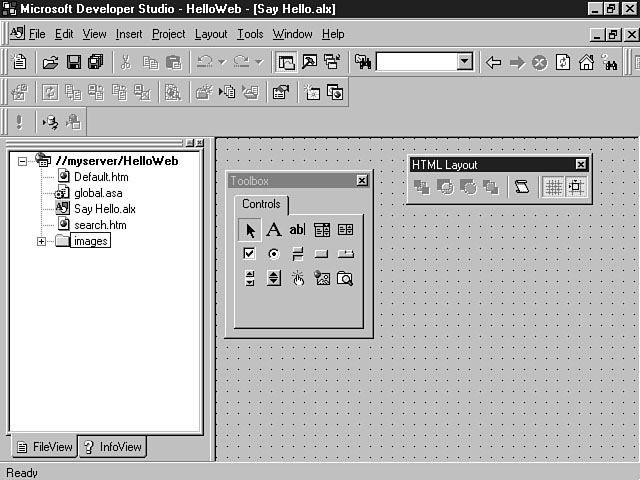
The HTML Layout is then created. The file Say Hello.alx should now be displayed
in your project workspace, and the HTML Layout Editor should be active in your display
pane. You also should have a floating toolbox containing multiple objects and controls
and a floating HTML Layout toolbar that contains buttons that affect the appearance
of these controls.
Figure 4.23 illustrates the features of the HTML Layout Editor and the available
controls and options. The HTML Layout Editor. The HTML Layout Editor provides a form for you to place your controls in. The
controls are located on the toolbox. As you can see from the preceding figure, you
have several objects for creating a basic user interface. If you're familiar with the ActiveX Control Pad or Visual Basic, you will be very
comfortable using the HTML Layout Editor. The basic method of creating your interface
is the same. The process consists of placing objects, or controls, onto the form,
properly positioning these controls, and setting their properties. A property defines how the controls look and behave. For example, you can set
the property of a form to be a certain height, width, and background color. Every
control has a distinct set of properties. These properties have default values that
you can change. The HTML Layout Editor is covered in detail on Chapter 13. For now, add the controls
to your form and set their properties. To add a control to the form, select the object
from the toolbar and then click your mouse on the area of the form where you want
the control placed.
You should now have two label controls painted on your form. The default names
of these controls are Label1 and Label2. When using controls, you should always change
the name and ID of the control to a distinct and descriptive name. Also, these labels
were created using a default length, height, and width.
Now you're going to change the properties for the second label control. On Chapter
13 you will learn more tips and shortcuts that will increase your productivity when
painting controls.
You are now going to paint the text box controls onto the window. Follow the same
method that you just used to place the label controls on the form. The text box control
is located next to the label control. After you paint the two text box controls onto
the form, follow these instructions to set the properties of the controls:
Now change the properties for the second text box:
Finally, you need to paint the command buttons onto your form. These buttons also
are referred to as push buttons. Refer to the previous Note on Tooltips for help.
After you have placed two push buttons on your form, change the following properties.
Now it's time to change the second push button.
You have one remaining task to complete. You need to set the properties for the
form. To set the properties of a form, double-click the form itself. The following
are the changes you need to make:
You have now created an HTML Layout. This process may have been a review for some
of you. The next section shows you the final stage of putting these components together.
Now that you have constructed your HTML Layout, you need to reference this layout
form within your HTML web page. Open your HTML page from the project workspace and
follow these instructions:
An HTML Layout is inserted into your HTML file. The layout is denoted by the <OBJECT>
tags.
The final step in this process is adding the logic for your application. You are
going to use the Script Wizard to accomplish this function.
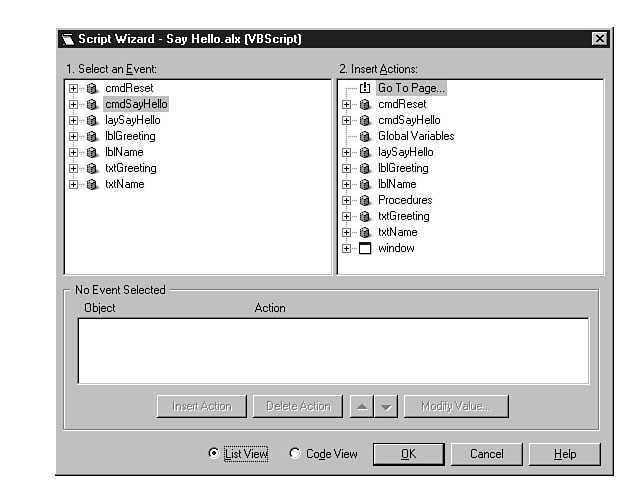
You should be looking at the same window that is shown in Figure 4.24. Adding code using the Script Wizard. The Script Wizard enables you to choose controls and related events and associate
actions for those events. The List View is the default view for this dialog window
and enables you to build your code through a point-and-click metaphor. As you can see from Figure 4.24, the first pane is the Event Pane, which displays
your form's controls and their possible events. The pane to the right of the Event
Pane is the Action Pane, which shows the actions for these controls. The bottom pane
is the Script Pane and shows the results of your choices in the first two panes.
As you build select control events and actions, your code is displayed in the Script
Pane. The Script Wizard is covered in detail on Chapter 15. For now, use the following instructions
to build your application logic:
For the Reset push button, follow the same method that you used for the Say Hello
push button:
You are now ready to preview the results of your first project. Before moving
on, you should choose the Save All menu from the File menu to save your work.
You can either use the Preview in Browser or the Browse With function from the
File menu to view your first web application. You should be able to enter your name
and press the Say Hello push button to display the personalized greeting. When you
press the Reset push button, the Name and the Greeting fields should be cleared,
enabling you to enter another name. Refer back to Figures 4.11 and 4.12 to verify your results. Does your application
look the same? If not, check to make sure that you followed the steps correctly.
ToChapter was a long but very productive Chapter. You finally got a chance to interact
with Visual InterDev and develop your first application. As you can tell, Visual
InterDev is very easy to use once you get a feel for the features. This morning, you explored a standard project, learning about the different files
and components. You learned about the concept of a Visual InterDev project by comparing
it to making pancakes, then about the virtual root and how Visual InterDev builds
the virtual root based on your project name. Next, you read about working with Visual
InterDev files and learned some of the more common files within a Visual InterDev
project. During the middle part of the Chapter, the Visual InterDev development process
was discussed. You learned how Visual InterDev facilitates each phase of this process
from development to deployment. The final part of the Chapter was spent developing your first project--the Hello Web
application. You received a hands-on approach to development through each step involved
in building this application. Throughout the Chapter, you the saw Visual InterDev development
environment, including pertinent dialog windows and menu options. The lessons you
learned toChapter will prove invaluable as you delve deeper into Visual InterDev's features
and capabilities.
In toChapter's workshop, you create your own application. Use toChapter's lesson as a
guide to create your web page and HTML Layout. You should practice using the various
components that you learned about toChapter. Begin by starting a new project and walk
through the whole process. Also, use the Windows Explorer to view the file structures
and files as they are created. You should understand the basic building blocks by
using Visual InterDev to produce your application. Practice makes perfect!
|
|
|


Popular Tutorials
-
 MS Access
1109
MS Access
1109
-
 C++
1222
C++
1222
-
 HTML
584
HTML
584
-
 JavaScript
616
JavaScript
616
-
 Vbscript
873
Vbscript
873
-
 Oracle
473
Oracle
473
-
 VC++
875
VC++
875
-
 SQL
2959
SQL
2959
-
 XML
514
XML
514
-
 Java
814
Java
814
-
 Perl
455
Perl
455
-
 Linux
451
Linux
451


