Chapter 14
Extending Web Pages
Through Design-Time Controls
If you are a developer, you recognize the importance of an application's design.
Throughout this guide, I have tried to emphasize the design as the crux of your application.
A design can make or break an application. You also probably realize the importance
of the design stage of a development project. It is imperative that you spend the
proper time contemplating the aspects of the application design so that the system
will execute successfully when the user runs the application.
These design aspects can be applied to the use of design-time controls. Microsoft
has introduced a new kind of control to enable you to design specific functionality
into your application that will execute when the system is run. In the same way that
your application exhibits its characteristics and design concepts when it is run,
design-time controls reveal their behavior at runtime. These controls enable you
to focus on designing robust functionality into your application.
ToChapter's lesson focuses on the use of design-time controls within your Web-based
applications. First, the lesson explains and defines the concept of a design-time
control, teaching you what a design-time control is and how it can be used within
your web pages. Next, the lesson explains the difference between design-time controls
and regular ActiveX controls.
The middle part of the Chapter presents one of the more robust design-time controls
that can be used in your web pages. The Data Command control can be used to provide
rich database integration for your applications. You learn how to insert and use
design-time controls like the Data Command control. You also discover the remnants
of a design-time control placed within your web page document.
The final lesson for the Chapter outlines how to truly use and integrate these exciting
new controls into your applications. You will discover how to extend the power and
functionality of your application through the use of design-time controls.
Defining Design-Time ActiveX Controls
Based on yesterChapter's lesson, you should now understand the concept of an ActiveX
control. You realize that you can use these controls to build the interface for your
application. You also know that ActiveX controls exhibit their presence and functionality
when the user initiates the application. But, what is a design-time control? Does
this mean that I can use this control when I design my application, but not when
I run it? This section answers these questions and more, and provides a basic definition
for a design-time control.
A design-time control is an important new control, developed specifically for
the Web, that enables you to place rich functionality in your application without
additional overhead. Design-time controls are the Diet Coke of the computer interface--same
great taste with half the calories!
Design-time controls enable you to take advantage of the same benefits as ActiveX
controls during the time of application design. This means that you can visually
set the properties and characteristics of the control, similar to ActiveX controls.
The distinguishing factor is that design-time controls don't incur the overhead cost
at runtime. When you insert a design-time control into your web page, you establish
the characteristics of the control. These property attributes are saved as text within
the context of the document. The text contains special instructions based on properties
that you have designed for the control. When the user runs the application, the actual
control that you used to develop these instructions is disabled, and the instructions
execute the designed functionality. In other words, you receive the same powerful
functionality with a lower overhead cost, hence the Diet Coke analogy.
New Term: A design-time control is
a special type of ActiveX control that enables you to inte- grate specific properties
and behavior characteristics when designing your applications. These controls insert
instructions into your documents instead of an actual control, thereby reducing the
amount of processing overhead in your application.
Design-Time ActiveX Controls Versus
ActiveX Controls
While the ActiveX control is typically a graphical object that is used to construct
a user interface for your application, the design-time control provides a visual
helper at the time of design. This visual aid then works behind the scenes to execute
the desired functionality.
With a few exceptions, ActiveX controls are usually visible to you when you're
designing your application. You have learned about several controls that enable you
to build a graphical user interface. These ActiveX controls include the command button,
the radio button, the checkbox, the listbox, the marquee, and so on. You have used
some of these controls during the first two weeks. Once you insert the controls on
your web page, you establish the property values for the controls to affect their
appearance and behavior. At runtime, these controls appear in your web page and provide
specific functionality. Runtime refers to the period of time that the user is running
the application and executing the code. ActiveX controls contain a binary runtime
component that provides additional functionality when the application runs. You incur
the overhead of the control being alive during application runtime to receive the
additional functionality.
Design-time controls, on the other hand, don't contain a runtime component. Design-time
controls aren't visible when the user runs the application. You can use these controls
while designing your web pages to provide powerful functionality to your application.
These controls are like wizards that facilitate the construction of your application
during the design phase of your development effort. When the user executes the application,
the functionality is exhibited in the application without the appearance of the design-time
control. It's control might not be visible at runtime, but its effects are evident
to the user.
Design-Time Controls Make Effective
Parents
A design-time control has a similar relationship and responsibility to the application
as a parent has to a child. A parent is charged with raising children. This task
includes providing the proper guidance and instruction, so that the child can thrive
when he or she becomes an adult. The parent serves as a counselor and coach who visually
provides an example in his or her actions and his or her speech. When the child becomes
an adult, he or she will exhibit behaviors, values, and characteristics that have
been taught by the parents. As a parent, I can already see the effects of this relationship
in my two small children.
A design-time control provides a similar guide to the web pages and application.
The design-time control affects your application by the properties and characteristics
that are set for the control. This information is stored in the context of the web
page documents. In a sense, the web page is affected by the instruction, or "teaching,"
of the design-time control. The control tells the web page what behaviors to exhibit.
You can think of the runtime environment as adulthood for the web page that includes
the code produced by the design-time control. During runtime, the control is no longer
around to help. This is analogous to the parent who is no longer around to instruct
the child, now an adult, what to do. The newly independent adult must live his or
her own life, using the characteristics and values that the parents taught him or
her as a child. Similarly, the runtime text code that was created in the web page
must execute independently of the design-time control when the application is executed.
Although the design-time control parent is no longer visibly around, this code exhibits
the properties and characteristics that were instilled during design-time. Figure
14.1 illustrates both the parent/child and the design-time control/run-time code
relationship.
Figure 14.1.
The design-time control--an effective parent.
The Origin of Design-Time Controls
Visual InterDev is one of the first tools to use design-time controls as a part
of the development environment. Design-time controls, like regular ActiveX controls,
are based on Microsoft's Component Object Model (COM). This model provides a standard
definition and structure for all design-time controls. Because a design-time control
is constructed based on COM, applications can access its functionality through a
standard method. You can build a design-time control with hard-core languages like
C and C++, as well as more intuitive languages such as Visual Basic. You also can
build design-time controls with the Java programming language.
NOTE: You must use Visual Basic version
5 or higher to build a design-time or ActiveX control. Microsoft also offers a trimmed
down version of Visual Basic 5.0 called the Visual Basic Control Creation Edition.
This product is specifically targeted at developers who want to build design-time
and ActiveX controls. You will get a chance to learn about this product and how to
use it to build a design-time control on Chapter 16, "Building Design-Time ActiveX
Controls."
Once you become familiar with using design-time controls, I think you will want
to rush out and build your controls. You will realize their benefit and structure
and recognize the importance of their reusability across your development team. You
might even begin by developing reusable design-time controls across your development
team.
After you become appreciated internally, you could expand your reach by authoring
controls that can be used commercially by a plethora of developers. Whatever the
case, I think you will see how easy it is to use and develop design-time controls.
You will also appreciate their power and capability.
Visual InterDev provides many design-time controls that you can integrate into
your application. The controls generate both HTML and scripting code that can be
used in a variety of ways, including the creation of the following items:
Within your Visual InterDev application, you can integrate design-time controls
in your client- and server-side components. Some of the more powerful Visual InterDev
design-time controls enable you to integrate rich and robust database functionality
into your application. The next few sections explain and explore these exciting new
controls.
Understanding Design-Time Controls
This section is for those intrigued minds who wonder how a design-time control
can achieve its purpose without visibly appearing in the application at runtime.
This part of the lesson explains how to insert a design-time control into your application.
Once you understand the process, I will review the inner workings of the design-time
control, then explain how these controls accomplish their tasks.
Inserting a Design-Time Control
Design-time controls are typically placed within a web page or an Active Server
Page. The design-time control must be installed and registered on the machine where
it is used. This requirement is the same as regular ActiveX controls. Once registered,
the design-time control can be used within the context of your application.
To insert a design-time control, open the ASP or HTML file and right-click the
mouse at the desired position in the file. Select Insert ActiveX Control from the
shortcut menu. When the Insert ActiveX Control tabbed dialog window is displayed,
click the Design-time tab. You will then be presented with a list of all of the registered
design-time controls. Figure 14.2 depicts a list of available design-time controls
that are included with Visual InterDev.
Figure 14.2.
Selecting a design-time control.
You can pick the design-time control from the list and click OK. The Object Editor
that you learned about yesterChapter will then be activated. You can use this visual
editor to set the properties of the design-time control. Figure 14.3 depicts the
Data Command control, a powerful database design-time control, as seen through the
eyes of the Object Editor.
Figure 14.3.
Setting the properties for a design-time control.
The Object Editor was covered in yesterChapter's lesson. You can use the Object Editor
to configure the properties and characteristics of the control. After you set the
properties of the design-time control, it is inserted into your web page document.
Later in the Chapter the lesson teaches you how to set the properties of some of the
more robust design-time controls. For now, you should focus on learning the basic
structure of all design-time controls. The next section teaches you how to recognize
the presence of a design-time control within a web page. The lesson also defines
the general attributes of a design-time control.
Reviewing the Remnants of a Design-Time
Control
Just exactly what does a design-time control look like? What magic is going on
behind the scenes to enable such elaborate behavior? How does a design-time control
affect my application? This section answers these questions, walks you through a
review of the rem-nants of a design-time control, and explains the basic structure
for all design-time controls as seen within an HTML or ASP document. Figure 14.4
depicts a design-time control as seen within the confines of an ASP file.
Figure 14.4.
The markings of a design-time control.
As you can see from Figure 14.4, the design-time control somewhat resembles an
ActiveX control. The control is denoted by the <OBJECT> tag and contains
an ID, CLASSID, and some parameters similar to an ActiveX control.
The design-time control differs from an ActiveX control in that it is initially denoted
with the METADATA comment. The design-time control also visually appears
in green within the ASP document. The runtime text for the control is highlighted
and displays below the ending <OBJECT> tag. The next few sections
examine the appearance and structure of a design-time control.
Examining the Structure of a Design-Time
Control
The METADATA comment is used to denote the start of the design-time control.
The TYPE attribute is equal to the value of Designer Control, which
is true of all design-time controls. The startspan attribute indicates the
beginning of the METADATA comment and causes this line of the comment to
be passed over. Another reason for using the METADATA comments to surround
a design-time control is to prevent instantiation of the object.
One of the key points and benefits about design-time controls that has been noted
in this lesson is that these controls don't incur the overhead of regular ActiveX
controls. Because the object is surrounded by comments, it won't be instantiated.
Only the runtime text will persist, thereby reducing the overhead incurred by the
application.
The <OBJECT> tag enables you to work with the control and visually
sets the properties of the control. In a sense, the <OBJECT> tag informs
Visual InterDev that the control is an object. This information enables you to easily
edit the properties of the design-time control. You can right-click the mouse within
the <OBJECT> tags to display the shortcut menu, as seen in Fig-ure
14.5.
Figure 14.5.
Editing the properties of the design-time control.
The option to edit a design-time control differs slightly from an ActiveX control.
As you can see from Figure 14.5, you select Edit Design-time Control from the list
of menu items to alter the properties of your control. This action activates the
Object Editor and displays your design-time control.
The attributes and parameters contained within the <OBJECT> tags
for the design-time control help to generally define the runtime code for the control.
The code in this example is displayed as script and explicitly defines the behavior
of the control. This scripting code is what the application and browser are going
to execute at runtime. The object declaration is passed over, and the runtime text
is the only thing that is noticed and processed. The ending METADATA comment
contains the endspan attribute, which signifies to the browser the end of
the runtime text for the design-time control.
Editing the Script for a Design-Time
Control
In the previous example, the runtime script that was displayed was automatically
generated based on properties defined in the Object Editor. You may be wondering
whether Visual InterDev enables you to extend and customize this scripting logic.
The answer is yes. There might be cases in which you need to customize the generated
logic for the control. The only thing you need to be aware of concerns the METADATA
comment tags. When these comment tags are present, opening the control after you
have made changes to the script replaces your customized code with the generated
scripting logic defined by the control's properties. To avoid this situation, remove
the METADATA comment tags.
Taking Charge with the Data Command
Control
Now that you understand the basic structure of a design-time control, the lesson
explores some of the more robust design-time controls. Visual InterDev includes several
design-time controls that provide rich database functionality for your application.
This section covers the Data Command control, which you received a preview of in
the previous section.
The Data Command design-time control uses a database connection to perform a basic
query against a database. The Data Command control creates a Recordset object
that you can use to perform your queries. You learned about the Recordset
object on Chapter 8, "Communicating with a Database." As a refresher, the Recordset
object represents all of the records in a specified table. You can use the Recordset
object to retrieve the individual rows within a designated table.
NOTE: The rest of the lesson assumes that
you have a valid database connection for your project. To use the database design-time
controls, you must first add a database connection to your project. Refer to the
lesson on Chapter 8 for a refresher on how to accomplish this task. The examples that
are used rely on the Publishers database connection that was created earlier in the
week.
The Data Command design-time control should be used for retrieving and modifying
a single row within a table. You will discover other design-time controls in the
next section that enable you to work with multiple rows of a table. You can specify
command text properties for the Data Command control that indicate the type of command
to execute against the database. This information is used with the Recordset
object to perform the specified type of database action against the desired row within
a table.
Inserting a Data Command Control
To insert the Data Command design-time control into your application, open the
file that will contain the control. Click the right mouse button at the desired position
within the document and select Insert ActiveX Control from the shortcut menu. Click
the Design-time tab and choose Data Command Control from the list, as seen in Figure
14.6.
Figure 14.6.
Selecting the Data Command design-time control.
TIP: You should use Active Server Pages
to handle your database logic. When inserting a database design-time control, choose
an ASP file instead of an HTML file.
After you have chosen the Data Command control, click the OK button. You will
then be able to edit the properties of the control using the Object Editor. Figure
14.7 displays the Data Command control and its property window.
The Data Command Properties window consists of the following tabs:
- Control tab
Advanced tab
Parameters tab
All tab
Each of these tabs is explained in the next few sections.
Figure 14.7.
The Data Command control Properties window.
The Control Tab
The Control tab is the default display tab for the Properties window. You saw
a preview of this window in Figure 14.7. The first field on the window is the ID
field, which enables you to define a name for the control. You use this ID to reference
the control within your code.
The Data Connection drop-down listbox enables you to specify the data connection
for the control. Any active data connections for the project will be displayed in
the list. For this example, I chose the database connection to the Pubs database
that was defined at the first part of this week's lesson. The Command to Submit frame
contains several options that enable you to specify the type of SQL command to execute.
The first drop-down listbox on the frame is the Command Type, which enables you
to indicate the type of command to send to the database. Table 14.1 displays the
available choices for the Command Type.
Table 14.1. Command types for the Data Command control.
| Type |
Description |
| SQL |
Enables you to format an SQL statement |
| Stored Procedure |
Specifies the use of a stored procedure |
| Table |
Specifies the use of a database table |
| View |
Specifies the use of a database view |
The Command Text drop-down listbox indicates the command that will be sent to
the database. The Command Type that you choose affects the contents of the Command
Text drop-down listbox as well as the behavior of the other controls in this frame.
For example, if you select Stored Procedure for the Command Type, the contents of
the Command Text drop-down listbox display the available stored procedures in the
database. Also, the SQL Builder push button is disabled because you're choosing to
use a pre-defined SQL procedure that already exists. The SQL Builder push button
enables you to use the Query Designer within Visual InterDev to create and construct
an SQL database call.
If you choose SQL for the Command Type, the SQL Builder push button is enabled,
allowing you to construct your SQL statement. You also can choose to directly enter
the SQL statement in the Command Text field. A Command Type of Table will disable
the SQL Builder push button and display a list of the available tables within the
database in the Command Type drop-down listbox. Similarly, you can select View for
the Command Type, which will disable the SQL Builder push button and populate the
Command Text drop-down listbox with the views that are contained within the database.
Finally, the Copy Fields push button enables you to copy the fields from the database
table for insertion into your web page document. When you click this button, the
Copy Fields dialog window displays as shown in Figure 14.8.
Figure 14.8.
Copying fields from a database table.
The Copy Fields dialog window displays the available column fields contained within
a database table in the list box on the left-hand side of the window. You can double-click
a field to move it to the Fields to Copy listbox. You also can select the available
field and click the single arrow button that points to the right to place the field
into the Fields to Copy listbox.
Pressing the double-arrow button that points to the right moves all of the available
fields into the Fields to Copy listbox. You can remove fields that have been selected
to be copied in a similar manner. You can either double-click the item within the
Fields to Copy listbox or select the item and click the single arrow button that
points to the left. To deselect all of the fields to be copied, click the double-arrow
button that points in the direction of the Available Fields listbox. The fields that
you choose are copied to the clipboard. You can then insert them into your web page
document using the text editor of your choice. This feature provides an easy way
to access the values of the columns within a row in your table.
The Advanced Tab
The Advanced tab enables you to customize your database commands. In many cases,
you can accept the defaults for this tab. Advanced database developers typically
use this dialog to fine-tune the performance of the application. For example, you
can specify the type of cursor to use with a query.
You also can choose the type of locking scheme that you want to use for database
requests among different users. This option can be used with applications and databases
that support high-volume transaction processing. For instance, if your application
will have users contending for the same data, you may want to use a locking scheme
that prevents users from overwriting changes to the same data. You can choose from
among several database locking schemes within the Advanced tab to meet the needs
of your application. You also can set the numbers of records to cache into local
memory. The Advanced tab enables you to prepare, or compile, an SQL statement when
it's initially executed. After the first user executes the SQL, performance will
increase for additional users, because the statement has already been compiled against
the database. Figure 14.9 displays the options on the Advanced tabbed dialog window.
Figure 14.9.
The Advanced tab.
The Parameters Tab
The Parameters tab is specifically used with stored procedures. If you choose
Stored Procedure for your Command Type on the Control property page, you can then
input values for the parameters for the stored procedure, if necessary.
The All Tab
You can use this property page to view all of the properties for the Data Command
design-time control. Figure 14.10 displays the properties for a sample Data Command
control.
Figure 14.10.
Viewing all of the properties for the control.
As you can see from Figure 14.10, this view is similar to the Properties dialog
window for ActiveX controls. All of the properties are listed along with their values.
This view maintains all of the values that are assigned on the individual property
pages for the control. You can use the All tab to get a comprehensive view of the
available properties and to assign their values at one time instead of tabbing through
the individual pages.
Building an SQL Statement with
the Query Designer
I stated that you could use the SQL Builder push button on the Control tab to
construct an SQL statement for your Data Command design-time control. Remember, you
must select a Command Type of SQL to enable the SQL Builder push button. When you
click the SQL Builder push button, the Query Designer will, by default, be activated.
NOTE: The Query Designer is automatically
displayed if it's the sole SQL builder installed on your machine. You can use other
commercially available SQL builders with this button. If another type of SQL builder
is installed on your system, you will be presented with a list of the available SQL
builders on your machine. The Query Designer, as well as the other products, will
be shown in the list. You can then select a tool from the list and build your SQL
statement.
Figure 14.11 demonstrates an example of choosing SQL for the Command Type and
pressing the SQL Builder push button.
Figure 14.11.
Using the Query Designer to build your query.
You can then use the Query Designer to construct your SQL statement. You learned
how to use the Query Designer and all of its panes on Chapter 9, "Using the Visual
Data Tools for Maximum Productivity." First, you need to drag and drop the tables
that you want to use into the Query Designer workspace. This example uses the Authors
table, and uses the Diagram pane to build an SQL query that selects all of the columns
from the Authors table, as shown in Figure 14.12.
Figure 14.12.
Constructing the SQL statement.
Once the query is built, you can save the query by selecting Save from the File
menu. This option saves the query within the context of the Data Command control.
In other words, you won't be prompted to provide a name for the query, as you were
in the previous lesson when you were creating an independent query against the database.
The Query Designer knows that you're creating this query for a database design-time
control and saves the SQL statement in the Command Text for the Data Command control.
When you close the Query Designer window, you should notice that the SQL statement
that is built is displayed in the Command Text drop-down listbox on the Control property
page, as shown in Figure 14.13.
NOTE: You can use all of the features
of the Query Designer while building your SQL statement. You might want to test the
results of your SQL statement before you save it, for example. You can execute the
statement and view the results in the Results pane, just as you did during the lesson
on Chapter 9. I will illustrate this process when I discuss the Data Range design-time
controls.
Figure 14.13.
A newly created SQL statement.
Examining the Results
Once you have finished setting the properties for the Data Command control, you
can return to the ASP document to view the results. The <OBJECT> tag
attributes as well as the runtime text are based on the properties that you define
for the control. Listing 14.1 displays the code that was placed in the ASP file based
on the previous example.
Listing 14.1. The ASP representation
of the Data Command design-time control.
<!--METADATA TYPE="DesignerControl" startspan
<OBJECT id="DataCommand1" WIDTH=151 HEIGHT=24
CLASSid="CLSID:7FAEED80-9D58-11CF-8F68-00AA006D27C2">
<PARAM NAME="_Version" VALUE="65536">
<PARAM NAME="_Version" VALUE="65536">
<PARAM NAME="_ExtentX" VALUE="3986">
<PARAM NAME="_ExtentY" VALUE="635">
<PARAM NAME="_StockProps" VALUE="0">
<PARAM NAME="DataConnection" VALUE="pubs">
<PARAM NAME="CommandText" VALUE="SELECT authors.* FROM authors">
</OBJECT>
-->
<%
Set pubs = Server.CreateObject("ADODB.Connection")
pubs.ConnectionTimeout = Session("pubs_ConnectionTimeout")
pubs.CommandTimeout = Session("pubs_CommandTimeout")
pubs.Open Session("pubs_ConnectionString"), Session("pubs_RuntimeUserName"), Session("pubs_RuntimePassword")
Set cmdTemp = Server.CreateObject("ADODB.Command")
Set DataCommand1 = Server.CreateObject("ADODB.Recordset")
cmdTemp.CommandText = "SELECT authors.* FROM authors"
cmdTemp.CommandType = 1
Set cmdTemp.ActiveConnection = pubs
DataCommand1.Open cmdTemp, , 0, 1
%>
<!--METADATA TYPE="DesignerControl" endspan-->
In this listing, you can see both the object declaration and the runtime text.
As stated before, the object declaration is enclosed in comments and won't be interpreted
by the browser. The runtime text is the only item that will persist when the application
is executed.
The first line of the runtime text creates a database connection object and stores
the instance of this object in the pubs variable. The next line exhibits
how the global.asa file and the ASP file that contains the database control work
together to connect to the database. Using the pubs object that was created
in the first line of this runtime text, the ConnectionTimeout and CommandTimeout
properties are established, based on the database connection that was created for
the project. The connection information can be found in the Session_OnStart
procedure within the global.asa file. The information in the global.asa file stores
general property information about the database connection. This information is used
to help the ASP create the connection dynamically when it's needed. The ConnectionTimeout
property defines the maximum length of time for the connection, while the CommandTimeout
property specifies the maximum duration for execution of the SQL command.
Next, a session is opened for the pubs object, again, based on information
contained in the Session_OnStart procedure in the global.asa file. The user
name and password are used to connect to the database. The cmdTemp variable
is used to create a Command object. This object is used later in the code
to capture the SQL command to execute against the database. The DataCommand1
variable is used to create the Recordset object. After this object is created,
the Recordset object is opened, using the SQL statement as a parameter.
In this case, the CommandText object that is contained in the cmdTemp
variable selects all of the columns from the Authors table.
The Data Range Controls
The Data Range Header and Footer controls provide two very robust design-time
controls. These controls enable you to retrieve multiple records from a database.
You can use the Data Range Header control to create the Recordset object
and query and to begin retrieving rows from the database table. The Data Range Footer
control works in conjunction with the Data Range Header control and enables you to
page through the records in the database.
The Data Range Header Control
The process of inserting a Data Range Header design-time control is very similar
to that of inserting the Data Command design-time control. Open the ASP file and
right-click the mouse at the desired position for the control. Select Insert ActiveX
Control from the shortcut menu and click the Design-time tab. Choose Data Range Header
Control and click OK. The Object Editor activates, and the control and its property
window are displayed as shown in Figure 14.14.
Figure 14.14.
The Data Range Header design-time control.
The fields in the top section of the Control property page are identical in meaning
to the Data Command control.
There are some new fields that pertain to the Data Range Header control. The Bar
Alignment enables you to align the database navigation bar on a web page. This bar
provide navigation controls for the user to traverse the records in the database.
The Range Type enables you to specify what type of fields will be used to display
the data. You can specify either Text, Form, or Table format.
In the example pictured in Figure 14.14, I chose Text for the Range Type. The
Record Paging checkbox and Page Size field are used together to define the number
of rows that will be displayed on a page. If Record Paging is checked, you can indicate
the number of rows that are displayed on your web page in the Page Size field. When
the Page Size field is greater than zero, the navigation bar is also displayed on
the page. If you don't select the Record Paging checkbox, all of the records for
the query are displayed on one page.
NOTE: To use Record Paging, you must set
the Cursor Type on the Advanced property page to either Keyset or Static. These values
are explained below.
The Advanced and Parameters property pages for the Data Range Header control contain
the same fields as the Data Command control. Because the Data Range control pertains
more to multiple rows of data, an explanation of the various cursor types is covered
in this section. Table 14.2 explains the types of cursors that you can set using
the Advanced property page.
Table 14.2. Available cursor types.
| Type |
Description |
| Forward Only |
Enables you to move only to the next record |
| Keyset |
Enables you to scroll through data in any direction; reflects up-to-date information
concerning the database except for additions by new users |
| Dynamic |
Enables you to scroll through data in any direction; reflects the most up-to-date
information including additions by other users |
| Static |
Enables you to scroll through data in any direction; contains a snapshot of the data
at a certain point in time |
As with the Data Command design-time control, you can use the Query Designer to
build a query for the Data Range Header design-time control. After selecting Save
from the File menu, you can view the design-time control within the ASP. For this
example, I have chosen to build an SQL statement that selects the first and last
name, phone number, and contract indicator from the Authors table. Listing 14.2 displays
the Data Range Header design-time control within the context of an ASP.
Listing 14.2. The ASP representation
of the Data Range Header design-time control.
<!--METADATA TYPE="DesignerControl" startspan
<OBJECT id="DataRangeHdr1" WIDTH=151 HEIGHT=24
CLASSid="CLSID:F602E721-A281-11CF-A5B7-0080C73AAC7E">
<PARAM NAME="_Version" VALUE="65536">
<PARAM NAME="_Version" VALUE="65536">
<PARAM NAME="_ExtentX" VALUE="3986">
<PARAM NAME="_ExtentY" VALUE="635">
<PARAM NAME="_StockProps" VALUE="0">
<PARAM NAME="DataConnection" VALUE="pubs">
<PARAM NAME="CommandText" VALUE="SELECT au_fname, au_lname, phone, contract
FROM authors">
<PARAM NAME="CursorType" VALUE="1">
<PARAM NAME="PageSize" VALUE="10">
</OBJECT>
-->
<%
fHideNavBar = False
fHideNumber = False
fHideRequery = False
fHideRule = False
stQueryString = ""
fEmptyRecordset = False
fFirstPass = True
fNeedRecordset = False
fNoRecordset = False
tBarAlignment = "Left"
tHeaderName = "DataRangeHdr1"
tPageSize = 10
tPagingMove = ""
tRangeType = "Text"
tRecordsProcessed = 0
If Not IsEmpty(Request("DataRangeHdr1_PagingMove")) Then
tPagingMove = Trim(Request("DataRangeHdr1_PagingMove"))
End If
If IsEmpty(Session("DataRangeHdr1_Recordset")) Then
fNeedRecordset = True
Else
If Session("DataRangeHdr1_Recordset") Is Nothing Then
fNeedRecordset = True
Else
Set DataRangeHdr1 = Session("DataRangeHdr1_Recordset")
End If
End If
If fNeedRecordset Then
Set pubs = Server.CreateObject("ADODB.Connection")
pubs.ConnectionTimeout = Session("pubs_ConnectionTimeout")
pubs.CommandTimeout = Session("pubs_CommandTimeout")
pubs.Open Session("pubs_ConnectionString"), Session("pubs_RuntimeUserName"), Session("pubs_RuntimePassword")
Set cmdTemp = Server.CreateObject("ADODB.Command")
Set DataRangeHdr1 = Server.CreateObject("ADODB.Recordset")
cmdTemp.CommandText = "SELECT au_fname, au_lname, phone, contract FROM authors"
cmdTemp.CommandType = 1
Set cmdTemp.ActiveConnection = pubs
DataRangeHdr1.Open cmdTemp, , 1, 1
End If
On Error Resume Next
If DataRangeHdr1.BOF And DataRangeHdr1.EOF Then fEmptyRecordset = True
On Error Goto 0
If Err Then fEmptyRecordset = True
DataRangeHdr1.PageSize = tPageSize
If Not IsEmpty(Session("DataRangeHdr1_Filter")) And Not fEmptyRecordset Then
DataRangeHdr1.Filter = Session("DataRangeHdr1_Filter")
If DataRangeHdr1.BOF And DataRangeHdr1.EOF Then fEmptyRecordset = True
End If
If IsEmpty(Session("DataRangeHdr1_PageSize")) Then Session("DataRangeHdr1_
PageSize") = tPageSize
If IsEmpty(Session("DataRangeHdr1_AbsolutePage")) Then Session("DataRangeHdr1_
AbsolutePage") = 1
If Session("DataRangeHdr1_PageSize") <> tPageSize Then
tCurRec = ((Session("DataRangeHdr1_AbsolutePage") - 1) * Session("DataRangeHdr1_
PageSize")) + 1
tNewPage = Int(tCurRec / tPageSize)
If tCurRec Mod tPageSize <> 0 Then
tNewPage = tNewPage + 1
End If
If tNewPage = 0 Then tNewPage = 1
Session("DataRangeHdr1_PageSize") = tPageSize
Session("DataRangeHdr1_AbsolutePage") = tNewPage
End If
If fEmptyRecordset Then
fHideNavBar = True
fHideRule = True
Else
Select Case tPagingMove
Case "Requery"
DataRangeHdr1.Requery
Case "<<"
Session("DataRangeHdr1_AbsolutePage") = 1
Case "<"
If Session("DataRangeHdr1_AbsolutePage") > 1 Then
Session("DataRangeHdr1_AbsolutePage") = Session Â("DataRangeHdr1_AbsolutePage") - 1
End If
Case ">"
If Not DataRangeHdr1.EOF Then
Session("DataRangeHdr1_AbsolutePage") = Session Â("DataRangeHdr1_AbsolutePage") + 1
End If
Case ">>"
Session("DataRangeHdr1_AbsolutePage") = DataRangeHdr1.PageCount
End Select
DataRangeHdr1.AbsolutePage = Session("DataRangeHdr1_AbsolutePage")
If DataRangeHdr1.EOF Then
Session("DataRangeHdr1_AbsolutePage") = Session Â("DataRangeHdr1_AbsolutePage") - 1
DataRangeHdr1.AbsolutePage = Session("DataRangeHdr1_AbsolutePage")
End If
End If
Do
If fEmptyRecordset Then Exit Do
If tRecordsProcessed = tPageSize Then Exit Do
If Not fFirstPass Then
DataRangeHdr1.MoveNext
Else
fFirstPass = False
End If
If DataRangeHdr1.EOF Then Exit Do
tRecordsProcessed = tRecordsProcessed + 1
`WHERE IS THE REST OF THE DO LOOP???
%>
<!--METADATA TYPE="DesignerControl" endspan-->
As you can see, the Data Range Header control generated a plethora of code from
just a few simple clicks of the mouse. I bet you can think of a million ways to spend
the time that can be saved by using a visual control such as the Data Range Header
control. The logic that is created basically creates the database connection and
opens the Recordset object using the SQL statement that I constructed with
the Query Designer. The other logic that is generated facilitates the ability to
page through the database records.
I stated previously that the Data Range Header and Footer controls are used together.
There is an error in Listing 14.2, because I haven't inserted the Data Range Footer
control. Can you pick out the error? My comments within the code provide a significant
visual aid to help you locate the error. The Data Range Footer design-time control
must be inserted into the ASP to complete the logic for the Data Range Header design-time
control.
The Data Range Footer Control
The process to insert the Data Range Footer design-time control is identical to
the process for inserting the Data Range Header design-time control. Select the Data
Range Footer Control from the list in the Insert ActiveX Control dialog window. The
Data Range Footer control will be displayed in the Object Editor, as shown in Figure
14.15.
The property page for the Data Range Footer control contains one page that enables
you to set all of the properties for the control at one time. After you set the properties,
you can select Save from the File menu to save the control. You then can view the
remnants of the Data Range Footer control within the ASP file. Listing 14.3 displays
a more complete ASP file that includes the Data Range Footer design-time control.
Figure 14.15.
The Data Range Footer design-time control.
Listing 14.3. Completing the set.
<!--METADATA TYPE="DesignerControl" startspan
<OBJECT id="DataRangeHdr1" WIDTH=151 HEIGHT=24
CLASSid="CLSID:F602E721-A281-11CF-A5B7-0080C73AAC7E">
<PARAM NAME="_Version" VALUE="65536">
<PARAM NAME="_Version" VALUE="65536">
<PARAM NAME="_ExtentX" VALUE="3986">
<PARAM NAME="_ExtentY" VALUE="635">
<PARAM NAME="_StockProps" VALUE="0">
<PARAM NAME="DataConnection" VALUE="pubs">
<PARAM NAME="CommandText" VALUE="SELECT au_fname, au_lname, phone, contract
FROM authors">
<PARAM NAME="CursorType" VALUE="1">
<PARAM NAME="PageSize" VALUE="10">
</OBJECT>
-->
<%
fHideNavBar = False
fHideNumber = False
fHideRequery = False
fHideRule = False
stQueryString = ""
fEmptyRecordset = False
fFirstPass = True
fNeedRecordset = False
fNoRecordset = False
tBarAlignment = "Left"
tHeaderName = "DataRangeHdr1"
tPageSize = 10
tPagingMove = ""
tRangeType = "Text"
tRecordsProcessed = 0
If Not IsEmpty(Request("DataRangeHdr1_PagingMove")) Then
tPagingMove = Trim(Request("DataRangeHdr1_PagingMove"))
End If
If IsEmpty(Session("DataRangeHdr1_Recordset")) Then
fNeedRecordset = True
Else
If Session("DataRangeHdr1_Recordset") Is Nothing Then
fNeedRecordset = True
Else
Set DataRangeHdr1 = Session("DataRangeHdr1_Recordset")
End If
End If
If fNeedRecordset Then
Set pubs = Server.CreateObject("ADODB.Connection")
pubs.ConnectionTimeout = Session("pubs_ConnectionTimeout")
pubs.CommandTimeout = Session("pubs_CommandTimeout")
pubs.Open Session("pubs_ConnectionString"), Session("pubs_RuntimeUserName"), Session("pubs_RuntimePassword")
Set cmdTemp = Server.CreateObject("ADODB.Command")
Set DataRangeHdr1 = Server.CreateObject("ADODB.Recordset")
cmdTemp.CommandText = "SELECT au_fname, au_lname, phone, contract FROM authors"
cmdTemp.CommandType = 1
Set cmdTemp.ActiveConnection = pubs
DataRangeHdr1.Open cmdTemp, , 1, 1
End If
On Error Resume Next
If DataRangeHdr1.BOF And DataRangeHdr1.EOF Then fEmptyRecordset = True
On Error Goto 0
If Err Then fEmptyRecordset = True
DataRangeHdr1.PageSize = tPageSize
If Not IsEmpty(Session("DataRangeHdr1_Filter")) And Not fEmptyRecordset Then
DataRangeHdr1.Filter = Session("DataRangeHdr1_Filter")
If DataRangeHdr1.BOF And DataRangeHdr1.EOF Then fEmptyRecordset = True
End If
If IsEmpty(Session("DataRangeHdr1_PageSize")) Then Session("DataRangeHdr1_
PageSize") = tPageSize
If IsEmpty(Session("DataRangeHdr1_AbsolutePage")) Then Session("DataRangeHdr1_
AbsolutePage") = 1
If Session("DataRangeHdr1_PageSize") <> tPageSize Then
tCurRec = ((Session("DataRangeHdr1_AbsolutePage") - 1) * Session("DataRangeHdr1_
PageSize")) + 1
tNewPage = Int(tCurRec / tPageSize)
If tCurRec Mod tPageSize <> 0 Then
tNewPage = tNewPage + 1
End If
If tNewPage = 0 Then tNewPage = 1
Session("DataRangeHdr1_PageSize") = tPageSize
Session("DataRangeHdr1_AbsolutePage") = tNewPage
End If
If fEmptyRecordset Then
fHideNavBar = True
fHideRule = True
Else
Select Case tPagingMove
Case "Requery"
DataRangeHdr1.Requery
Case "<<"
Session("DataRangeHdr1_AbsolutePage") = 1
Case "<"
If Session("DataRangeHdr1_AbsolutePage") > 1 Then
Session("DataRangeHdr1_AbsolutePage") = Session Â("DataRangeHdr1_AbsolutePage") - 1
End If
Case ">"
If Not DataRangeHdr1.EOF Then
Session("DataRangeHdr1_AbsolutePage") = Session Â("DataRangeHdr1_AbsolutePage") + 1
End If
Case ">>"
Session("DataRangeHdr1_AbsolutePage") = DataRangeHdr1.PageCount
End Select
DataRangeHdr1.AbsolutePage = Session("DataRangeHdr1_AbsolutePage")
If DataRangeHdr1.EOF Then
Session("DataRangeHdr1_AbsolutePage") = Session Â("DataRangeHdr1_AbsolutePage") - 1
DataRangeHdr1.AbsolutePage = Session("DataRangeHdr1_AbsolutePage")
End If
End If
Do
If fEmptyRecordset Then Exit Do
If tRecordsProcessed = tPageSize Then Exit Do
If Not fFirstPass Then
DataRangeHdr1.MoveNext
Else
fFirstPass = False
End If
If DataRangeHdr1.EOF Then Exit Do
tRecordsProcessed = tRecordsProcessed + 1
%>
<!--METADATA TYPE="DesignerControl" endspan-->
<!--METADATA TYPE="DesignerControl" startspan
<OBJECT id="DataRangeFtr1" WIDTH=151 HEIGHT=24
CLASSid="CLSID:F602E722-A281-11CF-A5B7-0080C73AAC7E">
<PARAM NAME="_Version" VALUE="65536">
<PARAM NAME="_ExtentX" VALUE="3969">
<PARAM NAME="_ExtentY" VALUE="635">
<PARAM NAME="_StockProps" VALUE="0">
</OBJECT>
-->
<%
Loop
If tRangeType = "Table" Then Response.Write "</TABLE>"
If tPageSize > 0 Then
If Not fHideRule Then Response.Write "<HR>"
If Not fHideNavBar Then
%>
<TABLE WIDTH=100% >
<TR>
<TD WIDTH=100% >
<P ALIGN=<%= tBarAlignment %> >
<FORM ACTION="<%= Request.ServerVariables("PATH_INFO") & stQueryString %>"
METHOD="POST">
<INPUT TYPE="Submit" NAME="<%= tHeaderName & "_PagingMove" %>"
VALUE=" << ">
<INPUT TYPE="Submit" NAME="<%= tHeaderName & "_PagingMove" %>"
VALUE=" < ">
<INPUT TYPE="Submit" NAME="<%= tHeaderName & "_PagingMove" %>"
VALUE=" > ">
<INPUT TYPE="Submit" NAME="<%= tHeaderName & "_PagingMove" %>"
VALUE=" >> ">
<% If Not fHideRequery Then %>
<INPUT TYPE="Submit" NAME="<% =tHeaderName & "_PagingMove" %>"
VALUE=" Requery ">
<% End If %>
</FORM>
</P>
</TD>
<TD VALIGN=MIDDLE ALIGN=RIGHT>
<FONT SIZE=2>
<%
If Not fHideNumber Then
If tPageSize > 1 Then
Response.Write "<NOBR>Page: " & Session(tHeaderName & "_AbsolutePage") &
"</NOBR>"
Else
Response.Write "<NOBR>Record: " & Session(tHeaderName & "_AbsolutePage") &
"</NOBR>"
End If
End If
%>
</FONT>
</TD>
</TR>
</TABLE>
<%
End If
End If
%>
<!--METADATA TYPE="DesignerControl" endspan-->
Notice that in this code example the Data Range Footer control nicely completes
the Do Loop. The Data Range Footer control does a lot more, though, than
simply add the word Loop to the end of the Do Loop. The Data Range Footer
control adds complex logic to format the records with the database. Remember, I selected
Text as the Range Type for the Data Range Header control. Based on this value, the
Data Range Footer control builds the necessary code to format the data in a table.
Also, the Data Range Footer control creates the logic for the user to traverse through
the database records.
There is one thing left to do to make this code functional. So far, the structure
has been developed to execute a query and display the results within a table. The
code is useless for an application, because the fields haven't yet been inserted
into the code. The following code sample can be inserted before the Data Range Header
control in the ASP file to create column names for the table:
<TABLE WIDTH=100% BORDER=1>
<TR><TH>Name</TH><TH>Phone</TH></TR>
This code sample creates two table header columns for the name and phone number.
To populate the rows of the table with the database information, you can insert the
following lines of code between the Data Range Header and Footer controls in the
ASP file:
<TR>
<TD> <%Response.Write DataRangeHdr1("au_fname") & " " &
DataRangeHdr1("au_lname") %> </TD>
<TD> <%Response.Write DataRangeHdr1("phone")%> </TD>
</TR>
This code sample formats the rows of the table with the names and phone numbers
of the people found in the Authors table. In this example, the first name and the
last name fields are concatenated together. Listing 14.4 displays the complete code
listing for the Author Contact List web page.
Listing 14.4. The Author Contact
List.
<%@ LANGUAGE="VBSCRIPT" %>
<HTML>
<HEAD>
<META NAME="GENERATOR" Content="Microsoft Visual InterDev 1.0">
<META HTTP-EQUIV="Content-Type" content="text/html; charset=iso-8859-1">
<TITLE>Contact List</TITLE>
<H3>Author Contact List</H3>
</HEAD>
<BODY>
<TABLE WIDTH=100% BORDER=1>
<TR><TH>Name</TH><TH>Phone</TH></TR>
<!--METADATA TYPE="DesignerControl" startspan
<OBJECT id="DataRangeHdr1" WIDTH=151 HEIGHT=24
CLASSid="CLSID:F602E721-A281-11CF-A5B7-0080C73AAC7E">
<PARAM NAME="_Version" VALUE="65536">
<PARAM NAME="_Version" VALUE="65536">
<PARAM NAME="_ExtentX" VALUE="3986">
<PARAM NAME="_ExtentY" VALUE="635">
<PARAM NAME="_StockProps" VALUE="0">
<PARAM NAME="DataConnection" VALUE="pubs">
<PARAM NAME="CommandText" VALUE="SELECT au_fname, au_lname, phone, contract
FROM authors">
<PARAM NAME="CursorType" VALUE="1">
<PARAM NAME="PageSize" VALUE="10">
</OBJECT>
-->
<%
fHideNavBar = False
fHideNumber = False
fHideRequery = False
fHideRule = False
stQueryString = ""
fEmptyRecordset = False
fFirstPass = True
fNeedRecordset = False
fNoRecordset = False
tBarAlignment = "Left"
tHeaderName = "DataRangeHdr1"
tPageSize = 10
tPagingMove = ""
tRangeType = "Text"
tRecordsProcessed = 0
If Not IsEmpty(Request("DataRangeHdr1_PagingMove")) Then
tPagingMove = Trim(Request("DataRangeHdr1_PagingMove"))
End If
If IsEmpty(Session("DataRangeHdr1_Recordset")) Then
fNeedRecordset = True
Else
If Session("DataRangeHdr1_Recordset") Is Nothing Then
fNeedRecordset = True
Else
Set DataRangeHdr1 = Session("DataRangeHdr1_Recordset")
End If
End If
If fNeedRecordset Then
Set pubs = Server.CreateObject("ADODB.Connection")
pubs.ConnectionTimeout = Session("pubs_ConnectionTimeout")
pubs.CommandTimeout = Session("pubs_CommandTimeout")
pubs.Open Session("pubs_ConnectionString"), Session("pubs_RuntimeUserName"), Session("pubs_RuntimePassword")
Set cmdTemp = Server.CreateObject("ADODB.Command")
Set DataRangeHdr1 = Server.CreateObject("ADODB.Recordset")
cmdTemp.CommandText = "SELECT au_fname, au_lname, phone, contract FROM authors"
cmdTemp.CommandType = 1
Set cmdTemp.ActiveConnection = pubs
DataRangeHdr1.Open cmdTemp, , 1, 1
End If
On Error Resume Next
If DataRangeHdr1.BOF And DataRangeHdr1.EOF Then fEmptyRecordset = True
On Error Goto 0
If Err Then fEmptyRecordset = True
DataRangeHdr1.PageSize = tPageSize
If Not IsEmpty(Session("DataRangeHdr1_Filter")) And Not fEmptyRecordset Then
DataRangeHdr1.Filter = Session("DataRangeHdr1_Filter")
If DataRangeHdr1.BOF And DataRangeHdr1.EOF Then fEmptyRecordset = True
End If
If IsEmpty(Session("DataRangeHdr1_PageSize")) Then Session("DataRangeHdr1_
PageSize") = tPageSize
If IsEmpty(Session("DataRangeHdr1_AbsolutePage")) Then Session("DataRangeHdr1_
AbsolutePage") = 1
If Session("DataRangeHdr1_PageSize") <> tPageSize Then
tCurRec = ((Session("DataRangeHdr1_AbsolutePage") - 1) * Session("DataRangeHdr1_
PageSize")) + 1
tNewPage = Int(tCurRec / tPageSize)
If tCurRec Mod tPageSize <> 0 Then
tNewPage = tNewPage + 1
End If
If tNewPage = 0 Then tNewPage = 1
Session("DataRangeHdr1_PageSize") = tPageSize
Session("DataRangeHdr1_AbsolutePage") = tNewPage
End If
If fEmptyRecordset Then
fHideNavBar = True
fHideRule = True
Else
Select Case tPagingMove
Case "Requery"
DataRangeHdr1.Requery
Case "<<"
Session("DataRangeHdr1_AbsolutePage") = 1
Case "<"
If Session("DataRangeHdr1_AbsolutePage") > 1 Then
Session("DataRangeHdr1_AbsolutePage") = Session Â("DataRangeHdr1_AbsolutePage") - 1
End If
Case ">"
If Not DataRangeHdr1.EOF Then
Session("DataRangeHdr1_AbsolutePage") = Session Â("DataRangeHdr1_AbsolutePage") + 1
End If
Case ">>"
Session("DataRangeHdr1_AbsolutePage") = DataRangeHdr1.PageCount
End Select
DataRangeHdr1.AbsolutePage = Session("DataRangeHdr1_AbsolutePage")
If DataRangeHdr1.EOF Then
Session("DataRangeHdr1_AbsolutePage") = Session Â("DataRangeHdr1_AbsolutePage") - 1
DataRangeHdr1.AbsolutePage = Session("DataRangeHdr1_AbsolutePage")
End If
End If
Do
If fEmptyRecordset Then Exit Do
If tRecordsProcessed = tPageSize Then Exit Do
If Not fFirstPass Then
DataRangeHdr1.MoveNext
Else
fFirstPass = False
End If
If DataRangeHdr1.EOF Then Exit Do
tRecordsProcessed = tRecordsProcessed + 1
%>
<!--METADATA TYPE="DesignerControl" endspan-->
<TR>
<TD> <%Response.Write DataRangeHdr1("au_fname") & " " &
DataRangeHdr1("au_lname") %> </TD>
<TD> <%Response.Write DataRangeHdr1("phone")%> </TD>
</TR>
<!--METADATA TYPE="DesignerControl" startspan
<OBJECT id="DataRangeFtr1" WIDTH=151 HEIGHT=24
CLASSid="CLSID:F602E722-A281-11CF-A5B7-0080C73AAC7E">
<PARAM NAME="_Version" VALUE="65536">
<PARAM NAME="_ExtentX" VALUE="3969">
<PARAM NAME="_ExtentY" VALUE="635">
<PARAM NAME="_StockProps" VALUE="0">
</OBJECT>
-->
<%
Loop
If tRangeType = "Table" Then Response.Write "</TABLE>"
If tPageSize > 0 Then
If Not fHideRule Then Response.Write "<HR>"
If Not fHideNavBar Then
%>
<TABLE WIDTH=100% >
<TR>
<TD WIDTH=100% >
<P ALIGN=<%= tBarAlignment %> >
<FORM ACTION="<%= Request.ServerVariables("PATH_INFO") & stQueryString %>"
METHOD="POST">
<INPUT TYPE="Submit" NAME="<%= tHeaderName & "_PagingMove" %>"
VALUE=" << ">
<INPUT TYPE="Submit" NAME="<%= tHeaderName & "_PagingMove" %>"
VALUE=" < ">
<INPUT TYPE="Submit" NAME="<%= tHeaderName & "_PagingMove" %>"
VALUE=" > ">
<INPUT TYPE="Submit" NAME="<%= tHeaderName & "_PagingMove" %>"
VALUE=" >> ">
<% If Not fHideRequery Then %>
<INPUT TYPE="Submit" NAME="<% =tHeaderName & "_PagingMove" %>"
VALUE=" Requery ">
<% End If %>
</FORM>
</P>
</TD>
<TD VALIGN=MIDDLE ALIGN=RIGHT>
<FONT SIZE=2>
<%
If Not fHideNumber Then
If tPageSize > 1 Then
Response.Write "<NOBR>Page: " & Session(tHeaderName & "_AbsolutePage") &
"</NOBR>"
Else
Response.Write "<NOBR>Record: " & Session(tHeaderName & "_AbsolutePage") &
"</NOBR>"
End If
End If
%>
</FONT>
</TD>
</TR>
</TABLE>
<%
End If
End If
%>
<!--METADATA TYPE="DesignerControl" endspan-->
</BODY>
</HTML>
Figure 14.16 depicts the web page that is created from this code example.
Figure 14.16.
Viewing the authors.
The web page displays a table which contains a list of authors and their phone
numbers. You can use the database navigation bar at the bottom of the page to traverse
the database records. From this example, I think you can understand the functions
of the Data Range Header and Data Range Footer controls. Basically, the Data Range
Header control opens the database connection and executes the initial SQL statement.
The Data Range Footer control completes the Data Range Header logic and processes
additional records through the use of the navigation bar. These controls are somewhat
analogous to a header and footer that you design for your web pages. In Listing 14.4,
you learned how to display the database information by inserting the logic to populate
the table between the Data Range Header and Footer controls. Similarly, you design
a web page to display the main content within the body of the document. In both of
these cases, the header and footer provide necessary logic and structure to properly
format the data.
Using the Data Range Builder
Now that you have learned how to individually insert the Data Range Header and
Footer controls, I bet you would like to discover an easier way to place these controls
in your web pages. Visual InterDev, again, lives up to its name by providing a visual
wizard to construct and insert both the Data Range Header and Footer controls into
your web page document. The Data Range Builder is a special type of wizard called
an HTML Builder. You can use HTML Builder to combine HTML and design-time controls
or to create pairs of design-time controls.
You can use the Data Range Builder to create a Data Range Header and Data Range
Footer control. Open the ASP file and right-click the mouse to display the shortcut
menu. Select Insert HTML Using Wizard, as shown in Figure 14.17.
After you select this menu item, the Choose Builder dialog window is displayed.
Select the Data Range Wizard from the list. The Data Range Builder Wizard displays,
as shown in Figure 14.18.
The Data Range Builder Wizard guides you through the process of creating the Data
Range Header and Footer controls. The first window enables you to select how many
records to display. You can choose to display all of the records on one page, or
you can specify the number of records to display per page. This window also enables
you to designate the alignment of the database navigation bar. After you complete
your selections, click the Next button to advance to the next window. The second
window of the wizard enables you to choose a name for your data range. Figure 14.19
shows the layout of this window.
Figure 14.17.
Selecting Insert HTML Using Wizard.
Figure 14.18.
Specifying the display options.
Figure 14.19.
Naming the data range.
After you click Finish, the Object Editor activates, enabling you to further customize
the properties of the Data Range Header control. You can choose the data connection
and use the Query Designer to construct your SQL statement. Once you complete this
process and close the Object Editor, the Data Range Header and Footer controls are
displayed in your ASP file. The Data Range Builder provides a very intuitive and
straightforward approach for creating the Data Range Header and Data Range Footer
controls.
Integrating Design-Time Controls
into Your Application
So far, you have learned how to use the Data Command, Data Range Header, and Data
Range Footer design-time controls. The lesson has presented several examples of how
to use these controls within your application. In the sections on the Data Range
Header and Footer controls, you learned how to format a table with database information.
This section explores another use of these controls to create a display form for
your data.
Exploring Other Uses of Design-Time
Controls
I am going to use the same example that was covered in the previous section and
show you how a few minor changes can affect the application that you create. Using
a new ASP file, I will cover how to create a Data Range Header and Footer again.
Refer to the previous sections on this topic for a refresher. This example starts
at the point of defining the Data Range Header control using the Object Editor.
In Listing 14.4, the application displayed the data in a table. I designed this
functionality by choosing Text as the Range Type. Other available values include
Form and Table. You can pick Form for the Range Type to display data within a form
on your web page. Also, for form data, you should choose to display only one record
at a time. You can select Record Paging and enter the value of 1 for the Page Size.
Remember, you must set the Cursor Type on the Advanced property page to either Keyset
or Static to be able to enter a value for the Page Size. Figure 14.20 displays these
choices for the Data Range Header control as it appears in the Object Editor.
Figure 14.20.
Setting the control properties.
Next, you need to build a query for the control. I have chosen to build a query
that selects the first name, last name, address, city, state, and ZIP code for all
rows contained in the Authors table. Figure 14.21 displays this query on the Control
property page.
The final task that needs to be completed is to copy the fields to the clipboard.
You can click the Copy Fields push button and select the fields that you want to
copy. These fields are inserted later into the ASP file to enable you to display
the database information on the form. Figure 14.22 displays the fields to be inserted
into the ASP file.
Figure 14.21.
Displaying the query for the control.
Figure 14.22.
Copying the fields.
After you close the Object Editor, the Data Range Header design-time control is
displayed in the ASP file. You then can create the Data Range Footer design-time
control. The final step is to paste the copied fields in your ASP file between the
Data Range Header and Data Range Footer controls. Listing 14.5 displays the resulting
ASP file that is created from the previous steps.
Listing 14.5. The Author Contact
display form.
<%@ LANGUAGE="VBSCRIPT" %>
<HTML>
<HEAD>
<META NAME="GENERATOR" Content="Microsoft Visual InterDev 1.0">
<META HTTP-EQUIV="Content-Type" content="text/html; charset=iso-8859-1">
<TITLE>Author Form</TITLE>
<H3>Author Contact Display Form</H3>
</HEAD>
<BODY>
<!--METADATA TYPE="DesignerControl" startspan
<OBJECT id="DataRangeHdr1" WIDTH=151 HEIGHT=24
CLASSid="CLSID:F602E721-A281-11CF-A5B7-0080C73AAC7E">
<PARAM NAME="_Version" VALUE="65536">
<PARAM NAME="_Version" VALUE="65536">
<PARAM NAME="_ExtentX" VALUE="3986">
<PARAM NAME="_ExtentY" VALUE="635">
<PARAM NAME="_StockProps" VALUE="0">
<PARAM NAME="DataConnection" VALUE="pubs">
<PARAM NAME="CommandText" VALUE="SELECT au_fname, au_lname, phone, address,
city, state, zip FROM authors">
<PARAM NAME="CursorType" VALUE="1">
<PARAM NAME="RangeType" VALUE="1">
<PARAM NAME="PageSize" VALUE="1">
</OBJECT>
-->
<%
fHideNavBar = False
fHideNumber = False
fHideRequery = False
fHideRule = False
stQueryString = ""
fEmptyRecordset = False
fFirstPass = True
fNeedRecordset = False
fNoRecordset = False
tBarAlignment = "Left"
tHeaderName = "DataRangeHdr1"
tPageSize = 1
tPagingMove = ""
tRangeType = "Form"
tRecordsProcessed = 0
If Not IsEmpty(Request("DataRangeHdr1_PagingMove")) Then
tPagingMove = Trim(Request("DataRangeHdr1_PagingMove"))
End If
If IsEmpty(Session("DataRangeHdr1_Recordset")) Then
fNeedRecordset = True
Else
If Session("DataRangeHdr1_Recordset") Is Nothing Then
fNeedRecordset = True
Else
Set DataRangeHdr1 = Session("DataRangeHdr1_Recordset")
End If
End If
If fNeedRecordset Then
Set pubs = Server.CreateObject("ADODB.Connection")
pubs.ConnectionTimeout = Session("pubs_ConnectionTimeout")
pubs.CommandTimeout = Session("pubs_CommandTimeout")
pubs.Open Session("pubs_ConnectionString"), Session("pubs_RuntimeUserName"), Session("pubs_RuntimePassword")
Set cmdTemp = Server.CreateObject("ADODB.Command")
Set DataRangeHdr1 = Server.CreateObject("ADODB.Recordset")
cmdTemp.CommandText = "SELECT au_fname, au_lname, phone, address, city, state,
zip FROM authors"
cmdTemp.CommandType = 1
Set cmdTemp.ActiveConnection = pubs
DataRangeHdr1.Open cmdTemp, , 1, 1
End If
On Error Resume Next
If DataRangeHdr1.BOF And DataRangeHdr1.EOF Then fEmptyRecordset = True
On Error Goto 0
If Err Then fEmptyRecordset = True
DataRangeHdr1.PageSize = tPageSize
If Not IsEmpty(Session("DataRangeHdr1_Filter")) And Not fEmptyRecordset Then
DataRangeHdr1.Filter = Session("DataRangeHdr1_Filter")
If DataRangeHdr1.BOF And DataRangeHdr1.EOF Then fEmptyRecordset = True
End If
If IsEmpty(Session("DataRangeHdr1_PageSize")) Then Session("DataRangeHdr1_
PageSize") = tPageSize
If IsEmpty(Session("DataRangeHdr1_AbsolutePage")) Then Session("DataRangeHdr1_
AbsolutePage") = 1
If Session("DataRangeHdr1_PageSize") <> tPageSize Then
tCurRec = ((Session("DataRangeHdr1_AbsolutePage") - 1) * Session("DataRangeHdr1_
PageSize")) + 1
tNewPage = Int(tCurRec / tPageSize)
If tCurRec Mod tPageSize <> 0 Then
tNewPage = tNewPage + 1
End If
If tNewPage = 0 Then tNewPage = 1
Session("DataRangeHdr1_PageSize") = tPageSize
Session("DataRangeHdr1_AbsolutePage") = tNewPage
End If
If fEmptyRecordset Then
fHideNavBar = True
fHideRule = True
Else
Select Case tPagingMove
Case "Requery"
DataRangeHdr1.Requery
Case "<<"
Session("DataRangeHdr1_AbsolutePage") = 1
Case "<"
If Session("DataRangeHdr1_AbsolutePage") > 1 Then
Session("DataRangeHdr1_AbsolutePage") = Session Â("DataRangeHdr1_AbsolutePage") - 1
End If
Case ">"
If Not DataRangeHdr1.EOF Then
Session("DataRangeHdr1_AbsolutePage") = Session Â("DataRangeHdr1_AbsolutePage") + 1
End If
Case ">>"
Session("DataRangeHdr1_AbsolutePage") = DataRangeHdr1.PageCount
End Select
DataRangeHdr1.AbsolutePage = Session("DataRangeHdr1_AbsolutePage")
If DataRangeHdr1.EOF Then
Session("DataRangeHdr1_AbsolutePage") = Session Â("DataRangeHdr1_AbsolutePage") - 1
DataRangeHdr1.AbsolutePage = Session("DataRangeHdr1_AbsolutePage")
End If
End If
Do
If fEmptyRecordset Then Exit Do
If tRecordsProcessed = tPageSize Then Exit Do
If Not fFirstPass Then
DataRangeHdr1.MoveNext
Else
fFirstPass = False
End If
If DataRangeHdr1.EOF Then Exit Do
tRecordsProcessed = tRecordsProcessed + 1
%>
<!--METADATA TYPE="DesignerControl" endspan-->
<INPUT TYPE="Text" SIZE=25 MAXLENGTH=20 NAME=au_fname
VALUE="<%= DataRangeHdr1("au_fname") %>"><br>
<INPUT TYPE="Text" SIZE=25 MAXLENGTH=40 NAME=au_lname
VALUE="<%= DataRangeHdr1("au_lname") %>"><br>
<INPUT TYPE="Text" SIZE=25 MAXLENGTH=40 NAME=address
VALUE="<%= DataRangeHdr1("address") %>"><br>
<INPUT TYPE="Text" SIZE=25 MAXLENGTH=20 NAME=city
VALUE="<%= DataRangeHdr1("city") %>"><br>
<INPUT TYPE="Text" SIZE=25 MAXLENGTH=2 NAME=state
VALUE="<%= DataRangeHdr1("state") %>"><br>
<INPUT TYPE="Text" SIZE=25 MAXLENGTH=5 NAME=zip
VALUE="<%= DataRangeHdr1("zip") %>"><br>
<INPUT TYPE="Text" SIZE=25 MAXLENGTH=12 NAME=phone
VALUE="<%= DataRangeHdr1("phone") %>"><br>
<!--METADATA TYPE="DesignerControl" startspan
<OBJECT id="DataRangeFtr1" WIDTH=151 HEIGHT=24
CLASSid="CLSID:F602E722-A281-11CF-A5B7-0080C73AAC7E">
<PARAM NAME="_Version" VALUE="65536">
<PARAM NAME="_ExtentX" VALUE="3969">
<PARAM NAME="_ExtentY" VALUE="635">
<PARAM NAME="_StockProps" VALUE="0">
</OBJECT>
-->
<%
Loop
If tRangeType = "Table" Then Response.Write "</TABLE>"
If tPageSize > 0 Then
If Not fHideRule Then Response.Write "<HR>"
If Not fHideNavBar Then
%>
<TABLE WIDTH=100% >
<TR>
<TD WIDTH=100% >
<P ALIGN=<%= tBarAlignment %> >
<FORM ACTION="<%= Request.ServerVariables("PATH_INFO") &
stQueryString %>" METHOD="POST">
<INPUT TYPE="Submit" NAME="<%= tHeaderName & "_PagingMove" %>"
VALUE=" << ">
<INPUT TYPE="Submit" NAME="<%= tHeaderName & "_PagingMove" %>"
VALUE=" < ">
<INPUT TYPE="Submit" NAME="<%= tHeaderName & "_PagingMove" %>"
VALUE=" > ">
<INPUT TYPE="Submit" NAME="<%= tHeaderName & "_PagingMove" %>"
VALUE=" >> ">
<% If Not fHideRequery Then %>
<INPUT TYPE="Submit" NAME="<% =tHeaderName & "_PagingMove" %>"
VALUE=" Requery ">
<% End If %>
</FORM>
</P>
</TD>
<TD VALIGN=MIDDLE ALIGN=RIGHT>
<FONT SIZE=2>
<%
If Not fHideNumber Then
If tPageSize > 1 Then
Response.Write "<NOBR>Page: " & Session(tHeaderName & "_AbsolutePage") &
"</NOBR>"
Else
Response.Write "<NOBR>Record: " & Session(tHeaderName & "_AbsolutePage") &
"</NOBR>"
End If
End If
%>
</FONT>
</TD>
</TR>
</TABLE>
<%
End If
End If
%>
<!--METADATA TYPE="DesignerControl" endspan-->
</BODY>
</HTML>
Notice that the fields that are copied into the ASP file use the <INPUT>
tags to create the display fields for the database information. The Data Range Header
design-time control handles this formatting for you based on the Range Type that
you select. This feature saves you precious development time. Figure 14.23 displays
the form that is created from Listing 14.5.
Figure 14.23.
Displaying a form.
You could enhance the look of the form by adding additional line breaks or moving
the fields around on the form. Listing 14.5, as well as the previous listings, demonstrates
how you can rapidly build an application that interacts with your database information.
Through the use of design-time controls, Visual InterDev takes care of the routine
programming. The time that you save can be spent on enhancing the design of the web
page and fine-tuning the programming logic.
Summary
ToChapter's lesson has introduced you to the exciting new world of design-time controls.
These new controls combine raw power with ease-of-use to become a true friend of
the developer. Design-time controls can truly augment your productivity. You can
use design-time controls to provide rich and robust functionality in your application
while reducing the overhead costs of your application.
In toChapter's lesson you first learned the definition of a design-time control. You
should now be able to describe the basic concept of a design-time control, and be
able to distinguish between a Design-time ActiveX control and a regular ActiveX control.
The lesson provided you with an overview of the origins of design-time controls
and described some common functions of these controls. The lesson then guided you
through the process of inserting a design-time control into your web pages. You learned
about three specific design-time controls that are included with Visual InterDev.
First, you learned how to use the Data Command design-time control. The lesson explained
each of the property pages for this control and how to set these properties. The
lesson also taught you about common uses of this control. Next, you learned about
the Data Range Header and Data Range Footer controls. You discovered how these two
controls complement and complete each other.
You also learned how the Query Designer can be used with all of the database design-time
controls. Toward the end of the Chapter, the lesson explained how to use the Data Range
Builder Wizard. You can use this wizard to easily insert pairs of design-time controls
into your web page documents at one time. The final lesson for the Chapter focused on
using the Data Range Header and Footer controls to create a display form for your
database information.
You have just completed the second week of your Visual InterDev training. How
do you feel so far about the product? Hopefully, the first two weeks have given you
a good overall look at using the features of Visual InterDev. You should now possess
a solid foundation with which to build robust applications with Visual InterDev.
The final week teaches you some additional advanced concepts that you can use to
build your applications.
Q&A
- Q Can I build my own custom design-time controls?
AYes. In fact, you will learn how to build a design-time control on Chapter 16, "Building
Design-Time ActiveX Controls."
Q How does the design-time control hide its object instantiation at run-time
AA design-time control is created at the time of design, using the <OBJECT>
tags. These tags primarily exist to enable you to edit the properties for the control
using the visual Object Editor. The <OBJECT> tags are enclosed in
comments, however, which prevents the browser from viewing or recognizing the object.
For this reason, the object is never instantiated at runtime.
Q If the object is never instantiated, how does the design-time control accomplish
its functionality
AThe properties that you define for the design-time control generate runtime
code, which persists when the application is run. This code can be a combination
of both HTML and scripting code and represents all of the logic for the design-time
control. When the user runs the application, this code is recognized and executed,
thereby providing the functionality of the design-time control.
Workshop
I want you to extend the examples that were provided in toChapter's lesson. The goal
is to gain extra practice using design-time controls within your application. Using
the table example and the display form, develop an application that integrates the
two forms. You also should develop additional functionality that enables you to submit
updates and additions of new authors to the database. Draw on all of the knowledge
that you have gained in the first two weeks to complete this workshop. If you aren't
using MS SQL Server as your database, you can still plug in your specific database
and apply the concepts to build an application.
Quiz
- 1. What is the difference between Design-time and regular ActiveX controls?
2.Explain the difference between the Data Command and the Data Range controls.
3 Which feature enables you to easily format the values of the database fields
into a web page document?
4 Name the three types of data ranges that can be created for a Data Range Header
design-time control.
Quiz Answers
- 1. A design-time control is a special type of ActiveX control that provides
code that persists and executes at runtime without incurring the overhead of a control
object at runtime. Regular ActiveX controls exist both at design-time as well as
at runtime. ActiveX controls are typically used to construct a user interface for
your application. An ActiveX control object is instantiated at runtime.
2.The Data Command design-time control enables you to create a database connection
and a Recordset object which you can use to query the database. The Data
Command control is typically used for selecting and updating one database row at
a time. The Data Range design-time controls are similar to the Data Command control
in that they also create a database connection and Recordset object. The
Data Range controls differ in that they typically are used for publishing and modifying
multiple rows of data. The Data Range controls enable you to traverse through multiple
records in the database.
3 You can use the Copy Fields dialog window to select database fields to insert
into the web page document. This feature enables you to display the information contained
in your database.
4 The three Range Types for the Data Range Header design-time control include:
- Text
Form
Table
|


 MS Access
1109
MS Access
1109
 C++
1222
C++
1222
 HTML
584
HTML
584
 JavaScript
616
JavaScript
616
 Vbscript
873
Vbscript
873
 Oracle
473
Oracle
473
 VC++
875
VC++
875
 SQL
2959
SQL
2959
 XML
514
XML
514
 Java
814
Java
814
 Perl
455
Perl
455
 Linux
451
Linux
451


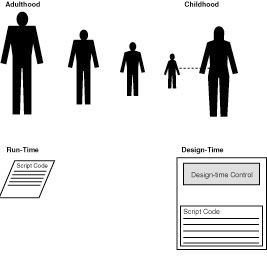
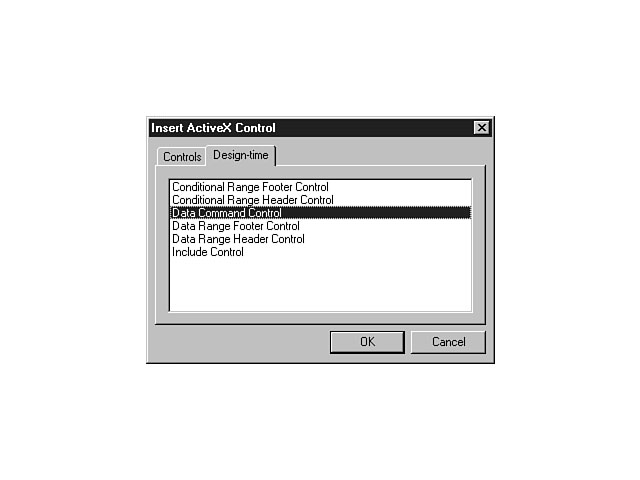
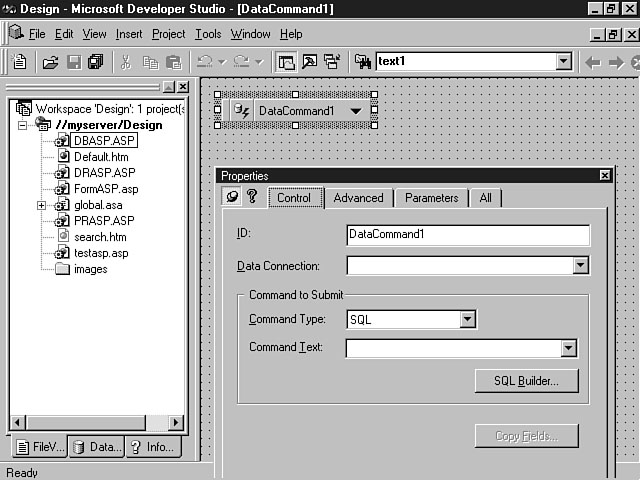
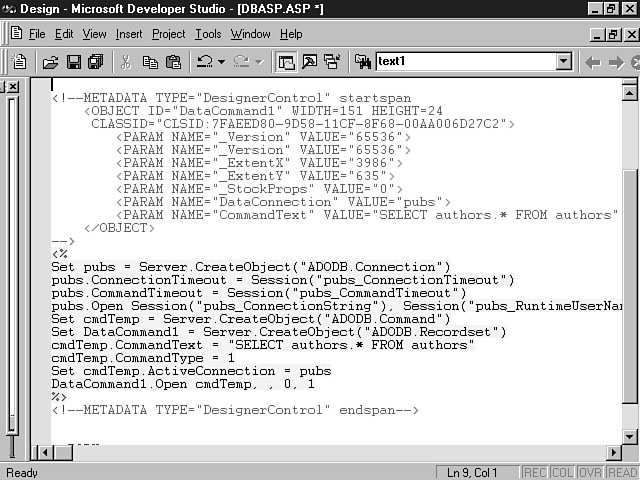
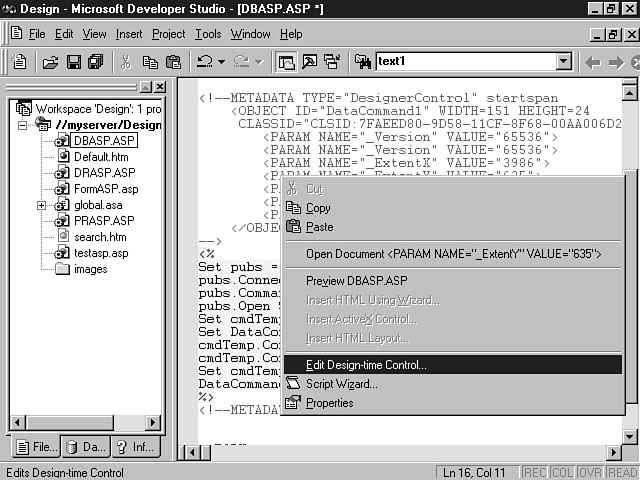
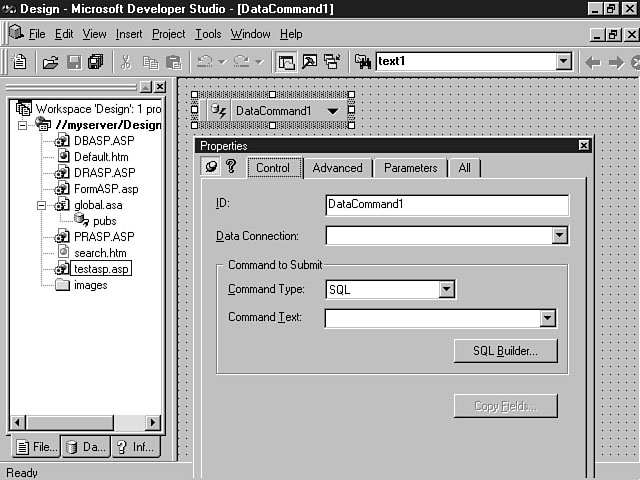
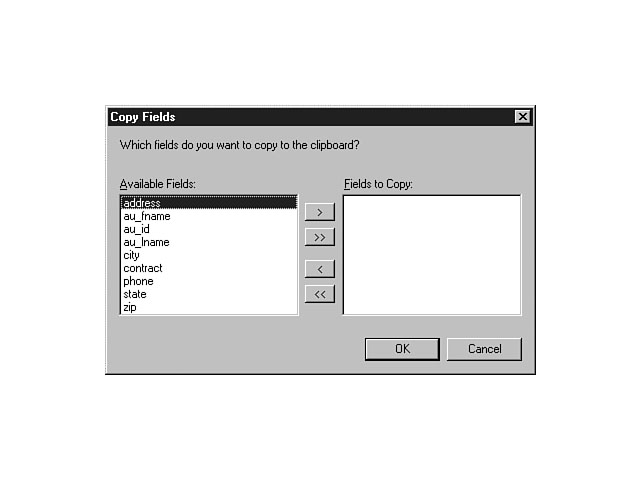
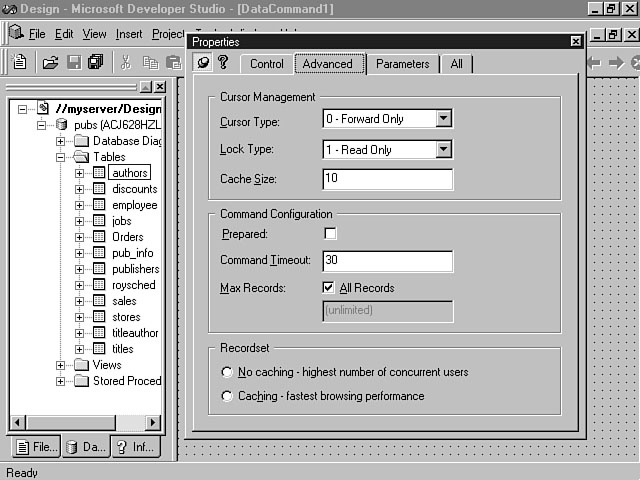
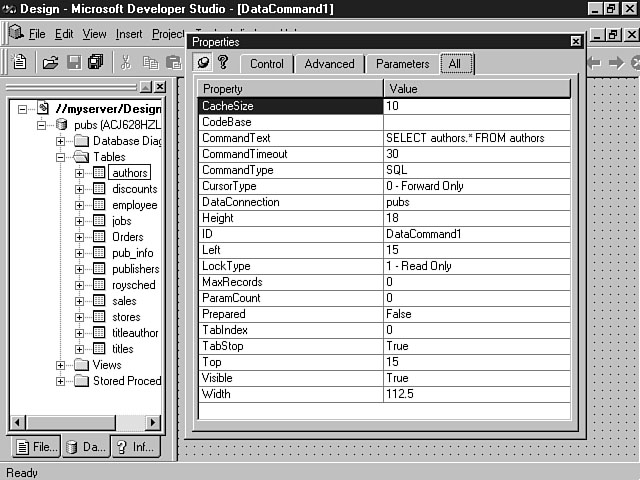
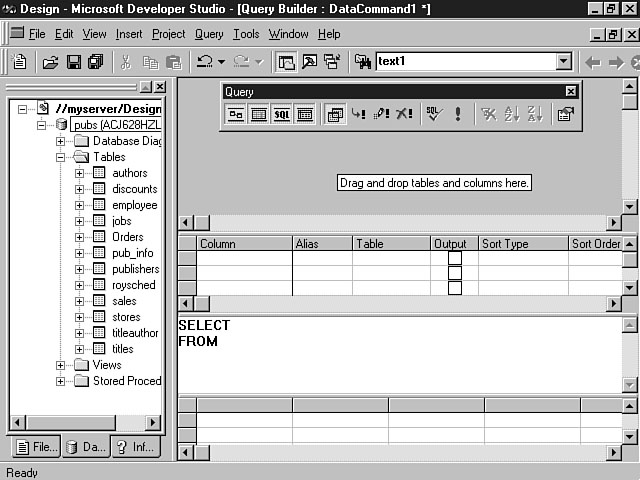
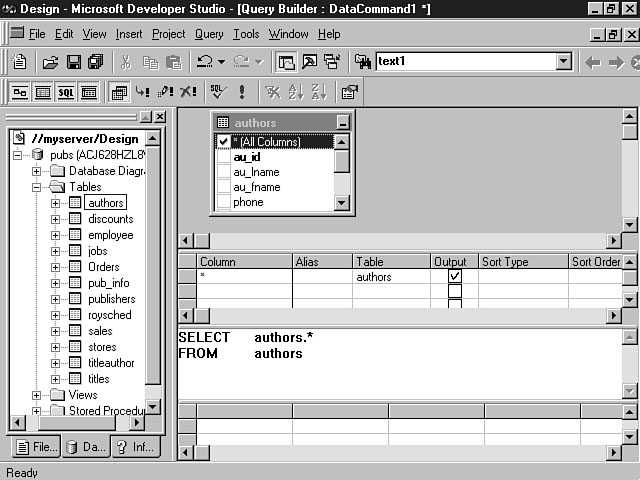
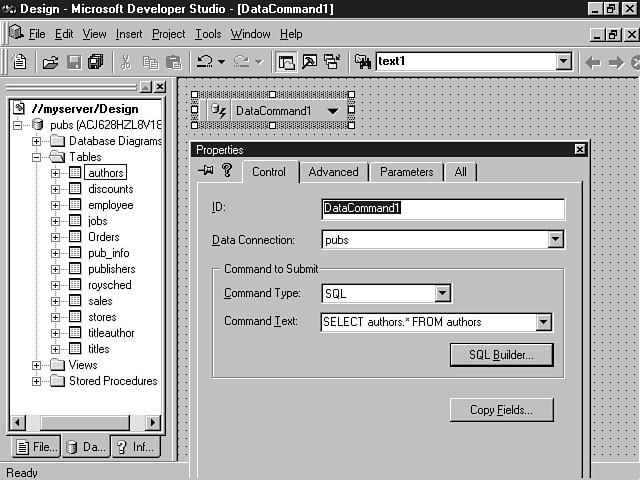
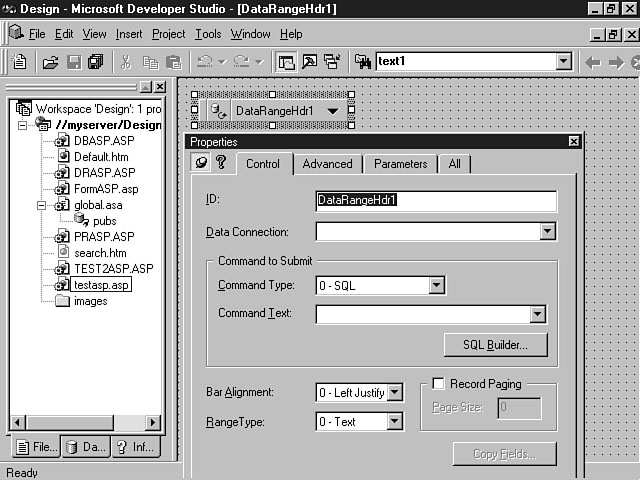
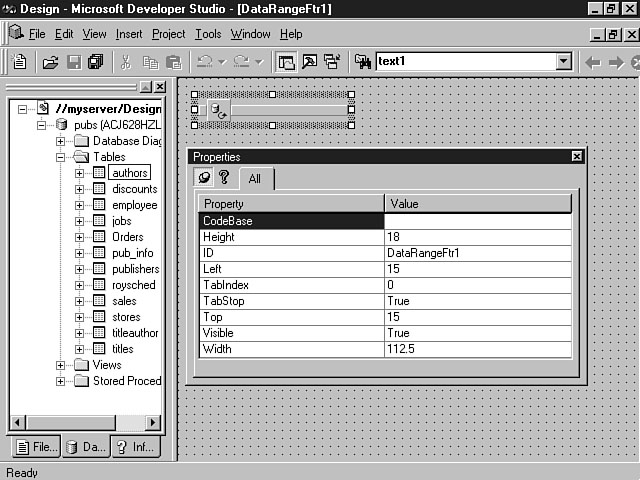
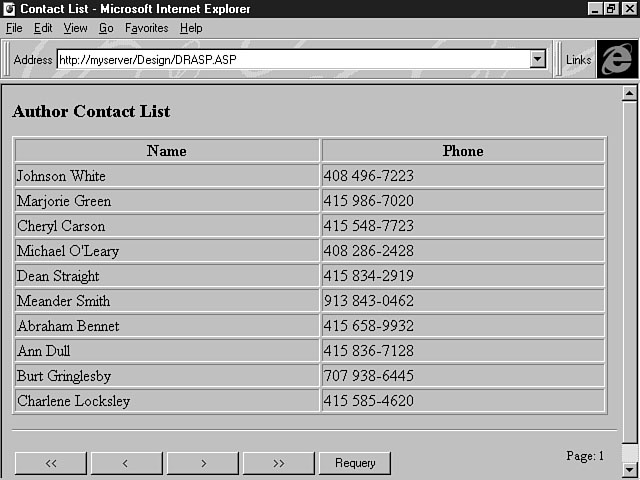
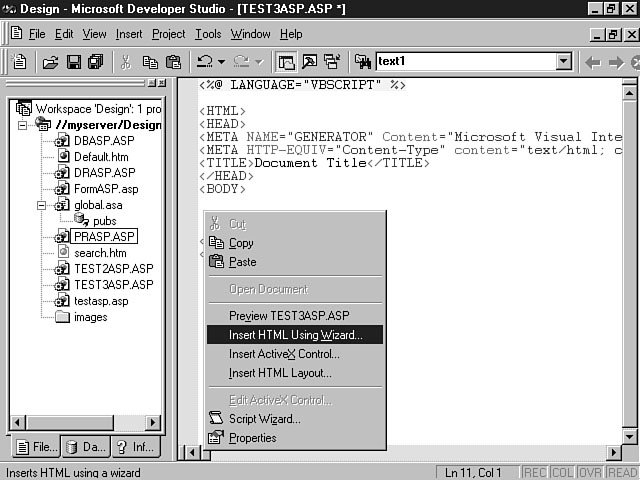