Web based School


- 2 — Project Creation and the AppWizard
2 — Project Creation and the AppWizard
2 — Project Creation and the AppWizard
One of the great strengths of the Visual C++ development system is its ability to create highly functional application skeletons through the AppWizard tool. The AppWizard can be used to generate skeleton Windows applications with a variety of OLE, database, windowing, help, and other options. The AppWizard can also be used to create Windows DLLs; in addition, specialized AppWizards exist for creating OLE controls and custom AppWizards.
In this section, we review how projects of various types are created using the Developer Studio.
Creating Windows Projects
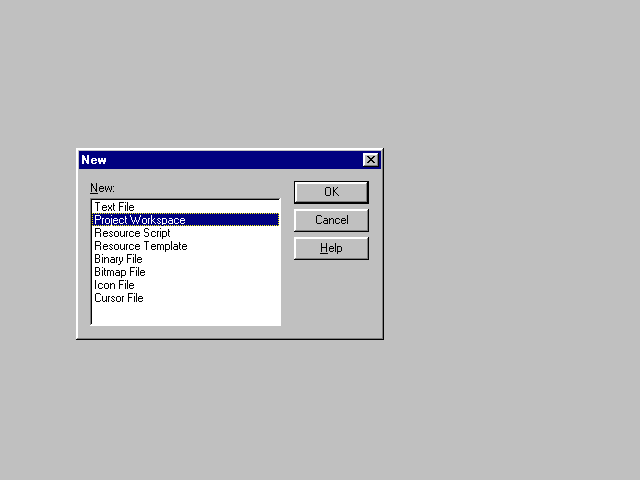
When you select the New command from the Developer Studio's File menu, you are presented with the choice of creating a new text file, a new project workspace, or a variety of new resource file components (Figure 2.1).
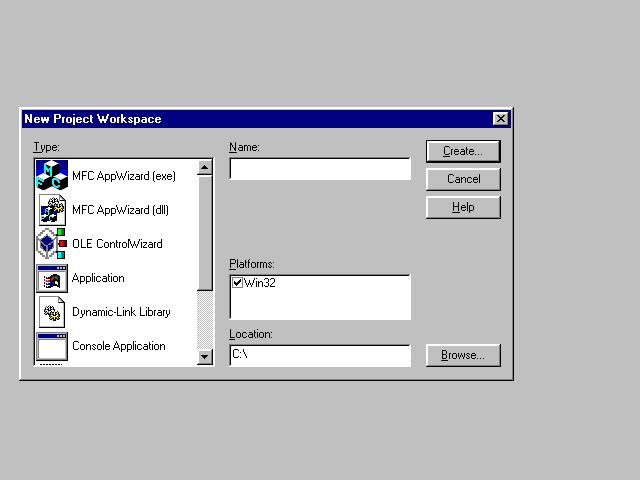
If you select Project Workspace in the New dialog, another dialog, the New Project Workspace dialog, appears (Figure 2.2). In this dialog, you can choose from a variety of workspace options.
Figure 2.2. The New Project Workspace dialog.
The first two choices listed in this dialog represent AppWizard-generated skeletons for Windows executable programs and for Windows DLLs. Next, we examine these options in detail. Later in this chapter, we take another look at the other project workspace types and how they can be used with new or existing projects.
Types of Windows Applications Created Through AppWizard
If you select MFC AppWizard (exe) as the type of your new project, you are presented with step one of a multistep wizard process (Figure 2.3). In this first step, you can decide the basic characteristic of your new application: whether it will have a single-document-based, multiple-document-based, or dialog-based user interface.
Figure 2.3. MFC AppWizard: Selecting your project's type.
A single-document-based application can present only one file to the user at any given time. A good example for such an application is the Windows NotePad.
A multiple-document-based application, in contrast, can present several documents at once, each in its own child window. Many word processing applications, such as Microsoft's Word for Windows, are multiple-document-based applications.
A dialog-based application presents a single dialog as its user interface. These applications are used when all user interaction can take place through a single dialog template. An example for a dialog-based application is the Windows Character Map.
During this first AppWizard step, you can also specify the language of your application. Your language selection defines which standard MFC resource set will be included with your project.
You can also use the AppWizard to create a project that supports multiple languages. To do so, create the additional resource files (perhaps by rerunning AppWizard to create dummy projects in the desired language) and add the new resource files to your project. Create additional project configurations, including and excluding resource files as needed.
Document-Based MFC Applications
The creation of single- or multiple-document-based (SDI or MDI) applications through AppWizard are nearly identical procedures, consisting of the same AppWizard steps.
The project files created by AppWizard for SDI and MDI projects are somewhat different; in particular, for an MDI project, AppWizard generates an additional class, CChildFrame, that represents MDI child windows.
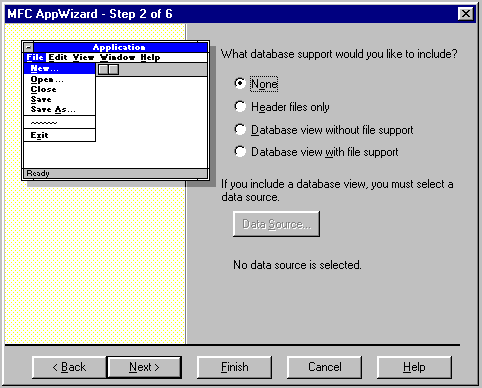
After you select one of these document-based options, clicking the Next button takes you to Step 2 of a six-step process. In this step (Figure 2.4), you must specify the level of database support your application will provide. Database support is in the form of MFC's Open Database Connectivity (ODBC) and Data Access Objects (DAO) classes.
Figure 2.4. MFC AppWizard: Selecting database support.
The meaning of the None option is obvious. The Header files only option creates a project with the necessary header files included, but otherwise the project files will be no different from files in a project with no database support.
The remaining two options represent significant additions to your project. First, your project's view class will be a class derived from CRecordView or CDaoRecordView; second, a new class, derived from CRecordSet or CDaoRecordSet, will be added to your project. The new view class is dialog template-based and represents the fields in a record; the record set class provides an internal representation for those fields and methods to access the underlying tables.
The difference between the Database view with file support and Database view without file support options in AppWizard Step 2 is simple. The former provides menu and toolbar commands to load and save document files; the latter does not. Often, when creating a database application, your application's document class provides merely a transient representation of the database and does not need to be saved; in this case, use the Database view without file support option.
Regardless which of these two options you choose, before you proceed to AppWizard Step 3, you must also specify a data source. The data source is a table or set of tables in a database that can be accessed through the ODBC or DAO mechanism. To select a data source, click on the Data Source button.
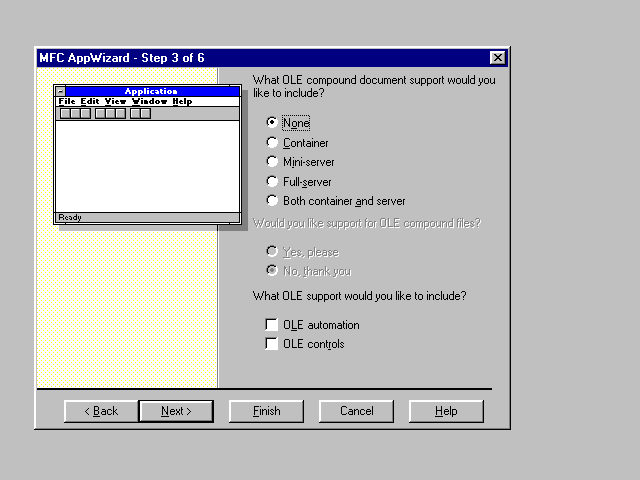
AppWizard Step 3 (Figure 2.5) is about support for Object Linking and Embedding features. You can specify whether your application supports OLE compound document functionality as a server, container, mini-server, or container-server. You can also add OLE automation server and OLE control container support; the latter is important if you wish to use OLE controls in your application's dialogs.
Figure 2.5. MFC AppWizard: OLE features.
If you select OLE compound document support, you can also specify OLE compound file support.
Depending on which OLE features you select, the AppWizard may generate additional classes for your application. For OLE servers, these additional classes include CInPlaceFrame (representing the frame window during in-place editing), and a COleServerItem-derived class representing the server object in container applications. For OLE containers, a new COleClientItem-derived class is added, representing OLE server items in the container. In both cases, the base class of your application's document class is also modified; it is derived from COleDocument in the case of containers, and COleServerDoc in the case of servers or container-servers.
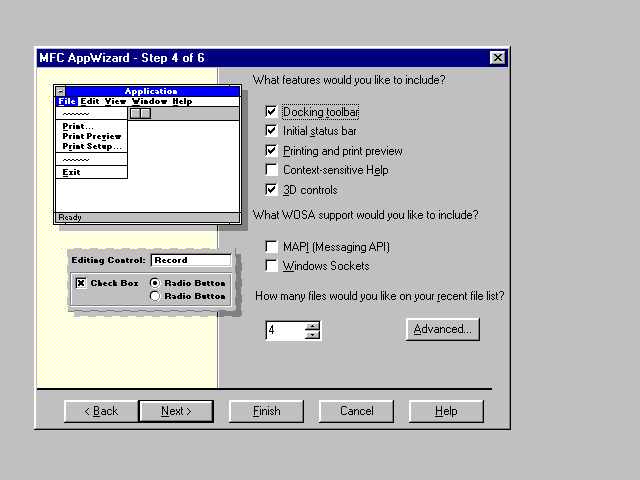
Step 4 of AppWizard (Figure 2.6) contains a variety of miscellaneous options. The checkboxes for toolbar support, status bar support, and support for 3-D controls require little explanation.
Figure 2.6. MFC AppWizard: Miscellaneous options in Step 4.
If you clear the Printing and print preview checkbox (it is set by default), your application will not have a Print or Print Preview command in its File menu, nor will it provide support for print preview mode. It is generally a good idea to leave this box checked even if you do not wish to provide the printing commands in the File menu, as long as you intend to use the printing and print preview-related features of MFC.
Setting the Context-sensitive Help checkbox adds a skeletal help project file and help topic files to your application. It also adds the batch file makehelp.bat that can be used to regenerate your project's help file.
Adding Messaging API (MAPI) support to your application means two things: first, your application will be linked with the MAPI libraries; second, your application will have a Send menu item in its File menu. Often this is all you need to provide minimal MAPI support for compatibility with Windows 95 application requirements.
Setting the Windows Sockets checkbox adds WinSock libraries and header files to your project. However, you are responsible for adding any specific WinSock functionality.
Of particular interest in AppWizard Step 4 is the Advanced Options dialog, invoked when you click on the Advanced button. Through this dialog, you can specify a variety of additional options that affect your application's appearance and execution in subtle ways.
The Advanced Options dialog is a tabbed dialog. The first tab, Document Template Strings (Figure 2.7), enables you to specify several string values defining your application's default filename extension, filename filter, file type identifier, and more. These strings are combined and stored in your application's string table (in the resource file) under the identifier IDR_MAINFRAME. For example, the string corresponding to the settings shown in Figure 2.7 is this:
TEST\n\nTEST\nTEST Files (*.tst)\n.TST\nTEST.Document\nTEST Document
Figure 2.7. MFC AppWizard: Advanced document template string settings.
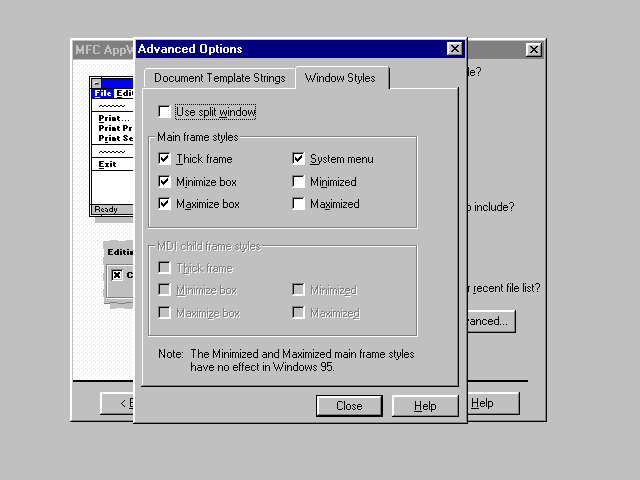
The second tab in this dialog, Window Styles (Figure 2.8), can be used to specify the window styles for the application's frame window. You can also select split window support; when this checkbox is set, your application's views will have a splitter bar.
Figure 2.8. MFC AppWizard: Advanced window style settings.
In this part of the Advanced Options dialog, you can also modify settings for child frame windows in MDI applications.
Step 5 of AppWizard (Figure 2.9) enables you to specify two simple options; whether the AppWizard-generated skeleton source should contain comments or not, and whether the MFC Library should be linked to your project as a static library or a DLL.
Figure 2.9. MFC AppWizard Step 5.
Usually, specifying source file comments is a good idea. In addition to providing meaningful explanations in your code, the AppWizard also generates "TODO" comments, which indicate those points in your code that you need to complete or modify manually.
The final step in the AppWizard process, Step 6 (Figure 2.10), lists the classes that the AppWizard is about to create for your application. You can also modify some aspects of class creation at this stage. For example, you can modify the base class of your application's view class to be based on the CFormView or CScrollView class, instead of the default CView.
Figure 2.10. MFC AppWizard: Class overview.
To complete the AppWizard process, click the Finish button. This displays the New Project Information dialog (incidentally, giving you one more chance to back out and cancel the AppWizard procedure); this dialog displays information about the skeleton project. This information is also saved in your project directory as your project's readme.txt file.
The classes generated for a basic single-document base application include a document class, a view class, a frame window class, and a CWinApp-derived class representing the application. The declaration and definition of a CDialog-derived class, representing your application's About dialog, will also be included in the implementation file of your application's CWinApp-derived class. Depending on what additional options you specified (MDI support, database support, OLE features), additional classes may be generated by AppWizard.
Dialog-Based MFC Applications
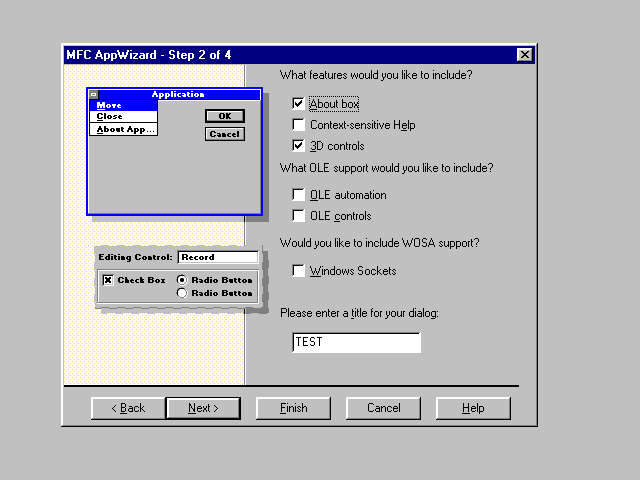
The AppWizard process for creating a dialog-based MFC application is much shorter than creating document-based applications. Selecting a dialog-based application in AppWizard Step 1 and clicking on the Next button takes you to Step 2 of a four-step process (Figure 2.11).
Figure 2.11. MFC AppWizard: Creating a dialog-based application.
The About box option in this step adds an About command to the dialog's control menu; note that the dialog will not have a menu bar. The Context-sensitive Help option adds AppWizard-generated skeletal help support in the form of a help project file, topic files, and the makehelp.bat script for regenerating your application's help file. The 3-D controls option needs no explanation.
You can also specify OLE automation and OLE control support. Check the latter if you wish to use OLE controls in the dialog.
The Windows Sockets option adds WinSock header and library files to your project; however, it is up to you to implement any specific WinSock functionality.
You can also specify the title of your application; this text will be displayed in the title bar of the application's dialog box.
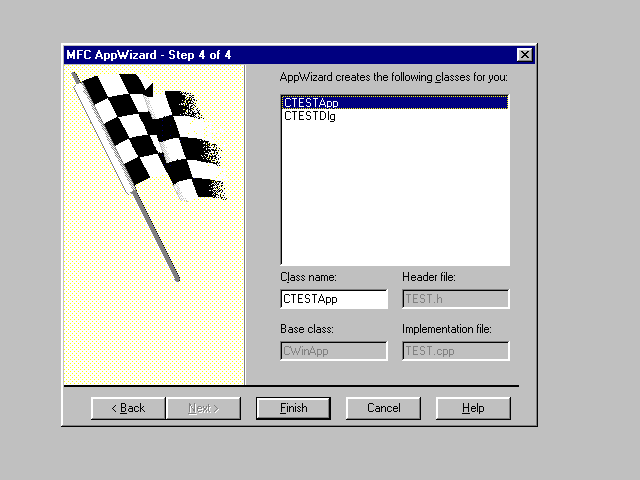
Step 3 of the AppWizard process for dialog-based applications is identical to Step 5 for document-based applications (see Figure 2.9). Similarly, Step 4 for dialog-based applications is the same as Step 6 for document-based ones; however, the list of generated classes is different (Figure 1.12). Only two classes are created: one representing the application object, the other representing the application's dialog.
Figure 2.12. MFC AppWizard: Dialog-based application classes.
In many cases, you may find that a dialog-based AppWizard-generated skeleton application lacks the features that you wish to see in your program. In such cases, consider using an SDI application based on the CFormView class.
Using AppWizard to Create MFC-Based DLLs
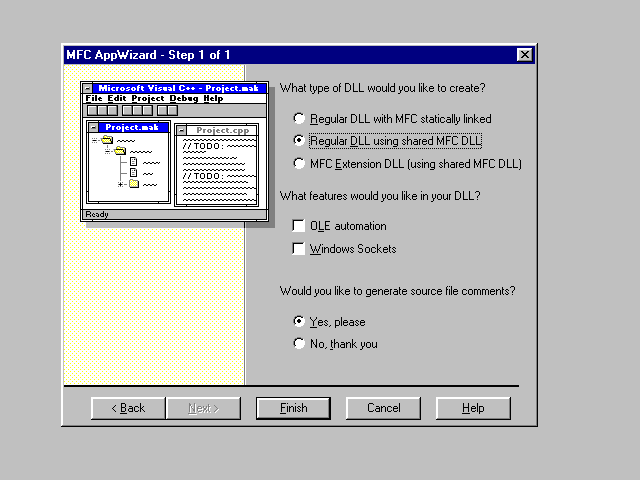
If you use the AppWizard to create an MFC-based DLL skeleton, you are presented with a one-step procedure where you can specify your DLL's characteristics (Figure 2.13).
Figure 2.13. MFC AppWizard: Creating an MFC-based DLL.
The first set of options is where you specify how the DLL should be linked with the MFC Library. Linking statically is the most expensive in terms of disk space and memory requirements. The least expensive is creating an MFC extension DLL; however, these DLLs can only be used with MFC applications. A regular DLL linked with the MFC DLL can, in turn, be called from any application.
By setting the OLE Automation checkbox, you enable support for using your DLL as an OLE Automation inproc server. (An inproc server is a server that executes in the process space of the client application, as opposed to using a remote procedure call mechanism for communicating with the client.)
Adding WinSock support enables compiling and linking with the WinSock header and library files; however, you must add your own implementation of any WinSock-specific functionality.
Finally, you can also specify if you wish to see AppWizard-generated source comments in your DLL.
Other Project Types
The New command in the Developer Studio's File menu, in addition to letting you create skeleton projects with AppWizard, also enables you to create other, blank projects.
Application
Creating an application means creating a project and its make file in support of a Windows-based graphical application. The make file will be blank; you will need to add your project files manually. You can use this option, for example, when you are setting up a Developer Studio project for a set of source files not created with AppWizard. You can also use this option to import files from a project that was created earlier with an incompatible version of Visual C++. However, you should try to open that project's make file (or better yet, a copy of the make file) first; chances are that if it is a make file generated by Visual C++, the Developer Studio will be able to successfully import it and convert it to its new format.
Dynamic Link Library
Creating a dynamic link library means creating the make file and project file for a dynamic link library project. The compiler and linker settings will be configured to generate a DLL file. The project will be blank; you must add or create your source files manually.
Console Application
A console application is a program that runs from the command line in Windows 95 or Windows NT DOS boxes. Creating a console application project means creating a blank project with project files and a make file supporting the generation of a console program. You must add or create your source files manually for this application.
Static Library
A static library is a library file with the .lib extension that can be linked with other projects. Selecting the static library option in the New Project Workspace dialog creates a make file and support files for a static library project. The project will be blank; you must add your own source files to create the library.
Make File
You can use the option to create a make file-based project when you wish to specify an external make file or some other executable program that is used to rebuild your project. This option is also useful when adding existing projects as subprojects.
Specialty AppWizards
The New Project Workspace dialog also offers access to special versions of the AppWizard. These include the OLE ControlWizard, the Custom AppWizard, and any custom AppWizards you may have created.
OLE ControlWizard
The OLE ControlWizard guides you through the steps of creating a project that consists of one or more OLE controls. An OLE control project creates an OCX file that is a special DLL file. The first of the two AppWizard steps is used to specify generic properties of your OLE control project; the second step enables you to specify settings specific to individual controls in your project.
Custom AppWizard
The Custom AppWizard enables you to create custom AppWizards (and if terms like "AppWizard-generated AppWizard project skeleton" confuse you, you are not alone). A custom AppWizard can be based on the standard AppWizards for MFC applications or DLLs; it can also be based on an existing project or contain only custom steps you define. If you specify that your custom AppWizard be based on standard steps, a second step of the Custom AppWizard lets you select which AppWizard to use. If your custom AppWizard is to be based on an existing project, you can specify the project's path in the second step. For custom AppWizards consisting entirely of custom steps, Step 2 of the Custom AppWizard is unavailable.
Modifying an Existing Project
A recurring problem with AppWizard-generated projects is how to modify project options "after the fact"—after a project has been created and extensive changes have been made to it. There are two methods that can be used for this purpose: manually updating your project based on dummy AppWizard projects is one, use of the Component Gallery is another.
Modifying a Project Manually
The first method consists of creating two dummy projects, one with the settings you used in your original application, another with the desired AppWizard settings. When the two projects have been created, close the project workspaces, and use the WinDiff utility to compare the two project directories. This comparison reveals any changes or additions that the AppWizard added for the project with the new settings. You can incorporate these changes into your own project manually.
Using the Component Gallery
Many AppWizard options can also be added to a project through the Component Gallery. For example, you can add MAPI support, OLE automation support, or support for OLE controls to an existing project using the appropriate components from the Component Gallery. In some cases, you may be able to use components from your own project to add support for specific features to your application.
Summary
The AppWizard has a central role in the Visual C++ development system for creating skeleton applications.
The AppWizard can be used to create project workspaces for MFC-based Windows applications and Windows DLLs.
Creating a document-based Windows MFC application is a six-step process. In the various AppWizard steps, you can specify database support, support for OLE features; you can determine your application's appearance, add support for context-sensitive help and printing, Windows Sockets and MAPI; and you can modify the list of classes generated by AppWizard.
Creating a dialog-based Windows MFC application is simpler; in addition to controlling your application's appearance, you can add OLE automation and OLE control support and modify the AppWizard-generated list of classes for your project.
In addition to MFC projects, you can also create blank projects for Windows applications, DLLs, console applications, static libraries, and existing make files.
There are also specialty AppWizards. The OLE ControlWizard can be used to create OLE control projects; the Custom AppWizard enables you to create customized versions of the AppWizard based on standard steps, an existing project, or your own custom steps.
If you created a project with the wrong settings, you can modify the project by copying settings from a dummy AppWizard project that was created with the settings you require. Alternatively, many options can also be added to an existing project using components in the Component Gallery.
Popular Tutorials
-
 MS Access
1109
MS Access
1109
-
 C++
1222
C++
1222
-
 HTML
584
HTML
584
-
 JavaScript
616
JavaScript
616
-
 Vbscript
873
Vbscript
873
-
 Oracle
473
Oracle
473
-
 VC++
875
VC++
875
-
 SQL
2959
SQL
2959
-
 XML
514
XML
514
-
 Java
814
Java
814
-
 Perl
455
Perl
455
-
 Linux
451
Linux
451


