Web based School


- 9 — Windows, Dialog Boxes, and Controls
- The Window Hierarchy
- Window Management
- The RegisterClass Function and the WNDCLASS Structure
- Creating a Window through CreateWindow
- Extended Styles and the CreateWindowEx Function
- Painting Window Contents
- Window Management Messages
- Window Classes
- Dialog Boxes
- Common Dialogs
- The Open and Save As Dialogs
- The Choose Color Dialog
- The Font Selection Dialog
- Dialogs for Printing and Print Setup
- Text Find and Replace Dialogs
- Common Dialogs Example
- OLE Common Dialogs
- Controls
- Summary
9 — Windows, Dialog Boxes, and Controls
9 — Windows, Dialog Boxes, and Controls
A window in Windows can be defined as a rectangular area on the screen. However, this definition, in all its simplicity, hides the volumes of functionality behind the abstract idea of a window as the primary unit through which a user and a Windows application interact.
A window is not only an area through which an application can present its output; it is also a target of events, a target of messages within the Windows environment. Although the window concept in Windows predates the use of object-oriented languages on the PC by several years, the terminology is more than appropriate here: the properties of a window determine its appearance, while its methods determine how it responds to user input.
A window is identified by a window handle. This handle (usually a variable of type HWND) uniquely identifies each window in the system. The list includes the "obvious" application windows and dialog boxes as well as the less obvious ones such as the desktop, certain icons, or buttons. User-interface events are packaged into Windows messages with the appropriate window handle attached and then sent, or queued, to the application (or thread, to be more precise) that owns that window.
Needless to say, Windows offers a lot of functionality covering the creation and management of windows.
The Window Hierarchy
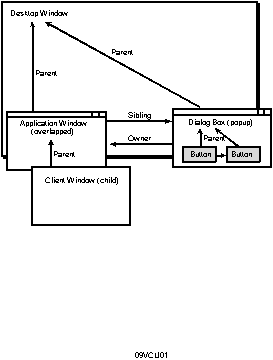
Windows maintains its windows (I wish there were a way to talk about windows within Windows without turning every second sentence into an unintentional joke!) in a hierarchical organization. Each window has a parent and zero or more siblings. At the root of all windows is the desktop window, created by Windows at startup time. The parent window for top-level windows is the desktop window; the parent window for child windows is either a top-level window or another child window higher up in the hierarchy. Figure 9.1 demonstrates this hierarchy by dissecting a typical Windows screen.
Figure 9.1. The window hierarchy.
Actually, the situation under Windows NT is somewhat more complex. Unlike its simpler cousins, Windows NT has the capability to maintain multiple desktops simultaneously. In fact, Windows NT normally maintains three desktops: one for the Winlogon screen, one for user applications, and one for the screen saver.
The visual window hierarchy normally reflects the logical hierarchy. That is, windows at the same hierarchy level are normally displayed in the Z-order, which is essentially the order in which siblings appear. However, this order can be changed for top-level windows. Top-level windows with the extended window style WM_EX_TOPMOST appear on top of any non-topmost top-level windows.
Another relationship exists between top-level windows. A top-level window may have an owner, which is another top-level window. An owned window always appears on top of its owner and disappears if its owner is minimized. A typical case of a top-level window owned by another occurs when an application displays a dialog box. The dialog box is not a child window (it is not confined to the client area of the application's main window), but it remains owned by the application window.
Several functions enable applications to traverse the window hierarchy and find a specific window. Here's a review of a few of the more frequently used functions:
GetDesktopWindow. Through the GetDesktopWindow function, an application can retrieve the handle of the current desktop window.
EnumWindows. The EnumWindows function enumerates all top-level windows. A user-defined callback function, the address of which is supplied in the call to EnumWindows, is called once for every top-level window. EnumWindows does not enumerate top-level windows that are created after the function has been called, even if it has not yet completed the enumeration when the new window is created.
EnumChildWindows. The EnumChildWindows function enumerates all child windows of a given window, identified by a handle that is supplied in the call to EnumChildWindows. The enumeration is accomplished by a user-defined callback function, the address of which is also supplied in the call to EnumChildWindows. This function also enumerates descendant windows; that is, child windows that are themselves children (or descendants) of child windows of the window specified in the call to EnumChildWindows.
Child windows that are destroyed before they are enumerated, or child windows that are created after the enumeration process started, will not be enumerated.
EnumThreadWindows. The EnumThreadWindows function enumerates all windows owned by a specific thread by calling a user-supplied callback function once for every such window. The handle to the thread and the address of the callback function are supplied by the application in the call to EnumThreadWindows. The enumeration includes top-level windows, child windows, and descendants of child windows.
Windows that are created after the enumeration process began are not enumerated by EnumThreadWindows.
FindWindow. The FindWindow function can be used to find a top-level window by its window class name or window title.
GetParent. The GetParent function identifies the parent window of the specified window.
GetWindow. The GetWindow function offers the most flexible way for manipulating the window hierarchy. Depending on its second parameter, uCmd, this function can be used to retrieve the handle to a window's parent, owner, sibling, or child windows.
Window Management
Typically, an application creates a window in two steps. First, the window class is registered; next, the window itself is created through the CreateWindow function. The window class determines the overall behavior of the new window type, including most notably the address of the new window procedure. Through CreateWindow the application controls minor aspects of the new window, such as its size, position, and appearance.
The RegisterClass Function and the WNDCLASS Structure
A new window class is registered when an application calls the following function:
ATOM RegisterClass(CONST WNDCLASS *lpwc);
The single parameter of this function, lpwc, points to a structure of type WNDCLASS describing the new window type. The return value is a Windows atom, a 16-bit value identifying a unique character string in a table maintained by Windows.
The WNDCLASS structure is defined as follows:
typedef struct _WNDCLASS {

    UINT    style;

    WNDPROC lpfnWndProc;

    int     cbClsExtra;

    int     cbWndExtra;

    HANDLE  hInstance;

    HICON   hIcon;

    HCURSOR hCursor;

    HBRUSH  hbrBackground;

    LPCTSTR lpszMenuName;

    LPCTSTR lpszClassName;

} WNDCLASS;
The meaning of some of these parameters is fairly straightforward. For example, hIcon is a handle to the icon used to represent minimized windows of this class; hCursor is a handle to the standard mouse cursor that is used when the mouse enters the window rectangle; hbrBackground is a handle to the GDI brush that is used to draw the window's background. The string pointed to by lpszMenuName identifies the menu resource (by name or, through the MAKEINTRESOURCE macro, by an integer identifier) that is used as the standard menu for this class; lpszClassName is the name of the window class.
The parameters cbClsExtra and cbWndExtra can be used to allocate extra memory for the window class or for individual windows. Applications can use this extra memory to store application-specific information pertaining to the window class or individual windows.
I left the explanation of the first two parameters for last, and for good reason. Most of what makes a window such a unique and complex entity is controlled through the window class style and the window procedure.
The parameter lpfnWndProc specifies the address of the window procedure function. This function is responsible for handling any messages the window receives. It can either handle those messages itself, or invoke the default window procedure, DefWindowProc. The messages can be anything: window sizing and moving, mouse events, keyboard events, commands, repaint requests, timer and other hardware-related events, and so on.
A typical window procedure contains a large switch statement block. Inside, case blocks exist for every message the application is interested in. Messages that the application does not handle are passed to DefWindowProc through the default block. The skeleton of such a window procedure is shown in Listing 9.1.
LRESULT CALLBACK WndProc(HWND hwnd, UINT uMsg,

                         WPARAM wParam, LPARAM lParam)

{

    switch(uMsg)

    {

        case WM_DESTROY:

            PostQuitMessage(0);

            break;

        // Other case blocks come here

        default:

            return DefWindowProc(hwnd, uMsg, wParam, lParam);

    }

    return 0;

}
Certain global characteristics of the window class are controlled through the class style parameter, style. This parameter may be set to a combination of values (using the bitwise OR operator, |). For example, CS_BYTEALIGNCLIENT specifies that the window's client area is always to be positioned on a byte boundary in the screen display's bitmap to enhance graphics performance (a very useful thing to remember when writing performance-intensive applications intended to run on lower-end graphics hardware). The value CS_DBLCLKS specifies that Windows should generate double-click mouse messages when the user double-clicks the mouse within the window. The pair of values CS_HREDRAW and CS_VREDRAW specify that the window be redrawn in its entirety every time its horizontal or vertical size changes. Or the value CS_SAVEBITS specifies that Windows should allocate what UNIX and X programmers often refer to as backing store; a copy of the window bitmap in memory, so that it can automatically redraw the window when parts of it become unobscured. (This should be used with caution; the large amounts of memory required for this may cause a significant performance hit.)
Creating a Window through CreateWindow
Registering a new window class is the first step in window creation. Next, applications must actually create a window through the CreateWindow function:
HWND CreateWindow(

    LPCTSTR  lpClassName,

    LPCTSTR  lpWindowName,

    DWORD  dwStyle,

    int  x,

    int  y,

    int  nWidth,

    int  nHeight,

    HWND  hWndParent,

    HMENU  hMenu,

    HANDLE  hInstance,

    LPVOID  lpParam

);
The first parameter, lpClassName, defines the name of the class that this window inherits its behavior from. The class must either be registered through RegisterClass or be one of the predefined control classes. The predefined classes include the BUTTON, COMBOBOX, EDIT, \, SCROLLBAR, and STATIC classes. There are also some window classes that are mostly used internally by Windows and are referenced only through integer identifiers; these include classes for menus, the desktop window, and icon titles, to name but a few.
The dwStyle parameter specifies the window's style. This parameter should not be confused with the class style, passed to RegisterClass through the WNDCLASS structure when the new window class is registered. While the class style determines some of the permanent properties of windows belonging to that class, the window style passed to CreateWindow is used to initialize the more transient properties of the window. For example, dwStyle can be used to determine the window's initial appearance (minimized, maximized, visible or hidden). As is the case with the class style, the window style is also typically a combination of values (combined with the bitwise OR operator). In addition to the generic style values that are common to all types of windows, some values are specific to the predefined window classes; for example, the BS_PUSHBUTTON style can be used for windows of the BUTTON class that are to send WM_COMMAND messages to their parents when clicked.
Some dwStyle values are important enough to deserve a closer look.
The WS_POPUP and WS_OVERLAPPED styles specify top-level windows. The basic difference is that a WS_OVERLAPPED window always has a caption, while a WS_POPUP window does not need to have one. Overlapped windows are typically used as the main window of applications, while popup windows are used for dialog boxes.
When a top-level window is created, the calling application sets its owner window through the hwndParent parameter. The parent window of a top-level window is the desktop window.
Child windows are created with the WS_CHILD style. The major difference between a child window and a top-level window is that a child window is confined to the client area of its parent.
Windows defines some combinations of styles that are most useful when creating "typical" windows. The WS_OVERLAPPEDWINDOW style setting combines the WS_OVERLAPPED style with the WS_CAPTION, WS_SYSMENU, WS_THICKFRAME, WS_MINIMIZEBOX, and WS_MAXIMIZEBOX styles to create a typical top-level application window. The WS_POPUPWINDOW style setting combines WS_POPUP with the WS_BORDER and WS_SYSMENU styles to create a typical dialog box.
Extended Styles and the CreateWindowEx Function
The CreateWindowEx function, while otherwise identical to the CreateWindow function, enables you to specify a combination of extended window styles. Extended window styles provide finer control over certain aspects of a window's appearance or the way it functions.
For example, through the WS_EX_TOPMOST style applications can make a window a topmost window; that is, a top-level window that is not obscured by other top-level windows. A window created with the WS_EX_TRANSPARENT style does not obscure other windows and only receives a WM_PAINT message when all windows under it have been updated.
Other extended window styles are specific to Windows 95 and versions of Windows NT later than 3.51; for example, Windows NT 3.51 with the beta version of the Windows 95 style shell installed. For example, the WS_EX_TOOLWINDOW style can be used to create a tool window. A tool window is a window with a smaller than usual title bar and other properties that make it useful as a floating toolbar window.
Yet another set of Windows 95 specific extended styles specifies the window's behavior with respect to the selected shell language. For example, the WS_EX_RIGHT, WS_EX_RTLREADING, and WS_EX_LEFTSCROLLBAR extended styles can be used in conjunction with a right-to-left shell language selection such as Hebrew or Arabic.
Painting Window Contents
Painting in a window is performed through the normal set of GDI drawing functions. Applications usually obtain a handle to the display device context through a function such as GetDC, and then call GDI functions such as LineTo, Rectangle, or TextOut.
But even more typically, window painting occurs in response to a specific message, WM_PAINT.
The WM_PAINT Message
The WM_PAINT message is sent to a window when parts of it require redrawing by the application and no other message is pending in the message queue of the thread that owns the window. Applications typically respond to this with a set of drawing instructions enclosed between calls to the BeginPaint and EndPaint functions.
The BeginPaint function retrieves a set of parameters that are stored in a PAINTSTRUCT structure:
typedef struct tagPAINTSTRUCT {

    HDC  hdc;

    BOOL fErase;

    RECT rcPaint;

    BOOL fRestore;

    BOOL fIncUpdate;

    BYTE rgbReserved[32];

} PAINTSTRUCT;
BeginPaint also takes care of erasing the background, if necessary, by sending the application a WM_ERASEBKGND message.
Applications can use the hDC member of the structure to draw into the client area of the window. The rcPaint member represents the smallest rectangle that encloses all areas of the window that require updating. By limiting their activities to this rectangular region, applications can speed up the painting process.
Repainting a Window by Invalidating Its Contents
The functions InvalidateRect and InvalidateRgn can be used to invalidate all or parts of a window. Windows sends a WM_PAINT message to a window if its update region, that is, the union of all update regions specified in prior calls to InvalidateRect and InvalidateRgn, is not empty and the thread that owns the window has no more messages in its message queue.
This behavior suggests a very efficient mechanism for applications that need to update parts of their window. Instead of updating the window immediately, they can schedule the update by invalidating the appropriate region. When they process WM_PAINT messages, they can examine the update region (the rcPaint member of the PAINTSTRUCT structure) and update only those elements in the window that fall into this region. Alternatively (or in addition to this), applications can maintain private variables in which they store hints; that is, information that assists the window updating procedure in determining the most efficient way of updating the window.
The use of such hints to assist in efficiently updating a window is present throughout the Microsoft Foundation Classes.
Window Management Messages
A typical window responds to many other messages in addition to WM_PAINT messages. Some of the more frequently processed messages are reviewed in this section.
WM_CREATE. The first message that the window procedure of a newly created window receives is the WM_CREATE message. This message is sent before the window is made visible and before the CreateWindow or CreateWindowEx function returns.
In response to this message, applications can perform initialization functions that are necessary before the window is made visible.
WM_DESTROY. The WM_DESTROY message is sent to the window procedure of a window that has already been removed from the screen and is about to be destroyed.
WM_CLOSE. The WM_CLOSE message is sent to a window indicating that the window should be closed. The default implementation in DefWindowProc calls DestroyWindow when this message is received. Applications can, for example, display a confirmation dialog and call DestroyWindow only if the user confirms closing the window.
WM_QUIT. The WM_QUIT message is usually the last message an application's main window receives. Receiving this message causes GetMessage to return zero, which terminates the message loop of most applications.
This message indicates a request to terminate the application. It is generated in response to a call to PostQuitMessage.
WM_QUERYENDSESSION. The WM_QUERYENDSESSION notifies the application that the Windows session is about to be ended. An application may return FALSE in response to this message to prevent the shutdown of Windows. After processing the WM_QUERYENDSESSION message, Windows sends all applications a WM_ENDSESSION message with the results of the WM_QUERYENDSESSION processing.
WM_ENDSESSION. The WM_ENDSESSION message is sent to applications after the WM_QUERYENDSESSION message has been processed. It indicates whether Windows is about to shut down or whether the shutdown has been aborted.
If an imminent shutdown is indicated, the Windows session may end at any time after the WM_ENDSESSION message has been processed by all applications. It is important, therefore, that applications perform all tasks pertaining to safe termination.
WM_ACTIVATE. The WM_ACTIVATE message indicates when a top-level window is about to be activated or deactivated. The message is first sent to the window that is about to be deactivated, then to the window that is about to be activated.
WM_SHOWWINDOW. The WM_SHOWWINDOW message indicates when a window is about to be hidden or shown. A window can be hidden as a result of a call to the ShowWindow function, or as a result of another window being maximized.
WM_ENABLE. The WM_ENABLE message is sent to a window when it is enabled or disabled. A window can be enabled or disabled through a call to the EnableWindow function. A window that is disabled cannot receive mouse or keyboard input.
WM_MOVE. The WM_MOVE message indicates that the window's position has been changed.
WM_SIZE. The WM_SIZE message indicates that the window's size has been changed.
WM_SETFOCUS. The WM_SETFOCUS message indicates that the window has gained keyboard focus. An application may, for example, display the caret in response to this message.
WM_KILLFOCUS. The WM_KILLFOCUS message indicates that the window is about to lose keyboard focus. If the application displays a caret, the caret should be destroyed in response to this message.
WM_GETTEXT. The WM_GETTEXT message is sent to a window requesting that the window text be copied to a buffer. For most windows, the window text is the window title. For controls like buttons, edit controls, static controls, or combo boxes, the window text is the text displayed in the control. This message is usually handled by the DefWindowProc function.
WM_SETTEXT. The WM_SETTEXT message requests that the window text be set to the contents of a buffer. The DefWindowProc function sets the window text and displays it in response to this message.
Several messages concern the nonclient area of a window; that is, its title bar, border, menu, and other areas that are typically not updated by the application program. An application can intercept these messages to create a window frame with a customized appearance or behavior.
WM_NCPAINT. The WM_NCPAINT message indicates that the nonclient area of a window (the window frame) needs to be repainted. The DefWindowProc function handles this message by repainting the window frame.
WM_NCCREATE. Before the WM_CREATE message is sent to a window, it also receives a WM_NCCREATE message. Applications may intercept this message to perform initializations specific to the nonclient area of the window.
WM_NCDESTROY. The WM_NCDESTROY message indicates that a window's nonclient area is about to be destroyed. This message is sent to a window after the WM_DESTROY message.
WM_NCACTIVATE. The WM_NCACTIVATE message is sent to a window to indicate that its nonclient area has been activated or deactivated. The DefWindowProc function changes the color of the window title bar to indicate an active or inactive state in response to this message.
Window Classes
Every window is associated with a window class. A window class is either a class provided by Windows, or a user-defined window class registered through the RegisterClass function.
The Window Procedure
The purpose of a window class is to define the characteristics and behavior of a set of related windows. Perhaps the most notable, but by far not the only property of a window class, is the window procedure.
I have already demonstrated a simple skeleton for a window procedure earlier in Listing 9.1.
The window procedure is called every time a message is sent to the window through the SendMessage function, and every time a posted message is dispatched through the DispatchMessage function. The role of the window procedure is to process messages sent or posted to that window. In doing so, it can rely on the default window procedure (DefWindowProc, or in the case of dialog boxes, DefDlgProc) for the processing of unwanted messages.
It is through the window procedure that the behavior of a window is implemented. By responding to various messages, the window procedure determines how the window reacts to mouse and cursor events and how its appearance changes in reaction to those events. For example, in the case of a button, the window procedure may respond to WM_LBUTTONDOWN messages by repainting the window indicating that the button is pressed. Or in the case of an edit control, the window procedure may respond to a WM_SETFOCUS message by displaying the caret.
Windows supplies two default window procedures: DefWindowProc and DefDlgProc. The DefWindowProc function implements the default behavior for typical top-level windows. It processes nonclient area messages and manages the window frame. It also implements some other aspects of top-level window behavior, such as responding to keyboard events; for example, responding to the Alt key by highlighting the first item in the window's menu bar.
The DefDlgProc function is for the use of dialog boxes. In addition to the default top-level window behavior, it also manages the focus within a dialog box. It implements the behavior of dialogs whereby the focus jumps from one dialog control to the next when the user presses the Tab key.
In addition to the default window procedures, Windows also supplies a set of window classes. These implement the behavior of dialog box controls, such as buttons, edit fields, list and combo boxes, and static text fields. The name for these classes is system global class, which is a leftover from the days of 16-bit Windows. In Win32 these classes are no longer global. That is, a change that affects a system global class will only affect windows of that class within the same application and have no effect on windows in another application because Win32 applications run in separate address spaces, and thus they are shielded from one another.
Whether it is a Windows-supplied class, or a class defined by the application, an application can use an existing window class from which to derive a new class and implement new or modified behavior. The mechanisms for accomplishing this are called subclassing and superclassing.
Subclassing
Subclassing means substituting the window procedure for a window class with another. This is accomplished by calling the SetWindowLong or SetClassLong function.
Calling SetWindowLong with the GWL_WNDPROC index value substitutes the window procedure for a specific window. In contrast, calling SetClassLong with the GCL_WNDPROC index value substitutes the window procedure for all windows of that class that are created after the call to SetClassLong.
Consider the simple example shown in Listing 9.2. (You can compile this code from the command line by typing cl subclass.c user32.lib.) This example displays the "Hello, World!" message. In a somewhat unorthodox fashion, it uses the BUTTON system class for this purpose. However, it subclasses the BUTTON class by providing a replacement window procedure. This replacement procedure implements special behavior when a WM_LBUTTONUP message is received; it destroys the window, effectively ending the application. To ensure proper termination, the WM_DESTROY message also receives special handling: a WM_QUIT message is posted through a call to PostQuitMessage.
#include <windows.h>

WNDPROC OldWndProc;

LRESULT CALLBACK WndProc(HWND hwnd, UINT uMsg,

                         WPARAM wParam, LPARAM lParam)

{

    switch(uMsg)

    {

        case WM_LBUTTONUP:

            DestroyWindow(hwnd);

            break;

        case WM_DESTROY:

            PostQuitMessage(0);

            break;

        default:

            return CallWindowProc(OldWndProc,

                                  hwnd, uMsg, wParam, lParam);

    }

    return 0;

}

int WINAPI WinMain(HINSTANCE hInstance, HINSTANCE d2,

                                        LPSTR d3, int d4)

{

    MSG msg;

    HWND hwnd;

    hwnd = CreateWindow("BUTTON", "Hello, World!",

                        WS_VISIBLE | BS_CENTER, 100, 100, 100, 80,

                        NULL, NULL, hInstance, NULL);

    OldWndProc =

        (WNDPROC)SetWindowLong(hwnd, GWL_WNDPROC, (LONG)WndProc);

    while (GetMessage(&msg, NULL, 0, 0))

        DispatchMessage(&msg);

    return msg.wParam;

}
I would like to call your attention to the mechanism used in the new window procedure, WndProc, to reference the old window procedure for the default processing of messages. The old procedure is called through the Win32 function CallWindowProc. In 16-bit Windows, it was possible to call the address obtained by the call to SetWindowLong directly; this was always the address of the old window procedure. In Win32, this is not necessarily so; the value may instead be a handle to the window procedure.
In this example, I performed the subclassing through SetWindowLong, meaning that it only affected the single button window for which SetWindowLong was called. If I had called SetClassLong instead, I would have altered the behavior of all buttons created subsequently. Consider the example program in Listing 9.3 (to compile this program from the command line, type cl subclass.c user32.lib).
#include <windows.h>

WNDPROC OldWndProc;

LRESULT CALLBACK WndProc(HWND hwnd, UINT uMsg,

                         WPARAM wParam, LPARAM lParam)

{

    switch(uMsg)

    {

        case WM_LBUTTONDOWN:

            MessageBeep(0xFFFFFFFF);

        default:

            return CallWindowProc(OldWndProc,

                                  hwnd, uMsg, wParam, lParam);

    }

    return 0;

}

int WINAPI WinMain(HINSTANCE hInstance,

                   HINSTANCE d2, LPSTR d3, int d4)

{

    HWND hwnd;

    hwnd = CreateWindow("BUTTON", "",

                        0, 0, 0, 0, 0,

                        NULL, NULL, hInstance, NULL);

    OldWndProc =

        (WNDPROC)SetClassLong(hwnd, GCL_WNDPROC, (LONG)WndProc);

    DestroyWindow(hwnd);

    MessageBox(NULL, "Hello, World!", "", MB_OK);

}
This example creates a button control but never makes it visible; the sole purpose of this control's existence is so that through its handle, the class behavior can be modified. Immediately after the call to SetClassLong, the button control is actually destroyed.
But the effects of SetClassLong linger on! The subsequently displayed message box contains an OK button; and the behavior of this button (namely that when it is clicked by the left mouse button, the PC speaker emits a short beep) reflects the new window procedure. Similarly, if the program displayed other dialogs or message boxes, indeed anything that had button controls in it, all the newly created buttons would exhibit the modified behavior.
Global Subclassing
In 16-bit Windows, a subclassing mechanism similar to that presented in the previous section was often used to change the system-wide behavior of certain types of windows such as dialog controls. (This is how the 3-D control library CTL3D.DLL was implemented.) Subclassing the window class affected all newly created windows of that class, regardless of the application that created them. Unfortunately, in Win32 this is no longer the case; only windows of the same application are affected by such a change.
So how can developers influence the global behavior of certain types of windows? The answer is, you have to use a DLL and ensure that it is loaded into every application's address space.
Under Windows NT, this can be accomplished easily by creating a setting in the registry. The following registry value needs to be modified:
\HKEY_LOCAL_MACHINE\Software\Microsoft\Windows NT\CurrentVersion\Windows\APPINIT_DLLS
DLLs that are listed under this registry key are loaded into the address space of every newly created process. If you wish to add several DLLs, separate the pathnames by spaces.
Listing 9.4 shows a DLL that subclasses the BUTTON class just like the example shown in Listing 9.3. If you add the full pathname of this DLL to the above-mentioned registry key, every time a button control is clicked, a short beep will be heard.
#include <windows.h>

WNDPROC OldWndProc;

LRESULT CALLBACK WndProc(HWND hwnd, UINT uMsg,

                         WPARAM wParam, LPARAM lParam)

{

    switch(uMsg)

    {

        case WM_LBUTTONDOWN:

            MessageBeep(0xFFFFFFFF);

        default:

            return CallWindowProc(OldWndProc,

                                  hwnd, uMsg, wParam, lParam);

    }

    return 0;

}

BOOL WINAPI DllMain (HANDLE hModule, DWORD dwReason,

                     LPVOID lpReserved)

{

    HWND hwnd;

    switch(dwReason)

    {

        case DLL_PROCESS_ATTACH:

            hwnd = CreateWindow("BUTTON", "",

                                0, 0, 0, 0, 0,

                                NULL, NULL, hModule, NULL);

            OldWndProc = (WNDPROC)SetClassLong(hwnd, GCL_WNDPROC,

                                               (LONG)WndProc);

            DestroyWindow(hwnd);

    }

    return TRUE;

}
To compile this DLL from the command line, use cl /LD beepbtn.c user32.lib. The /LD command line flag instructs the compiler to create a DLL instead of an executable file.
Adding your DLL's pathname to the APPINIT_DLLS Registry key is perhaps the simplest, but certainly not the only technique to inject your DLL's code into another application's address space. This technique also has some drawbacks, not the least of which is the fact that it does not work under Windows 95. (You may find information to the contrary on the Microsoft Developer Library. I tried the technique and it does not work; when I asked Microsoft's product support, they confirmed that this registry setting is not supported under Windows 95.)
Another drawback of this technique includes the fact that a DLL specified this way is loaded into the address space of every application—or, to be more precise, every GUI application that links with USER32.DLL. Even the slightest bug in your DLL may seriously affect the stability of the entire system.
Fortunately, there are other techniques available that enable you to inject your DLL into the address space of another process.
The first such technique requires the use of a Windows hook function. By using the SetWindowsHookEx function, it is possible to install a hook function into the another application's address space. Through this mechanism, you can add a new window function to a window class owned by another application.
The second technique relies on the CreateRemoteThread function and its ability to create a thread that runs in the context of another process.
Superclassing
Superclassing means creating a new class based on the behavior of an existing class. An application that wishes to superclass an existing class can use the GetClassInfo function to obtain a WNDCLASS structure describing that class. After this structure has been suitably modified, it can be used in a call to the RegisterClass function that registers the new class for use.
The example shown in Listing 9.5 demonstrates the technique of superclassing. In this example, a new window class, BEEPBUTTON, is created, its behavior based on the default BUTTON class. This new class is then used to display a simple message. To compile this program from the command line, type cl supercls.c user32.lib.
#include <windows.h>

WNDPROC OldWndProc;

LRESULT CALLBACK WndProc(HWND hwnd, UINT uMsg,

                         WPARAM wParam, LPARAM lParam)

{

    switch(uMsg)

    {

        case WM_LBUTTONDOWN:

            MessageBeep(0xFFFFFFFF);

        default:

            return CallWindowProc(OldWndProc,

                                  hwnd, uMsg, wParam, lParam);

    }

    return 0;

}

int WINAPI WinMain(HINSTANCE hInstance, HINSTANCE d2,

                                        LPSTR d3, int d4)

{

    MSG msg;

    HWND hwnd;

    WNDCLASS wndClass;

    GetClassInfo(hInstance, "BUTTON", &wndClass);

    wndClass.hInstance = hInstance;

    wndClass.lpszClassName = "BEEPBUTTON";

    OldWndProc = wndClass.lpfnWndProc;

    wndClass.lpfnWndProc = WndProc;

    RegisterClass(&wndClass);

    hwnd = CreateWindow("BEEPBUTTON", "Hello, World!",

                        WS_VISIBLE | BS_CENTER, 100, 100, 100, 80,

                        NULL, NULL, hInstance, NULL);

    while (GetMessage(&msg, NULL, 0, 0))

    {

        if (msg.message == WM_LBUTTONUP)

        {

            DestroyWindow(hwnd);

            PostQuitMessage(0);

        }

        DispatchMessage(&msg);

    }

    return msg.wParam;

}
We have looked at the difference between the two techniques, subclassing and superclassing, in terms of their implementation. But what is the difference between them in terms of their utility? In other words, when would you use subclassing, and when would you use superclassing?
The difference is simple. Subclassing modifies the behavior of an existing class; superclassing creates a new class based on the behavior of an existing class. In other words, if you use subclassing, you implicitly alter the behavior of every feature in your application that relies on the class that you subclass. In contrast, superclassing only affects windows that are based explicitly on the new class; windows based on the original class are not be affected.
Dialog Boxes
In addition to its main application window with its title and menu bar and application-defined contents, an application most commonly uses dialogs to exchange information with the user. Typically, the application's main window exists throughout the life of the application, while its dialogs are more transient in nature, popping up only for the duration of a brief exchange of data; but this is not the key distinguishing characteristics of a main window and a dialog. Indeed, there are applications that use a dialog box as their main window; in other applications, a dialog may remain visible for most of the application's lifetime.
A dialog box usually contains a set of dialog controls, themselves child windows, through which the user and the application exchange data. There are several Win32 functions that assist in constructing, displaying, and managing the contents of a dialog box. Applications developers usually need not be concerned about painting a dialog's controls or handling user-interface events; instead, they can focus on the actual exchange of data between the dialog's controls and the application.
Dialogs represent a versatile capability in Windows. To facilitate their efficient use, Windows provides two types of dialog boxes: modeless and modal.
Modal Dialogs
When an application displays a modal dialog box, the window that owns the dialog box is disabled, effectively suspending the application. The user must complete interaction with the modal dialog before the application can continue.
A modal dialog is usually created and activated through the DialogBox function. This function creates the dialog window from a dialog template resource and displays the dialog as a modal dialog. The application that calls the DialogBox function supplies the address of a callback function; DialogBox does not return until the dialog box is dismissed through a call to EndDialog made from this callback function (possibly in response to a user-interface event, such as a click on the OK button).
Although it is possible to create a modal dialog with no owner, it is not usually recommended. If such a dialog box is used, several issues must be taken into account. As the application's main window is not disabled, steps must be taken to ensure that messages sent or posted to it continue to be processed. Windows does not destroy or hide an ownerless dialog when other windows of the application are destroyed.
Modeless Dialogs
In contrast to modal dialogs, presenting a modeless dialog does not suspend execution of the application by disabling the owner window of the dialog box. However, modeless dialogs remain on top of their owner window even when the owner window gains focus. Modeless dialogs represent an effective way of continuously displaying relevant information to the user.
A modeless dialog is typically created through the CreateDialog function. As there is no equivalent of the DialogBox function for modeless dialogs, applications are responsible for retrieving and dispatching messages for the modeless dialog. Most applications do this in their main message loop; however, to ensure that the dialog responds to keyboard events as expected and enables the user to move between controls using keyboard shortcuts, the application must call the IsDialogMessage function.
A modeless dialog does not return a value to its owner. However, the modeless dialog and its owner can communicate using SendMessage calls.
The dialog box procedure for a modeless dialog must not call the EndDialog function. The dialog is normally destroyed by a call to DestroyWindow. This function can be called in response to a user-interface event from the dialog box procedure.
Applications are responsible for destroying all modeless dialog boxes before terminating.
Message Boxes
Message boxes are special dialogs that display a user-defined message, a title, and a combination of predefined buttons and icons. Their intended use is to display brief informational messages to the user and present the user with a limited set of choices. For example, message boxes can be used to notify the user of an error condition and request instructions whether to retry or cancel the operation.
A message box is created and displayed through the MessageBox function. The application that calls this function specifies the text string that is to be displayed and a set of flags indicating the type and appearance of the message box.
In addition to the default application modal behavior of a message box, application can specify two other modes of behavior: task modal and system modal. Use a task modal message box if you wish to disable interaction with all top-level windows of the application, not just the owner window of the message box. A system modal message box should be used in extreme cases, warning the user of a potential disaster that requires immediate attention. System modal message boxes disable interaction with all other applications until the user deals with the message box.
Dialog Templates
Although it is possible to create a dialog in memory, most applications rely on a dialog template resource to determine the type and appearance of controls within a dialog.
Dialog templates are typically created as part of the application's resource file. They can be created manually as a set of instructions in the resource file, or they can be created through a visual resource file editor, such as the resource editor of the Developer Studio.
The dialog template defines the style, position, and size of the dialog and lists all controls within it. The style, position, and appearance of controls are also defined as part of the dialog template. The various dialog box functions draw the entire dialog based on the dialog template, except for controls that are marked as owner-drawn.
The Dialog Box Procedure
Dialog box procedure is just another name for the window procedure of a dialog box. There is no fundamental difference between a dialog box procedure and a window procedure, except perhaps the fact that a dialog procedure relies on DefDlgProc, rather than DefWindowProc, for default processing of messages.
A typical dialog box procedure responds to WM_INITDIALOG and WM_COMMAND messages but little else. In response to WM_INITDIALOG, the dialog box procedure initializes the controls in the dialog. Windows does not send a WM_CREATE message to a dialog box procedure; instead, the WM_INITDIALOG message is sent, but only after all the controls within the dialog have been created, just before the dialog is displayed. This enables the dialog box procedure to properly initialize controls before they are seen by the user.
Most controls send WM_COMMAND messages to their owner window (that is, the dialog box itself). To carry out the function represented by a control, the dialog box procedure responds to WM_COMMAND messages by identifying the control and performing the appropriate action.
Common Dialogs
Win32 implements a series of commonly used dialogs, freeing the programmer from the need to implement these for every application. These common dialogs are well known to every Windows user. They include dialogs for opening and saving files, selecting a color or a font, printing and setting up the printer, selecting a page size, and searching and replacing text.
Common dialogs can be used in two ways. Applications can utilize the common dialog "as is" by calling one of the common dialog functions that are part of the Win32 API. Alternatively, applications can customize common dialogs by implementing a special hook function and supplying a custom dialog template.
Windows 95 has introduced several changes to the common dialogs that were known to Windows 3.1 and Windows NT programmers. However, most of these changes are cosmetic, and do not affect typical usage of the dialogs. Where the differences are significant, I mention them in the appropriate following sections.
When a common dialog function encounters an error, the CommDlgExtendedError function can often be used to obtain additional information about the cause and nature of the problem.
The Open and Save As Dialogs
The File Open and File Save As dialogs are perhaps the most often seen common dialogs. The purpose of these dialogs is to enable the user to browse the file system and select a file to be opened for reading or writing.
The File Open dialog is displayed when the application calls the GetOpenFileName function. The function's single parameter is a pointer to an OPENFILENAME structure. Members of this structure provide initialization values for the dialog box, and, optionally, the address of a hook function and the name of a custom dialog template, which are used for customizing the dialog. When the dialog is dismissed, applications can obtain the user's selection from this structure. A typical File Open dialog is shown in Figure 9.2.
Figure 9.2. The File Open dialog (Explorer-style).
The File Save As dialog is displayed in response to a call to GetSaveFileName. This function also takes a pointer to an OPENFILENAME structure as its single parameter. An example for the File Save As dialog is shown in Figure 9.3.
Figure 9.3. The File Save As dialog (Explorer-style).
For those familiar with the Windows 3.1 look of the common file dialogs, the difference between that and the new Windows 95 look is striking. Applications that wish to use the new look (and take advantage of the new Explorer-related functionality) must specify the style OFN_EXPLORER in the Flags member of the OPENFILENAME structure.
The Windows 95 versions of the common file dialogs have another new feature. When a file dialog is customized, it is no longer necessary to reproduce the entire dialog template before adding your modifications. Instead, it is possible to create a dialog template containing only the controls you wish to add to the dialog and an optional special field, labeled with the ID stc32, indicating where the standard components of the dialog should be placed.
The Choose Color Dialog
The Choose Color dialog box is used when the user is requested to select a color. The dialog can be used to select a color from the system palette, or to specify a custom color.
The Choose Color dialog, shown in Figure 9.4, is presented in response to a call to the ChooseColor function. Applications can control the initialization values of this dialog through the pointer to a CHOOSECOLOR structure, passed to the ChooseColor function as its single parameter. Through this structure, applications can also customize the dialog's behavior by supplying a hook function and the name of a custom dialog template. When the dialog is dismissed, the new color selection is available as the rgbResult member of the CHOOSECOLOR structure.
Figure 9.4. The Choose Color dialog.
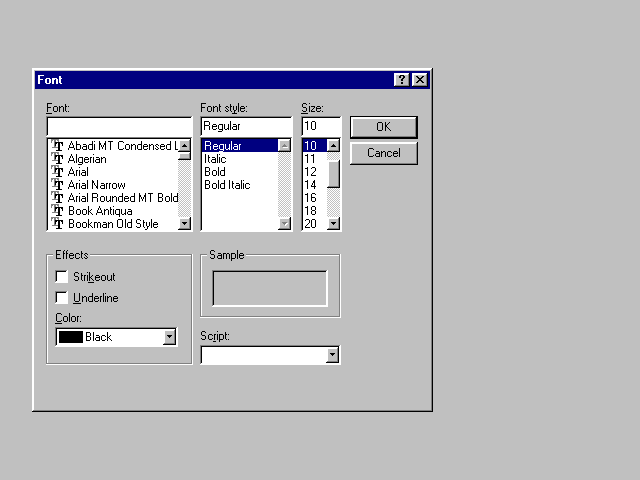
The Font Selection Dialog
Another of the more frequently seen common dialogs is the font selection dialog. Through this dialog, the user can select a typeface, a font style, font size, special effects, text color, and, in the case of Windows 95, a script. The font selection dialog is shown in Figure 9.5.
Figure 9.5. The Font Selection dialog.
The font selection dialog is initialized through the CHOOSEFONT structure. This structure can also be used to specify a custom hook function and the name of a custom dialog template. The lpLogFont member of this structure points to a LOGFONT structure that can be used to initialize the dialog and receives information about the newly selected font when the dialog is dismissed. This structure can be used in a call to the GDI function CreateFontIndirect to actually create the font for use.
Dialogs for Printing and Print Setup
In the Windows 3.1 version of the Print dialog box, the user selects printing parameters and starts the printing process. The user selects and configures the printer from a separate dialog, the Print Setup dialog.
Under Windows 95, these dialogs look and behave differently. The Print dialog (Figure 9.6) combines the functionality of the Windows 3.1 Print and Print Setup dialogs. Selection of the paper source and paper type, previously a function of the Print Setup dialog, is now available as part of a new dialog, the Page Setup dialog (Figure 9.7).
To use the Print dialog, applications must first prepare the contents of a PRINTDLG structure, then call the PrintDlg function with a pointer to this structure as the function's only parameter.
Figure 9.7. The Page Setup dialog.
The Page Setup dialog is displayed when applications call the PageSetupDlg function. The function's only parameter is a pointer to a PAGESETUPDLG structure. Through this structure, applications can control the fields of the dialog and possibly specify customization. When the dialog is dismissed, the user's selections are available in this structure.
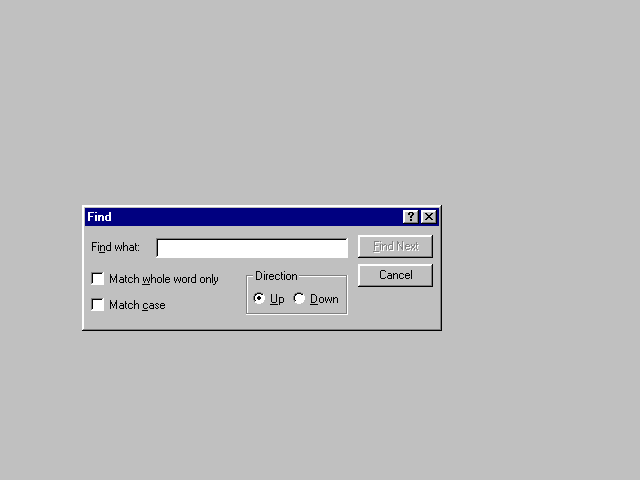
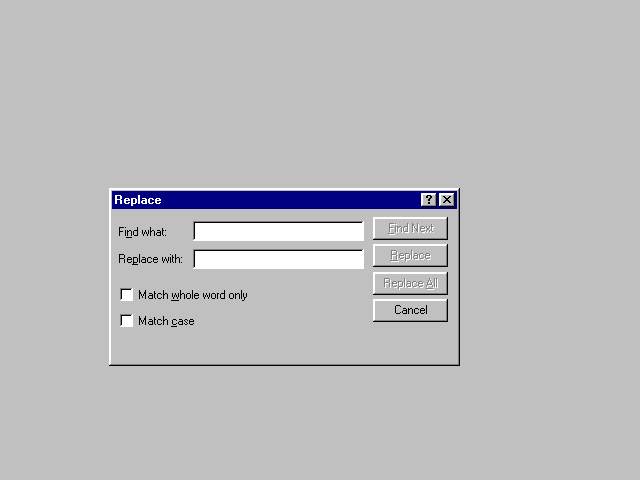
Text Find and Replace Dialogs
The Find and Find and Replace dialogs present an interface where the user can enter a text search string and, optionally, a replacement string. These dialogs differ fundamentally from the other common dialogs in that they are modeless dialogs; the other common dialogs all operate as modal dialogs. Therefore, the application that creates them is responsible for providing the message loop and dispatching dialog messages through the IsDialogMessage function.
The Find dialog, shown in Figure 9.8, is displayed in response to a call to the FindText function. The function returns a dialog handle that can be used in the application's message loop in a call to IsDialogMessage. The dialog is initialized through a FINDREPLACE structure, which also receives any values the user may enter in the dialog.
The dialog communicates with its owner window through a series of messages. Before calling FindText, applications should register the message string "FINDMSGSTRING" through a call to the RegisterWindowMessage function. The Find dialog will send this message to the application whenever the user enters a new search value.
Figure 9.8. The Find Text dialog.
The Replace dialog (Figure 9.9) is a close cousin to the Find dialog and is initialized through an identical FINDREPLACE structure. This dialog is displayed in response to a call to the ReplaceText function.
Figure 9.9. The Replace dialog.
When the application receives a message from a Find or Replace dialog, it can check the Flags member of the FINDREPLACE structure to determine what action was requested by the user.
Common Dialogs Example
The example program shown in Listing 9.6 creates and displays each of the common dialogs in sequence. This example has little practical value; it simply demonstrates, with a minimum amount of code, how these dialogs can be created and displayed. This sample can be compiled from the command line with cl commdlgs.c comdlg32.lib user32.lib.
#include <windows.h>

LRESULT CALLBACK WndProc(HWND hwnd, UINT uMsg,

                         WPARAM wParam, LPARAM lParam)

{

    switch(uMsg)

    {

        case WM_DESTROY:

            PostQuitMessage(0);

            break;

        default:

            return DefWindowProc(hwnd, uMsg, wParam, lParam);

    }

    return 0;

}

int WINAPI WinMain(HINSTANCE hInstance, HINSTANCE hPrevInstance,

                                        LPSTR d3, int nCmdShow)

{

    MSG msg;

    HWND hwnd;

    WNDCLASS wndClass;

    OPENFILENAME ofn;

    CHOOSECOLOR cc;

    CHOOSEFONT cf;

    PRINTDLG pd;

    PAGESETUPDLG psd;

    FINDREPLACE fr;

    COLORREF crCustColors[16];

    LOGFONT lf;

    char szFindWhat[80];

    char szReplaceWith[80];

    HWND hdlgFt, hdlgFr;

    if (hPrevInstance == NULL)

    {

        memset(&wndClass, 0, sizeof(wndClass));

        wndClass.style = CS_HREDRAW | CS_VREDRAW;

        wndClass.lpfnWndProc = WndProc;

        wndClass.hInstance = hInstance;

        wndClass.hCursor = LoadCursor(NULL, IDC_ARROW);

        wndClass.hbrBackground = (HBRUSH)(COLOR_APPWORKSPACE + 1);

        wndClass.lpszClassName = "COMMDLGS";

        if (!RegisterClass(&wndClass)) return FALSE;

    }

    hwnd = CreateWindow("COMMDLGS", "Common Dialogs Demonstration",

                        WS_OVERLAPPEDWINDOW,

                        CW_USEDEFAULT, 0, CW_USEDEFAULT, 0,

                        NULL, NULL, hInstance, NULL);

    ShowWindow(hwnd, nCmdShow);

    UpdateWindow(hwnd);

    memset(&ofn, 0, sizeof(ofn));

    ofn.lStructSize = sizeof(OPENFILENAME);

    GetOpenFileName(&ofn);

    memset(&ofn, 0, sizeof(ofn));

    ofn.lStructSize = sizeof(OPENFILENAME);

    GetSaveFileName(&ofn);

    memset(&cc, 0, sizeof(cc));

    memset(crCustColors, 0, sizeof(crCustColors));

    cc.lStructSize = sizeof(cc);

    cc.lpCustColors = crCustColors;

    ChooseColor(&cc);

    memset(&cf, 0, sizeof(cf));

    memset(&lf, 0, sizeof(lf));

    cf.lStructSize = sizeof(cf);

    cf.lpLogFont = &lf;

    cf.Flags = CF_SCREENFONTS | CF_EFFECTS;

    ChooseFont(&cf);

    memset(&pd, 0, sizeof(pd));

    pd.lStructSize = sizeof(pd);

    PrintDlg(&pd);

    memset(&psd, 0, sizeof(psd));

    psd.lStructSize = sizeof(psd);

    PageSetupDlg(&psd);

    memset(&fr, 0, sizeof(fr));

    memset(szFindWhat, 0, sizeof(szFindWhat));

    memset(szReplaceWith, 0, sizeof(szReplaceWith));

    fr.lStructSize = sizeof(fr);

    fr.hwndOwner = hwnd;

    fr.lpstrFindWhat = szFindWhat;

    fr.lpstrReplaceWith = szReplaceWith;

    fr.wFindWhatLen = sizeof(szFindWhat);

    fr.wReplaceWithLen = sizeof(szReplaceWith);

    hdlgFt = FindText(&fr);

    hdlgFr = ReplaceText(&fr);

    while (GetMessage(&msg, NULL, 0, 0))

        if(!IsDialogMessage(hdlgFt, &msg))

            if(!IsDialogMessage(hdlgFr, &msg))

                DispatchMessage(&msg);

    return msg.wParam;

}
OLE Common Dialogs
As part of the OLE 2 implementation, the system provides common dialogs for the following set of functions: Insert Object, Paste Special, Change Source, Edit Links, Update Links, Object Properties, Convert, and Change Icon. Most applications do not invoke these dialogs directly, but use the Microsoft Foundation Classes (and, in particular, the wrapper classes for these dialogs) to implement OLE functionality.
Controls
A control is a special window that typically enables the user to perform a simple function and sends messages to this effect to its owner window. For example, a pushbutton control has one simple function, namely that the user can click on it; when that happens, the pushbutton sends a WM_COMMAND message to the window (typically a dialog) that owns it.
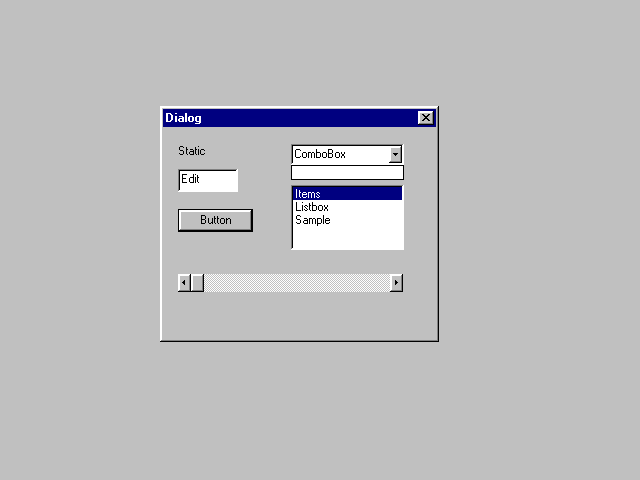
Windows offers several built-in control classes for the most commonly used controls. A dialog with a sample collection of these controls is shown in Figure 9.10.
Figure 9.10. A collection of standard controls.
Windows 95 introduced a set of new control classes, collectively referred to as Windows 95 Common Controls. This name is slightly misleading as the new control classes are now also available in Windows NT 3.51 and Win32s 1.3.
Applications can also create their own controls. These can be derived from the standard control classes, or they can be built independently.
The control class and the control style (which defines variations of behavior within a button class) are usually both defined in an application's resource file. Alternatively, applications that create controls programmatically select the button class and specify the button style as parameters to the CreateWindow function.
Static Controls
Static controls are perhaps the simplest of all control types. The sole purpose of their existence is to display a piece of text, such as a label for another control. Static controls do not respond to user-interface events and do not send messages to their owner window.
Buttons
Buttons, as their name implies, are controls that respond to simple mouse clicks. There are several button types. A pushbutton is a button that posts a WM_COMMAND message to its owner window when it is clicked. A check box indicates one of two states, selected and not selected. A variant of the check box, the three-state check box, adds a third, disabled state to the other two. A radio button is a control that is typically used in groups, indicating a set of mutually exclusive choices.
There are variants to these control styles that define secondary aspects of their behavior.
Edit Controls
An edit control is a rectangular area where the user can enter unformatted text. The text can be a few characters—such as the name of a file—or an entire text file; for example, the client area of the Windows Notepad application is one large edit control. Applications typically communicate with the edit control through a series of messages that are used to set or retrieve text from the control.
List Boxes
A list box contains a collection of values arranged in rows. Users can use the mouse cursor to select the desired value from the list. If the list box contains more values than can be displayed at ones, a vertical scrollbar is also displayed as part of the list box.
Combo Boxes
A combo box combines the functionality of a list box and an edit control. Users can enter a value in the edit control part of the combo box. Alternatively, they can click the down arrow next to the edit control to display the list box part, where a value can be selected.
Scrollbars
A scrollbar control consists of a rectangular area with two arrows at the end and a sliding pointer. A scrollbar can be vertical or horizontal. Scrollbars are typically used to indicate the position of the visible portion within a larger area. Applications also used scrollbars to implement the functionality of a slide control; however, as one of the new Windows 95 common controls is a slider control, using scrollbars for this purpose is no longer necessary.
Windows 95 Common Controls
Windows 95 defines a new set of common controls.
Tab controls help in implementing multipage dialogs, also known as tabbed dialogs or property sheets. A tab control provides a user-interface where the user can select the dialog page (property page) by clicking on a little tab. The tab gives the visual appearance of several sheets organized on top of each other and clicking on the tab gives the visual impression of bringing the selected sheet to front.
Tree controls present a list of items in a hierarchical organization. Tree controls are ideal for displaying hierarchical lists, such as a list of directories on disk. Tree controls provide an efficient mechanism for displaying a large number of items by providing the ability to expand and collapse higher-level items.
List controls expand the functionality of a list box by providing a means to display a list of items in one of several formats. In a typical list control, items have an icon and some text; the control can display these items in a variety of formats as icons, or as list items arranged in rows.
A slider control provides the functionality similar to the sliding volume control on many stereo systems. The user can position the sliding tab with the mouse to set a specific position in the slider control. Slider controls are ideal in multimedia applications as volume or picture controls, or controls through which the user can set the position during playback of a multimedia data source.
Progress bars are used to indicate the progress of a lengthy process. Progress bars do not accept user input; they are used for informational purposes only.
Spin buttons are used to increment or decrement the value of an associated control, usually an edit control.
The rich-text edit control expands the functionality of the Windows 3.1 edit control by enabling the editing of Microsoft RTF (Rich Text Format) files. Rich-text controls encapsulate the capability of a reasonably sophisticated word processor.
A hot key control accepts a keystroke combination from the user, which the application can use to set up a hot key through the WM_SETHOTKEY message.
Other Windows 95 common controls include the animation control, header control, status bar, toolbar control, and tooltip control. All Windows 95 common controls are also supported in Windows NT beginning with Version 3.51.
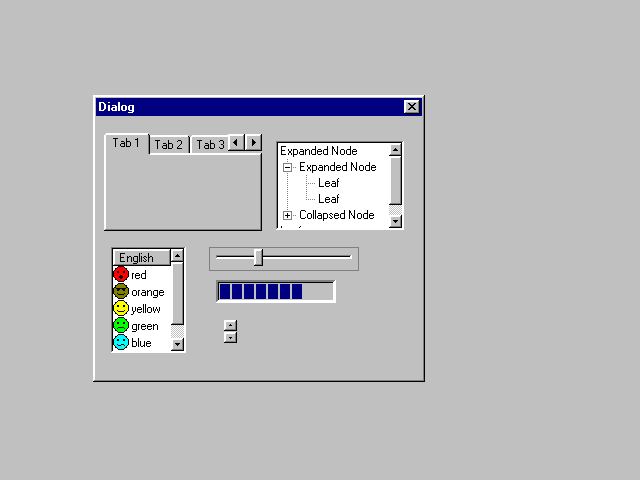
Figure 9.11 presents a collection of Windows 95 common controls in a dialog.
Figure 9.11. Some Windows 95 common controls.
Summary
A window is a rectangular area on the screen through which applications and the user communicate. Applications draw into the window to display information for the user. Applications receive messages on user-interface events through a handle to the window.
Windows are arranged hierarchically. At top is the desktop window. Top-level windows are those whose parent is the desktop window—or those that have no parent window. Child windows are those whose parent is a top-level window or another child window. Windows sharing the same parent are siblings; the order in which sibling windows are displayed is called the Z-order. A special category of windows contains top-level windows that have the topmost attribute; these windows always precede non-topmost windows in the Z-order, even when a non-topmost window is the active window.
A top-level window may have an owner window that is different from its parent window.
Typical windows that users normally interact with include overlapped windows (normal application windows); popup windows (dialog boxes); and controls.
Window messages are handled in the window procedure. A window procedure and other window attributes are associated with the window class from which windows are derived. In addition to the capability of defining their own window classes, applications can also superclass and subclass existing window classes. Subclassing means modifying the behavior of an existing window class; superclassing means creating a new window class based on the behavior of an existing class.
Part of the Win32 API is a set of functions that assist in creating, displaying, and managing dialogs. Windows distinguishes between modal dialogs and modeless dialogs. A modal dialog disables its owner window while it is displayed and does not return control to the application until the user dismisses the dialog. In contrast, modeless dialogs are displayed without disabling their owner window. Applications must provide message loop functionality and dispatch dialog messages through the IsDialogMessage function for modeless dialogs.
Windows also provides a set of common dialogs for common tasks. These include dialogs for opening and saving a file, printer and page setup, color and font selection, and text find and replace functions. In addition, a set of common dialogs is available to implement OLE-related functionality.
Controls include buttons, static text, edit boxes, list boxes, combo boxes, and scrollbars. Applications can also implement new control types. In addition, Windows 95 defines a set of new common controls: list views, tree views, tab controls, hot key controls, sliders, progress bars, spin buttons, and rich-text edit controls.
Controls are usually defined through dialog box templates in the application's resource file. Controls communicate with the application by sending messages (such as WM_COMMAND messages) to their owner window, that is, the dialog box.
Popular Tutorials
-
 MS Access
1109
MS Access
1109
-
 C++
1222
C++
1222
-
 HTML
584
HTML
584
-
 JavaScript
616
JavaScript
616
-
 Vbscript
873
Vbscript
873
-
 Oracle
473
Oracle
473
-
 VC++
875
VC++
875
-
 SQL
2959
SQL
2959
-
 XML
514
XML
514
-
 Java
814
Java
814
-
 Perl
455
Perl
455
-
 Linux
451
Linux
451


