Web based School


- 38 – Implementing Context-Sensitive Help
38 – Implementing Context-Sensitive Help
38 – Implementing Context-Sensitive Help
Users of Windows applications expect intuitive user interfaces that enable them to work productively even when they are using an application for the first time. Lengthy learning periods and large, complex user manuals are no longer acceptable features of a new application.
A significant element of a well-thought-out user interface is integrated help. Although many application features are obvious to the experienced user, others are not; furthermore, inexperienced users may not immediately grasp the significance of elements in a menu, window, or dialog.
Windows provides many features that assist the development of professional quality context-sensitive help files. Among these is the WinHelp program, the WinHelp API, and Windows' ability to assign help context identifiers to various user-interface elements.
For MFC applications, AppWizard can be instructed to create a skeleton help file. AppWizard-generated help can also be added to applications that were initially created without context-sensitive help.
Developing help files has never been easier. The Visual C++ development system now includes the Microsoft Help Workshop, an integrated tool that helps you maintain and manage help projects.
In this section, we first examine the features of WinHelp, the Windows help application. Next, we review the rules for constructing help topic files. Lastly, we examine the Help Workshop and touch on the subject of advanced topics.
When authoring a help file, you should always keep in mind your intended audience. Despite a frequently heard myth to the contrary, I do not believe that the contents of help files and printed documentation should be identical. The purpose of these items is fundamentally different; while printed documentation is most often used by users who are new to your application and wish to receive an introduction to its concepts and ideas, help files are more likely to be used by experienced users wishing to obtain specific reference information on a particular topic. The format of the presentation (static, printed text versus online text with hypertext links) also prescribes a different authoring approach.
Help File Development
Help files are hypertext files that are presented by a special Windows application, WinHelp.exe. Constructing a help file is a process of several steps. First, help topic files need to be authored using an editor that is capable of handling rich text format (RTF) files. Next, a help project (HPJ) file must be created; this file identifies the help topic files and other components that comprise a help file project. Next, any additional files (for example, bitmap images) must be created. Finally, the help project file must be compiled using the Microsoft Help Compiler. The final version of the help system may also include dynamic link libraries and a help contents file. Figure 38.1 provides a graphical illustration of this process, identifying the various elements of a help project and the tools used to process them.
Figure 38.1. Help file development.
Help files can be invoked from an application in a variety of ways. Applications may invoke help in response to the user's selection of Help menu items, pressing the F1 key, or entering help mode by pressing Shift-F1. In all of these cases, help is actually invoked by a call to the WinHelp function.
Help Topics and the Rich Text Format
I purchased my first Windows SDK back in 1990 or thereabouts. I was a bit disappointed to learn that I needed to make an additional purchase in order to be able to edit rich text format help topic files. Nevertheless, I swallowed the bullet and went out and bought Word for Windows 1.1. What a long way Word has come in five years! Working with Word 1.1 and Windows 3.0 taught me to save my work after every paragraph or so; otherwise, it fell prey to those dreaded Unidentified Application Errors, or UAEs, that crashed Windows every 15 minutes it seemed.
As it turns out, although I never regretted this purchase, there was no need for me to buy Word for Windows to edit help topics. RTF files consist of printable ASCII characters; the file format is not exactly user-friendly, but human-readable. It is possible to edit RTF help topic files using any ASCII text editor.
Regardless of what editor you use, the Windows Help Compiler treats RTF files the same way. It accepts formatted text as its input; however, it interprets certain text attributes in a special way. For example, text that is marked with a double underline is interpreted as text marking a jump to another topic.
Take a look at an example. Listing 38.1 shows a very simple help topic file consisting of only two topics.
{\rtf1\ansi

{\fonttbl\f0\fswiss MS Sans Serif;}

\deff0\fs20

#{\footnote #H_CONTENTS}

${\footnote $Help Contents}

K{\footnote KContents}

\keepn\brdth\fs28

Help Contents

\par\pard\fs20\sb30

This is the Help Contents page. To see more help, click on

 {\uldb Overview}{\v H_OVERVIEW}.

\par\pard

\page

#{\footnote #H_OVERVIEW}

${\footnote $Help Overview}

K{\footnote KOverview}

!{\footnote !PositionWindow(256,256,512,512,1,"main")}

\keepn\brdrb\fs28

Help Overview

\par\pard\fs20\sb30

This is the Help Overview page. To see more help, click on

 {\uldb Contents}{\v H_CONTENTS}.

\par

To see the a macro at work, click on {\ul About}{\v !About()}.

}
At the beginning of this file, \rtf1\ansi identifies the RTF version number and the ANSI character set. This part is mandatory for all help topic files.
The next line specifies a font table. The font table of this simple help file consists of only one font. This font is selected as the default font by the \deff0 statement in line three.
The \footnote statements in the next three lines are of crucial importance in help topic files. The help system uses footnotes of different types to index help text and to identify topic-specific information. The type of information specified by the footnote depends on the footnote character. In the present example, the pound sign (#) specifies a context string; the context string is used to refer to the current topic (as in a hypertext link). The 'K' footnote specifies a keyword; the '$' footnote specifies the topic title that will be displayed by the help system as the help window caption.
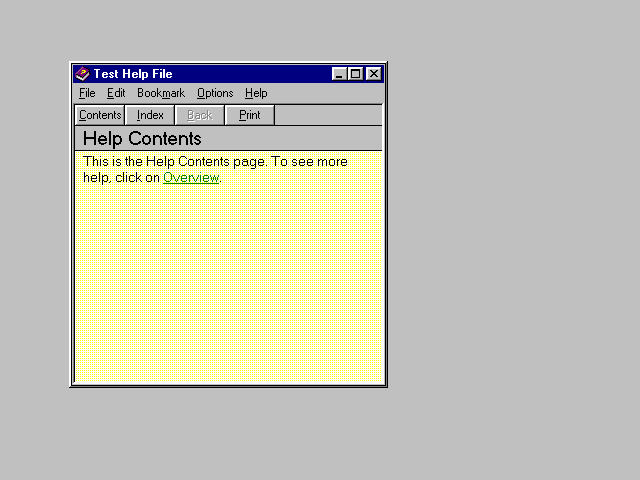
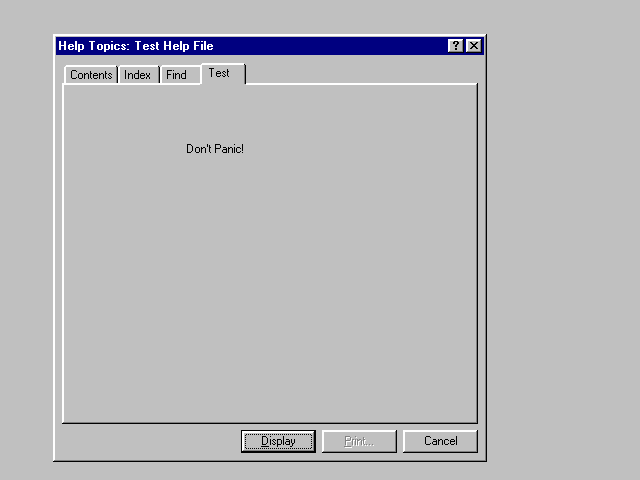
The topic text that follows is broken by a variety of formatting codes into a scrolling and nonscrolling part. The nonscrolling region appears on top, and can be used, for example, as a topic subtitle (Figure 38.2).
Figure 38.2. Help topic example.
The second part of the topic text contains a hypertext reference to the second topic. The help system recognizes two types of links. Popup links are marked by the \ul statement and represent links to topics that appear in a popup window. Links marked with the \uldb statement represent links to topics that are displayed in the help system's main window. The link itself is identified by the subsequent \v statement.
These codes and most other codes recognized by the help system can easily be generated by an RTF editor. For example, the \ul command represents underlined text; \uldb represents double underline. For example, the help topics that were presented in Listing 38.1 appear, when edited using Microsoft Word 7.0, as shown in Figure 38.3.
Figure 38.3. Editing a help topic using Word.
The help system also recognizes commands that are not part of the standard RTF format. These commands are related to bitmaps and DLLs. For example, the bmc command can be used to embed a bitmap in text. These help-only commands use a special syntax. The curly braces that normally enclose RTF commands are to be preceded by the backslash character. Furthermore, the backslash character that normally precedes RTF commands should be omitted. For example:
\{bmc bitmap.bmp\}
This special syntax enables such commands to be included when using an RTF word processor. Simply include the command with the curly braces but without the backslashes:
{bmc bitmap.bmp}
When this text is saved as part of the RTF file, the curly braces are automatically preceded by backslashes to distinguish them from RTF commands.
The RTF file shown in Listing 38.1 also contains some macro references. We discuss help macros later in this chapter.
The Help Project File
Every help project must have a help project file. It is this file that is specified when the help compiler is invoked. Help project files usually have the HPJ extension. A typical help project file, the one used to compile the help topics demonstrated earlier, is shown in Listing 38.2.
[OPTIONS]

CONTENTS=H_CONTENTS

TITLE=Test Help File

COMPRESS=OFF

[WINDOWS]

main=,,,(255,255,192),(192,192,192)

[FILES]

HLP.RTF

[CONFIG]

CreateButton("about", "About", "About()")

[MAP]

H_CONTENTS              10000

H_OVERVIEW              10100
Perhaps the most important element in this file is the [FILES] section. It is in this section that the names of the help topic files are specified. Other sections, such as the [OPTIONS] and the [WINDOWS] sections, provide additional parameters specifying the help file's appearance and behavior.
The [WINDOWS] section can also be used to define secondary help windows. Such windows can be referred to in topic files by name, in order to display specific topics in a separate window. A possible use of this capability is to define a window type where sample code can be displayed.
The [CONFIG] section contains macros that are executed when the help file is first opened. More about this later.
The [MAP] section associates context strings with context identifiers. Context identifiers can be passed to WinHelp by the application invoking help. Mappings can be created manually, or, in the case of MFC applications, automatically by using the makehm.exe utility. This utility uses the MFC project's resource.h file to create a mapping for all resource elements in the project.
Help project files can contain #include directives. This is, for example, how AppWizard-generated help project files refer to context mappings that are stored in separate files.
The Help Contents File
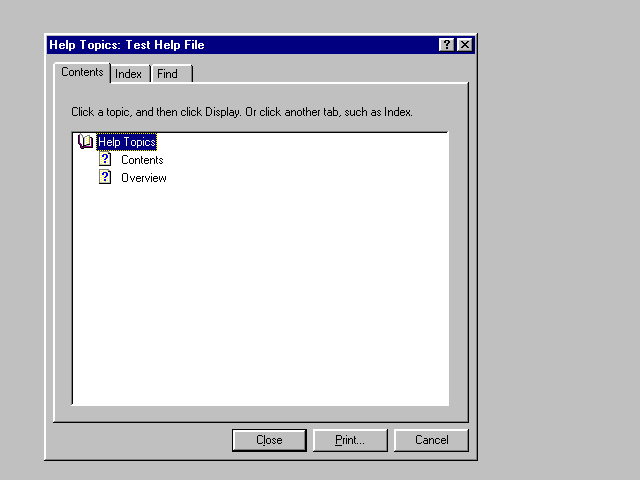
The new version of WinHelp, Version 4.0, can use a separate Table of Contents property page (see Figure 38.4). The table of contents is created from a separate file, one with a name identical to that of the help file but having the CNT extension.
Figure 38.4. Help table of contents.
The table of contents file used to generate the table of contents in Figure 38.4 is shown in Listing 38.3.
:Base HLP.hlp

1 Help Topics

2 Contents=H_CONTENTS

2 Overview=H_OVERVIEW
In addition to specifying the items to appear in the table of contents, this file can contain additional options. For example, it can be used to specify the name of DLLs that specify additional property pages to appear in the Help Topics property sheet next to Contents, Index, and Find.
Compiling Help
In the preceding sections, we have reviewed the elements that comprise a help project. All these elements come together when you invoke the Windows Help Compiler to generate the application's help file.
The name of the new help compiler is hcrtf.exe. This program can be invoked by itself, or as part of the Microsoft Help Workshop. To compile a help file from the command line, type a command similar to the following:
hcrtf -x hlp.hpj
Macros and DLLs
The Windows help system offers a variety of macros that can be used to enhance the appearance and functionality of a help file. Macros can be utilized in three ways; they can be executed when the help file is first loaded, when a help topic is displayed, or when a hotspot is selected by the user. In addition, some macros (for example, CreateButton, AppendItem) take macros as arguments; these macros are executed when the item is activated.
To execute a macro at the time the help file is loaded, add the macro to the [CONFIG] section of your help project file. For example, the following [CONFIG] section in a help project file creates a button that invokes the About dialog:
[CONFIG]

CreateButton("about", "About", "About()")
To invoke a help macro when a topic is selected, add a footnote to the topic with the exclamation mark (!) as the footnote character. For example, the following footnote, when added to a topic, causes the help window to be centered on the screen every time the topic is invoked:
!{\footnote !PositionWindow(256,256,512,512,1,"main")}
The third method of invoking a help macro is by adding a macro reference to a hotspot. The following example invokes the Help About dialog when a hotspot is selected by the user:
To see the a macro at work, click on {\ul About}{\v !About()}.
Wherever you need to specify a macro, you can also specify a macro string. A macro string consists of several macros, separated by semicolons (;).
In addition to macros, help files can also call functions in dynamic link libraries. DLL functions must be registered before use; for registration, use the RegisterRoutine macro. Typically, you would invoke this macro from the [CONFIG] section of your help project file; this way, the DLL will be registered when the help file is loaded.
For example, if you wish to add a hotspot to your project that plays back a video file, add the following to the help project file:
[CONFIG]

RegisterRoutine("MSVFW32.DLL", "MCIWndCreate", "UUUS");
Afterwards, you can add a hotspot to a help topic like follows:
Click {\ul here}{\v !MCIWndCreate(0,0,0,"myvideo.avi")} for video.
Needless to say, you can use functions from system DLLs as well as DLLs that you develop yourself.
DLLs can also be invoked in the context of embedded window references, through the statements ewc, ewl, or ewr that are to be included in your help topic files.
Invoking Help from Applications
Now that we have seen most aspects of help file development, only one question remains: How is help invoked from a C/C++ application?
Regardless of what specific user action causes it, help is always invoked through the WinHelp Windows function. When invoking WinHelp through this function, applications can specify a variety of commands, causing help to appear in a regular or popup window, causing it to display the help contents, a specific topic, and so on.
The simplest way to invoke help is to call WinHelp when the user selects a help command from the application's menu. In this case, simply invoke help by calling WinHelp from the handler of the appropriate WM_COMMAND message.
Handling the F1 key is somewhat more difficult. In order to handle this key regardless of which user-interface element is active, applications used to require a message hook function. In Windows 95, handling F1 is somewhat easier; no hook function is needed because whenever the user presses the F1 key, Windows 95 sends a WM_HELP message to the application.
Windows 95 assists the development of context-sensitive help in other ways. For example, it sends a WM_CONTEXTMENU message whenever the user right-clicks a window. In response to this message, applications can invoke WinHelp with the HELP_CONTEXTMENU command; this causes the popup menu with the "What's This?" menu item to be displayed.
To handle context-help mode, applications must implement a flag indicating that the user has pressed the F1 key or invoked context help through some other means—selecting a toolbar button, for example. When this flag is set, applications must process messages such as command messages differently, invoking WinHelp instead of invoking a command function. If you wish to provide context help on nonclient area components of your application's window, you may also need to intercept the appropriate nonclient area messages as well.
If the application implementing context-help mode is an in-place OLE server or client, care must be taken to ensure that the context-help mode of the server and the client are synchronized. If either the client or the server does not support context-help mode, context-help mode cannot be made available during an in-place session.
For MFC applications, the framework automates invoking the help system with appropriate parameters. Unless you wish to add special effects, you do not need to worry about calling WinHelp yourself.
The Microsoft Help Workshop
The Microsoft Help Workshop is a Windows-based utility for creating and managing help project files and help content files. Using this utility in conjunction with an RTF-capable word processor greatly simplifies help file development.
Editing a Help Project
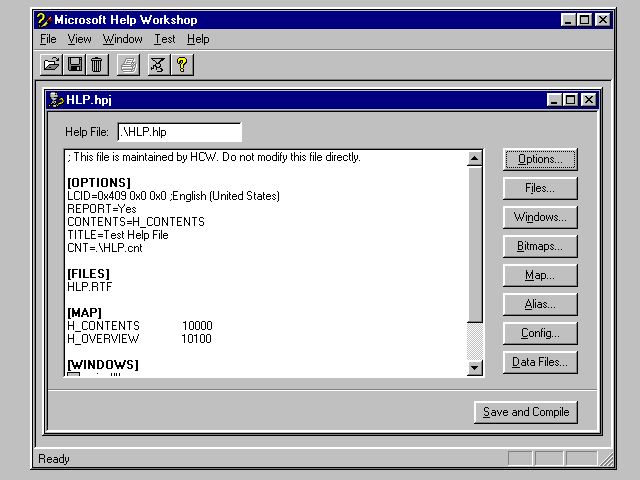
Figure 38.5 shows the Microsoft Help Workshop with a help project file open. This is the same help project file shown in Listing 38.2. As you can see, the Microsoft Help Workshop adds a series of standard sections and comments to the manually generated file.
Figure 38.5. The Microsoft Help Workshop.
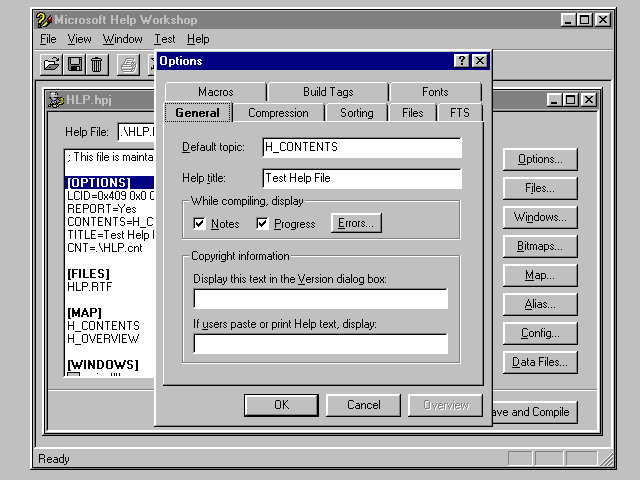
On the right side of the help project window, a series of buttons corresponds to sections of the help project file. Project settings can be modified by either using one of these buttons, or double-clicking on the appropriate item itself. For example, clicking on the Options button or double-clicking on the [OPTIONS] section in the help project file invokes the Options property sheet, shown in Figure 38.6.
Figure 38.6. Help project options: the General page.
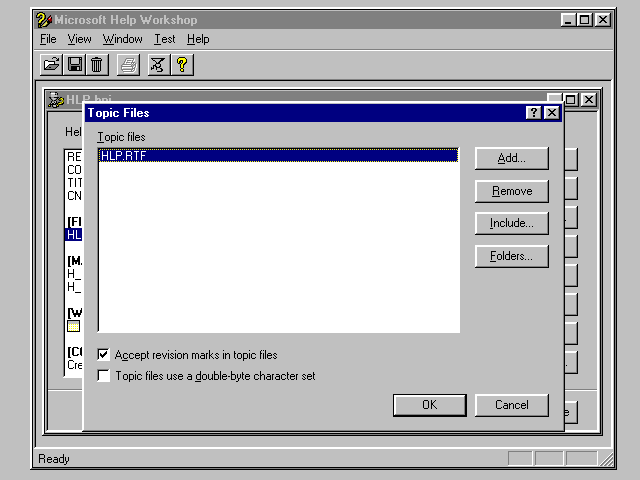
The Files button can be used to identify the help topic (RTF) files that comprise the project (Figure 38.7). You can add or remove files from the file list; you can also specify files that are to be included using the #include directive. A file included here with this directive should contain a list of topic files.
Figure 38.7. Adding and removing topic files.
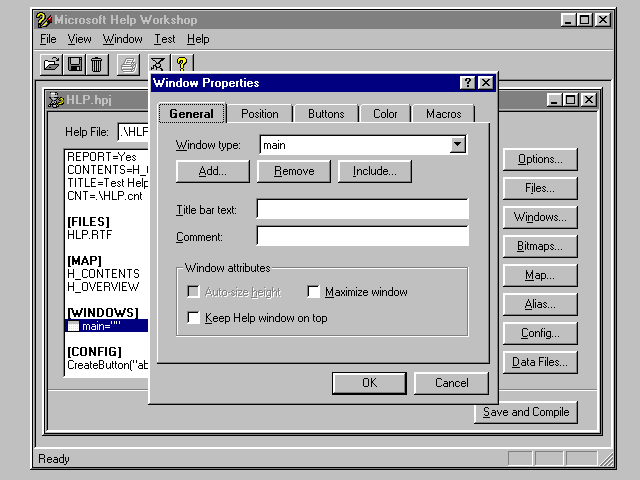
Window options can be set or modified by clicking on the Window button. The property sheet that is displayed (Figure 38.8), can be used to modify window properties such as size, color, caption, standard buttons, and any macros that are to be invoked when the window is displayed. To modify the properties for the main help window, use the window type main; however, you can also define additional window types by using the Add button in the General property page.
Figure 38.8. Help window options: the General page.
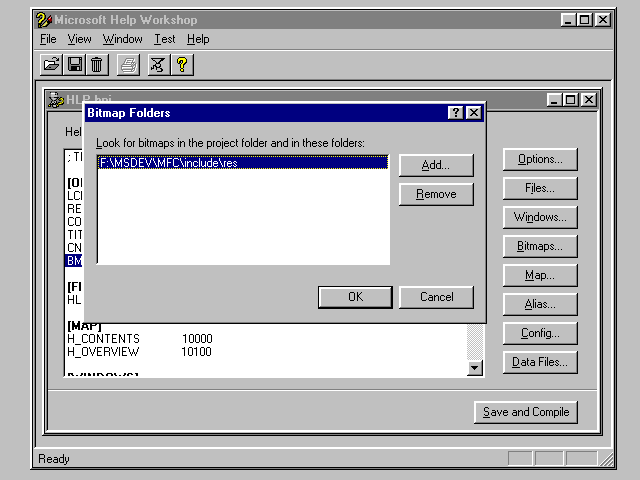
The Bitmaps button can be used to specify the location of bitmap files that are to be included with your help project (Figure 38.9). This option can be used as an alternative to including full pathnames in your help topic files—an approach that would make moving your help project to a different directory difficult.
Figure 38.9. Bitmap directories.
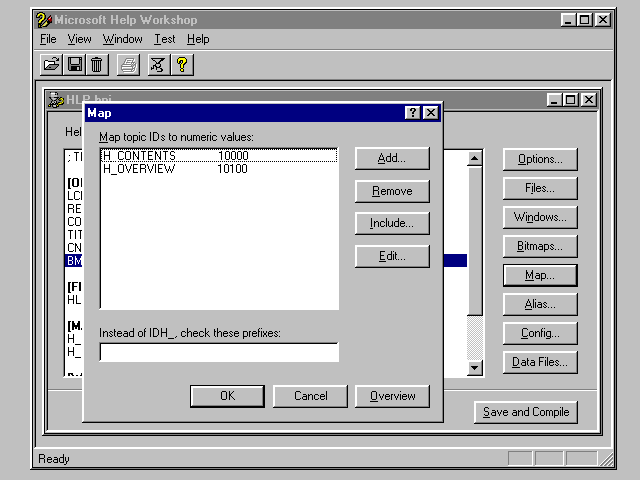
Help topic mappings (associations of context strings with numeric context identifiers) are added or modified using the Map button (Figure 38.10). A notable feature of this dialog is the Overview button, which invokes the Microsoft Help Workshop help file.
Figure 38.10. Help topic mappings.
The Alias button can be used to set up topic aliases (Figure 38.11). Topic aliases are particularly useful if you wish to map several user-interface elements to the same topic (for example, a "catchall" topic for error messages).
Figure 38.11. Editing a topic alias.
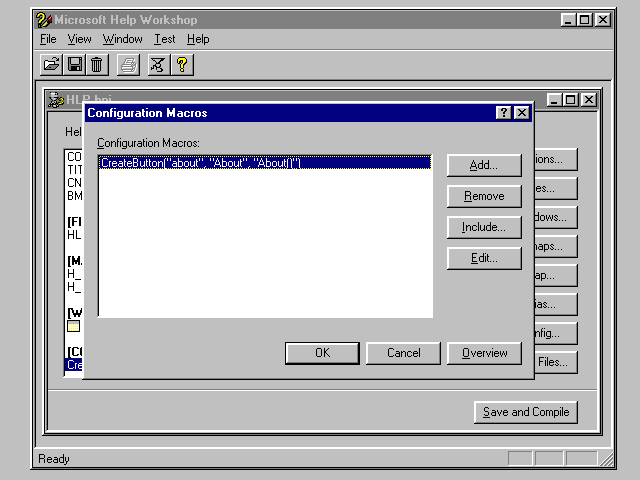
The Config button can be used to add or modify configuration macros (Figure 38.12). These macros, added to the [CONFIG] section of your help project file, are called when the help file is first loaded.
Figure 38.12. Configuration Macros dialog.
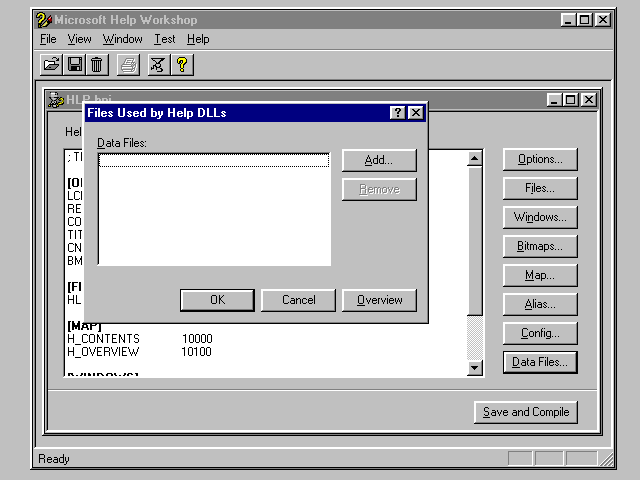
The Data Files button is used to add files to the help project file's [BAGGAGE] section. Files listed in this section are added to the help file's internal file system. WinHelp exposes a set of baggage handling functions that DLLs can use to access these internally stored files. The advantage of using internal files is improved access speed when the help file is loaded from slower media (for example, CD-ROM). A typical use of this capability is to store multimedia files in the help file that are later retrieved and played back by a DLL.
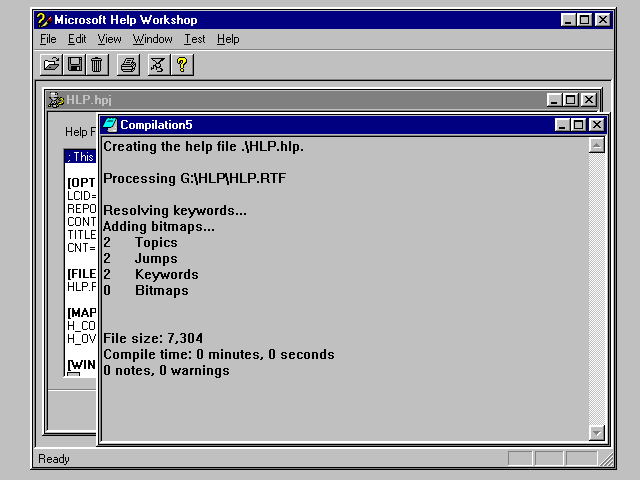
When you wish to recompile a help file, use the Save and Compile button. Clicking on this button causes your modifications to the help project file to be saved and the help compiler, hcrtf.exe, to be started.
Because the Microsoft Help Workshop displays any compiler messages during compilation (Figure 38.14), this is the preferred method for compiling help files. When invoking the help compiler, hcrtf.exe, from the command line, compiler warnings and errors may be lost.
Figure 38.14. Help file compilation.
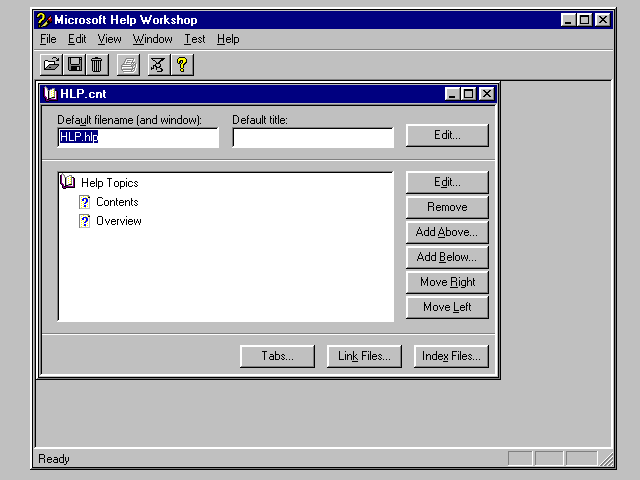
Editing a Help Contents File
The second function of the Microsoft Help Workshop is to maintain help table of contents files (Figure 38.15). These files specify the appearance and contents of the table of contents property page that WinHelp displays when a table of contents file is available and the user selects the Contents button.
Figure 38.15. Editing a help contents file.
The Edit, Remove, Add Above, Add Below, Move Right, and Move Left buttons can be used to add and remove items as well as to modify the hierarchy of the help table of contents.
The Link Files and the Index Files buttons specify additional help files that are to be included in index searches.
It is possible to add new property pages to the Help Index property sheet by using the Tabs button. A new property page is represented by a DLL that exports the following function:
HWND WINAPI OpenTabDialog(HWND, DWORD, DWORD);
When called, this function should create a dialog. The first parameter to this function identifies the dialog's parent; the remaining parameters are reserved.
The dialog should be based on a template that is visible, has no borders, and has the WS_CHILD and DS_CONTROL styles set.
You can use the AppWizard to create such a DLL. Create a regular DLL that is statically linked with the MFC library (DLL AppWizard Step 1). Create a new dialog and add a class for the dialog. Next, add an OpenTabDialog function in a separate file (for example, opentab.cpp) that looks similar to the one shown in Listing 38.4.
#include "stdafx.h"

#include "resource.h"

#include "HlpDlg.h"

__declspec(dllexport)

    HWND WINAPI OpenTabDialog(HWND hwnd, DWORD, DWORD)

{

    CHlpDlg *pDlg;

    pDlg = new CHlpDlg;

    pDlg->Create(CHlpDlg::IDD, CWnd::FromHandle(hwnd));

    return pDlg->m_hWnd;

}
If your DLL is functioning properly, a new tab is added to the help topics property sheet (Figure 38.16).
Figure 38.16. Adding a custom tab to the Help Topics property sheet.
You can communicate with WinHelp from your DLL by sending messages to it.
Testing and Running Help
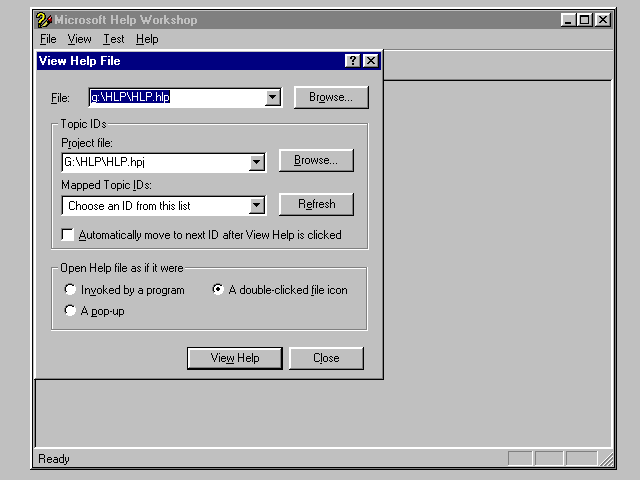
The Microsoft Help Workshop can also be used to test help files. To start WinHelp with a specific help file, use the Run WinHelp command from the File menu. If you select this command, a dialog is displayed (Figure 38.17) where a variety of options can be selected.
Figure 38.17. Starting WinHelp from the Help Workshop.
The File menu also contains the special Help Author option. When this flag is set, help files are run with debugging enabled. While debugging is enabled, WinHelp displays extra error messages; it also displays the topic identifier in window captions instead of the topic title.
Another useful feature is the WinHelp Messages command in the View menu. This command displays a variety of debugging messages generated by WinHelp while executing a help file.
Finally, several useful test commands are available under the Test menu. The Contents File command tests a help contents file for link integrity. The Close All Help command closes all instances of WinHelp. The Send a macro command executes a macro in the context of the specified help file. Lastly, the WinHelp API command can be used to invoke the WinHelp function with a variety of parameter settings.
AppWizard-Generated Help File Skeletons
For MFC projects that are created with AppWizard with help support requested, the AppWizard can be instructed to create a skeleton set of help files.
The files created include afxcore.rtf, afxprint.rtf, and a variety of bitmap files. The bitmap files represent toolbar buttons, window portions, and other graphical illustrations used in the help topic files.
Many of the help topics in afxcore.rtf and afxprint.rtf are complete; others may require modifications. Your application will probably also require a variety of application-specific topics; these you would probably implement in a separate topic file.
In addition to creating the help topic files and bitmaps, the AppWizard also creates a help project file and a help content file for your application. Furthermore, it creates a batch file, makehelp.bat, which can be utilized to recompile the help project. This batch file is automatically invoked from your application's make file. However, makehelp.bat will not report any errors; if you wish to recompile your help project after extensive changes, I recommend that you use the Microsoft Help Workshop.
Summary
Online context-sensitive help is a mandatory feature for most new Windows applications. Context-sensitive help is developed using a variety of tools and displayed using the WinHelp.exe utility.
The files that make up a Windows help project include a help project file, help topic files, and other, optional file components.
Help topic files are in the Microsoft rich-text format. As RTF files consist of printable ASCII characters, they can be edited by most ASCII editors; alternatively, and for convenience, an RTF-compatible word processor, such as Word for Windows, can be used.
The help system interprets specific RTF formatting codes. For example, underlined text represents a hotspot, a hypertext link to another topic in a help topic file. In addition to standard RTF formatting codes, the help system also uses a few help-only codes.
The help project file specifies the files that make up the help project. In addition, this file also specifies a series of settings and attributes for the help file, its windows, and its behavior.
Another help project component is a table of contents file. If such a file exists, the help system uses a special property page for displaying a help file's table of contents.
The help system offers a series of macros. Macros can be nested and chained into macro strings. Macros can be invoked when the help file is first loaded, when a particular help topic is displayed, or when a specific hotspot is selected by the user. In addition to macros, applications can also invoke functions from dynamic-link libraries, assuming that those functions have been previously registered using the RegisterRoutine macro.
Applications invoke help using the WinHelp Windows function. This function is invoked when the user selects a Help menu command, the F1 key, or when context help mode is selected through the Shift+F1 key. Of these, processing the F1 key requires the use of hook functions, or, alternatively, you can rely on the WM_HELP message that is sent to your application under Windows 95.
For MFC applications created with AppWizard, AppWizard automatically adds the functionality to invoke help as appropriate.
A new tool that comes with Visual C++ Version 4 is the Microsoft Help Workshop. This application provides a graphical editing facility for help project and help content files. Use of this application in conjunction with an RTF-capable word processor greatly simplifies the task of help file development.
For MFC application skeletons created with help support, AppWizard creates a series of help-related files. These files contain many complete topics and several other topics that require completion in accordance with the specifics of your application. AppWizard also creates a file, makehelp.bat, that is invoked from your application's make file. However, as makehelp.bat does not report any errors, it may be useful to compile your help project from within the Microsoft Help Workshop after any significant changes to the help project files.
Popular Tutorials
-
 MS Access
1109
MS Access
1109
-
 C++
1222
C++
1222
-
 HTML
584
HTML
584
-
 JavaScript
616
JavaScript
616
-
 Vbscript
873
Vbscript
873
-
 Oracle
473
Oracle
473
-
 VC++
875
VC++
875
-
 SQL
2959
SQL
2959
-
 XML
514
XML
514
-
 Java
814
Java
814
-
 Perl
455
Perl
455
-
 Linux
451
Linux
451


