


6
Windows NT File Systems Management
No other operating system has as many choices for file systems as does Windows NT. Besides Windows NT's backwards compatibility for DOS's FAT (File Allocation Table), and OS/2's HPFS (High Performance File System), Windows NT has an advanced version of FAT and its own NTFS (NT File System) that offers greater performance, security, and reliability then the other, older, file systems.
Having a knowledge of the different file systems and how to manage them is a important matter that should be considered before installing Windows NT Server.
This chapter reviews DOS's FAT file system and introduces you to Windows NT's NTFS and the tools used to manage file systems under Windows NT, most notably the Disk Administrator utility.
Working with File Systems
Before deciding on which file systems to keep or whether NTFS should be implemented, you need to know the background on these file systems. I'll discuss a little history of the file systems as well as their pros and cons.
The Three File Systems Supported By Windows NT
The FAT file system for personal computers was designed at a time that floppy diskettes were the most used media, and hard drives had a capacity of ten megabytes on the average. Because of this, FAT was not designed with larger capacities in mind, and has since required the use of new operating systems and system BIOS's to allow for the use of larger hard drives and directory trees of files that number in the thousands or millions. Partitions formatted with FAT are broken into clusters. The FAT file system is also prone to fragmentation, which is the result of data being written to noncontiguous clusters, which can slow down the read/write process. FAT writes files to the first available cluster it can find, and then skips ahead past used clusters to complete writing a file. These clusters are broken down into sectors. FAT also keeps track of a few attributes for each file, such as the name of the file, the address of the starting sector, whether the file was deemed a system file, a read-only attribute, an archive bit (denoting if the file had been backed up or changed since the last time it was backup up), and a date for the file's creation or the last time the file was modified.
TIP:Because the overhead of using the FAT file system grows as partition size increases, it is advisable to not use FAT on partitions that are greater than 200 megabytes.
HPFS was introduced in 1990 as part of OS/2 Version 1.2. HPFS allowed for greater capacity of hard drives and instituted technologies that would help prevent the occurrence of fragmentation, such as using physical sectors instead of clusters, HPFS implemented a data structure called a B-Tree, which allows for directory searches to occur in a more logical manner, as opposed to FAT's linear structure. HPFS also implements physical separation between files giving each file room for expansion, which would then result in less chance of fragmentation. HPFS also introduced long filenames of up to 255 characters, along with other attributes, such as the same attributes kept by FAT, and an access control list (ACL).
Of course, HPFS was designed with OS/2 in mind and is currently the file system of choice for that operating system. At one point, when Microsoft and IBM were co-developing OS/2, another file system, HPFS386, was introduced that took advantage of the then new 386 processor and was available for use on Microsoft's LAN Manager product. HPFS386 is back again in the most recent version of OS/2.
NOTE:Previous versions of Microsoft Windows NT Server came with native support for HPFS. Microsoft Windows NT Server 4.0 does not come with a driver for HPFS, so the only way you can get NT support for HPFS is if you are upgrading from a previous version of NT (3.51 or below).
With the introduction of Windows NT in 1992, Microsoft took the advanced capabilities of HPFS and went many steps further. A major part of the security model that NT offers is based on the NTFS file system. While shared directories can be set up on an NT server regardless of the file system used, it is only with NTFS that individual files can be assigned permissions. These rights, which also includes rights to a directory, can be assigned permissions whether or not they are shared. Every attribute of the NTFS is kept as a file.
NTFS is the preferred file system for Windows NT because it allows for the use of all NT's security features. A system, however, can use all three of the available file systems at the same time. Of course, only the NTFS partitions will have the advantages. Usually HPFS partitions will be kept on a nondedicated NT server to allow for dual booting of both NT and OS/2. However, the access control lists associated with the data on the HPFS partitions will not be recognized by NT's implementation of HPFS. If the Server is a dedicated server, the existing HPFS partitions can be converted to NTFS using the CONVERT.EXE utility. The CONVERT.EXE utility is discussed later in this chapter in the section entitled Converting To NTFS.
NOTE:Incidentally, whenever Windows NT formats a floppy disk, it will format using FAT because the overhead of the NTFS file system would create too much extraneous, although important, information making the actual capacity of the floppy disk too small. Therefore, NTFS is not a supported format on floppy disks.
File descriptions on an NTFS volume are stored in a master file table (MFT), which is also a file. Besides the several records that contain data about the MFT itself, the MFT contains a record for each file and directory, and a log file. A mirror of the MFT is also kept, as well as pointers to the MFT and its mirror, which are stored in the boot sector of the disk. A copy of the boot sector is stored in the logical center of the disk. With this many copies of the MFT, data recovery becomes even easier. That is why NTFS is known as a "recoverable file system."
Figure 6.1 shows the general format of the Master File Table. The Master File Table contains pointers that refer to external continuations, which are referred to in this diagram as extents.
Figure 6.1
NTFS's Master File Table.
When a file is called for on a FAT partition, a pointer to a list of sectors is read. NTFS cuts out one of these steps by having the sector map contained within the MFT. In cases of small files, it is possible that only a single record in the MFT can contain all the information for that one file. Larger files require that extents are read, and directories will require that the B-tree structure is read. All in all, this makes for a very speedy file system.
When a partition is formatted as NTFS, numerous system files are created that keep track of certain attributes of that partition. These system files are documented in Table 6.1.
Table 6.1. NTFS system files.
| Filename | System File | Description |
|---|
| $Mft | Master File Table | The MFT |
| $MftMirr | Master File Table2 | The mirror copy of the MFT |
| $LogFile | Log File | A file activity log that can be used to help rebuild information in case of a failure |
| $Volume | Volume | The name of a volume, along with other volume information |
| $AttrDef | Attribute Definitions | A table of attribute names, numbers, and descriptions. |
| $. | Root Filename Index | The root directory |
| $Bitmap | Cluster Bitmap | A representation of the volume showing which allocation units are in use |
| $Boot | Boot File | If this partition is bootable, a bootstrap is included here |
| $BadClus | Bad Cluster File | Pointers to all the bad clusters on this volume |
The attributes of a file on an NTFS volume may contain all or some of the items listed in Table 6.2.
Table 6.2. NTFS file attributes.
| Standard Information | Includes time stamps, link count, and so on |
| Attribute List | Lists all other attributes in large files only |
| Filename | The long filename (up to 255 characters) and the MS-DOS compatible short filename |
| Security Descriptor | Contains permissions for the file, along with the owner's ID |
| Data | Various data attributes which may include unnamed attributes that are identified by keywords |
| Index Root | Required for directories |
| Index Allocation | Required for directories |
| Volume Information | The volume name and other information required by the volume system file |
| Bitmap | Pointers to records in use on the MFT or directory |
| Extended Attribute Information | Not used by NT, but contains data that can be used by OS/2 systems |
| Extended Attributes | Not used by NT, but contains data that can be used by OS/2 systems |
FAT is handled slightly differently under NT. While NT's FAT implementation is one hundred percent backward compatible, NT also adds features to the FAT file system. Long filenames are allowed for FAT partitions, and are handled the same way as long filenames on a Windows 95 system. That is, the generated 8.3 filename is stored along with the long filename. As with HPFS, FAT partitions can be converted to NTFS. See my discussion of the CONVERT.EXE utility, later in this chapter, to find out how to convert FAT to NTFS.
CAUTION:Any FAT partitions that use DOS-based disk compression (such as Stacker or DriveSpace) will not have readable files when running Windows NT. Only the "host drive" will be visible.
CAUTION:Special partitioning software designed for DOS will also not be recognized by Windows NT, therefore making the drive unreadable.
NOTE:One of the few reasons I have come across in support of keeping FAT partitions on a Windows NT Server is for certain DOS-based programs, such as Computer Associates' AccPac Plus, which has, at the time of this writing, not been certified to run on a Windows NT server. The support staff at Computer Associates does recommend that if it must be run from a Windows NT server, however, their data should be kept on a FAT partition. Other software manufacturers may have similar concerns about running their software on NTFS, so if you are running any older 16-bit software from your NT Server, you should inquire if the manufacturer supports running their software from NTFS.
Also, I have heard reports of benchmarks which show DOS-based programs running slower from network partitions that are formatted as NTFS, as opposed to running from FAT partitions. I might suggest that if you going to implement a DOS-based program from a Microsoft Windows NT Server, you may want to run your own benchmarks.
Better yet, migrate to all 32-bit Windows-based programs.
Long Filenames
Another reason to keep a partition as FAT is if it is necessary to dual boot to DOS on the server. When booting DOS on an NT server, only the FAT partitions will be recognized. Any long filenames that exist on the FAT partition will be seen with the standard 8.3 filename limitation. NT creates an 8.3 filename along with it's long filenames the same way that Windows 95 creates 8.3 filenames along with long filenames.
The 8.3 version of a long filename of, for example "My Report", would be MYREPO~1. Note that the imbedded space has been stripped out and only the first six characters of the filename have been used. The following tilde character and the number one have been added in case there was another filename that started with the same first six characters. If another long filename existed named "My Report For September," that file under DOS would be seen as MYREPO~2 and so on. Spaces are not the only characters that will be removed from a long filename. Any other special character that is not supported in 8.3 filenames will be replaced in the conversion by an underscore.
Because generating short filenames does create a certain amount of overhead on the server, you do have the option to disable this feature.
To disable short filename support, use the registration database editor, REGEDT32.EXE, and search the HKEY_LOCAL_MACHINE section for the entry HKEY_LOCAL_MACHINE\System\CurrentControlSet\Control\FileSystem. Change the value of the parameter NtfsDisable8dot3NameCreation to a value of 1 (one), and then short filename generation will be disabled.
NTFS uses the 16-bit Unicode character set, which contains many special characters as well as support for most international special characters. Because many of these characters are deemed illegal by DOS file naming standards, these characters are also stripped.
NTFS Filenaming Concerns
As I just mentioned, NTFS uses the 16-bit Unicode character set, which allows for the use of some special characters and includes both upper- and lowercase letters of the alphabet. Therefore, a filename of "My Document" will retain the uppercase characters in its name. NTFS, however, will not differentiate between files that use the same characters but with different cases. For instance, "my document" may coexist in the same directory as "My Document," but if you use Notepad to open the "My Document" file, the contents of "my document" will appear in Notepad. This anomaly can create havoc for some users, which is why it is important to standardize the way files are named.
NOTE:Interestingly enough, although NTFS can handle filenames of up to 255 characters, files created from the command line can only have filenames up to 253 characters.
The special characters that cannot appear in an NTFS filename are as follows:
? " / \ < > * | :
When copying files from NTFS to either HPFS or FAT using command-line utilities such as XCOPY and COPY, you may receive errors because those utilities can handle the long filename, but the receiving file system may "choke" on embedded spaces among other characters. To get around this, use the /N switch on those commands, and then the short filename will be used. For example, to copy the contents of directory C:\My Documents from an NTFS partition to the directory D:\DOCS which is located on a FAT partition, use the following syntax:
XCOPY "C:\My Documents\*.*" D:\DOCS /N
Special attention must also be used when creating shortcuts to programs using file associations. If a type of file is associated with a 16-bit program, and the long filename is being used, the 16-bit program will not know how to interpret the filename and not be able to load the file. This will not be a problem on a system that is running all Windows NT or Windows 95 compliant programs.
WARNING:Using any 16-bit program[md]such as the Windows 3.x File Manager or a DOS utility such as Norton Commander[md]to manipulate files that have long filenames will destroy the long filenames! If this is on an NTFS volume, all the security information will be eliminated as well! Only use 32-bit programs that support long filenames to move or copy files on an NTFS volume.
The Recoverable File System
Of course, the main purpose of file systems are to keep track of data stored on hard drives and to facilitate the reading and writing of this data. NTFS's recoverable file system is a great enhancement on FAT's careful-write file system and the lazy-write file system used by UNIX and FAT as implemented on Windows NT.
FAT's careful-write file system allows writes one at a time and alters its volume information after each write. This is a very secure form of writing. It is, however, also a very slow process.
The lazy-write file system uses a cache. All writes are performed to this cache and the file system intelligently waits for the appropriate time to perform all the writes to disk. This system gives the user faster access to the file system and prevents holdups due to slower disk access. It is also possible that if the same file is being modified more than once that it may never actually be written to disk until the modifications are finished within the cache. Of course, this can also lead to lost data if the system crashes and unwritten modifications are still held in the cache.
NTFS's recoverable file system provides the speed of a lazy-write file system along with recovery features. The recovery features come from a transaction log that keeps track of which writes to disk have been completed and which ones have not. In the recovery process this log can assure that after only a few moments after a reboot that the file system's integrity is back to one hundred percent without the need of running a utility such as CHKDSK, which requires the scanning of an entire volume. The overhead associated with this recoverable file system is less than the type used by the careful-write file system.
The recoverable file system can also ensure that an NTFS partition will always remain accessible, even if the partition is bootable and the bootstrap has been damaged. In this instance, you can boot from another drive, or boot from disks, and still have access to the formerly-bootable volume.
NTFS supports hot-fixing as well. Instead of FAT's notorious Abort, Retry, Fail? message, NTFS will attempt to move the data in a damaged cluster to a new location in a fashion that is transparent to the user. The damaged cluster is then marked as unusable. Unfortunately, it is possible that the moved data will be unusable anyhow, because the chance of corruption is very likely unless fault tolerance is enabled, and then the replicated data from the nondamaged cluster will be used in its place.
The way that NTFS processes file actions as transactions is the key to its high degree of recoverability. Each write request to an NTFS partition generates redo and undo information. The redo information tells NTFS how to recreate the intended write. The undo information tells NTFS how to rollback the transaction the event the transaction is incomplete or has an error. Once the write transaction is complete, NTFS generates a file update commit. Otherwise, NTFS uses the undo information in order to rollback the request.
The type of commit that NTFS performs is called a lazy commit. This is similar to a lazy write in the sense that it will cache these file commits and write them to the transaction log when system resources are high. This feature allows NTFS's high reliability features to have less overhead, overall, on the system.
In the case of system crash or unexpected shutdown of NT (such as someone accidentally powering off the server before a clean shutdown is performed), NTFS will perform a three pass system check upon restarting.
As with most transactional-type logs, checkpoints are created once all log transactions since the last checkpoint have been confirmed. Checkpoint creation occurs every few seconds. The first pass that NTFS makes after a system restart is called the analysis pass. In this pass, NTFS compares items in the transaction log, since the last checkpoint, to the clusters those transactions dealt with. A second pass, called the redo pass, performs all the transaction steps since the last checkpoint. The third pass, which is the undo pass, performs a rollback on any incomplete transactions.
NOTE:Whenever you start Windows NT, the NTFS volumes are checked to see whether they are "dirty." If it detects a potential problem, Windows NT will automatically run CHKDSK /F.
If the CHKDSK utility finds orphaned files or directories, they are moved to special directories which are named FOUNDnnn (if no other FOUNDnnn directories exist, the first one created will be FOUND000, the next is FOUND001, and so on). Directories are named DIRnnn.CHK, and if they have files associated with them, those files will be placed within that directory. Orphaned files are named FILEnnn.CHK.
If you want to run CHKDSK /F from the command line, run it from a drive other than the one you are checking. For example, to check the C: drive, from a D: prompt run CHKDSK C: /F. If you CHKDSK cannot get control of the drive because it is in use, it will ask you if it should run automatically the next time NT is booted.
Converting To NTFS
The CONVERT.EXE utility is a command-line utility that can convert HPFS and FAT partitions over to NTFS. It will not convert from NTFS, nor will it allow for the conversion of FAT to HPFS or vice versa.
The proper syntax for the CONVERT.EXE utility is CONVERT d: /fs:ntfs where d is the drive letter for the partition you are converting. You cannot convert the boot partition while it is active, so if the CONVERT command is attempted on the boot partition, an entry is written to the Registry that will initiate the conversion the next time the system is booted. Figure 6.2 depicts an actual conversion of a 300 megabyte FAT volume into an NTFS volume. For this size partition only 3K was needed for this conversion.
Figure 6.2
Converting FAT to NTFS using CONVERT.EXE.
TIP:Whenever possible, use NTFS as your file system. Its security and reliability is too good a thing to pass up. Also, the file compression for NTFS is another great advantage (see the next section for a discussion on NT's unique file compression).
If you are using a RISC-based system and wish to use NTFS , create a one megabyte FAT partition for the system files. The remaining space can then be formatted as NTFS.
CAUTION: Because RISC-processor-based machines require FAT on the boot partition, never run the CONVERT.EXE utility on these. If you do, the machine will no longer be bootable, and the program ARCINST.EXE, located on the NT CD-ROM, will be needed to run and reformat the boot partition.
NTFS File Compression
Available only to the NTFS file system on Windows NT is file-level compression. This form of compression is unlike the more familiar DOS-based programs, such as Stacker or DriveSpace.
These DOS device driver-based programs create one large file that contains all the files contained in the drive that you compressed. This single file is a mountable volume that a DOS device driver mounts as its own drive. This drive is then viewed as a standard DOS FAT volume.
Windows NT uses Explorer and the COMPACT.EXE utility to individually compress files. These compressed files are then decompressed in real time when the files are opened.
Windows NT's type of compression is much safer than the DOS method, as it is possible that a corrupted compressed volume on DOS could result in loss of the entire volume. As with all file compression techniques, there is a certain amount of overhead for the decompression and recompression of these files.
With Windows NT's compression scheme, each file is handled separately. Therefore, any corruption will only affect that one file.
Again, this compression is only available for partitions formatted as NTFS.
TIP: I personally use Windows NT's file compression and have not had any bad experiences or noticeable lags due to compression. I would advise the following:
- Feel free to use the compression for seldom-used files or archived data
- Large documents compress very well.
- Do not use file compression for files that are already compressed, such as JPEG format graphics or archive files such as PKZIP or ARJ files.
- Do not use compression on files that are part of a highly critical application (you never know).
- Back up. Back up. Back up. Whether there are compressed files or not, always keep a current backup.
Support For Removable Media
While Windows NT supports formatting removable media, such as Bernoulli drives, it requires that the system is rebooted in order to change media. It is recommended that the FAT file system is used to avoid this inconvenience. Of course, if the security of NTFS is required, this routine must be used.
Disk Administrator
During the installation of Windows NT, the option of creating, deleting, and formatting partitions is your first exposure to NT's file systems configuration. Windows NT's Disk Administrator utility is the primary utility for handling your physical and logical hard drives after the installation of NT.
Disk Administrator is only available to members of the Administrators group on the NT Server.
Disk Administrator is usually used when adding a new physical drive to the server. It can, however, also be used to modify existing drives and for implementing fault tolerance.
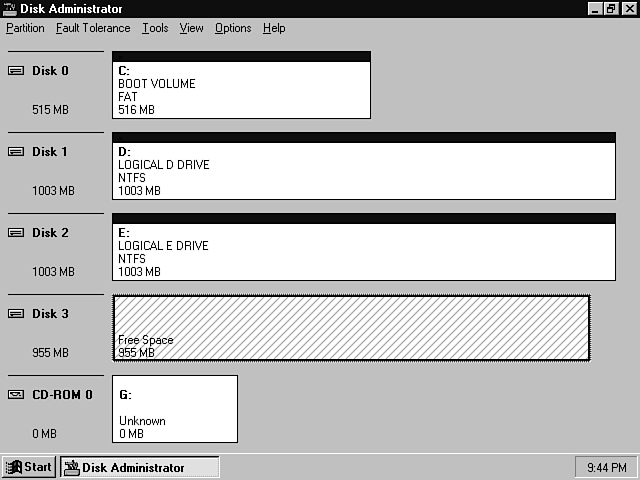
As seen in Figure 6.3, Disk Administrator shows a graphical representation of your physical hard drives and CD-ROM drives. You can see at a glance the different partitions and their size, the volume names, the file systems in use, the drive letter assignments, and the amount of free space that is available for creating new partitions.
For all intents and purposes, Disk Administrator is a graphical version of DOS's FDISK.
Figure 6.3
Disk Administrator.
Disk Administrator's menu choices give you the following options:
- Create a partition
- Create an extended partition
- Format a partition
- Change a partition's format
- Label a partition
- Delete a partition
- Mark a partition as active
- Select a drive letter
- Create a volume set
- Extend a volume set
- Establish a mirror set
- Break a mirror set
- Create a stripe set
- Create a stripe set with parity
- Regenerate a member from a missing or damaged stripe set with parity
- Save or Restore a Disk Configuration File
- View a partition's properties
- Check a partition for errors
- Choose a physical or logical view for Disk Administrator
- Customize Disk Administrator's toolbar
Fault tolerant choices will be explained in greater detail in Chapter 28, Fault-Tolerant Systems, so also refer to that chapter when using Disk Administrator to configure your hard drives.
NOTE:Whenever using Disk Administrator to alter disk information, you should run the RDISK.EXE utility, which is the program that creates your Emergency Repair Disk. This will create a new Emergency Repair Disk with the updated disk information.
Starting Disk Administrator
The Disk Administrator is started choosing Disk Administrator, which is located in the Administrative Tools program group on the Start Menu. You can also start Disk Administrator by executing the program WINDISK.EXE.
The first time you start Disk Administrator you will be prompted to allow Disk Administrator to write a nondestructive signature to each of your hard drives (Figure 6.4). This signature is written to an otherwise inaccessible part of the hard drive, and is used by Windows NT to identify if a change of hardware has occurred. You should choose OK on this dialog box, unless you are only using a temporary drive. This prompt will appear each time you add a new hard drive to your system.
Figure 6.4
Prompt to write a signature to the hard drives.
Configuring Disk Administrator
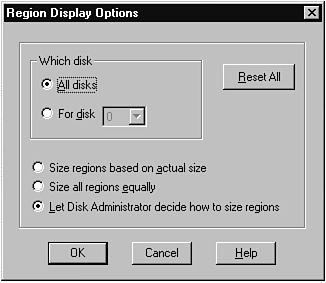
Disk Administrator uses visual cues to enable you to easily identify the size and type of partitions on your hard drives. Different colors and patterns are used as a legend to identify a primary partition, a logical drive, a stripe set, a mirror set, and a volume set. Free space is also identifiable by not having a color bar associated with it, but rather it just uses diagonal lines as a background. This legend is customizable by using and choosing Colors And Patterns from the Options menu. These options are shown in Figures 6.5 and 6.6.
Figure 6.5
Color options.
Figure 6.6
Region display options.
The Options menu also has choices for whether or not to show the status bar at the bottom of the Disk Administrator, and how to size the disk regions. Disk Administrator will size these regions in a fashion that is easier to read and identify. You have, however, the option to make the length of the individual bars, which represent the individual hard drives and the partitions or free spaces contained within, in a more proportionate manner (See Figure 6.7).
Figure 6.7
Disk display options.
In all cases, an active partition is identified by an asterisk in the upper-left corner of the color bar of the disk region.
Another configurable option for Disk Administrator's display is the capability to customize the Disk Administrator toolbar. The Customize Toolbar dialog (Figure 6.8) is shown when you choose Customize Toolbar from the Options menu.
Every menu item from Disk Administrator can be added as a button on the toolbar, which can make configuring your storage media even easier than hunting through the many menu items that Disk Administrator offers.
Figure 6.8
Customize toolbar dialog.
Changing The View
Besides the "bar chart" representation of hard drives, removable media, and CD-ROM drives, the View menu item enables you to switch to a grid-like listing of the different volumes that exist on the server (See Figure 6.9). This is done by choosing Volumes from the View menu. This listing ignores unpartitioned space and shows a logical view of the server's storage devices. You can switch back to a physical view of the storage media by choosing Disk Configuration from the View menu.
Figure 6.9
Volume View.
Working with Partitions
As with any operating system, there must be a way to manage your hard drive, or hard drives. The Disk Administrator gives you a graphical way to look at the partitioning schemes that you have implemented on these drives. It makes it that much easier to work with these partitions, or unpartitioned space, when being able to view the entire drive or set of drives.
Existing Partitions
In the case of a new server, where no partitions existed on the hard drives prior to the installation of Windows NT, there should be no problem for Disk Administrator to recognize all your server's partitions. However, if you are installing Windows NT on top of a hard drive that already has DOS or another operating system previously installed, there are cases where Windows NT will not be able to understand the existing partitioning of a disk. This happens when a partition table does not comply with the strict requirements that Windows NT enforces. When this occurs you must first boot from the operating system that created the disk partitions. Then, back up any information that you would like to retain from those partitions. Once completed, delete the partitions by using FDISK for DOS, or whatever utility is appropriate for that particular operating system.
To recreate the partitions, either use a recent version of MS-DOS, or you may use the Windows NT installation program if you have deleted the partition that contained Windows NT. Otherwise, you can boot Windows NT and use Disk Administrator to recreate the partitions.
CAUTION:Using an older PC as a server with today's large IDE hard drives usually causes problems with Windows NT because not all the cylinders of an IDE hard drive that is greater than 540 megabytes will be recognized by the setup program for the PC.
Working with large hard drives will be much easier if you either use SCSI hard drives with a supported SCSI controller or use a server that has built-in support for large IDE hard drives.
The latest version of On Track's Disk Manager does come with Windows NT drivers. However, this software implementation of cylinder translation should probably not be used on mission-critical servers due to its unnecessary overhead.
Creating A Partition
When creating a partition you need to first decide on the method that you want to use.
DOS allows for only two types of partitions. These are a primary partition that is usually used for the operating system, and an extended partition. Windows NT will allow for up to four partitions on a hard drive, one of which may be an extended partition. An extended partition can contain one or more logical partitions. If you create a primary partition that is formatted as FAT, DOS will be able to recognize this as a DOS drive. Any extended partition containing logical drives which are also formatted as FAT will also be recognized by DOS as valid drives. Nonextended partitions beyond the first FAT drive will not be recognized as a valid drive, nor will any partitions that are formatted as NTFS or HPFS. Be sure to keep this in mind if you are planning to dual-boot the server as both NT and DOS. Even FAT partitions may not be recognized by DOS if the partitioning scheme is not one that is DOS compliant (See Figure 6.10).
Figure 6.10
A message regarding the creation of a non-DOS compatible primary partition.
Usually drives will contain more than one non-DOS partition if you are planning to dual-boot NT and UNIX or OS/2.
To create a primary partition, select the hard drive by clicking on the representation of the drive that is noted as free space, as shown in Figure 6.11. Then choose Create from the Partition menu. A dialog will appear that will display both a minimum and a maximum number of megabytes that can be used for this partition. You will be prompted to enter the number of megabytes that you would like to use (See Figure 6.12). If this is the only partition that you would like on this drive, you may use the maximum. If you plan on also creating additional partitions, which may or may not include an extended partition, be sure to leave enough space for the other partitions you may create. After you finalize your decision, the new partition will appear on the graph. These changes will not take effect until the changes are committed, either by choosing the Partition menu item Commit Changes Now, or by exiting Disk Administrator and then confirming the changes. Once completed, you may create more partitions (space allowing). As soon as you create a nonextended partition, a drive letter is assigned to that partition.
Figure 6.11
Free space.
Figure 6.12
Creating a primary partition.
Formatting A Partition
After creating a partition and commiting the changes, the new partition may now be formatted, which is accomplished by selecting the new partition and then choosing Format from the Tools menu (See Figure 6.13). Choose the appropriate type of file system (note that the choices are NTFS and FAT in Figure 6.14) and click the OK button to start the format process. There is also a checkbox that enables you to choose whether to perform a quick format. This type of format will bypass checking the physical drive during the format process. It is recommended that you do not use this option unless you have recently formatted the same partition without incident. Before proceeding, a confirmation dialog box will appear for you to confirm that you wish to format the selected partition. While formatting, a status box, shown in Figure 6.15, will appear that lets you know how far along the formatting process is.
Figure 6.13
The Tools menu.
CAUTION: You may cancel the format from within this status box, but be aware that if the partition was formerly formatted, canceling this format will not restore the partition to its former state.
Figure 6.14
Formatting a partition.
Figure 6.15
The Format Status dialog.
NOTE: In Figure 6.15, the formatting that is taking place is a Quick Format. The Quick Format should only be used if you have already formatted that area of the hard drive before.
NOTE: During a normal format Windows NT performs an exhaustive check of the physical hard drive. By selecting Quick Format you bypass that check.
If the selected partition had been previously formatted, the Tools menu would instead show the choice Change Format, as shown in Figure 6.16.
Figure 6.16
The Tools menu, when a previously formatted partition is highlighted.
If you would like to change the drive letter that was automatically assigned by the operating system for the new partition, or for any other existing partition, select the partition and then choose Drive Letter from the Tools menu. A drop down box, shown in Figure 6.17, with a choice of unused drive letters will appear. Choose the drive letter you would like to use and click the OK button. That drive letter will be assigned to the selected partition instantly.
You can also use this option to change the drive letter that is assigned to CD-ROM drives as shown in Figure 6.18.
Figure 6.17
Changing a drive letter.
Figure 6.18
Changing a CD-ROM drive letter.
As with DOS, you may still use the FORMAT and LABEL command for formatting and labeling a volume.
With primary partitions, you can choose which of the primary partitions should be the active partition and which is the partition used as the boot volume. Usually the first partition on the first hard drive will be used as active partition, however in certain scenarios you may want to change this. It is possible to have two primary partitions as well.
An example of using two primary partitions is if you want to set up a second C: drive as a small partition contained on your first hard drive (drive 0) that is formatted with DOS, you can then have the option to reboot your PC to that partition instead of the current NT-bootable partition. This can be useful if you want to keep your NT partition formatted as NTFS, but still want the option to boot DOS.
After changing the active partition through Disk Administrator and restarting the server, you can use DOS, but you will not have access to your NT boot partition. When you want to go back to booting from the NT-bootable partition, use DOS's FDISK to make the non-DOS partition the active partition again.
Marking An Active Partition
An active partition is the primary partition that can be used to boot from. In most cases the active partition will be the first partition on the first hard drive. It is possible to have different operating systems installed on the same computer, however, and allow the computer to boot from different partitions.
A good example of why you would alter the active partition on your first hard drive is when you install Microsoft Windows NT Server onto a computer that already has the OS/2 Boot Manager installed. By default, Microsoft Windows NT Server marks the partition that contains the NT system files as active. Prior to the installation, the OS/2 Boot Manager partition had been marked as active. The only way to re-enable Boot Manager would be to use Disk Administrator. You would do this by highlighting the Boot Manager partition, and then click the Partition menu. Choose Mark Active from that menu, and you will get the confirmation message shown in Figure 6.19. The next time the system restarts, the Boot Manager will appear.
Figure 6.19
The mark active confirmation message.
Creating An Extended Partition
Creating an extended partition is similar to creating a primary partition except that you have the option afterwards to create logical partitions within the extended partition. To create an extended partition, select a free space on a hard drive that already has an existing primary partition. Next choose Create Extended from the Partition menu. You will be prompted for the size of this partition, as shown in Figure 6.20. Once entered, click the OK button to create the partition. Once completed, the extended partition will appear as free space, but the status bar at the bottom the screen will indicate that it is an extended partition. You may now create logical partitions within the extended partition.
Figure 6.20
Creating an extended partition.
Creating Logical Partitions
To create logical partitions within the extended partition, first choose the extended partition and then choose Create from the Partition menu. The same dialog box shown in Figure 6.21 will enable you to choose the size of the logical partition. The maximum size displayed is the amount of free space within the extended partition. After entering the size, click the OK button, and the logical partition will be created. As with primary partitions, a drive letter is instantly assigned.
Figure 6.21
Creating a logical partition.
Deleting Partitions
To delete a partition, select the partition you want to delete, and then choose Delete from the Partition menu.
CAUTION: Be sure to back up all the information on the partition before you proceed with the deletion.
As seen in Figure 6.22, when you attempt to delete a partition, a confirmation dialog appears that warns you about the loss of data that will occur. If you are sure that you want to continue, click the OK button, and the partition will then be shown as free space. As with all the options within Disk Administrator that permanently alter a hard drive's partition map, the final changes to the affected partition will not occur until you choose to commit these changes. The changes can be manually committed by choosing the Commit Changes Now menu item, or by committing the changes when exiting Disk Administrator. After committing the changes, Disk Administrator will warn you that the changes will be permanent (as shown in Figure 6.23). Choose the OK button to continue, or click the No button to cancel the changes.
Figure 6.22
Deleting a partition.
Figure 6.23
Committing changes.
Partition Properties
Disk Administrator enables you to check your partitions for errors. This option is available directly from the Tools menu (See Figure 6.24), and is also available from within the Properties option that is also on the Tools menu.
When selecting Properties from the Tools menu, you will be presented with a pie chart view of the partition. As shown in Figure 6.25, the amount of free space and used space are shown, as is the Volume Name, which can be changed directly from within the Properties box. Formatting is another option that can be done directly from this box, as is the Check Now option, which will inspect the partition for any damage, such as cross-linked files.
When selecting the Check Now option, you will be presented with a dialog box (see Figure 6.26) that gives you the choice to not fix file system errors automatically, fix file system errors, or perform a complete disk scan which will search for physical damage.
Figure 6.24
Choosing Check for Errors from the Tools menu.
Figure 6.25
Disk volume properties.
Figure 6.26
The Check for Errors dialog.
If you select a volume that is busy with a process, and it cannot be locked for inspection, you will receive a message (see Figure 6.27) that will ask you if you want to check the volume the next time the system is started. You can choose to allow this, or you can choose to cancel the Check Now option. If this is not the case the disk check will proceed. Once completed, you will be presented with a summary of event that occurred during the disk check (see Figure 6.28).
Figure 6.27
Disk Locked message.
Figure 6.28
Results from checking a disk for errors.
Disk Volumes
A Windows NT Server disk volume is comprised of one or more partitions on one or more hard drives that are formatted with a file system and can be assigned a drive letter.
With DOS, a volume was simply a partition on one hard drive, but with Windows NT Server, you can create different types of volumes that offer greater flexibility and fault tolerance.
Working with Volume Sets
A Volume Set is created by combining free space from one to thirty-two hard drives and creating a logical volume that is seen by the operating system as one partition. In reality, once the first segment of a volume set is used, the file system continues on the next segment of the volume set. One advantage of using a volume set is that you can save drive letters by combining areas on different hard drives, as opposed to assigning a drive letter to each individual area (partition). Disk I/O can also improve because it is possible that data from the same program is being read from multiple physical drives at the same time, instead of queuing instructions for one physical drive. You may also run across a partitioning scheme that ends up with small empty areas at the end of multiple hard drives. These can easily be combined to form one volume.
To create a volume set, select all the free areas you want to include in the volume set. Do this by clicking on the first area you wish to include. Then, hold down the Ctrl (Control) key and select the next area for inclusion. Continue this until all the free space areas that will comprise the volume set are selected. Next, choose Create Volume Set from the Partition menu. Just as shown in Figure 6.29, you will be prompted to enter the amount of disk space you would like to allocate to this volume. Clicking the OK button then creates the volume set.
Figure 6.29
Creating a Volume Set.
You can also extend a single NTFS partition by selecting an NTFS partition and also selecting free space. Choose Extend Volume Set from the Partition menu and then enter the number of megabytes from the free space that you would like to append onto the current NTFS partition, as seen in Figure 6.30. Click the OK button and the chosen free space will now appear as part of the NTFS volume. Note that the color bar on all the included partitions will now share the color that has been designated as signifying a volume set.
Also, you cannot extend the volume where Windows NT's system files reside. Attempting to do so will result in the message shown in Figure 6.31.
Figure 6.30
Extending a Volume Set.
Figure 6.31
Attempting to extend a volume with Windows NT system files.
You may delete a volume set by selecting any of the regions that are part of the volume set and then choosing Delete from the Partition menu.
CAUTION: Be sure to back up all the information on the volume set before you proceed with the deletion.
A confirmation dialog (see Figure 6.32) will then enable you to proceed or cancel the deletion.
Figure 6.32
Deleting a Volume Set.
Working with Mirrored Partitions
Mirroring enables you to create a mirror image of a partition on another drive. This form of fault tolerance is also known as RAID 1. Usually, you will want to mirror all the partitions on a server so that in case of a drive failure you are able to easily install a working drive that contains all the information that was on the faulty drive.
To mirror a partition, select the partition that you would like to mirror. Hold down the Ctrl (Control) key and click once on the free space that you would like to contain the mirror.
NOTE: The free space that you select for the mirror must be as large as, or larger than, the partition you wish to mirror.
Choose the Establish Mirror option from the Fault Tolerance menu, and a partition that is the same size as the original partition will be created. Both of these partitions will share the same drive letter.
As shown in Figure 6.33, when mirroring the boot partition you will be instructed to create a boot floppy that will be needed when replacing the mirror drive for the mirrored drive. This is discussed further in Chapter 28, Fault-Tolerant Systems.
Figure 6.33
Mirroring a boot partition.
After the mirror has been established, Disk Administrator will indicate that the mirror is in progress by a message on the status bar (see Figure 6.34). In addition, the color of the mirror partition's statistics will appear in red until the partition has finished initializing. Once initialized, the mirror partition is now a usable partition in case of an emergency.
Figure 6.34
Mirror initialization.
Figure 6.35 shows the entry that is written to the System Event Log once the mirror starts to initialize. Once the mirror has completed, the entry shown in Figure 6.36 will also be written to the System Event Log.
Figure 6.35
The System Event Log entry for the start of a mirror initialization.
Figure 6.36
The System Event Log entry for a completed mirror initialization.
Whether to reclaim disk space, remove a hard drive, or just to rearrange your partitions, you may find yourself in the position of needing to break a mirror. To break a mirror, select the partition you would like to no longer mirror (or select its mirror) and choose Break Mirror from the Fault Tolerance menu. As shown in Figure 6.37, you will first be warned that breaking the mirror will result in a two separate partitions. Once confirmed, the break will be established, and the former mirror partition will now have a new drive letter assigned to it, retaining the same data it had while it was part of the mirror set. In order to reclaim the space, you must now delete or reformat the partition.
Figure 6.37
Breaking a mirror.
In some cases, the mirrored volume will not be able to be broken while a system service is active that resides on that volume. This is due to inability for NT to lock the mirrored set while it is active. A message, shown in Figure 6.38, will let you choose whether to break the mirror the next time the system starts, or you can choose to cancel the breaking of the mirrored set.
Figure 6.38
A mirror set cannot be locked.
Once the mirror is broken, the next available drive letter will be given to the mirror partition (see Figure 6.39).
Figure 6.39
The result of a broken mirror.
Working with Stripe Sets
While offering no-fault tolerance, disk striping offers increased performance. Disk striping will evenly distribute a volume across multiple physical hard drives. This allows a read or write to a single volume to be broken up into separate instructions that can be executed at the same time without queuing. Using free space on each drive (from 2 to 32 hard drives) select the free space areas by clicking on the first free space region, and then hold down the Ctrl (Control) key and select the remaining free space regions you would like to include in the stripe set. This type of disk striping without parity is considered to be RAID 0. Disk striping with parity, which is RAID 5, is the preferred method because it offers both a performance increase and fault tolerance. Disk striping with parity is covered in detail in the Chapter 28, Fault-Tolerant Systems.
CAUTION: While a stripe set without parity is a cost efficient way to increase disk performance, the entire volume can be lost if any of the hard drives that contains part of the stripe set has a failure.
To create a stripe set, select Create Stripe Set from the Partition menu. You will be shown the minimum and the maximum size of the stripe set that can be created. If you want to use the maximum size, just click the OK button. Otherwise, alter the size first, and then click the OK button. Windows NT will then allocate the appropriate slices from the free space regions to build the stripe set. Once completed, these members of the stripe set will be identified by a color bar and background that symbolizes stripe sets (which is green for both by default). Exit Disk Administrator, and you will be prompted to shutdown and restart the server. After rebooting, your stripe set will be available for use.
NOTE: Because all the regions used for the stripe set must be the same size, the smallest free space region will determine the size of the stripe set volume.
To remove a stripe set, select one of the members of the stripe set. Select Delete from the Partition menu. After confirming that you want to removed the entire stripe set, those regions are then marked as available. Commit your changes to allow these sections to be reused.
CAUTION: Be sure to back up all the information on the stripe set before you proceed with the deletion.
Disk Striping with Parity
Of Windows NT Server's choices for a software RAID solution, disk striping with parity at RAID Level 5 is the most secure and robust form of disk fault tolerance available. A stripe is written across multiple hard drives, with a parity stripe interleaved within them.
An in-depth discussion of disk striping with parity is in Chapter 28, Fault-Tolerant Systems, but to quickly summarize this option, this form of disk striping is very similar to disk striping without parity, but it also involves one more hard drive. Data is written across two or more hard drives, while the another hard drive hold the parity information. This way, if one of the hard drives fail, the two remaining drives can recalculate the lost information and place this information back onto a newly installed working hard drive. This then brings the minimum number of hard drives involved in disk striping with parity to three, with a maximum number of 32 hard drives.
To create a stripe set, select Create Stripe Set with Parity from the Fault Tolerance menu. You will be shown the minimum and maximum size of the stripe set that can be created. If you want to use the maximum size, just click the OK button, otherwise alter the size first, and then click the OK button. Windows NT will then allocate the appropriate slices from the free space regions to build the stripe set with parity. Once completed, these members of the stripe set will be identified by a color bar and background that symbolizes stripe sets (which is green for both by default).
NOTE: Disk Administrator does not distinguish between a stripe set with parity and a stripe set without parity. Both of these stripe set will share the same color coding and background.
Exit Disk Administrator, and you will be prompted to shutdown and restart the server. After rebooting, your stripe set will be available for use.
NOTE: As with stripe set without parity, all the regions used for the stripe set must be the same size. Therefore, the smallest free space region will determine the size of stripe set volume.
To remove a stripe set, select one of the members of the stripe set. Select Delete from the Partition menu. After confirming that you want to remove the entire stripe set, those regions are then marked as available. Commit your changes to allow these sections to be reused.
CAUTION: Be sure to back up all the information on the stripe set before you proceed with the deletion.
Regenerating a Stripe Set
With a stripe set with parity, you have protection if there is a single hard drive failure. When this occurs and you replace the hard drive, one of the first tasks you should do is to regenerate the stripe set.
After installing your new hard drive and restarting Windows NT Server, the autocheck phase will determine that the stripe set has been broken, and the stripe set will be locked. To re-enable the stripe set you must start the Disk Administrator program and select one of the regions that belongs to the stripe set with parity. Once selected, hold down the Ctrl (Control) key and select the new empty region that you would like to replace with the missing stripe set partition. Next, select Regenerate from the Fault Tolerance menu, and the system will acknowledge the new member of the set. Exit Disk Administrator and restart the system to enable the stripe set again.
TIP: While Microsoft Windows NT Server's Fault Tolerance options are greatly useful, most of the time a hardware implementation of fault tolerance will be a better way to run your server. This is because the disk controller will take over and provide the necessary processes, leaving the CPU(s) to handle other tasks. Of course, this solution will cost you more, and in some cases, this is not an option.
Another reason to go with hardware fault tolerance is the newest breed of controllers that will allow you to increase storage on a RAID system without requiring re-initialization of the hard drives, thus enabling you to leave the server active while upgrading the disk space.
Saving Disk Configuration Information
Disk Administrator enables you to save and restore disk configuration information, such as drive letter assignments, stripe set, mirror, and volume set information.
You can save this information to a floppy disk by selecting Configuration from the Partition menu, then selecting Save from the submenu. You will be prompted to insert a floppy disk into the A: drive on the server. This information is very important to keep available, should you accidentally make changes in Disk Administrator from which you would like to revert. It can also be used if you have to reinstall Windows NT Server since reinstalling will reset your disk configuration information to it's default state. If you ever decide to perform fresh installation of Windows NT Server, this information could save you a lot of time in reconfiguring disk information.
To restore the information from disk, select Configuration from the Partition menu, and then select Restore from the submenu. You will be prompted to insert the disk configuration information disk into the A: drive on the server. After a confirmation the information is restored. You should then restart the system to allow all the disk configuration changes take effect.
Summary
Once you have determined the most appropriate file system configuration, you are ready to configure and implement the rest of your Microsoft Windows NT Server network.
It is no coincidence that using the NTFS file system on your server will give you the most flexibility in implementing security and fault tolerance.
Be careful using Disk Administrator. One wrong move and you'll wipe out a partition. Remember that it is practically the same as using DOS's FDISK; do be sure to make your plans in advance of making changes.
And do use the RDISK.EXE utility. If you do make a mistake and remove a partition by accident, you can restore a saved configuration. While you may have made your Emergency Repair Disk during installation, any changes made to your disk configuration should be updated on that disk, and using RDISK.EXE will keep that disk up-to-date.
And one last time I will remind you: backup your data!


