Apowersoft Screen Capture Pro : Effortlessly take screenshots and make recording of your desktop's windows or points of interest, edit and then share them on social networks with this app
Apowersoft Screen Capture Pro is a feature-rich application that packs numerous tools to help you record or take screenshots of your desktop that you upload directly to the major social network seamlessly.
Comes with a fresh and user-friendly GUI
The program comes with an intuitive interface that is organized as a dashboard, thus allowing to access the desired function conveniently and without too much effort. You should know that the app includes several tools that enable you to take specific types of snapshots, namely polygon, free hand, scroll window, region, menu, window, full screen and all in one.In case you are working on a tutorial for instance and require to use similar captures, then you will be happy to learn that the utility also includes a Repeat last capture function. The option is especially beneficial when you need to have an identical configuration for all images that you intend to add to your project.You can switch between the record and snapshot mode from the lower section of the main window or use a key combination for this purpose. The app also permits you to set your own hotkey for capturing or recording the desktop.
Includes advanced editing options and a Photo Boot
It is worth mentioning that the application constitutes a step up from Apowersoft Free Screen Capture, a free utility that comes with fewer tools and functions for recording or capturing the desktop. To be more precise, the Pro version includes advanced screen capture and editing options as well as a schedule function for taking screenshots.In addition, the utility includes a Photo Boot function that permits you to take screenshots from your webcam that you can edit, save or share similarly to the other images or video files. As far as the scheduler is concerned, you can configure the app to take snapshots automatically by specifying the start time, interval and stop triggers.
A powerful tool for anyone working with tutorials and demos
All in all, in case your job responsibilities entail creating tutorials, guides and demos that feature annotations and that you can seamlessly share on the social networks, then perhaps Apowersoft Screen Capture Pro might lend you a hand.
Capture Anything on Screen
Thanks to the user-friendly interface, you are able to quickly access the features included in this program. Be it quick snapshot or easy screen recording, Apowersoft Screen Capture Pro allows you to utilize all of these through the stunning and reliable interface.
Multiple capture modes
From fixed region to window, full-screen, there's a wide range of capture modes that you can take full advantage of. The captured images can be saved in various formats such as PNG, JPG, BMP, PDF, etc. While, videos can be saved in MP4, WMV, AVI, FLV and many other formats.
Different scenarios
There are different situations in which you want to take screenshots or make video recording. For example, you may want to capture a single window, web pages, webcams, or select the capture area on your own. This screen capture software provides you with the unique opportunity to do all of these and much more.
Simple and Advanced Image Editors
Upon creating a snapshot, this professional screenshot tool will help you do everything no matter you need to perform multiple modifications, add annotations or just bring some effects. Thanks to the instant editing sidebars and advanced editing panel, all edits can be done quickly without any hassle.
Annotate screenshot instantly
By using the quick editor of this screenshot software, you can annotate the snapshot with editing options on the horizontal toolbar. It can help you quickly add lines, text, arrows, highlight, blur and others to the captured image.
Professional image editor
This application is also equipped with a professional image editor with which users can do all the annotations that simple editor provides, and make other advanced edits such as cropping, resizing, rotating, or even adding effects like shadow, torn edge, etc.
Create schedule tasks
The screenshot scheduler gives you the best option in this regard. Just take a short while to configure the time for activating the snapshot, and then you can rest assured and leave the other things for the program. It can also be used to surveil your computer in the background.
Flexible settings for scheduler
Users won't find it hard to create scheduled screenshots as it provides flexible settings for customizing the specific time, internal, region and the output folder for taking snapshots automatically.
Schedule screenshots daily/weekly
For those who need to make scheduled snapshots on daily/weekly basis, you can also make use of this screenshot tool to do this trick. You can access this feature simply by enabling the daily trigger for making screenshots.
Upload and share images
Apowersoft Screen Capture Pro also comes with an integrated image uploading and social sharing function, so if you want to upload images to cloud space or share the images with friends, you will be able to work it out within a few clicks. The whole uploading and sharing process comes seamlessly in this screen capture software.
Free cloud space with security protection
Easy sharing to social networks like Facebook, Twitter, Google+ and Pinterest.
Auto-generated links including direct link, image link, HTML link and BB-code link.
Frequently Asked Questions
How to Screenshot WhatsApp
WhatsApp Messenger is one of the most popular messaging apps for smartphones. It enables you to make calls, send text/audio messages, images and videos to others by using the Internet instead of standard cellular mobile numbers. It receives more and more popularity year after year. In the use of this app, you may find that taking screenshot of it is one of most necessary tricks. Screenshots enables you to share funny conversations, save interesting images or tell others how to use one of its particular functions. Therefore, this article provides several ways on how to take screenshot in WhatsApp on iOS, Android, Windows and BlackBerry phones.
I. Snapshot WhatsApp on Android
II. Snapshot WhatsApp on iOS
III. Snapshot WhatsApp on Windows and BlackBerry
Screen Capture WhatsApp on Android
1. Make use of Apowersoft Screenshot
Apowersoft ScreenshotApowersoft Screenshot is one of the best apps you can use to take screenshot on Android. It is free and doesn’t require you to root your phone. It offers you two ways to take screenshot. One is pressing the “Power” + “Volume down/Home” buttons at the same time for two seconds and the other one is tapping on its overlay icon (for Android 5.0 and higher). In addition to taking screenshots, this app also provides image editing tools. You can crop and annotate the screenshot with lines, texts, arrows, mosaics, etc. What’s more, this app also gives you options to directly upload the screenshot to free cloud space provided by the developer or share it via other apps on your phone.
To screenshot WhatsApp with this app, just follow the steps below.
Firstly, download and install this app on your phone.
Open it and tap on the “Start” button on its starter interface.
Display WhatsApp contents that you want to capture on the screen.
Press the “Power” + “Volume down/Home” simultaneously for 2 seconds, or you can also just tap on the blue overlay icon if you’re using Android 5.0 or higher.
After that, the screenshot will be automatically loaded into the image editor of this app. You can edit the screenshot as you like.
Lastly, tap “Done” > “Save” on the top left to keep the screenshot on your phone. Alternatively, you can also choose to send it directly to other apps by tapping on the share icon on the top right.
2. Default Android Screenshot Key Combo
Of course, you can take screenshot of anything on any Android phones by pressing “Power” + “Volume down/Home” buttons at the same time. It is also applicable to WhatsApp. However, it has some shortages. For example, you have no annotation options which can help you mark up some important parts or cover private information on the screenshot.
Capture WhatsApp Screenshot on iPhone
To take screenshot of WhatsApp on iPhone, you just need to press the “Power” + “Home” buttons at the same time. There will be a shutter sound and a flash on the screen, indicating that a screenshot is successfully taken. Then you can check the screenshot in the “Screenshots” folder under “Photos” app. You can crop the screenshot with iPhone’s built-in image editing function. But if you need to cover some parts on the screenshot, you have to download another image editing app to do that.
IIIScreen Capture WhatsApp on Windows and BlackBerry
1. Windows Way: If you are using Windows 8.1 phones, then, you can take a screenshot of WhatsApp by pressing the “Power” + “Volume up” keys at the same time. You will also hear a shutter sound and you can find the screenshot in the “Screenshots” album in “Photos hub”. If you want more editing options, you can also get other apps like Phototastic Collage and Picture Perfect.
2. BlackBerry Way: On BlackBerry 10 devices, you can screenshot WhatsApp by pressing the “Volume up” + “Volume down” keys simultaneously. And you can find it in the “Recents” section under “Pictures” app.
But on BlackBerry Curve or Bold, you need to download a screenshot app in the first place. Among various screenshot apps for BlackBerry, Screen Muncher is the best. It has a classic munch sound effect and vibrate every time you capture a screenshot. Once it’s installed, display WhatsApp contents on the screen and press the BlackBerry menu button and tap on “Munch Screen” > “Save”. You can check the screenshot in “Pictures” > “Picture Folders” > “Screen Munches”.
How to Print Screen on a PC easily
Capturing the computer’s screen is essential these days, since it allows the users to collect materials to be inserted on some documents, provide supplement on a tutorial, or simply share screen with their friends or co-worker. The usual way to print screen on PC is by using the default print screen configuration with the “Print Screen key”. Just open something that you want to capture, then click the “Print Screen key” on the keyboard and paste it on a paint app to save the file. This method is easy to do, however, this function is limited to taking screenshot and it requires additional app to save the image on local disk. In this case it is better to take a look at some of the advisable ways to print screen on computer as this post continues.
Recommended Ways to print screen on PC
To take print screen on a PC, it is recommended to use a reliable application like Apowersoft Free Screen Capture. This is an online based screen capture program that is designed to take screenshots effectively. By using this program you can easily capture an image from a webpage, blog, program, video, or even a game play. Plus, this app has a built in image editor that can help you add annotations like lines, shapes, text, and highlight. And if you wish to share your captured screenshot to your friends online, you can do it so by using its sharing function.
Here are the simple steps in using this program:
Go to the webpage of Apowersoft Free Screen Capture and click “Launch Application”, and wait till the screen capture tool is launched.
After that, open something that you want to capture from your computer.
In order to take screenshot, simply click the camera icon, and a cross-hair will then appear.
Now drag the cross-hair along the portion to capture and release the mouse.
An image preview will then appear, along with a simple editor. From here you can add basic annotation.
To save the screenshot, click the diskette like icon to keep the image on local disk.
Aside from these, you can also use this application to copy screenshot on clipboard, or upload the captured screenshot on cloud storage. On the other hand, if you wish to capture screenshot offline, and then you can use its professional version which provides a bunch of interesting features like: 10 various capture modes, simple and advanced editor, a task scheduler, and a video recorder. To get this app simply hit the download button below.
Other alternative tools to print screen on PC
This is one of the common alternatives to take PC print screen, since it is easy and convenient to use. Snipping tool is a default utility that can be found on most Windows OS, which is capable of taking and saving screenshots. In using this tool, you will be given options whether you like to take a Free-form Snip, Rectangular Snip, Window Snip, and Full-screen Snip. Plus users also have an option to send the snipped image via email if they wish. To use this tool, simply go to Windows start menu and search for Snipping tool and open it.
Skitch: Another alternative that you can try is Skitch. This is a free tool that works on screen capturing, image editing, and sharing. Many users use this app since it has version for different platforms, such as Windows, OS X, Android, and iOS. By using this tool, users can capture different things on their computer like webpage, map, images, PDF. Plus they can add annotations afterwards to put emphasis on something or to simply give feedback and share ideas.
How to Take a Screenshot on Windows 10
The release of Windows 10 has brought a lot of changes in its displays and performances. Along with the new appearance, there are also some new and cool features. For example, you can now surf the Internet with its new browser Edge and record screen with its Game DVR. If you are willing to show things you’ve discovered on this new operating system, screenshots will be of great help. Also, if you need to ask for troubleshooting, show steps of using an application or collect images for articles about Windows 10, screenshots are always the best way for you. Therefore, this article gives you several methods on how to take screenshot on Windows 10.
1. Make use of Screenshot Tool
2. Use key combinations
3. Utilize Windows Bundled Utility
4. Use Microsoft Snip
Easy Ways to Screenshot on Windows 10
Apowersoft Free Screen Capture
This is a free online screenshot application. It is capable of capturing full screen, active window and particular region of the screen. It also provides a delay time option for capturing drop-down menus or tooltips, then you can set a delay time in its “Options”. Apart from taking screenshot, this tool also provides a quick image editor for you to annotate the screenshot with arrows, lines, and texts. You can also use its blur feature to cover private or sensitive info on the screenshot. What’s more, when the screenshot is done, this tool allows you to copy, save, email, upload or share it directly.
Follow the steps below to learn how to take a screenshot on Windows 10 with this tool.
Go to the page of this application. Click “Launch Application” button, run Java applet to load this application. Wait a few seconds until its interface pops up.
Display what you want to screenshot on the screen.
Click the screenshot tool and hit the camera icon on its interface. You mouse cursor will turn into a blue crosshair. Click, hold and drag your mouse to capture a region on the screen and then release the mouse to confirm it.
You will see blue frame around the captured region with two toolbars on two sides. Make use of the annotation tools on the horizontal bar.
Lastly, click the disk-like icon to save the screenshot on your PC. Alternatively, you can also copy it to the clipboard or upload it to the free cloud space provided by the developer by clicking the corresponsive buttons on the vertical bar.
This application has a pro version which comes with more than 10 screenshot modes, allowing you to capture not only visible things on the screen, but also the contents beyond the screen in a scrolling window. In addition to that, it also has a Task scheduler for you to take screenshots automatically and a Screen recorder for making screencasts by yourself. Try it now by clicking the button below.
Simple ways to take automatic screenshots
How can we know what happened on computers during our absence? This question is probably proposed by those people who often stare at screen to observe the stock trends or surveil the children’s browsing history on internet. For such needs, the best way is to take automatic screenshots on PC. By using the applications as reviewed in the sections below, you’re able to surveil or record the details of your daily work on screen.
Apowersoft Screen Capture Pro
Apowersoft Screen Capture Pro is a professional screenshot application which features various screenshot modes, amazing advanced image editor and quick social media sharing function. Aside from these basic functions, this application also supports a smart tool named Task Scheduler which enables you to create screenshot tasks. This Task Scheduler allows you to configure a portion to capture screenshots for it automatically. You may also set the start time, interval and region of screenshot. Follow the operation steps to make automatic screenshot as below.
Launch it then go to “Tools” > “Options” at the top of the interface to customize hotkeys, output image format and other screenshot settings.
Click the left option of “Task scheduler” on its interface.
Set screenshot trigger, time, interval and region for your task. Next click “Create” to validate the task.
once the task is activated, just let the program run in the background and it will capture screenshots according to your requests in terms of start time.
The advanced editor is also available in this application which allows you to blur, edit and add some annotations on the images. With this function, you can make the screenshot more expressive. Moreover, its built-in screen recorder and quick sharing utility are very nice.
How to Pin Screenshots to Computer Screen
You might find yourself in situations where you have to switch back and forth among the open applications/pages or view two windows side by side by resizing them into smaller windows on desktop for reference. No matter what situations you may come across, you can simply deal with this issue by utilizing Screen Capture Pro to pin screenshots on PC screen.
It’s a professional screenshot program specially designed for individuals and businesses, which offers nine capture modes including all in one, menu, scroll window, region, free hand and more. To better facilitate needs for users’ easy reference in daily life and work, a new version (V1.3.0) was released for users to pin screenshots to computer screen. Below is the simple instruction on how to use this newly added function.
Download the latest version from below and get it installed.
Run the application, then navigate to “Options” to configure screenshot hotkeys and other settings.
Press hotkeys or camera-like icon on the main interface to start capturing. Next, click and drag your mouse to customize desirable region, then release it.
Upon the creation of screenshot, you can click “Pin to Screen” or press “Ctrl+T” key combinations to access this feature.
Once the captured image is pinned to PC screen, you can right click on it to zoom in/out, topmost, copy, replace or edit screenshot.
Upon editing, you’re allowed to add highlight, text and different shapes or even blur/pixelate images.
“Quick Editor” is designed for instant editing when capturing, while “Advanced Editor” is for more professional editing after capturing. And please note that this feature is only accessible in “Quick Editor” which can be set in “Output”.
How to take and capture Screenshots on Surface Pro
If you’re one of the adopters of Microsoft Surface, you probably enjoy the superb experience brought by tablets and keyboards quite well. Microsoft released Surface Pro 2 on September 2013, which has big improvement in battery and performance. The system also upgrade to Windows 8.1, there are also some highlights like CPU upgrade and equipped with dual-position Kickstand. However, sometimes it turns out to be a hassle to take screenshots on Surface, but it’s also a necessity to take notes, share info with others, make presentations, etc. Although Surface Pro supports X86 software including screen capture, there problems come with them, especially when your have changed the desktop scaling to 100%.
In order to overcome such issues and limitations, here we introduce several other ways to take screenshot on Microsoft Surface.
The most reliable way of capturing screenshot on Surface Pro is by using an outstanding app called Screen Capture Pro. This is a well rounded application that enables you to take screenshot on various capture modes like: All in one, Full screen, Window, Menu, Region, Scroll window, Free hand, and Polygon. This app also has other interesting features like a video recorder, and quick launch function that includes Image editor, Webpage screenshot, and Upload image.
Here are the steps to capture screen with this program:
Download and install the app from the below link.
Once installed, open something that you want to capture on your Surface Pro, such as a picture, a video scene, etc.
Now, resume to Screen Capture Pro, select a certain capture mode that you want, and then hit the camera icon. (You need to drag the cross-hair along the portion to capture if you choose a mode that triggers the cross-hair).
After that, an image preview will be shown together with the image editor that you selected, there are simple and advanced editors.
You can edit your screenshot if you want, and then save it on your local disk or share it with your friends online.
How to Screenshot Skype on Multiple Platforms
Apowersoft Free Screen Capture is a small nifty application that can capture any image depicted on your desktop. It works with both Windows and Mac computer and you don’t need to install it just to start doing skype snapshot. The Apowersoft Free Screen Capture is a web-based application that comes absolutely free with no viruses, malwares or adware. What makes it different from other applications offering the same kind of service is that it features flexible screenshot modes from full screen, customized region, application window, delayed capture and many more. It equally comes with a built-in direct image editor where you can place texts, arrows, shapes or add additional images on the captured snapshot.
Using this tool to snapshot skype is very easy, all you need to do is:
Go to the webpage of this free screenshot tool, then lick the “Launch application” button and allow the java notification pop up.
When you’re ready to grab Skype stills, just press the camera icon or screenshot hotkey.
You can then save the captured image or edit it using the same software.
Press the diskette icon to save the Skype screenshot. You can also directly share it to your social networks or upload it to the free space provided by the developer.
This Tool also has a pro version which contains more functions, including 10 screenshot modes, a robust image editor with multiple annotation options and effects. You are able to screenshot in a delay time, too. What’s more, this pro version even allows you to record short video clips. Just click the button below to get all those benefits.
User Guide for Apowersoft Screen Capture Pro
How to Use Apowersoft Screen Capture Pro
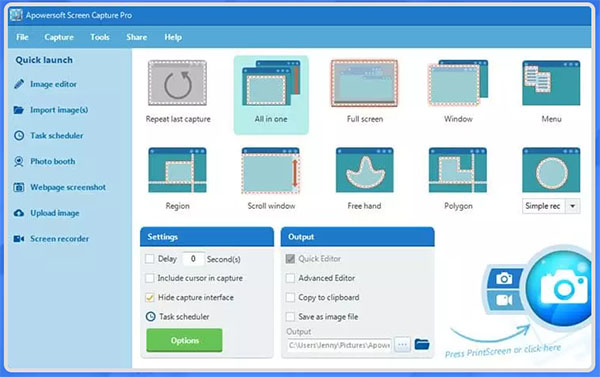
This screenshot software provides more than 10 capturing modes, including All-in-one, Full screen, Region, Window, Menu, Free hand, etc. You choose the desirable one based on your requirements.
All in one: this screenshot mode allows you to flexibly capture a region on the screen.
Full Screen: this mode enables you to snapshot the full screen with just one click.
Window: upon the selection of this mode, just move your mouse to the active window you desire to capture and then click the window to capture it.
Menu: this mode enables you to snapshot in 5-second delay as default. Therefore, you could have time to present the menu. The screenshot of the menu will be captured automatically after 5 seconds.
Region: this mode is for you to capture screen with a fixed region. Once, you’ve selected it, you can click your mouse to capture a screenshot. While you can also customize the width and height of the region by right clicking the mouse.
Scroll window: this mode is for capturing all contents in a scrolling window or webpage, even they are beyond the screen.
Free hand: Using free hand capture mode, you can create irregularly shaped screenshots as you wish.
Polygon: this mode is for capturing a special polygon area on your screen, just click the screen to set the first point, then continue setting other points according to your need, double-click to confirm the screenshot.
ii- Configure Settings
Before taking screenshot, you’re allowed to select the desirable output and configure other settings.
Choose Output Directory
As for the output, four possible outputs are available for you to choose from.
Quick editor – capture, annotate the screenshot and save/upload/share it within one interface.
Advanced editor – open the screenshot in its built-in image editor after capturing so that you can polish the images with more options, such as resize, rotate, effects, etc.
Copy to clipboard – directly copy the snapshot to the clipboard. Then you can paste it in other applications like Word, message programs and so on.
Save as image file – simply select the output folder and the screenshot will be automatically saved to the folder after you capture it.
Delay in Capture
Besides, you can also set a delay time in capture if needed. This feature is mainly for you to capture pop-up menus and tooltips.
Include Cursor
If you want to capture your mouse cursor, you can check the “Include cursor in capture” in the “Settings”. Then, press the hotkey “Print Screen” or “Ctrl + Q” to activate the screenshot. After that, the cursor will appear on the screen, and you can take a screenshot with the cursor in it.
Set DPI for Screenshots
This program allows you to customize the DPI for the screenshots. You can do it by going to “Tools” > “Options” > “Screenshot” and customize the DPI from 96 to 600. The higher the DPI is, the clearer the screenshot will be.
Once these settings are done, you can check the following part to start capturing.
iii- Start Making a Screenshot
Press the print screen key or click the camera icon in the bottom right of the interface, then your cursor will turn into a blue reticle. Then, click, hold and drag your mouse to select a region, and release the mouse to confirm the screenshot.
iv- Capture a Photo from Webcam
You can also take a photo from your webcam. Just click the “Photo booth” on the left “Quick launch” pane. A window will pop up, you can click “Take a photo” on the right bottom of this window to capture a picture from the webcam.
2- Screenshot Editing
Apowersoft Screen Capture Pro is of great help when it comes to editing screenshots. It integrates abundant options to polish screenshots easily. In order to access the Editor function, you can press the “Image editor” button located in the “Quick Launch” panel on the left. If you want to edit the screenshot in this editor immediately after capturing it, you need to select the “Advanced Editor” option on starter interface, then, capture a snapshot and the screenshot will be automatically presented in the advanced image editor.
i- Adjust the Screenshot
Once the editor is opened, you can see the image loaded in the large window portion located under the toolbar.
One of the first modifications that you might want to do is to resize it. Just press the “Home” menu, then select the “Resize” button. You can resize the image with a certain percentage or set a specific width and height for it depending on your needs.
To rotate the screenshot, you have to press the “Rotate” button and then select the direction which can be either clockwise or counterclockwise. You can also perform a horizontal and vertical flip.
In addition to screenshots, you can also open any images in this image editor. You can do that by pressing the “File” menu and then choosing “Open”. After that, select the image(s) that you want to edit.
ii- Add Annotations to Screenshot
With the options in the “Tools” section, you’re able to annotate your image with a variety of shapes, highlights and texts in different styles. You can also blur or pixelate some parts on the screenshot to cover private information.
If you want to add some step marks on the screenshot, you can use the “Step” function in the image editor. This option helps you add numbers on the image quickly. It also enables you to customize the style for the numbers, such as color, opacity, etc.
iii- Add Effects to Screenshot
The advanced editor comes with a variety of effects that you can add to your images. These include grayscale, invert, pixelate, torn edge, sharpen and many more. You can access them from the “Home” menu.
In the “Color” section you can select the color for arrows, lines, texts, etc. This also allows you to select colors from other images. This will help you get the exact color you want.
In the “Font” section, you’re able to select the desired fonts for texts. You can choose the size for the texts, italicize and underline them or set them in bold.
iv- Change Image View
From the “View” menu you have the opportunity to change the way you view all files you work on. By pressing the “Thumbnail” button, you will be able to view all the images within one interface so that you can easily select the one you want to edit.
In the “Show” section of the “View” menu you can zoom in or out of the image, or if you want you can view it in full-screen or its actual size by pressing the adjacent buttons. You have multiple predetermined zoom functions to choose from 25% to 800%.
When the editing process is completed, you can go to “File” menu and choose the “Save” function. This tool provides various formats for images, including JPG, BMP, PNG, GIF, TIFF and PDF.
From the “File” menu you can also perform a quick screenshot capture which will then be automatically integrated into the application for editing.
That is the guide for editing screenshots and images. Every function included within the program is very easy to perform, and by following the guideline, you will be able to know where to access each function and how to polish your screenshots and images.
Once you’ve done with the screenshot, you can choose to upload it to the free Cloud or share it to your social networks so that you can always get access to it as long as you are online.
i- Upload Your Screenshot
Click the “Upload” button.
After that, you will see an upload window for you to enter title and password (optional fields) for the screenshot. Users who need to protect the privacy of image can set a password, otherwise, just leave this field empty. Then just hit “OK” to go. The screenshot will be uploaded to the free space on screenshot.net.
upload window
Once it is uploaded, you will be directed to a web page with your screenshot on it. You will also see image links in different forms, letting you insert the screenshot in blogs and forums.
ii- Share Your Screenshot
Click the “Share” button on “Load & Save” column or under “File”. There will be five options for you to choose: Facebook, Twitter, Google +, Pinterest and Email. If you share it to your social networks, the screenshot will be uploaded to the Cloud first and then be delivered to the social networks via a link. If you want to email it, the screenshot will be directly sent as an attachment.
4- Create Schedule Task
Apowersoft Screen Capture Pro comes with a “Task scheduler” for taking screenshots automatically. You can access this function by clicking “Task scheduler” located in Quick launch pane on the left.
To create a task schedule, you need to give the task a name, set its start time, interval and stop manners. You can choose to capture full screen or a specific region. The output directory for storing screenshots is also customizable. After all the settings, just hit “Create” and “OK” to confirm the schedule. Screenshots will be taken automatically according to your schedule, you can find them by going to the directory you’ve set for them.
5- Screen Recording
Apowersoft Screen Capture Pro added another powerful function: Screen recorder. This option enables you to record anything on your screen as videos. You can access it by clicking the “Screen recorder” button on the “Quick launch” pane. Alternatively, you can also have a quick access to it by clicking on the recorder icon on the right bottom of the interface.
After that, you will be taken to the screen recorder interface. There are plenty of choices for you to make a perfect video.
a. Recording modes
This recorder allows you to record screen in different modes:
Region: this mode enables you to record any particular region on the screen.
Full Screen: this mode is for recording the entire screen.
Around mouse: this mode is for recording a specific region around the mouse.
Web camera: this mode is for you to record the web camera only.
Only audio: this mode records audio only. And there are different audio formats for you to choose: MP3, AAC, OGG, WAV, etc.
around mouse
b. Audio input
You can choose which audio to be recorded in the video:
None: record screen without any sound.
System sound: record sound from the computer.
Microphone: record sound from Microphone only.
System sound and microphone: record sound from both computer and microphone.
set audio source
You are able to do other advanced settings to meet some of your particular requirements. Click “Tools” on the interface, then choose “Options”, another window will then pop up. In this window, there are multiple recording settings for you to produce high-quality screencasts.
c. Video format
You are able to select a format for the video before recording. And there are various formats for you to choose: MP4, WMV, AVI, MOV, FLV, etc.
d. Mouse style settings
Mouse style is also available to change for the recording. Apowersoft Screen Capture Pro allows you to record screen with mouse cursor movements, and highlight the mouse clicks as well.
e. Others
You can also adjust the Codec, Bitrate and Frame rate for the screencast.
a. Choose a recording mode to start a video recording
For instance, if you choose “Region”, then your mouse cursor will turn into a crosshair. Click, hold and drag your mouse to select a recording area. Release your mouse to confirm it. A preview of the recording area will show up. You can also choose a resolution for the screencast on this interface. Lastly, click “OK” to go. After the countdown of 3, 2, 1, the recording begins.
b. Edit the screencast during recording
During the recording, you are able to annotate the video with lines, circles, arrows, texts by clicking the pen icon on the toolbar. These annotation additions will not affect the fluency of your video. If you are recording a movie, the frames of the movie will keep moving when you are adding annotations to the screen.
c. Move the recording area during recording
Apowersoft Screen Capture Pro allows you to move the recording region during recording. Just move your mouse the margin of the recording window. When the cursor turns into pointer with four arrows, click, hold and drag the recording window to the place you want to record into the video.
d. Save screencast
At last, to finish the screencast, just click the red stop button. The screencast will appear on the recording list and also be saved to your local disk automatically.
When a screencast is created, you can playback, rename, remove, delete or convert it as you like.
Apowersoft Product & Solution
Multimedia
ApowerEdit
ApowerCompress
ApowerShow
Streaming Audio Recorder
Video Converter Studio
Watermark Remover
Apowersoft GIF
Mobile
ApowerManager
ApowerMirror
iPhone/iPad Recorder
Android Recorder
ApowerRescue
Utility
ApowerREC
ApowerPDF
ApowerRecover
Screen Recorder Pro
Screen Capture Pro
PDF Converter
CAD Viewer
Online
Video Editor
File Compressor
Screen Recorder
Audio Recorder
Video Converter
HEIC Converter
Screen Capture
PDF Editor
Watermark Remover
Windows 10 64 bit / Windows 10 / Windows 8 64 bit / Windows 8 / Windows 7 64 bit / Windows 7 / Windows Vista 64 bit / Windows Vista / Windows XP
Apowersoft Screen Capture Pro runs on
Windows 10/11
and is available under the
Demo
license
— the installer is 22.1 MB.
We’ve catalogued it under
Graphics Editing and Painting.
Help fellow users decide. Share your experience with Apowersoft Screen Capture Pro.