Avery Wizard makes it easy to print on Avery laser or ink jet printer products from within Microsoft Word.
Overview
It prints text in the right place on Avery products and keeps text from printing off the top, bottom and side of labels. It offers an easy way to create reusable lists within Word. The program suggests the correct font and alignment for each product. You can make each label on a sheet different or create a sheet of identical labels. It makes mail merge easy by merging Access, dBASE, comma-delimited, Paradox, Excel, FoxPro and all other data formats supported by Microsoft Word. It supports most commonly used Avery laser and ink jet products; mailing and shipping labels; diskette labels; name badges and name tags; Index Maker (tm); file folder labels; and Ready Index (tm).
The Avery Wizard had a long and glorious career, but it is now retired.
If you use Office 365 or 2016, you can use the 'Avery Easy Merge Excel add-on'.
You can still design and print Avery products using Microsoft Word.
If you’re ready to try a new solution, you can find templates and easy formatting in 'Avery Design & Print Online'.
Avery Label Wizard : Your Microsoft Office Assistant
Avery have worked in partnership with Microsoft® for over 30 years to help you create the perfect labels.
The Avery Wizard for Microsoft® is a free plug-in that you can install inside your Office® package. When activated, you will be given step by step guidance on how to create address labels, business cards and more.
Avery Wizard works with Word, Excel, Access and Outlook and contains all of Avery’s printable product templates.
Avery® Wizard Software Features
-Easy Mail-Merge within Microsoft® Word
-Import lists from Microsoft® Excel and other databases
-Customise and print your Avery products within Microsoft® Office
System Requirements
Microsoft® Windows 8, 7, Vista® or XP
Microsoft® Office 2013, 2010, 2007, 2003 or XP (not compatible with Microsoft® Office Starter 2010)
40MB available disk space
If your system doesn't meet the requirements above, you can also find templates in Avery Design & Print Online.
Instructions for Download
Close all open Microsoft applications
Click on the “Download Wizard” link below
Choose to Run the download and follow the on-screen instructions
If you have difficulties downloading, restart your computer and follow this process again
Printing Tips
How to get perfect alignment, every time.
Printing is easy with free software from Avery. We have been developing template and software solutions for over 20 years and we offer various free tools to help you print:
Design & Print software which can be used on your computer, tablet or mobile phone and free downloadable templates for Microsoft Word.
- Be sure you are using a genuine Avery product. Non-Avery products are not optimised for our templates, and are not manufactured to our specifications.
- Open your print dialogue and check the following
Page size is set to A4 (Not US Letter Size)
Paper Type is set to Labels (or Heavyweight if Labels is not available)
Paper Source is set to Rear Tray or Manual Feed
Page Scaling is set to Actual Size (Not fit, or scale)
- Stop MS Word scaling your content
Tip for Microsoft Word template users
As well as ensuring you have checked your printer settings in Step Two, Word users also need to ensure they have changed their paper settings:
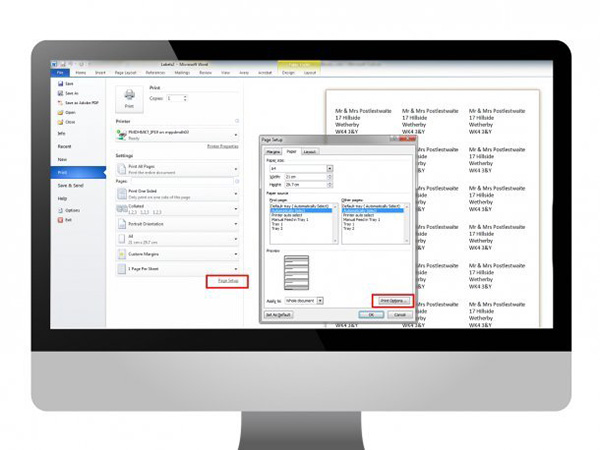
In the Main Print Screen Click on Page Setup at the bottom
Under the Paper Tab click Print Options
Select ADVANCED.
Scroll down to the PRINT section
Remove the tick from “Scale content for A4 or 8.5 x 11 sizes” and click Ok
- Test Print on Plain Paper
Before printing on your Avery product, we always recommend you perform a test print on a plain sheet of paper. Hold the printed sheet behind the Avery product to check the alignment of your layout. This is easier to see when held up against a window or a light. When satisfied with the layout, print on to the Avery product.
- How to Adjust your Margins Manually
Tip for users of Design & Print only. If your design does not print correctly on the plain paper then click on the Make a Printer Adjustment button (Step 4 Preview & Print menu) on the right hand side of the page. Review your test print to determine which direction you need to move your project. Now use the controls to shift your project’s alignment left, right, up or down. Test again on plain paper and return to this step if it’s still not quite right.
How to use Avery Design & Print
Design & Print is Avery’s free software that contains all our printable products’ templates. With inspiring template designs and creative tools, you will be able to edit our designs or create your own from scratch. Whether you need to address an envelope, organise your office, produce a business card or brand your products, Avery Design & Print can help you make them look great, without the need for an external agency or expensive design programme.
-Open Design & Print: Avery believe the best way to print on our products is to use Avery Design & Print Online, as this is always the most up-to-date version of our software.
To access it, go to www.avery. Co. uk print and click the blue Start button to open.
- Find your Avery product: The fastest way to select a product is to enter your product's software code in the Quick Search box. You can also search by product description, click on the column headings to sort by size, product description, colour or layout.
Click the green Select this Product button to move forward.
- Choose your template design: On the Choose Design tab, you will find the blank and pre-designed templates available for your chosen Avery product. You can narrow your choice by selecting a design category from the list on the left.
Click on the design you’d like to customise and a green Select this design button will appear. Click that template again to continue.
- Navigator tool: You are now on the Customise Screen, where you can edit and personalise your product. At the top right of this screen is our Navigator tool, where you can Edit All the labels on your sheet at once or make changes to individual labels using Edit One.
It’s best to first make your design changes to the entire page at once using Edit All, then switch to Edit One for individual changes.
Please review VERY carefully if you have switched back and forth between Edit One and Edit All.
- Add and edit text and images: On the left hand side of the screen are your item tools. This is where you can choose to add text, images or other objects to your design.
When you select a tool an additional set of options will appear. There will be different options, depending if you select Text, Image or Shape.
This tool bar is also where you can perform more complex actions such as create a mail merge, generate barcodes or add sequential numbers.
- Save your design: You can save your project at any time using the Save button at the top of the Customise and Preview & Print screens.
Select Avery Account to save the project within Design & Print. Projects saved in Avery Accounts can be accessed from any computer with internet access.
Select My Computer to save the project to your computer. Projects will save as a .avery file and can only be opened using Design & Print Online or our Desktop app.
- Print your labels: When you have finished formatting your design, click the green Preview & Print button at the bottom of the Customise screen.
Before printing, open your print dialogue and check the following
Page size is set to A4 (Not US Letter Size)
Paper Type is set to Labels (or Heavyweight if Labels is not available)
Paper Source is set to Rear Tray or Manual Feed
Page Scaling is set to Actual Size (Not fit, or scale)
Frequently Asked Questions
How do I find a template in Avery Design & Print Online?
The fastest way to find a template is to go to avery.com/templates and type your Avery product number or template number into the white Search Bar at the top center of the page. (Your product and template number can be found on the bottom right of your Avery packaging.) You can also search by product category if you don't have your product number handy.
Many Avery products have similar layouts but are different sizes, so it's important to use the correct template for your product. It's also important to be sure you're using the correct product type for your printer. (Inkjet-only products should only be used in inkjet printers, and laser-only products in laser printers).
How do I find an Avery template built in to Microsoft Word?
If you have Word 2007 or a newer version, follow the instructions below to find Avery templates built in to Microsoft® Word. Older versions of Word are slightly different.
With your Word document open, go to the top of screen and click Mailings > Labels > Options. (In older versions of Word, the Options setting is located in Tools at the top of the page.)
Select Avery US Letter from the drop-down menu next to Label Vendors. Then scroll to find your Avery product number and click OK.
If you want all your labels to have the same information, type it into the address box and click New Document. If you want different information on each label, click New Document and then proceed to fill in your labels.
If your template looks like a blank page, select Layout > View Gridlines to see the template layout.
If your product number isn't built in to your software, you can download the template instead.
How do I type a different address on each label using Avery Design & Print?
Once you've opened your template and are on the Customize screen, find the Navigator located in the upper right corner. Click on the Edit All tab and make all your formatting, font style and size changes. Then switch to the Edit One tab and click on the individual item you want to edit. That item will appear on your screen for editing. Once you've made changes to that item, click on the next item you want to edit and repeat.
After you've made changes to individual items, if you switch back to the Edit All tab, any changes you make won't apply to those individual items.
How do I import data from a spreadsheet (mail merge) into Avery Design & Print?
You can easily import data from a spreadsheet to create address labels, name badges, inventory labels and more.
First, make sure your data is arranged in columns on your spreadsheet (one column for names, one for addresses, etc.). Be sure this information is on Sheet 1 of your spreadsheet.
Make sure your data is arranged in columns on your spreadsheet
Second, open your project in Avery Design & Print Online. Click Import Data on the left of the Customize screen. Then click Browse to find your Excel or CSV file. When your data is displayed, you can deselect any rows you don’t want printed, such as the header row.
Then import / edit / save your data from a spread sheet.
Click Next and then double-click or drag and drop data from the Available Fields on the left to the Arrange Fields box on the right, which represents the text box of your item. (You'll be able to format your text in a later step.) Once you’re done arranging your fields, click Next and then click Finish. This will return you to the Customize screen where you can make formatting changes.
Any changes you make will appear on all items unless you switch to the Edit One tab in the Navigator on the right side. A good idea is to make your formatting changes first using Edit All, then switch to Edit One to personalize text and images on individual items. Once you make changes to individual items, they won't be affected by future Edit All changes
How do I import data from a spreadsheet (mail merge) using Microsoft® Word for Windows?
You can easily import data from a spreadsheet to create address labels, name badges, inventory labels and more.
First, make sure your data is arranged in columns on your spreadsheet (one column for names, one for addresses, etc). Be sure this information is on Sheet 1 of your spreadsheet.
Make sure your data is arranged in columns on your spreadsheet
In Microsoft® Word click on the Mailings tab at the top of the screen. Click Start Mail Merge, then Step by Step Mail Merge Wizard.
Click on Labels and then click on Next:Starting document.
In the Label Options window, make sure that:
Printer Information is set to Page Printers
Tray is set to the Default Tray
Label Vendor is set to Avery US Letter
Then click on your product number and click on OK. Then click on Next:Select Recipients.
Then click on your product number and click on OK
Choose the option to use an existing list and click on Browse. Once you find and open your database file a window will appear asking to select a table. Leave Sheet 1 and click on OK.
Now you should be able to view your Mail Merge Recipients. Scroll through the options to make sure the data is correct and click on OK. Then at the bottom click on Next:Arrange your labels.
Click on More Items and it should open a new window for Insert Merge Field. This is where you will choose which of your columns are merged and in what order. Click on each field and then click on Insert one at a time. For example, here we will need to click on First Name and then click Insert, then click on Last Name and then Insert, and so on. Once every field is added, click on Close.
Insert Merge Field
In the first label, you can click between each field to add spaces, line breaks, or any other characters. For example, we've added spaces between each field, moved the addresses to another line, and a comma between the City and State. Then click on Update All Labels to apply these changes to the entire sheet. You can then click on Next: Preview Your Labels to move to the next step.
Update All Labels
On this step you can preview the first sheet. If there are any other spaces, line breaks, or characters you need to add you can click on Previous: Arrange Your Labels to go back to the previous step and make adjustments. If everything looks correct then you can click on Next: Complete The Merge.
Click on Edit Individual Labels to open the Merge to New Document window. Then make sure that All is selected and click on OK. This should then create the fully merged document.
Can I print an Avery laser product with an inkjet printer or an inkjet product with a laser printer?
Most Avery products are optimized for printing on either laser or inkjet printers. We always recommend you use the Avery product designed for your printer type as shown on the product packaging. If you switch printers frequently, some of our products, including our EcoFriendly line, support printing on both inkjet and laser printers.
How do I get the printing to align properly on the page?
Be sure you are using a genuine Avery product – non-Avery products are not optimized for our templates, and are not manufactured to our specifications.
Test print. Print first on a sheet of plain paper to determine which direction to feed in your printer and to check your design and alignment.
Print actual size (100%) – Never “Fit to Page.” If you’re printing a PDF, make sure the “Fit to Page” box is not checked. Otherwise, your printing will not be printed at the actual size and won’t align properly to the product.
Printer settings. After you click Print, click on Properties or Preferences, or look for the “Print using system dialog” option where you’ll find Paper options.
For laser printer labels - change the Paper Type to "Labels"
For cards - choose "Heavyweight" or "Cardstock."
If your printer doesn't have a Labels setting under Paper Type, choose "Heavyweight" or "Cardstock" instead.
Print adjustment. If your printer is shifting your design by a consistent amount of space, click the Make a Print Adjustment button in Step 4 (Preview & Print) in Avery Design & Print. This tool will allow you to nudge your entire design up, down, left or right by increments you determine. In Microsoft® Word, you can use the Ruler feature to adjust the placement of the rows and columns.
Avery Wizard runs on
Windows 10/11
and is available under the
Freeware
license
— the installer is 27 MB.
We’ve catalogued it under
Business Cards.
Help fellow users decide. Share your experience with Avery Wizard.
