|
Appendix B
Installing Visual
InterDev
This appendix provides a general overview on how to install Visual InterDev. The
steps guide you through the process of installing the most common configuration of
Visual InterDev--Windows 95 on the client and Windows NT on the server. The concepts
described in this appendix can be applied to variations of the basic configurations.
NOTE: If you have been participating in
the public or private beta programs for Visual InterDev, Microsoft recommends that
you remove all of the beta components before installing the commercial release of
Visual InterDev.
Installing the Client Components
This section covers the installation of the Visual InterDev client components,
which include the following:
NOTE: The instructions for the client
and server installation of Visual InterDev are based on Release Candidate 2 of the
product. While the process should be the same for the commercial version, there may
be slight variations.
Installing the Microsoft Visual
InterDev Client
The following steps guide you through the process of installing the Visual InterDev
client:
- 1. Begin the setup program for Visual InterDev by double-clicking the
setup.exe program.
2. Select Visual InterDev Client under the Client Components list.
3. Click Continue on the Visual InterDev welcome screen.
4. Enter your name and organization and click OK.
5. Enter the 10-digit CD key for the product and click OK.
6. Write down the product ID number for future reference and click OK.
7. Read the license agreement and click I Agree.
8. Review the installation choices. The available options include Typical, Custom,
and Compact. Choose the directory folder in which you want to install the product
and click Custom installation.
9. Select the options that you want to install from the list displayed in Figure
B.1.
Figure B.1.
Visual InterDev client options.
The ODBC components include drivers for SQL Server and Oracle as well as the
ODBC driver manager and components. The sample applications include valuable web
site samples that you can reference. You probably will want to select the guides Online
option as well as the samples depending on the available disk space on your computer.
NOTE: You can select an item and click
the Change Option button to select the items to include for an installation option.
This feature is valuable when you want to perform a partial install for a certain
feature.
- 10. Click Continue and the product is installed in the designated directory
folder.
Installing the Image Composer
The following steps guide you through the process of installing the Image Composer:
- 1. Begin the setup program for Visual InterDev by double-clicking the
setup.exe program.
2. Select Image Composer 1.0 under the Client Components list.
3. Click Continue on the Image Composer welcome screen.
4. Enter your name and organization and click OK.
5. Enter the 10-digit CD key for the product and click OK.
6. Write down the product ID number for future reference and click OK.
7. Read the license agreement and click I Agree.
8. Review the installation choices. The available options include Typical Install,
Complete/Custom Install, and Compact Install. Choose the directory folder in which
you want to install the product and click Complete/Custom installation.
9. Select the options that you want to install from the list displayed in Figure
B.2.
10. Select all of the options except for the Photo Samples and click Continue.
NOTE: Unless you have an inordinate amount
of disk space, you shouldn't install the Photo Samples files located on the CD. You
can easily access these files from the CD when you need to integrate them into your
web pages and image files.
- 11. Choose a program group for the application and click Continue. The
product is then installed in the specified directory folder.
Figure B.2.
Image Composer options.
Installing the Media Manager
The following steps guide you through the process of installing the Media Manager:
- 1. Begin the setup program for Visual InterDev by double-clicking the
setup.exe program.
2. Select Media Manager 1.0 under the Client Components list.
3. Click Continue on the Media Manager welcome screen.
4. Enter your name and organization and click OK.
5. Enter the 10-digit CD key for the product and click OK.
6. Write down the product ID number for future reference and click OK.
7. Read the license agreement and click I Agree.
8. Confirm the directory folder for the application and click OK.
9. Read the license agreement and click I Agree.
10. Choose Complete installation.
11. Choose the workgroup database for sharing media files among developers and
the product files are copied to your machine. Figure B.3 displays the available options
for this feature.
Figure B.3.
Media Manager options.
NOTE: For the initial installation of
the Media Manager, you should select the Create Default Annotations Database option.
- 12. You need to choose the Restart Windows option to complete the installation.
Installing the Music Producer
The following steps guide you through the process of installing the Music Producer:
- 1. Begin the setup program for Visual InterDev by double-clicking the
setup.exe program.
2. Select Music Producer 1.0 under the Client Components list.
3. Click Continue on the Music Producer welcome screen.
4. Enter your name and organization and click OK.
5. Enter the 10-digit CD key for the product and click OK.
6. Write down the product ID number for future reference and click OK.
7. Read the license agreement and click I Agree.
8. Review the installation choices. The available options include Typical Install
and Custom Install. Choose the directory folder in which you want to install the
product and click Custom installation.
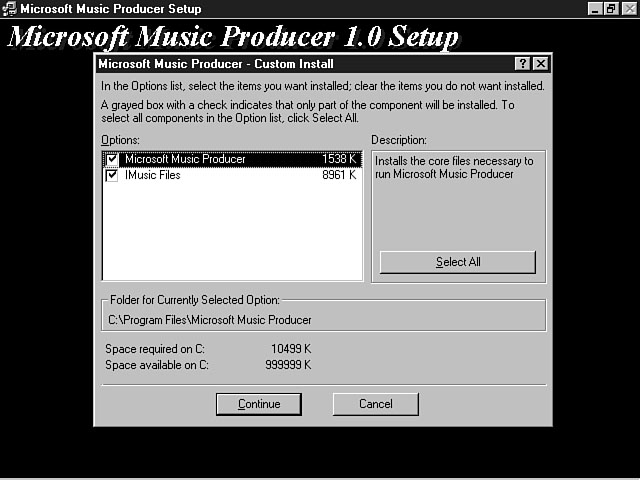
9. Select the options that you want to install from the list displayed in Figure
B.4.
Figure B.4.
Music Producer options.
- 10. Select all of the options and click Continue.
11 Choose a program group for the application and click Continue. The product
is then installed in the specified directory folder.
Installing the Server Components
This section covers the installation of the Visual InterDev client components,
which include the following:
NOTE: The instructions for this section
are based on a Windows NT Server installation. You also can choose to install the
Personal Web Server for Windows 95. This option should be used for standalone Windows
95 development. You would typically select this option if you wanted to develop your
application on a single Windows 95 machine and then deploy the application on a more
robust server environment such as Windows NT. Refer to the lesson on Chapter 3, "Design
and Development Considerations," for more information about the strengths and
weaknesses of these platforms.
Installing the Active Server Pages
The following steps guide you through the process of installing the Active Server
Pages:
- 1. Begin the setup program for Visual InterDev by double-clicking the
setup.exe program.
2. Select Active Server Pages from the Server Components list.
3. Read the license agreement and click I Agree.
4. Click the Next button on the welcome screen for the Active Server Pages Wizard.
NOTE: If you're running any Internet services
during the installation, the setup program prompts you to temporarily stop the services
and proceed with the installation.
- 5. Click OK to stop the Internet services and continue with the installation.
6. Select all of the options and Click the Next button.
7. Confirm the directory folder for the installation and click the Next button
to install the Active Server Pages.
8. The setup program gives you the opportunity to install the Windows NT Service
Pack 1 from the Visual InterDev CD. Your NT installation must contain Service Pack
1 or higher. If you need to install the service pack, click Yes to proceed with this
installation.
Installing the FrontPage Server
Extensions
The following steps guide you through the process of installing the FrontPage
Server Extensions:
- 1. Begin the setup program for Visual InterDev by double-clicking the
setup.exe program.
2. Select FrontPage Server Extensions from the Server Components list.
3. Click the Next button on the welcome screen for the FrontPage Server Extensions
Wizard.
4. Read the license agreement and click I Agree.
5. Confirm the directory folder for the installation and click the Next button.
6. Select the web server from the list and click the Next button.
7. Confirm the settings and click Next to install the FrontPage Server Extensions.
NOTE: If you're running any Internet services
during the installation, the setup program prompts you to temporarily stop the services
and proceed with the installation.
- 8. Click OK to stop the Internet services and continue with the installation.
The extensions are installed in the designated directory folder.
|


 MS Access
1109
MS Access
1109
 C++
1222
C++
1222
 HTML
584
HTML
584
 JavaScript
616
JavaScript
616
 Vbscript
873
Vbscript
873
 Oracle
473
Oracle
473
 VC++
875
VC++
875
 SQL
2959
SQL
2959
 XML
514
XML
514
 Java
814
Java
814
 Perl
455
Perl
455
 Linux
451
Linux
451


