|
Chapter 11
Extending Your Application
Through Active Server Script
A key design goal of Visual InterDev is to provide a tool that facilitates the
construction of dynamic, Web-based applications. Visual InterDev accomplishes this
objective through the use of Active Server Pages.
During the last few Chapters, you have learned about server side topics such as integrating
a database into your application. This lesson continues with that theme and introduces
you to another component that resides on the server: Active Server Pages. Active
Server Pages enable you to combine HTML and script code on the server to build dynamic
and highly interactive web pages. On Chapter 7, "Extending Your Web Page Through
Client-Side Script," you learned about the use of scripting languages within
the context of the browser on the client machine. For toChapter's lesson, you will learn
how to apply the power of script code on the server.
First, you receive a brief introduction to making the server an active part of
your Web-based application. Next, you will discover what makes Active Server Pages
so dynamic and powerful. The lesson provides a closer look at the client-server picture.
In exploring the conceptual architecture for a Web-based application, the lesson
explains how Active Server Pages fit into the big picture, helping you understand
how to use Active Server Pages within the scope of your application. At the end of
the Chapter, you will create your first Active Server Page.
Throughout the Chapter, I will provide examples of Active Server Pages and dissect
the meaning of the code. You learned during the first week that Active Server Pages
support the use of scripting languages such as VBScript and JScript. VBScript code
examples are used throughout the lesson. The principles that you will learn, though,
apply to either scripting language.
Making the Server Come Alive
The Web has been transformed into a place of interaction. Users don't just want
to browse a web page; they want to experience a web site. Using the server to provide
this exciting experience for your users is a very important concept to master. Active
Server Pages enable you to easily integrate server-side logic into your application.
You may have used CGI or APIs in the past to provide this logic. With both of these
methods, you have to create an executable program on the server that involves a development
process different from your web page development.
Active Server Pages add an intriguing alternative to your choices for server-side
development. You can design and develop Active Server Pages in a way similar to the
process that you use for your web page development. Active Server Pages consist of
HTML and script that reside on the server. The same popular scripting languages that
you use on the client, including VBScript and JScript, are supported by Active Server
Pages. The main benefit is that you can leverage the investment you make learning
HTML and a scripting language on the client to your development for the server.
What Makes Active Server Pages So
Dynamic?
Active Server Pages can be used as the main hub to control your server activity.
You can code application-specific logic directly into an Active Server Page. This
logic could be HTML as well as script code that changes the format of your web pages.
Within an Active Server Page you also can include ActiveX and Design-time ActiveX
controls that are built specifically to execute on the server. Active Server Pages
can be integrated with Active Server Components to provide robust application processing
on the server. For example, you could build an Active Server Component with Visual
Basic or Visual C++ that processes financial data and then returns the results through
the Active Server Page. You also can place your database connections in Active Server
Pages.
The development paradigm for Active Server Pages differs slightly from programming
script on the client. If you remember from the lesson on client-side script during
the first week, the script that you develop for the client is embedded within the
web page that is sent to the brow-ser. This script is then executed by the browser
based on system and user events. The browser must support the use of the particular
scripting language to execute the code. If the browser doesn't recognize the script
language, it will ignore the code. With Active Server Pages, all of the script is
processed on the server by the ActiveX Server scripting engine. The results are returned
to the client in a standard HTML format that is universally recognized by the browser.
Taking a Closer Look at the Process
This section explores how a browser interacts with an Active Server Page. First,
the web page references an Active Server Page (ASP) within the context of the application.
Active Server Pages contain the file name extension of .asp. The following line of
code demonstrates an example of calling an Active Server Page:
<FORM METHOD= "POST" ACTION="ProcessForm.asp">
When the browser requests the ASP, the file is first processed by the server.
The ASP may contain both HTML and scripting code. Any HTML code is passed directly
to the browser as well as any client-side script. The server then searches for any
server-side script. Similar to script on the client, server-side script is denoted
by the symbols <% and %>. Upon locating the server-side code,
the server processes the script and returns the results to the browser in the form
of HTML. The server processes the script based on the current conditions and events.
This model gives your application its unique and dynamic nature. The web page that
is formatted is based on conditions that are dynamic and changing, instead of a static
HTML file that resides on the server. These conditions could be based on user input
as well as information that is contained in a database.
Exploring the Client-Server Picture
Active Server Pages are an important part of your application. You can use Active
Server Pages to create more intelligent server processing that handles the needs
of your application. Active Server Pages are a central figure in the client-server
model for your application. Figure 11.1 demonstrates the role of an Active Server
Page in the overall scheme of your application.
Figure 11.1.
Playing an active part of the client-server picture.
As you can see, Active Server Pages reside on the web server and play an active
part in the functionality of your application. Active Server Pages are based on the
ActiveX Server scripting engine first introduced with Internet Information Server
3.0. First, you can return dynamic web pages to the client based on the preferences
entered by the user. The ASP also can interface through the Component Object Model
(COM) with Active Server Components. These components are applications that you develop
using a more robust language such as Visual Basic or Visual C++. These components
are compiled as executable (EXE) or dynamic link library (DLL) programs that handle
the detailed processing of the application. You learn more about working with and
developing these components on Chapter 17, "Using Active Server Components to Create
Multitier Applications."
In Figure 11.1, you should also notice the database component of the application.
You can use Active Server Pages to directly interface with the database. The other
alternative is to use an Active Server Component that is called from an ASP to handle
the database processing. For database-intensive processes and transaction processing,
you will probably want to use the power of a language like Visual Basic or Visual
C++ for these activities.
Understanding Active Server Pages
Active Server Pages can contain both script and HTML. Visual InterDev supports
the use of VBScript, JScript, JavaScript, and LiveScript. The scripting engines for
VBScript and JScript are included with Visual InterDev. You can choose the scripting
language by selecting the Tools menu and choosing Options from the list of menu items.
The Options dialog window displays, enabling you to specify a default scripting language
for your Active Server Pages. Figure 11.2 depicts the Options dialog window.
Figure 11.2.
Choosing a default scripting language.
Once you specify a default scripting language, the chosen language is used when
you create new Active Server Pages. Visual InterDev formats a line of your ASP to
denote the type of scripting language that is being used, similar to the way that
client-side script is recognized in an HTML file. The following code example demonstrates
an ASP that uses VBScript for the scripting language:
<%@LANGUAGE="VBSCRIPT"%>
You can include both client- and server-side script in an Active Server Page.
The client-side script is passed to the client along with the HTML and executes within
the context of the browser. The HTML also may contain references to intrinsic controls
as well as ActiveX controls.
The Active Server Page Object Model
Active Server Pages use a robust object model that enables you to develop the
correct logic to handle your application needs. This object model resembles object
models that are used in Visual Basic. The following list outlines the five basic
objects that are available in an ASP:
1. Request object
2. Response object
3. Session object
4. Application object
5. Server object
Each of these objects is covered in detail in the following sections.
The Request Object
The Request object enables you to obtain information from a user. This
object is useful when you're trying to discover preferences specified by the user.
Also, you can use this object to retrieve information that is entered on a form.
A Guest guide is a good example where the user enters information into an initial
form that is then later used by the application.
The Request object consists of five collections. The concept of collections
was first mentioned on Chapter 8, "Communicating with a Database." A collection
is a set of related objects that are accessed using the same method. An object uses
a collection to access variables that define certain attributes and characteristics
about the object. Table 11.1 lists the types of Request collections and
their purposes.
Table 11.1. The Request collections.
| Collection |
Purpose |
| ClientCertificate |
Retrieves certification fields from the browser request |
| Cookies |
Retrieves the value of cookies in the request |
| Form |
Retrieves the values of a form using POST command |
| QueryString |
Retrieves the values of a query string |
| ServerVariables |
Retrieves the value of environment variables |
You can access the information contained in a collection using the following syntax:
Request.CollectionName("variable name")
CollectionName is the name of the collection and variable name is the name of
the collec-tion variable containing the desired information. You can use the following
method as an alternative:
Request.("variable name")
NOTE: If you use the alternate method,
you must ensure that different collections contain unique variable names. You should
explicitly use the collection name method to access a variable if you have collection
variables with the same name.
As indicated previously, the Request object can be used to get information
from the user. The following sections demonstrate how to use this object to accomplish
this task.
Using the Cookies Collection
You have probably used cookies in developing previous Web-based applications.
A cookie represents information about the user session that is stored on a client
machine. You can use cookies to maintain information about the user across the scope
of your application. A cookie can be sent by the browser to the server or from the
server to the client machine. You can use Active Server Pages to both populate and
retrieve values for your cookies. The syntax for the Cookies collection is as follows:
Request.Cookies(cookie)[(key)].attribute]
cookie specifies the value of the cookie to be retrieved, key indicates an optional
parameter that is used to retrieve sub key values of the cookie, and attribute contains
information about the cookie. The attribute parameter can be used to determine
if a cookie contains multiple key values as in the following code example:
<%Request.Cookies("MyCookie").HasKeys%>
If MyCookie contains multiple key values, the preceding code statement
returns a value of True. A value of False is returned if the cookie
only contains a single value.
The following code sample shows how to retrieve the value of a cookie named User
that contains only one value of Male:
<%Request.Cookies("User")%>
If the HTTP request from the browser contains multiple key values for the User
cookie, as in
Gender=Male&Age=30
then the code to return the value of this cookie is
<%Request.Cookies("User")("Age")%>
This code statement returns the value of 30. As you can see from the
examples, key values are used to contain type and subtype information about the user.
The Cookies collection can be used as an alternate method to store information
about the user. This method is sometimes disputed, because information about the
user is being stored on the local machine and distributed to the server without the
user's knowledge. You should be careful not to store sensitive information within
a cookie to ensure the security of your application and your users.
Using the Form Collection
The Form collection contains the values of a form that are submitted via the POST
method. The syntax for using the Form collection is
Request.Form(parameter)[(index)].Count]
where parameter is the name of the form element that contains a value. The optional
index attribute enables you to access the specific value of a parameter that can
contain multiple values. The Count attribute denotes the number of possible
values for a parameter in the form. The value of the index can be an integer between
one and the value of the Count attribute.
The following examples exhibit how you can use the Form collection in an ASP file
to retrieve information from the user. Both examples use HTML forms as the basic
user interface. You may already be familiar with working with HTML forms. You learn
about developing HTML forms during tomorrow's lesson (Chapter 12, "Using Basic and
Advanced HTML Form Controls"). It isn't important to understand the development
of the form for purposes of these examples. For now, focus on the logic contained
in the ASP and how the ASP is used to process the needs of the application.
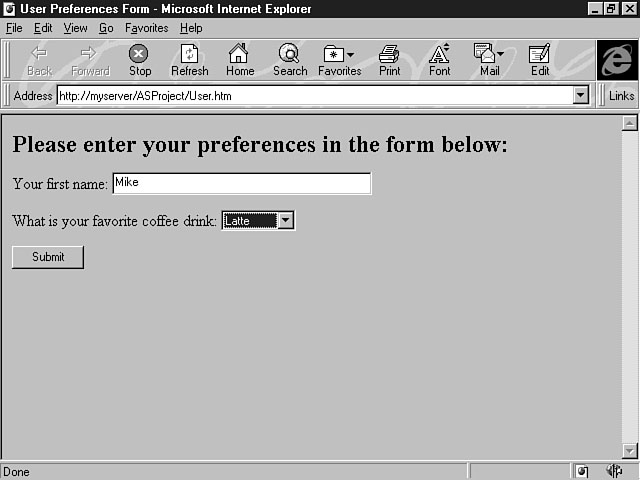
The first example involves a basic HTML form that retrieves the user name and
favorite type of coffee drink. Figure 11.3 illustrates the layout of this form.
The HTML form in this example contains a text field for the user name, along with
a drop-down listbox that contains a list of choices of different coffee drinks. The
form also contains a Submit button for the user to click the preferences have been
entered. When the users enter their preferences and press the Submit button, the
form is submitted to the Active Server Page. Listing 11.1 displays the code for the
HTML file that contains the layout of the form.
Figure 11.3.
Retrieving the user preferences.
Listing 11.1. User Preferences
Form.
<HTML>
<HEAD>
<TITLE>User Preferences Form</TITLE>
<H2>Please enter your preferences in the form below: </H2>
</HEAD>
<BODY>
<form action="/ASProject/scripts/submit.asp" method="post">
<p>Your first name: <input name="firstname" size=48>
<p>What is your favorite coffee drink: <select name="drink">
<option>Cappuccino <option>Espresso <option>Latte <option>Mocha
</select>
<p><input type=submit>
</form>
</BODY>
</HTML>
As you can see from Listing 11.1, an ASP file is referenced in the form action
line. Those of you familiar with CGI scripts should notice that this line is different
from the typical way you have processed your forms in the past. You're probably used
to specifying a CGI script in this line of code. This method is a basic difference
with Active Server Pages. The ASP file is used to process the form instead of the
CGI script. The Submit.asp file retrieves the information that is entered and displays
the preferences in a new page to the user with a welcome message. Listing 11.2 shows
the code for the Submit ASP.
Listing 11.2. Processing the users
preference.
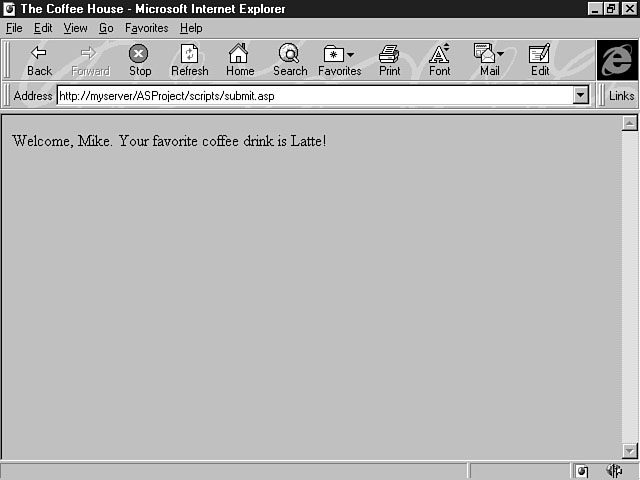
Welcome, <%= Request.Form("firstname")%>.
Your favorite coffee drink is <%= Request.Form("drink")%>!
This ASP shows how you can combine HTML with script code to construct a dynamic
web page. The Form collection is used to obtain the firstname as well as
the drink parameter. Figure 11.4 demonstrates a sample user entry.
Figure 11.4.
Entering the user preference.
Based on the user preference entered above, Figure 11.5 depicts how the new page
will be formatted by the Submit ASP.
In this example, the ASP used the Form collection to process the user preference
and create a new web page based on these values. You may have a need to send results
back to the same form that submitted the user preference. For example, you may need
to confirm that the user entered a valid character in a field before the value can
be stored in the database. If the form parameter value is incorrect, the server needs
to send the message to the user within the context of the user form, so that the
user can correct the mistake on that form.
Figure 11.5.
Displaying the user's preference.
The other alternative is to send a message to the user on a new page indicating
that a field was incorrect on the form. The user would then have to navigate to the
form and correct the field. The better alternative is to develop an ASP that both
creates and processes a form to handle this case and present the message within the
proper context of your application.
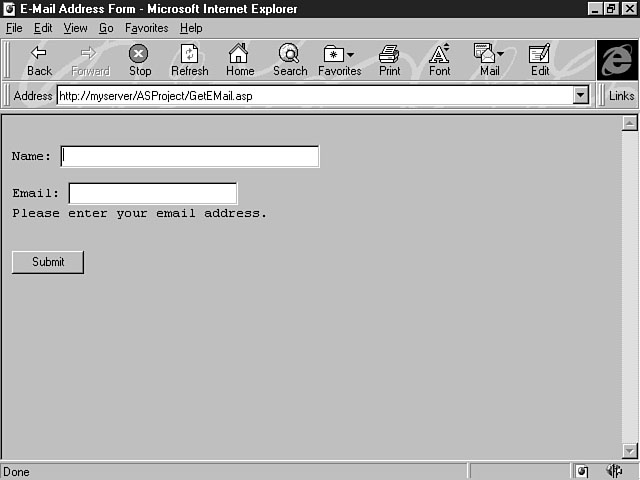
The following example illustrates the use of an ASP to create this dynamic form.
Figure 11.6 shows a sample form to obtain a user name and e-mail address.
Figure 11.6.
Entering an e-mail address.
This form is constructed using the ASP file that is shown in Listing 11.3.
Listing 11.3. Creating a dynamic
web page.
<HTML>
<!-- This is GetEmail.asp -->
<%
If IsEmpty(Request("Email")) Then
Msg = "Please enter your email address."
ElseIf InStr(Request("Email"), "@") = 0 Then
Msg = "Please enter an email address" & _
" in the form username@location."
Else
Msg = "This script could process the " & _
"valid Email address now."
End If
%><FORM METHOD="POST" ACTION="GetEmail.asp">
<PRE>
<p>Name: <input name="firstname" size=48 VALUE= "
<%=Request("firstname")
%>">
<p>Email: <INPUT TYPE="TEXT" NAME="Email" SIZE=30 VALUE= "
<%= Request("Email")
%>">
<%= Msg %><P>
<INPUT TYPE="SUBMIT" VALUE="Submit">
</PRE>
</FORM>
</HTML>
This code listing demonstrates the effective combination of HTML and script to
construct a dynamic web page. Also, this example shows how you can properly handle
the needs of your application. You learned earlier toChapter that HTML contained in an
ASP file is initially sent to the browser. The HTML form contained in the GetEmail.asp
file is, therefore, created first. After the user submits the information, the ASP
script processes the form using the Request object and Form collection.
The e-mail field is validated to ensure that an @ sign was included in the
e-mail address. If this character isn't in the e-mail address, the ASP sends an error
message and the original form to the browser, so that the user can correct the mistake.
Figure 11.7 shows the page that is formatted by the ASP.
Figure 11.7.
Displaying the form and a message.
As you can see, this method provides an effective way to process user input. The
Form col-lection is an invaluable tool for handling the values of the form.
Using the Server
Variables Collection
You can use the ServerVariables collection to retrieve environment variables
that pertain to the browser request. The syntax for this collection is
Request.ServerVariables(variable)
where variable references the name of the server environment variable to retrieve.
NOTE: There are many variables that exist
for the ServerVariables collection. It is beyond the scope of this lesson
to exhaustively cover each of the variables that you can access. Refer to the Visual
InterDev documentation for a comprehensive list and description of each of the possible
variables for the ServerVariables collection.
I am going to cover two of the more useful variables for the ServerVariables
collection in the following section. These examples should provide you with a good
idea of how to use other ServerVariables for your application needs.
Two of the more useful server variables that you can access with this collection
include the REQUEST_METHOD and the SERVER_NAME. The REQUEST_METHOD
variable indicates the method with which a page has been requested. The following
example demonstrates how to capture the value of the REQUEST_METHOD server
variable:
RequestMethod = Request.ServerVariables("REQUEST_METHOD")
The value of this variable will be POST when the page has been referenced
by another form and GET when the user has specifically requested the form.
In the previous section, you learned about the use of Active Server Pages to process
HTML forms. The ACTION parameter was formatted with a value of POST
when the user submitted the form. If the page is called by any other method, the
REQUEST_METHOD value is equal to GET. You can use this variable
to provide validation for the page based on the access method. For the form example,
if a user refreshes an Active Server Page or enters the URL directly without completing
the user preferences form, the page may not contain the proper values to dynamically
format the page. For both of these requests, the REQUEST_METHOD is equal
to the value of GET. You can add validation logic to confirm the access
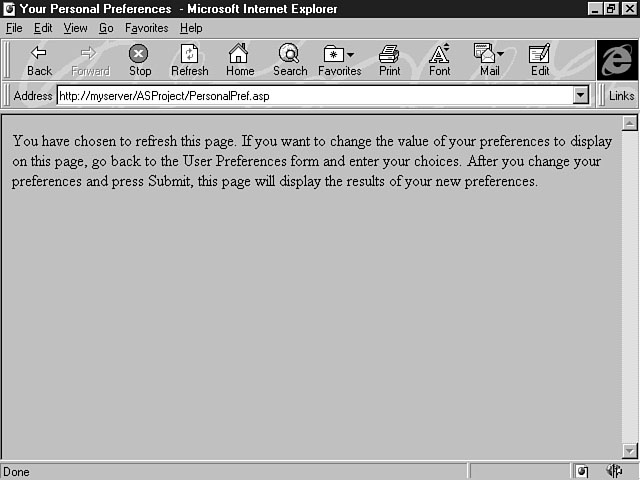
method for the page and then process the page based on this value. Listing 11.4 displays
sample validation logic for the user preferences form.
Listing 11.4. Verifying the request
method for a page.
<HTML>
<HEAD>
<TITLE>Your Personal Preferences </TITLE>
</HEAD>
<BODY>
<%
DIM RequestMethod
` Captures the request method for the page
RequestMethod = Request.ServerVariables("REQUEST_METHOD")
` Validate the value of the request method
If RequestMethod = "GET" then
` The user has refreshed the ASP - Display error message
%>
<P>You have chosen to refresh this page. If you want to change the value of
your preferences to display on this page, go back to the User Preferences form
and enter your choices. After you change your preferences and click Submit,
this page will display the results of your new preferences.
<%
Else
%>
Welcome, <%= Request.Form("firstname")%>.
Your favorite coffee drink is <%= Request.Form("drink")%>
<%
End If
%>
</BODY>
</HTML>
In the code listing, the script uses an If...Then...Else statement to
determine the value of the REQUEST_METHOD. Based on the value of this variable,
the appropriate code block is executed. Within an ASP, you will see a combination
of HTML and script. Many times, the HTML and script will be intermingled, as shown
in Listing 11.4. This coding standard is different from the method that you learned
concerning client-side script. With client-side script, the recommendation is to
use a strict split between the HTML and script code. The dynamic nature of Active
Server Pages dictates that a combination coding convention be used instead of a strict
split between HTML and script. Figure 11.8 demonstrates what happens when a user
refreshes an Active Server Page using the new validation logic.
Figure 11.8.
Displaying an error message.
The SERVER_NAME is another server variable that can be used to provide
valuable information to your application. The SERVER_NAME variable contains
the server's host name, DNS alias, or IP address that is used in self-referencing
URL addresses. This variable can be used to format a URL link to another page in
your application. The following code sample demonstrates the use of this variable:
<A HREF = "http://<%= Request.ServerVariables("SERVER_NAME")
%>
/ASProject/scripts/MyPage.asp">Link to MyPage.asp</A>
In this example, the ServerVariables collection is used to retrieve the
value of the host server name. This value is used to format the prefix of the URL
link to an Active Server Page. Figure 11.9 illustrates the results of executing this
code sample.
Figure 11.9.
Creating a dynamic link.
Using the QueryString Collection
The QueryString collection enables you to access the values of the variables
in an HTTP query string. These values are located after the question mark in an HTTP
request. The QueryString collection provides an easy method to access the
value of these variables, because you can reference the variables by name. The syntax
for the QueryString collection is as follows:
Request.QueryString(variable)[(index)].Count
variable is the name of the desired variable in the HTTP query string and index
is an optional parameter that enables you to retrieve the value of a variable that
contains multiple values. The index can contain an integer between one and the value
of the Count attribute.
Take a look at the User Preferences Form again. You could use an ASP that contains
the QueryString collection to process the user input. Listing 11.5 demonstrates
an example of using the QueryString to display the name and coffee drink
preference for a particular user.
Listing 11.5. Using the QueryString
collection to process the users preference.
Welcome, <%= Request.QueryString("firstname")%>.
Your favorite coffee drink is <%= Request.QueryString("drink")%>
Figure 11.10 displays the page that is produced from the ASP code.
Figure 11.10.
The results of the QueryString.
For variables that contain multiple values, the QueryString collection
creates a new collection instance with the number of values that are passed to the
ASP. For example, if the User Preferences form is changed to allow multiple names
to be passed to the server, the QueryString creates a new collection instance
called firstname. If three names are passed to the ASP, firstname
contains three values. The index attribute can be used to reference each
value within the firstname variable. The following example illustrates how
the firstname values would be accessed by the QueryString. For
the sake of example, suppose that the following values are passed to the ASP from
a client request:
/scripts/submit.asp?firstname=Mike&firstname=Matt&firstname=Chris
The following QueryString statements
Request.QueryString("firstname")(1)
Request.QueryString("firstname")(2)
Request.QueryString("firstname")(3)
would produce the values of
Mike
Matt
Chris
respectively. The Count attribute would be three for the firstname
collection instance. You also could reference the firstname collection using
the following statement:
Request.QueryString("firstname")
This statement would produce a comma-delimited value of
Mike,Matt,Chris
The QueryString can be used with forms that use both the GET
and POST action commands. If you use the QueryString collection
with a form that uses GET, the collection will contain all of the information
contained on the form. If the ASP is requested using the POST statement,
the QueryString collection will contain all of the information that is passed
as a parameter to the ASP.
The Response Object
You can use the Response object to send information to the user. You
can format HTML to be sent to the client as well as manipulate state and session
information. Some examples include redirecting the user to another URL address and
formatting the value of a cookie on the server. The Response object supplies
several properties and methods needed to accomplish these tasks. A property defines
characteristics about the object that it represents, and a method indicates an action
that the object can execute. Properties and methods are thoroughly explored during
the lessons on Chapter 13, "Interacting with Objects and ActiveX Controls,"
and Chapter 15, "Integrating Objects into Your Applications."
The Cookies collection is the single collection of the Response object.
You can use this collection to set the values of cookies. Table 11.2 defines the
properties that are available for the Response object.
Table 11.2. The Response properties.
| Property |
Description |
| Buffer |
Indicates whether the page is buffered |
| ContentType |
Defines the content type for the response |
| Expires |
Indicates the length of time before the expiration of a page that has been cached
by the browser |
| ExpiresAbsolute |
Indicates date and time of the expiration of a page that has been cached by the browser |
| Status |
Indicates the status line value returned by the server |
These properties can be used with the Response object methods to send
the proper in-formation to the user. Table 11.3 lists the methods that are available
for the Response object.
Table 11.3. The Response methods.
| Method |
Description |
| AddHeader |
Defines a name for the HTML header |
| AppendToLog |
Adds a string of text to the web server log |
| BinaryWrite |
Writes the output to the HTTP response without converting the characters |
| Clear |
Erases all HTML output that has been buffered |
| End |
Terminates ASP processing and returns the result |
| Flush |
Sends buffered output immediately to the client |
| Redirect |
Redirects the user to another URL address |
| Write |
Writes the output to the HTTP response as a string |
The next few sections explore some of the more powerful properties and methods
of the Response object that you can use to enhance the functionality of
your Active Server Pages.
Using the Cookies Collection
The Cookies collection for the Response object provides a way to set
the value of a cookie on the server. You can create new cookies as well as change
the value of existing cookies. The syntax for using the Cookies collection for the
Response object is similar to the format that you used for the Request
object. To use the Cookies collection for the Response object, type the
following:
Response.Cookies(cookie)[(key).attribute] = value
cookie is the name of the cookie. The key is an optional parameter used to define
a cookie that contains multiple key values. The attribute parameter describes information
about the cookie. The value parameter can be used to set the values of the key and
attribute parameters. You also can use the HasKeys attribute to determine
if the cookie contains key values. Table 11.4 provides a complete listing of the
attributes for the Cookies collection.
Table 11.4. The Cookies collection attributes.
| Attribute |
Description |
| HasKeys |
Determines if the cookie contains key values |
| Expires |
Indicates expiration date for the cookie |
| Domain |
Defines the domain for which cookies are distributed |
| Path |
Defines the path for which cookies are distributed |
| Secure |
Indicates whether the cookie is secure |
You can update the value for all of the attributes of the Cookies collection except
HasKeys, which is read-only. The HasKeys attribute evaluates to
a value of True to indicate that the cookie contains key values or False
to specify that the cookie does not contain key values.
Listing 11.6 demonstrates several methods for populating the value of cookies.
Listing 11.6. Setting the value
of cookies.
<%
`Sets the value of cookie
Response.Cookies("Name") = "Mike"
`Sets the value of cookie with key values
Response.Cookies("MyCookie")("FirstName") = "Mike"
Response.Cookies("MyCookie")("LastName") = "Van Hoozer"
`Changes the cookie to a non-key value cookie and sets the new value
Response.Cookies("MyCookie") = "Mike"
`Sets the value of a cookie and its attributes
Response.Cookies("StdCookie") = "User"
Response.Cookies("StdCookie").Expires = "December 31, 1997"
Response.Cookies("StdCookie").Domain = "mydomain.com"
Response.Cookies("StdCookie").Path = "/www/home/"
Response.Cookies("StdCookie").Secure = "TRUE"
%>
The code example in Listing 11.6 sets the value of the Name cookie to
Mike. The next example creates a cookie called MyCookie and sets
the key values of FirstName and LastName. The third code example
demonstrates how you can change the type for the cookie as well as its value. This
example changes MyCookie to a non-key value cookie. The values that were
previously stored in this cookie are discarded, and the new value of Mike
is assigned to MyCookie. The final code example shows how to set both the
value of a cookie as well as its attributes.
Using the Buffer Property to Process
Your Script
You were introduced to the properties of the Response object. The properties
help describe the characteristics for an object. The basic syntax to reference a
Response object property is
Response.PropertyName
PropertyName is the name of the property.
The Buffer property defines whether the page results are buffered. You
can use the Buffer property to process all of the script code in your ASP
before the results are sent to the client. The syntax for the Buffer property
is as follows:
Response.Buffer = flag
flag contains the value of True or False to indicate whether
or not to buffer the page output. If you set the value of the flag parameter to True,
the page output is buffered, and the script code is processed before distributing
the results to the browser. The default value for the flag parameter is False.
You cannot set the value of the Buffer property if your ASP has previously
sent output to the client. If you are going to process your script before sending
the results to the client, you should assign the value of the Buffer property
in the first line of your ASP to prevent this situation from happening.
There are two methods that can be used to halt the processing of the script code
in your ASP. You can use either the Flush or the End method to
stop the script processing and send the results to the client. The syntax for these
two methods is
Response.Flush
and
Response.End
You should balance the need to process your script versus the length of time that
it takes to process your script. For long scripts, you may want to send intermediate
results to the user while your script continues to process. In these situations,
you won't want to set the value of the Buffer property to True.
Using the Write Method to Send
Output to the User
You can use the Write method to format a string of text to send to the
user. The syntax for the Write method is
Response.Write variant
variant represents the data to be written. The variant parameter can contain any
value that is supported by the VBScript variant data type, including characters,
strings, and integers.
The Write method is commonly used to format HTML to be sent to the client
browser. The following code example shows how to use the Write method to
format the User Preferences Form:
Welcome, <% Response.Write Request.Form("firstname")%>.
Your favorite coffee drink is <% Response.Write Request.Form("drink")%>
Notice that this example differs from the previous ASP code that was used to format
the User Preferences Form. Instead of using the = Request.Form statement,
the equal sign is replaced by the Response.Write method. Figure 11.11 displays
the results of using the Write method.
Figure 11.11.
Using the Write method to format the page.
You also could use the Write method to create a dynamic header for your
web page, based on the user ID that is entered. For new users, you could display
an initial greeting that is different from the greeting for return visitors to your
site. Listing 11.7 demonstrates the use of the Write method in an Active
Server Page to create this type of greeting.
Listing 11.7. Creating a dynamic
greeting.
<%
If NewUser Then
Response.Write "<H3 ALIGN=CENTER>Welcome to the Overview Page</H3>"
Else
Response.Write "<H3 ALIGN=CENTER>Welcome Back to the Overview Page</H3>"
End If
%>
In this code listing, the NewUser variable is used to designate whether
the ID represents a new or existing user. If NewUser is True, the
initial welcome message is displayed. If this user is a return visitor, the welcome
back message is displayed. Notice that the text is formatted using the header HTML
tags. You could use this code with a procedure that verifies user IDs against those
IDs stored in your database.
Using the Redirect Method
The Redirect method can be used to redirect the user to another URL address.
The syntax for using the Redirect method is as follows:
Response.Redirect URL
URL is the URL address location to redirect the browser.
NOTE: You cannot use this method from
an ASP if results have already been distributed to the client.
This method is helpful for ensuring that users follow a specific path when using
your application. For example, an order entry application may require that a user
enter basic order header information like name and address before selecting the items
that will be ordered. If a user attempts to access the order detail page to order
an item, you can use the following code sample in Listing 11.9 to redirect them to
the initial page of your application.
Listing 11.9. Guiding the users
path.
<%
If NOT Session("OrderHeaderPage") Then
Response.Redirect "OrderHeader.asp"
End If
%>
This code example uses the Session object, which will be covered in a
later section. You can use this object to store variables for a user session. In
this example, a variable is used to verify that the user has entered the application
from the Order Header page. If this variable isn't true, the browser will be redirected
to the ASP to process the Order Header page.
Specifying the Type of Content
You can use the ContentType property to designate the type of content
that is located in the response for the page. The syntax for this property is
Response.ContentType = content type
content type represents the type of content for the page. This value is a string
that conforms to the MIME standards for a web page. The content type defines the
type and subtype of information that's contained in the response that is sent to
the client. The type describes the general category of the information, while the
subtype specifically defines the content type. The default value for the ContentType
property is "text/HTML". This value defines the content type for
a response as text and the content subtype as HTML. The following
code samples demonstrate how to use this property:
Response.ContentType = "text/HTML"
Response.ContentType = "image/GIF"
Response.ContentType = "text/plain"
The Session Object
You can use the Session object to store and retrieve information during
a specific session for a user. The information contained in the Session
object persists for the entire time that the user interacts with your application.
You can use and access this information across the web pages in your application.
A Session object is automatically created by the web server when a user
accesses a web page in your application. The user session persists until the user
leaves the application, the session times out, or the session is explicitly abandoned.
To access the Session properties, the syntax for referencing the Session
object is
Session.property
and it is
Session.method
to access the Session methods. The Session object consists of
two defined properties and one defined method.
The SessionID property returns the Session ID for a user. The web server
creates a unique identifier as it creates each user session. The value of this identifier
is a LONG data type. The syntax to reference the SessionID property
is
Session.SessionID
NOTE: The Session ID that is generated
is stored as a Session cookie. If the user's browser doesn't support the use of cookies,
the Active Server engine examines the URL references on the page. The Active Server
Engine determines which URL links reference another page in your application and
append the Session ID to each of these references. In this way, the Session ID remains
available within the user session scope of the application.
The other property of the Session object is the Timeout property.
You can use the Timeout property to identify the maximum length of time
before the session will end, or time out, for a user. This property is measured in
minutes. If there is no user activity such as refreshing or requesting a page before
the timeout period, the session terminates. The syntax for using this property
is
Session.Timeout = nMinutes
nMinutes indicates the number of minutes for the timeout period. The
default value for the timeout period is 20 minutes.
The Abandon method is the sole method for the Session object.
You can use the Abandon method to explicitly terminate a session and destroy
all of the information stored in the session object. The syntax for calling the Abandon
method is
Session.Abandon
After you call the Abandon method, the page processes any remaining script
and then terminates the session.
Working with the Session Object
You can create additional properties and variables for the Session object
to store information about a user session. Examples include user preferences as well
as global information to be shared between the pages for a particular user session.
Another example would involve storing data to be used to calculate the grand total
for an order. The following example shows how to store variables in the Session
object:
Session("UserName") = "John Smith"
Session("Email") = "JSmith@msn.com"
Session("CoffeeDrink") = "Latte"
Session("Age") = 32
These examples show how you can store various types of information using the Session
object. The information contained in these variables can then be accessed and referenced
throughout the scope of this user's session.
You also can use the pre-defined properties and methods of the Session
object. For example, if you want to change the timeout period for a user
session, you can alter the value in the Timeout property. The following
code sample changes the timeout period from the default of 20 minutes
to 30 minutes:
Session.Timeout = 30
Listing 11.10 demonstrates how to use a Session object variable to dynamically
format a page based on the user preferences that were entered on an initial User
Preferences Form.
Listing 11.10. Using a new variable
in the Session object.
<HTML>
<% If Session("CoffeeDrink") = "Latte" Then %>
<IMG SRC="/MyApp/images/latte.GIF" WIDTH="85"
<% Else %>
<IMG SRC="/MyApp/images/Cappuccino.GIF" WIDTH="85"
<%End If%>
</HTML>
In this code example, the ASP checks the value of the user's coffee drink preference,
which is stored in the Session object. If the preference is a Latte, then
the page is formatted with an image of a Cafe Latte. If the user specified something
other than a Latte, the page is formatted with an image of a Cappuccino. This code
again demonstrates the dynamic nature of Active Server Pages.
Working with the Session Events
The Session object is related to two events that are unique to an Active
Server Page. The Session_OnStart and Session_OnEnd events can be
used to execute script when a session is initially created and when the session is
terminated. These events are contained in the global.asa file. You were first introduced
to the global.asa and these events during Chapter 4, "Creating Your First Visual
InterDev Project."
The Session_OnStart event is triggered when the server creates the new
session. The Session_OnStart script is the initial code that is processed
for a new user session. In other words, the script that you place in the procedure
for this event is processed before the request for the page is executed. You can
access all of the objects for an ASP, including the Application, Session,
Server, Request, and Response objects during this event.
The Session_OnEnd event occurs when the user session is abandoned or times
out. The only ASP objects available during the Session_OnEnd event include
the Application, Server, and Session objects.
An example of using the Session_OnStart event involves the Redirect
method for the Response object that you learned earlier toChapter. I used the
example of redirecting a user to a defined start page for the application. Listing
11.11 demonstrates an expansion of this example used within the context of the Session_OnStart
event.
Listing 11.11. Starting the user
off right.
<SCRIPT RUNAT=Server Language=VBScript>
Sub Session_OnStart
` Sets the value of the Order Header start page
OrderHeaderPage = "/MyApp/OrderHeader.asp"
` Sets the value of the current user page
CurrentPage = Request.ServerVariables("SCRIPT_NAME")
` Do a case-insensitive compare on the pages. If they
` don't match, send the user to the Order Header page.
If strcomp(currentPage,OrderHeaderPage,1) then
Response.Redirect(OrderHeaderPage)
End If
End Sub
</SCRIPT>
Because the code in the listing executes when a user session is initiated, the
Session_OnStart is a perfect place to verify that the user is beginning
with the proper page in your application. This code example combines several of the
concepts that you have learned toChapter to demonstrate their value within the context
of an application.
The Application Object
The Application object enables you to share information across all users
of the ASP-based application. While the Session object is limited to a single
user, this information is globally available for all users of the application. The
Application object is created when the application is initiated. Upon initial
creation, the Application object is then available to each additional user
who accesses your application. The syntax for accessing the Application
object is as follows:
Application.method
method is the name of the method for the Application object. The Application
object supports two defined methods. The Lock and Unlock methods
provide a way to prevent contention between multiple users. The Lock method
enables you to prevent other users from modifying an Application object
that has been accessed by a user. The Unlock method enables you to then
unlock the Application object once it has been released by the user. When
you use the Unlock method, other users are then able to modify the Application
object's properties and variable information.
A great example of using the Application object involves calculating
the number of visits to your web site. Almost all web sites track this information.
For commercial sites, the number of people that visit a web site continues to be
a very important number. This number is used to justify the existence of the web
site as well as to determine how much to charge advertisers that place a banner on
the web page. The code in Listing 11.12 demonstrates how to use the Application
object to determine the number of hits for a web site.
Listing 11.12. Determining the
number of web site visitors.
<%
` Locks the Application object
Application.Lock
` Increments the number of visits by one
Application("NumVisits") = Application("NumVisits") + 1
` Unlocks the Application object
Application.Unlock
%>
` Displays the number of visitors for the application
This application page has been visited
<%= Application("NumVisits") %> times!
In this code example, the NumVisits variable is created the first time
the code is executed. The variable is initialized to zero. The NumVisits
is then incremented each additional time the code is executed, and the value is stored
in the Application object.
The values that are stored in the Application object are contained in
persistent storage. For this reason, you can access the values of these variables
even if you have to stop and restart your server. You can, therefore, create and
use variables for your application that need to be consistently maintained. You want
to use good judgment about the kind of values that you store in the Application
object. You should store simple rather than complex information.
Working with the Application Events
The Application object has two associated events that are contained in
the global.asa. You were first introduced to the global.asa and these Application
events during Chapter 4.
The Application_OnStart event is triggered when the first user accesses
a web page within the application. This event occurs before the Session_OnStart
event. The Application_OnEnd event is activated when the application terminates.
The Application_OnEnd occurs after the Session_OnEnd event. The
Server and the Application objects are the only objects that are
available during both the Application_OnStart and the Application_OnEnd
events.
The Server Object
The Server object enables you to interface with Active Server Components,
also called OLE Automation Components. These components provide robust application
processing on the server. Active Server Pages include the following five Active Server
Components:
- 1. Database Access Component
2 AdRotator Component
3 Browser Capabilities Component
4 File Access Component
5.Content Linking Component
These components are included with Visual InterDev and enable you to accomplish
certain tasks within the context of an ASP. You also can create custom Active Server
Components for your Active Server Pages. You learn how to interact with these components
as well as build your own custom Active Server Component on Chapter 17.
The syntax for referencing the Server object is as follows:
Server.method
method is the name of the method for the Server object. The methods for
the Server object are outlined in Table 11.5.
Table 11.5. The Server object methods.
| Method |
Description |
| CreateObject |
Creates an instance of an object |
| HTMLEncode |
Applies HTML encoding to a string |
| MapPath |
Maps the virtual path to a physical path |
| URLEncode |
Applies URL encoding to a string |
The Server object also contains one property that can be accessed. The
ScriptTimeout property defines the length of time for a script to be able
to run. The syntax for this property is as follows:
Server.ScriptTimeout = NumofSeconds
NumofSeconds represents the number of seconds before the script times out and
terminates its processing. The default value for this property is 90 seconds.
The ScriptTimeout property only applies to the processing of the script
code. A script won't time out based on this property while a server component is
processing. You set the value of this property as well as retrieve its value to store
in a variable within your application. For example, if you wanted to find out the
timeout period for the server script, you could execute the following code:
<% TimeoutForScript = Server.ScriptTimeout %>
This code sample would retrieve the value of the timeout period for the
server script and store the value in the variable TimeoutForScript.
You will typically interact with the Server object by using the pre-defined
server components for Active Server Pages as well as your own custom ActiveX Server
Components. The following sections explain how to create and work with an instance
of an object.
Creating a Server Object Instance
The CreateObject method is the most widely used method for the Server
object. You can use this method to create an instance of a particular object that
can then be used by your application. The syntax for calling this method is as follows:
Server.CreateObject progID
progID indicates the type of object to create. The syntax for the progID parameter
is
Vendor.Component.Version
Vendor is the author of the component, Component is the name of the component,
and Version is the version number of the component.
When you use this method to create an instance of an object, the scope of the
object exists for the lifetime of the ASP. For example, if you execute this method
in a typical ASP within your application, the component only exists while your ASP
script is processed. The object is destroyed when the ASP completes its processing.
Listing 11.13 demonstrates an object that is created for the lifetime of an ASP.
Listing 11.13. An object with limited
existence.
<%
` Creates an instance of the Browser Capabilities object
Set bc = Server.CreateObject("MSWC.BrowserType")
` Check to see if the browser supports VBScript
If bc.vbscript = "True" Then %>
` Format a friendly confirmation message
Your Browser supports VBScript!
<%Else %>
` Format another message
Your Browser is very limited!?!
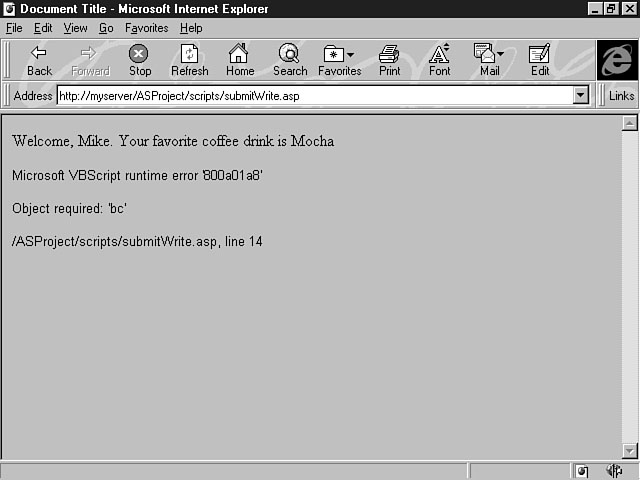
In this code example, the object that is created can only be referenced for the
lifetime of the ASP. After the script executes the last line of code to format a
message to display on the browser page, the object is destroyed. Any references to
the object after the ASP has completed result in a runtime error, as shown in Figure
11.12.
Figure 11.12.
Referencing an object that has died.
You can extend the life of your objects by calling the CreateObject method
and storing its value in a Session or Application object variable.
For example, you could execute the following line of code to store an object in an
Application object variable:
<% Set Application("BrowserCapabilities") = Server.CreateObject("MSWC.BrowserType")
%>
In this example, an instance of the BrowserType object is created and
stored in an Application object variable named BrowserCapabilities.
The BrowserType object, also referred to as the Browser Capabilities component,
enables you to determine the capabilities of the current browser. Because an Application
object variable is used to store this object, the object and its methods and properties
can be referenced for the lifetime of the application.
-
NOTE: In the previous code example, notice
the Set statement used to store the component in the Application
object variable. The use of this word differs from the normal convention that you
learned earlier. You must use the Set keyword to store object variables.
You have now learned two methods for storing an instance of an object. When naming
a variable to store an instance of the object, you cannot choose a name of a pre-defined
object. For example, the following line of code would result in an error.
<% Set Application = Server.CreateObject("Application") %>
You also can use the <OBJECT> declaration to create an instance
of an object in the global.asa file. You must declare these objects to contain either
Application or Session scope. The syntax for using the <OBJECT>
tag is as follows:
<OBJECT RUNAT=Server SCOPE=Scope id=Identifier
{PROGid=ProgID|CLASSid=ClassID}>
Scope indicates the scope of the object. This value of this parameter will be
either Session or Application. The Identifier parameter designates
a name for the object. The ProgID parameter was discussed previously. The ClassID
parameter represents a unique class identifier for an OLE class object. You must
enter either the ProgID or the ClassID parameter. Listing 11.14 demonstrates a global.asa
file that declares an object with Session scope.
Listing 11.14. Using the <OBJECT>
tag to extend the life of an object.
<SCRIPT LANGUAGE="VBScript" RUNAT="Server">
<%
If ProgramID Then
` Declare an object with Session scope using the PROGID
<OBJECT RUNAT=Server SCOPE=Session id=MyConnection
PROGid="ADODB.Connection">
Else
` Declare an object with Session scope using the CLASSID
<OBJECT RUNAT=Server SCOPE=Session id=MyConnection
CLASSid="Clsid:8AD3067A-B3FC-11CF-A560-00A0C9081C21">
</OBJECT>
Both the PROGID and CLASSID formats are used in this code example
for the purpose of illustration. You will typically use either one format or the
other, depending on the object that is being declared. This code listing shows an
example of a database connection that is declared in a global.asa file. You could
then reference characteristics about this connection object throughout the lifetime
of a user session.
-
TIP: The lesson has outlined the different
lifetimes of an object based on when and where it is created. If you're ruthless
and want to kill the object yourself, you can accomplish this task by using the Nothing
key- word. To destroy an object, set the object variable equal to Nothing.
For example, to destroy the bc object instance, execute (pardon the pun)
the code: <%Set bc = Nothing %>. This code will destroy the instance
of the BrowserType object that has been stored in the variable bc.
This is the only tip that you get on how to destroy something. The lesson will not
provide any tips on how to destroy your coworker's house or property.
Creating Your First Active Server
Page
Now that you have learned about all of the benefits and features of Active Server
Pages, you're probably wondering how to create an ASP. As you would expect, Microsoft
has included a template within Visual InterDev to make this process easy.
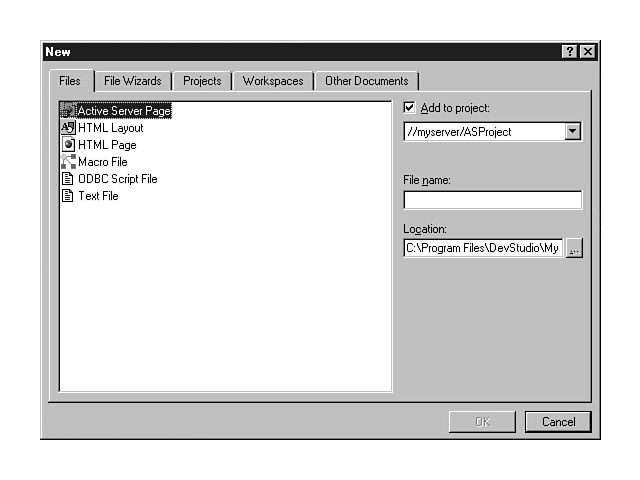
From the File menu, select the New menu item. You are probably very familiar with
the New tabbed dialog window by now. Figure 11.13 displays the Files tab within the
New dialog window.
From this window, you can select the Active Server Page option from the list.
You need to enter a name for the ASP and click OK. The ASP is created with the name
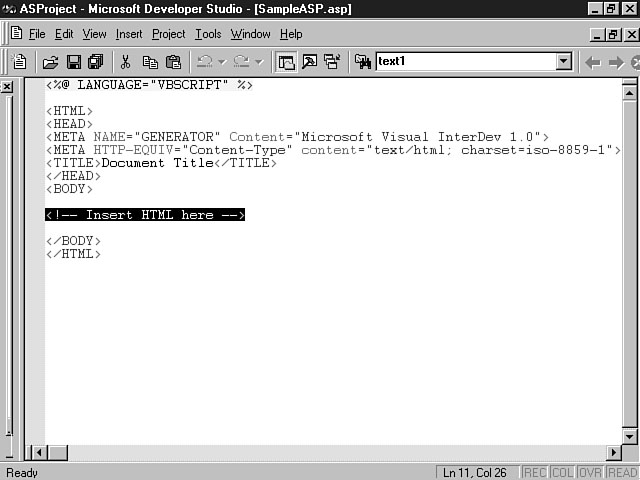
that you specify and added to the current project. Figure 11.14 shows a newly created
ASP.
Notice that the scripting language is denoted at the top of the ASP. This language
is based on the default scripting language that you selected for your ASP. You learned
how to change the default scripting language earlier in toChapter's lesson.
Figure 11.13.
Creating an Active Server Page.
Figure 11.14.
A sample Active Server Page.
You're now ready to add processing logic to your ASP. An ASP is very similar to
the HTML files that you created with Visual InterDev during the first week. The Active
Server Page contains a place to put your HTML. You also can add your scripting code
to the ASP. You can use most of the same options that are available for creating
an HTML page, including HTML layouts and ActiveX and Design-time ActiveX controls.
To add these features to your ASP, right-click the mouse in the ASP to display the
shortcut menu for the ASP, as seen in Figure 11.15.
Figure 11.15.
Adding additional features to your ASP.
You can then choose an option to insert into your ASP.
Summary
Active Server Pages provide an excellent method for constructing interactive applications.
ToChapter's lesson has provided you with a thorough overview of Active Server Pages.
Visual InterDev enables you to easily implement Active Server Pages within your application.
You now understand how Active Server Pages derived their name--an ASP represents
the difference between a passive, dull site and a site that truly comes alive, thereby
providing a rich and rewarding experience for the user.
During toChapter's lesson, you first received an explanation of a server that is alive
and active, then learned about the features and benefits of Active Server Pages.
During this part of the lesson, you learned the characteristics of Active Server
Pages that give them their dynamic nature. The lesson then provided an overview of
the client-server picture of a Web-based application. The role of an Active Server
Page was outlined within the context of the application components.
You learned about the types of scripting languages that are used within an Active
Server Page. You also learned how Visual InterDev assigns the scripting language
for an ASP and how you can change the default language for your Active Server Pages.
A majority of the lesson covered the various objects that can be used with Active
Server Pages. You learned about the five types of ASP objects. You also received
an exhaustive discourse on the collections, methods, and properties of these objects.
The lesson provided detailed examples of how to access and reference these objects.
Throughout the lesson, you received relevant examples of scripting logic that can
be used to meet the needs of your application.
At the end of the Chapter, you received an overview of how to create your first Active
Server Page. You were able to view the format of an ASP. Finally, you learned about
the Active Server Page's additional features such as ActiveX controls and Design-time
ActiveX controls that can be added to an ASP.
Q&A
- Q What is the main difference between an HTML web page and an Active Server
Page?
- A An HTML web page consists of HTML, limited client-side script, ActiveX
controls, and other objects that help to format the look of the web page. All of
the logic included within an HTML file is executed within the context of the client
browser. An ASP, on the other hand, can include all of the aforementioned items as
well as robust server-side script. This server-side script executes on the server
and can interact with Active Server Components that are also on the server. An ASP
can dynamically generate formatted HTML back to the client, based on both client
and server conditions. The dynamic nature of an ASP is what distinguishes it from
a regular HTML web page.
Q Can I use an Active Server Page instead of an HTML file to create my web pages?
- A Definitely, yes. In fact, I think you will appreciate the dynamic nature
of Active Server Pages so much that you won't want to go back to using HTML files.
Of course, there still may be situations where you need to use an HTML web page instead
of an Active Server Page.
Workshop
ToChapter's workshop will enable you to explore the development of an Active Server
Page. You're going to use the template that you created during the last section of
the lesson to add your application logic. Choose some of your favorite objects and
examples from toChapter's lesson, and experiment using these objects and the examples
that were provided to create a sample application of your own. This application should
use Active Server Pages to create a dynamic experience for the user. You should also
extend the functionality of the examples to include your own ideas. For example,
you may want to extend the functionality of the User Preferences Form to include
other preferences besides name and favorite type of coffee drink.
You should practice using the ASP concepts explained in toChapter's lesson to develop
your application. You also should experiment using different scenarios for your ASP
and your application. An example would be to experiment creating your objects in
different places, including creating an object in a regular ASP as well as in the
global.asa file. Finally, you should practice using variables that contain different
scopes, such as Application versus Session versus Page.
Quiz
- 1. Name the five types of ASP objects.
2 Which object supports a method to write HTML back to the client?
3 Which object contains a collection which enables you to access the object values
on a form?
4 Explain the difference between Session and Application scope.
5 Given the following code for an Active Server Page, what is displayed as the
value of the NumofVisits variable for user C after users A and B access
the application?
<%
Session("NumofVisits") = Application("NumofVisits") +
1
%>
This application page has been visited
<%= Session("NumofVisits") %> times!
Quiz Answers
- 1. The five types of ASP objects are:
Request object
Response object
Session object
Application object
Server object
- 2. The Response object
3. The Request object
4. Session scope of a variable extends for the lifetime of a user
session, and information stored in a Session variable is only available
to the specified user. As long as the user interacts with your application, this
information is available to the user. Application scope refers to a variable
that is available to all users of your application.
5. The answer is 1. A Session variable was used instead
of an Application variable. The developer of this code was attempting to
track the number of visitors to the web site application. As you discovered from
correctly answering Quiz question number 4, the Application variable would
have provided access to all users of the application. If an Application
variable had been used, the code would have reflected the accurate number of people
who had visited the site--3.
|


 MS Access
1109
MS Access
1109
 C++
1222
C++
1222
 HTML
584
HTML
584
 JavaScript
616
JavaScript
616
 Vbscript
873
Vbscript
873
 Oracle
473
Oracle
473
 VC++
875
VC++
875
 SQL
2959
SQL
2959
 XML
514
XML
514
 Java
814
Java
814
 Perl
455
Perl
455
 Linux
451
Linux
451


