|
Chapter 16
Building Design-Time
ActiveX Controls
During the past couple of Chapters, you have had a steady diet of ActiveX and Design-time
ActiveX controls. By now, you understand the benefits of these objects and know how
to incorporate them into your applications. ToChapter's lesson is the breakthrough lesson
that lets you try your hand at building a Design-time ActiveX control. You get a
guided tour to teach you the whys and hows of developing these controls. Who knows:
This lesson could offer a springboard to a new career of constructing commercially
available controls for developers.
The first part of toChapter's lesson centers on why you should build custom controls.
Next, the lesson describes some of the available tools that enable you to construct
these controls. The middle portion of the lesson walks you through the steps of creating
a Design-time ActiveX control with the user-friendly, powerful Visual Basic 5 Control
Creation Edition (VBCCE). During this tutorial, the lesson also explores the VBCCE
development environment, explaining its features and functions. You also learn how
to test the control in the VBCCE environment. Once your control has been built, the
lesson explains how to integrate it into your Web-based application. Controls must
have a purpose, which usually revolves around meeting the needs of your Web-based
or client-server application. The final lesson for the Chapter demonstrates how to review
and test the results in your Visual InterDev project.
Why Should You Build a Design-Time
Control?
As a developer, you have probably experienced the joys of using custom controls
in your client-server and Web-based applications. Using third-party controls has
become commonplace among developers. Magazines, such as Visual Basic Programmers'
Journal, are devoting at least a third of their pages to advertising and reviewing
the latest controls that can be used in your application. With each new revision
of products such as Visual Basic, developers check out the product's new features,
especially the custom controls included as part of the tool. Next, they thoroughly
review the guide of supplemental controls that come with the product to discover other
commercially available controls. Finally, they build their application with a set
of robust controls, only to realize sometimes that the vendor didn't include all
the necessary functionality.
Does this sound like an adventure ride you have been on before? No control is
going to please everyone or do all you need it to, so you develop workaround solutions
in your application to compensate for the function you want. Until recently, the
thought of creating your own custom control probably frightened you because of the
time involved and the availability of tools. In the past, you had to be a C++, object-oriented
disciple to develop a custom control because the only products available to create
custom controls were development tools--such as Visual C++ and Borland C++--that
supported the C or C++ programming language.
With the advent of new tools such as the Visual Basic Control Creation Edition
from Microsoft, you can no longer claim control technophobia: the fear of creating
custom controls. Tools such as VBCCE simplify the process of developing custom controls
while reducing the time it takes to construct a control. Now, you can create your
own custom controls and have no one but yourself to blame if the control doesn't
do everything you want it to. Why should you build a custom control, you ask? There
are two main reasons for attempting this feat. First, you want to meet your application's
needs. I'm sure you have been on a development project with two developers who needed
to execute the same block of code within their individual code. Instead of putting
the identical code in both places, someone created a common function or module that
both developers could access from their program. The concept of a custom control
is the same. Since you already know that no control is going to totally satisfy your
development needs, at some point you will probably need to develop a custom control
tailored to fulfill your application's requirements.
Second, you should try to develop a custom control because the process isn't as
difficult as it once was. Now that you have new tools to make the process easier,
there's no excuse not to build these exciting new controls. Remember, technology
has come a long way since the Chapters of VBX controls. ActiveX and Design-time ActiveX
controls are now the hot new objects that can spice up both your client-server and
Web-based applications. There are basically three types, or categories, of controls
you can build; here are the three approaches for building these types of controls:
- 1. The Nestle Tollhouse approach
2 The Pillsbury slice-and-bake approach
3.The M&M cookie approach
You're probably wondering what baking cookies has to do with creating ActiveX
controls, but the following sections outline each approach and explain the correlation.
The Nestle Tollhouse Approach
The Nestle Tollhouse approach means building a new, custom ActiveX control from
scratch, much like the process of baking Nestle Tollhouse cookies. My grandmother
used to buy Nestle Tollhouse chocolate chips and mix the necessary ingredients to
bake the best chocolate chip cookies you could ever imagine. Although mixing the
cookie dough from scratch and baking the cookies took a long time, they were definitely
worth the wait. Similarly, you can construct a brand-new control from scratch by
using the features (ingredients) of a tool such as VBCCE or Visual C++. These tools
give you the basic core elements you need to build your control.
This approach offers the most flexibility because you're not confined to the limitations
of another control. You design and develop the control from the ground up, including
setting the control's properties, methods, events, and appearance. You have the ability
and freedom to include the functions and features needed to address your application's
needs. The drawback is that you must construct everything yourself because with freedom
comes responsibility. You're responsible for designing all the control's features
and functions, including its appearance, which can be a laborious process. The end
product might be worth the wait, but you may be interested in using one of the other
two approaches for creating custom controls.
The Pillsbury Slice-and-Bake Approach
Since my grandmother's Chapters of baking, the process of creating cookies has made
big strides. In this fast-paced world, the need for better and faster methods of
delivering these tasty morsels grew. Pillsbury was one of the first companies to
invent slice-and-bake cookies. These cookies are ready to bake--all you have to do
is slice the dough into the number of cookies you want, put the slices on a cookie
sheet, and bake them for 10 to 15 minutes. The slice-and-bake approach has revolutionized
cookie baking because you no longer have to buy and mix the ingredients, which reduces
the time spent making cookies. The main responsibility of the cook is to define characteristics
about the cookie, such as size and amount, and put them in the oven.
This approach is similar to the second method of developing an ActiveX control,
which is creating an ActiveX control based on an existing control. The existing control
supplies certain features and functions you can use, enhance, and extend. You also
can add your own custom properties, methods, and events to the control's predefined
list. The slice-and-bake approach is faster than the Tollhouse approach because it
gives you a starting point for your development efforts.
The M&M Cookie Approach
The M&M cookie approach is very similar to the slice-and-bake approach. After
the invention of slice-and-bake chocolate chip cookies, people grew tired of eating
the same type of cookie. This quandary was probably caused by the shorter cookie-making
time, which led to people eating more cookies. Pillsbury decided to make a different
type of cookie based on existing delicacies and created the M&M cookie. The makers
of this cookie used two existing sweets that people loved--M&Ms and chocolate
chip cookies--to create this new-and- improved cookie.
This revolutionary approach is similar to the third method for building controls,
which makes use of several existing controls to build a new one. Using this approach,
you can synergize the best features and functions of several controls to create an
even better control. This approach is very similar to the slice-and-bake approach
because both approaches take advantage of the power of existing controls. The difference
is that the M&M approach uses the power of multiple controls, not just individual
ones. Just as you can with the slice-and-bake approach, you can use the existing
properties, methods, and events as you develop new ones. The M&M approach also
reduces your development time.
What Tools Are Available?
Now that you're familiar with the different approaches to constructing ActiveX
and Design-time ActiveX controls, the lesson describes some of the tools you can
use to build these controls. These tools include Microsoft Visual Basic version 5.0
and the VBCCE, Microsoft Visual C++, Borland C++ and Delphi, and Symantec C++, to
name just a few. The tools from Microsoft are probably the most popular, so they're
covered in this section of the lesson.
Using the Microsoft Visual Basic
Family
Of all the tools you can use to build an ActiveX control, Microsoft Visual Basic
version 5.0 and the Microsoft VBCCE are the simplest and most user-friendly. Microsoft
included the ability to create ActiveX and Design-time ActiveX controls in version
5.0 of the Visual Basic Enterprise Edition. This feature and the ability to natively
compile the Visual Basic code are two of the best features in this version of the
tool. Microsoft also extracted the control creation feature and marketed it as its
own stripped-down version of the tool called the Visual Basic Control Creation Edition
(VBCCE). You can get the VBCCE, a subset of the Visual Basic 5.0 Enterprise Edition,
as a separate product. Microsoft targets the VBCCE at those developers who want to
create custom controls rather than client-server applications. By doing so, Microsoft
offers developers a choice in their selection of tools, making it possible for you
to use the control creation capabilities without having to buy the full-blown Visual
Basic product. Figure 16.1 illustrates the relationship between Visual Basic 5.0
Enterprise Edition and VBCCE.
Figure 16.1.
Visual Basic 5.0 Enterprise Edition and one of its offspring: VBCCE.
Regardless of which Visual Basic product is used, the features and functions are
the same. Those of you who have used Visual Basic before know that it's the easiest
control creation tool to learn. For those who haven't, you have some familiarity
with this language from the lessons that have taught VBScript, a subset of the Visual
Basic language. Visual Basic can now natively compile the fourth-generation language,
so this feature should resolve some of the doubts you have about developing a control
with Visual Basic and sacrificing performance for ease of use.
You can use Visual Basic to create ActiveX and Design-time ActiveX controls that
can be used in your client-server and Web-based applications. Visual Basic offers
a user-friendly, powerful integrated development environment (IDE). This robust IDE
enables you to both code and test your control to ensure its quality.
Using Microsoft Visual C++
For hard-core developers, Visual C++ also offers the ability to develop ActiveX
and Design-time ActiveX controls. As someone who has developed extensively with both
Visual Basic and C, I can tell you that C and C++ aren't very user-friendly and are
much harder to learn and comprehend than Visual Basic. The main advantage to using
Visual C++, however, is better performance in your control's speed. This performance
improvement results from C and C++ being third-generation languages, as opposed to
Visual Basic, a fourth-generation language. Even with Visual Basic's advance in native
compiling, applications and controls built with Visual C++ still tend to outperform
those written in Visual Basic.
There are three different methods for developing a control with Visual C++. First,
you can use the powerful features of the Microsoft Foundation Classes (MFC) packaged
as part of the Visual C++ product. This method is the easiest one. Using the MFC
means you don't have to know the intricacies of the Microsoft Component Object Model
(COM) that all controls are founded on. Although you can create small controls that
download relatively quickly, the drawback to this approach is that you must also
install the control's MFC library on the user's machine. This DLL file is approximately
1M.
The second method uses the BASECTL samples that were first introduced
in the ActiveX Development Kit. BASECTL includes three main components that
help you develop ActiveX controls. The first component--called FRAMEWRK--gives
you the framework for constructing ActiveX controls. The other two components included
with BASECTL are TODOSVR and WEBIMAGE; they are actually
ActiveX control samples built by using the FRAMEWRK method. Using this method,
you can build the smallest and fastest ActiveX controls of the three methods; however,
you must have a thorough knowledge of OLE, COM, and ActiveX technologies.
The final method uses the ActiveX Template Library (ATL), which is a library of
C++ templates that enables you to quickly create small, fast ActiveX controls. These
templates let you avoid some of the details of OLE, but you still need to know COM
and ActiveX technology.
Regardless of which method you use, Visual C++ offers a challenging, powerful
tool for constructing your ActiveX controls.
Introducing the Latest Member of
the VB Family
Visual Basic had a recent addition to its family that makes creating ActiveX and
Design-time ActiveX controls a breeze. The Visual Basic Control Creation Edition
(VBCCE) simplifies the process of building your own custom controls. The objects
you create can then be used in your client-server and Web-based applications. With
the invention of VBCCE, you have a robust tool that encourages and facilitates both
productivity and reusability. In this section, you get a tour of the Visual Basic
Control Creation Edition and its features. Since entire guides are written about this
tool, this overview isn't an exhaustive discussion on the subject. You will, however,
understand the basic methods of using the tool to create your controls. After this
overview, you get to try your hand at creating an ActiveX and a Design-time ActiveX
control.
VBCCE: The New Kid on the Block
This section isn't about some child prodigy music group that fizzled out. Instead,
this part of the lesson takes you on a guided tour of the features and functions
of the Visual Basic Control Creation Edition. This tour serves only as an introduction
to the wonderful world of VBCCE.
As stated, VBCCE is a trimmed-down version of Visual Basic 5.0 Enterprise Edition.
As you might expect, the integrated development environment (IDE) looks the same
for both tools. VBCCE offers a very user-friendly workspace, whether you've worked
with Visual Basic before or not. All the tools and features are just a mouse click
away. Figure 16.2 shows Visual Basic's developer-friendly environment.
As you can tell, VBCCE's IDE is analogous to a cockpit, where everything you need
to construct your control is right at your fingertips. The following sections briefly
explain the VBCCE features.
Figure 16.2.
The VBCCE integrated development environment.
The Toolbox
The VBCCE toolbox is similar in purpose to other toolboxes, such as the HTML Layout
Editor toolbox found in Visual InterDev. All the controls that are registered on
your machine show up in the VBCCE. The ActiveX controls in the toolbox make it easier
to develop your own custom controls. You can click any of the controls and insert
it into your Visual Basic container form. You can customize the toolbox's look by
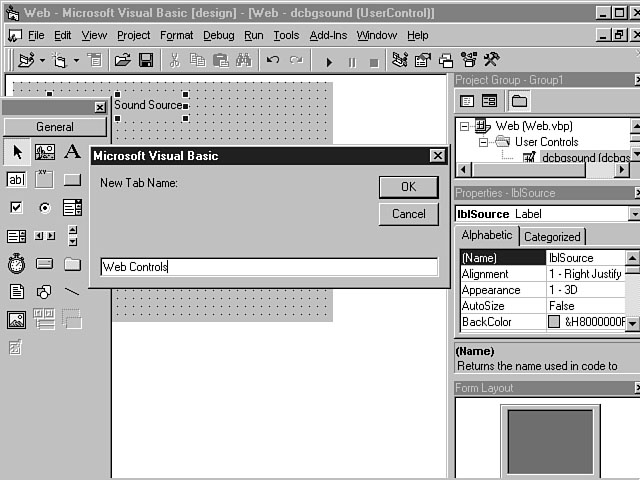
creating additional tabs for organizing your controls. To do this, right-click the
toolbox to display the shortcut menu and choose Add Tab. You can then type the name
of the new tab in the dialog window, as shown in Figure 16.3.
You also can add or remove controls on the toolbox by selecting Components from
the toolbox shortcut menu. You then see the Components dialog window, which allows
you to include or remove toolbox controls, as shown in Figure 16.4.
From this dialog window, you can select or deselect controls by clicking the checkbox
to the left of the control. After you have finished making your selections, click
OK and the toolbox then reflects your changes.
Figure 16.3.
Adding a new tab to organize your controls.
Figure 16.4.
The Components dialog window.
The Project Explorer
When you begin working with VBCCE, you initiate a project just as you do with
Visual InterDev, Visual Basic, and other related tools. This project provides a house
for your control, as well as its container, attributes, properties, methods, and
events. The Project Explorer works much like Windows Explorer; it enables you to
view all the objects and files in your project. You can move and resize the Project
Explorer to get a clearer view of your project files. The Project Explorer organizes
the files into folders that contain items such as forms and user controls. You can
open folders in the Project Explorer to view their contents and open individual files
to work in the VBCCE project environment.
The UserControl Designer
The UserControl Designer is the container for the control during design-time,
enabling you to work with and define the control's properties and characteristics.
You can insert ActiveX controls into the designer and then assign their properties
and get instant feedback about the control's appearance.
You can set the properties for the UserControl Designer, which affects the appearance
and characteristics of controls in the designer. In other words, you can affect some
of the attributes of the control you're creating by setting the properties of the
designer container, in addition to the control's properties. For example, you can
set the background color for the designer and let the control assume this color.
From the UserControl Designer, you also can double-click a control to open the code
window.
The Code Window
The code window displays the Visual Basic code for your project. When you're creating
a control, the code in this window represents all the logic needed to make your ActiveX
or Design-time ActiveX control work. You can double-click a control on the form or
double-click the form itself to activate the code window and display the entire set
of code procedures and declarations for the project. If you double-click a specific
control, you're taken to the procedure in the project code block for that control.
The code window enables you to enter the necessary Visual Basic logic for your control
and declare any objects or variables.
The Properties Window
The properties window is similar to the other property windows you have worked
with during the first two weeks of lessons. The VBCCE properties window displays
all the properties for the control you're constructing, for the container form, and
for existing controls you're using to create your custom control. You can view the
properties in alphabetical order, which is the default, or you can click the Categorized
tab to display the properties by category.
Other IDE Features
The form layout window appears below the properties window; use it to determine
the proper placement of forms used in your project. This window displays a computer
monitor as a visual guide to help you position your form. You also can view the monitor
size for your layout design by using the Resolution Guides found on the form's layout
shortcut menu.
VBCCE has several toolbars you can use to create, compile, and test your controls.
It also contains an integrated debugger that enables you to step through your code
and monitor project variables.
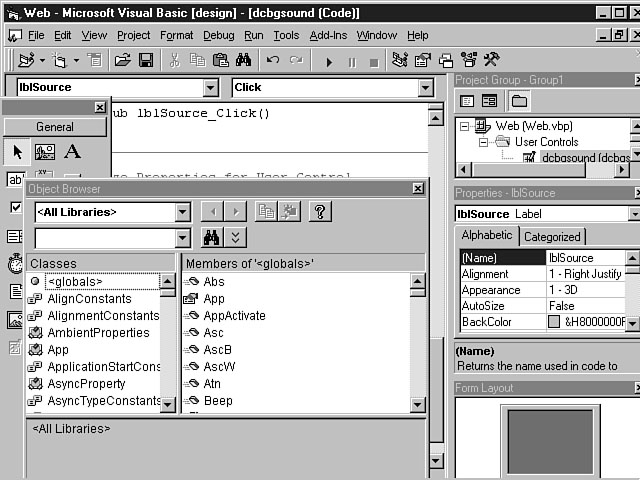
With the Object Browser, you can find out which functions can be used with your
ActiveX controls. You can open the Object Browser and view all the ActiveX controls
that have been registered on your machine and that you have chosen to display in
the VBCCE environment. This list can include any custom controls you have created.
Figure 16.5 displays the enhanced Object Browser found in VBCCE and Visual Basic
5.0.
Figure 16.5.
The Object Browser.
The Object Browser is an excellent tool that lists the methods, properties, and
functions for a certain control. The left side of the Object Browser displays the
classes, and the right side of the window reveals the class members, or functions,
associated with the control class. The bottom portion of the window displays the
syntax for a selected function, which gives you a helpful guide for correctly implementing
or using a property or function. Another feature includes the Find icon that enables
you to search for specific text in your class libraries.
Exploring the UserControl Object
The UserControl object is the basis for all ActiveX controls. Earlier
in the lesson, you learned the three approaches to building an ActiveX control, which
involved either creating a brand-new control from scratch or combining and customizing
the power of existing controls. Regardless of the method you choose, your custom
ActiveX control will always consist of the UserControl object.
The UserControl object is analogous to a form in Visual Basic. For those
of you who aren't VB programmers, a form object is included with every project you
create in Visual Basic. The form supplies a visual interface for your controls to
reside in. For GUI applications, the form represents the window that's displayed
to the user at runtime. For ActiveX controls, the UserControl object serves
this basic purpose. Similar to the Visual Basic form object, the UserControl
object contains many properties, methods, and events that you can customize. Later
in toChapter's lesson, you learn how to create the UserControl object.
Understanding ActiveX Properties
ActiveX controls consist of three basic properties: ambient, extender, and custom.
Ambient properties contain information about the characteristics of the control's
container, and extender properties are supplied by the container at runtime and result
from a combination of the control and the container. Custom properties are those
properties you design and implement. The following sections explain each of these
types of properties in more detail.
NOTE: Because of their visual nature,
the properties covered in the following sections pertain mainly to regular ActiveX
controls.
Ambient Properties
Ambient properties are supplied by the container so that the control fits into
its environment more easily. The first time I visited the Microsoft campus, I wore
a suit. Those of you who have toured the campus or are familiar with the Microsoft
environment know that suits aren't the norm. Obviously, I looked out of place. Based
on my discovery of the Microsoft environment's characteristics, I adapted my attire
to blend in with my environment. Ambient properties can be used similarly by your
control. A container "publicizes" its ambient properties to the control
so that the control can blend in with its environment and not look out of place.
For example, a container's BackColor property is an ambient property that
can be used to set the background color of the ActiveX control. In this way, the
user won't see the ActiveX control as separate from its container. The key factors
in ambient properties are information and communication. The container communicates
information about its properties, and the ActiveX control receives the information
and adapts accordingly. As a developer, you facilitate this communication by using
the container's properties in the ActiveX control as it's designed and created.
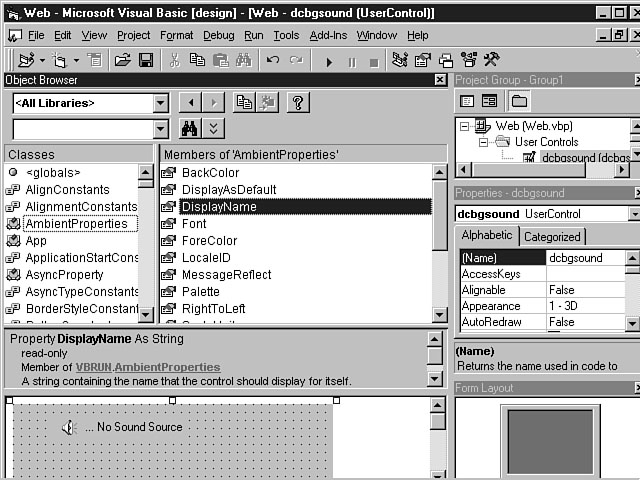
You can find a container's ambient properties by using the AmbientProperties
object, which is accessed through the UserControl object's ambient property.
This is the syntax for finding ambient properties:
UserControl.Ambient.AmbientPropertyName
In this code line, AmbientPropertyName is the name of the ambient property you
want to find. These properties are unique to the control and can only be accessed
by using the UserControl object.
Ambient properties are used primarily during design-time. What if the ActiveX
container's properties change at runtime? You can call the UserControl_AmbientChanged
event procedure to adapt the control's property at runtime to match that of the container.
Table 16.1 lists some of the more common ambient properties.
Table 16.1. Common ambient properties.
| Property |
Description |
| DisplayAsDefault |
Indicates whether the control is the default control for the container |
| DisplayName |
Specifies the control's instance name |
| BackColor |
Identifies the container's background color |
| ForeColor |
Identifies the container's foreground color |
| Font |
Specifies the preferred font for the control's text |
| TextAlign |
Specifies the preferred alignment of the control's text |
| UserMode |
Indicates whether the control is in design mode or run mode |
Extender Properties
The extender properties are a direct result of combining a control with a container.
These properties are associated with the Extender object, which is typically
created by integrating a control with a container. By using the UserControl
object, you can access the Extender object and its properties from within
your ActiveX control. Common examples of extender properties include size, placement,
tab order sequence, and whether a control is enabled.
NOTE: Seasoned Visual C++ and Control
Development Kit (CDK) developers might already be familiar with the extender properties
but know them as extended properties, as they're called in the CDK.
Custom Properties
You determine how this category of properties is implemented. Custom properties
enable you to design those features that never go any further than a third-party
feature wish list. You have a lot of freedom in designing custom properties for your
ActiveX control. In the following section, you learn how to implement custom properties.
Constructing a Control with Visual
Basic Control Creation Edition
The ActiveX categories and approaches mentioned, along with the tools outlined
in the lesson so far, should have convinced you why you should build ActiveX and
Design-time ActiveX controls. The process is as easy as baking cookies! Seriously,
you need to devote some time to building your controls, but the process has been
simplified with the advent of new methods and tools, such as Visual Basic Control
Creation Edition, to create ActiveX and Design-time ActiveX controls.
The lesson now shifts into high gear and leads you through the cookie-cutter approach
to building ActiveX controls. During this part of the lesson, you learn how to construct
a Design-time ActiveX control and integrate the control into your application.
NOTE: This part of the lesson assumes
you're running Visual Basic Control Creation Edition. If you don't have VBCCE loaded
on your machine, please do so now before you go on. You can install VBCCE from the
CD-ROM included with this guide. This part of the lesson is very hands-on, so you
will get more out of it if you perform the tasks explained in this lesson as you
go along.
Examining the End Result
The first step is constructing the Design-time ActiveX control. You're going to
build a custom control that enables you to design a background sound for your HTML
web page. Figure 16.6 shows what this Design-time control looks like.
Figure 16.6.
The end result.
The main purpose of this control is to enable you to specify the location of a
sound file. Based on a developer's specifications, the Design-time control creates
the runtime text to do this. Now that you have a picture of where you're going, it's
time to start VBCCE and design the control's appearance.
Creating the Custom Control
When you initially start VBCCE, you see the New Project dialog window, shown in
Fig- ure 16.7.
Figure 16.7.
Creating a project.
In this dialog window, you can create a Visual Basic project for your control.
Here, you can choose to create an ActiveX control project, a standard Visual Basic
project, or a control group project. This dialog window has New, Existing, and Recent
tabs. The Existing tab enables you to open an existing project, and the Recent tab
gives you an easy way to find your most recently opened projects. Select ActiveX
Control project from the New tab and click the Open button. VBCCE then creates an
ActiveX control project, inserting the UserControl object and displaying
its visual designer in the VBCCE workspace, as shown in Figure 16.8.
Figure 16.8.
The UserControl Designer.
Next, you need to insert the existing controls that will be used to construct
this new custom control. Click the mouse on the label control in the toolbox and
insert it into the UserControl Designer. Select the label control and insert an image
control on the left side of the label, as shown in Figure 16.9.
Figure 16.9.
Designing the look of a control.
As you can tell, the label's caption is now covered up by the image, so you need
to change the label's Alignment property to the value of Right Justify.
Also, you need to change the label's Name property to lblSource
and the label's Caption property to ... No Source Specified.
Next, click the image control to select the image for the control. After you have
selected the image control, click the ellipsis displayed for the value of the Picture
property in the control's properties window. The Load Picture dialog window opens
so you can choose an image to insert into the image control. You need to select the
bgsound.bmp file, which is on this guide's CD-ROM, and click the Open button.
The next step is to name the Design-time control and the project. You can change
the name of the Design-time control by choosing the UserControl object in
the Project Explorer window. The properties window then displays the properties for
the UserControl, enabling you to change the text of the Name property
to dcbgsound. After you enter the new name, it shows up in the Project Explorer
window. Next, select the project file in the Project Explorer window, and change
the Name property in the properties window to Web. Your custom
control should now look like the control illustrated in Figure 16.10.
Figure 16.10.
The background sound Design-time control.
You should save your work now. You can do this by choosing Save Project Group
from the File menu. You're prompted to save both the control and the project. To
confirm the save, click Save for all these files.
Developing the Controls Interface
Now you're ready to build an interface for your control that enables developers
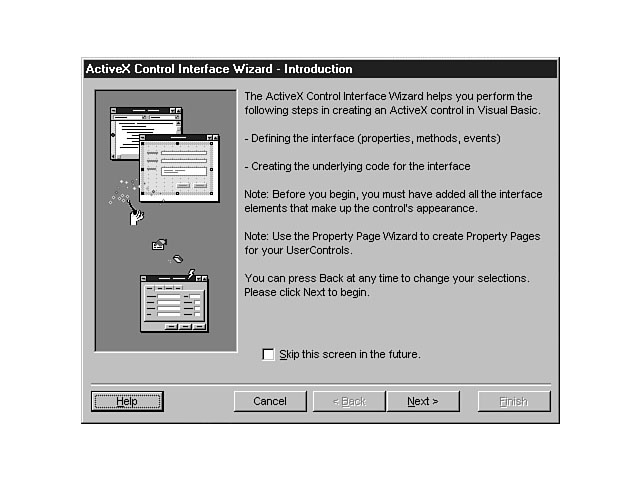
to interact with your Design-time control. Choose ActiveX Control Interface Wizard
from the Add-Ins menu. This wizard offers a visual guide to help you construct the
properties and characteristics of the control that are available to the developer.
Figure 16.11 shows the wizard's first dialog window.
This first dialog window gives you a brief overview and explanation of the interface
creation process for your control. For future uses of the wizard, you can choose
to ignore this window. Click the Next button to start the process. You then see a
dialog window where you can select the interface members for your control. All the
properties for the controls you have used to design your custom control appear as
selected, as shown in Figure 16.12.
Figure 16.11.
The ActiveX Control Interface Wizard.
Figure 16.12.
Choosing the properties, methods, and events.
This dialog window displays a listbox on the left side that displays all the properties,
methods, and events for the two controls you have chosen to use in your design. The
listbox on the right side displays the properties, methods, and events that have
been selected for your custom control. Use the buttons between the listboxes to insert
or remove these items, either individually or all at once. For this example, remove
all the selected items by clicking the button with the double arrows pointing toward
the Available names listbox. When you're done, click the Next button to go to the
next dialog window and create your own custom interface members. Click the New button
to add a custom property for your control, as shown in Figure 16.13.
Figure 16.13.
Creating a custom control property.
From the dialog window pictured in Figure 16.13, you can create custom properties,
me-thods, and events for your Design-time control. Make sure that the Property radio
button is selected and enter SoundSource for the name of the custom property.
A developer can use this property to choose the source of the background sound file.
After you confirm your entries and click OK, the newly created property appears in
the Create Custom Interface Members dialog window, as shown in Figure 16.14.
Figure 16.14.
The Create Custom Interface Members dialog window.
The listbox in this dialog window displays all the custom properties, methods,
and events for your control. From here, you can add, edit, and delete any of the
entries in the list. Click the New button and create another custom property named
Repeat. This property is used to indicate the number of times the sound
file is repeated.
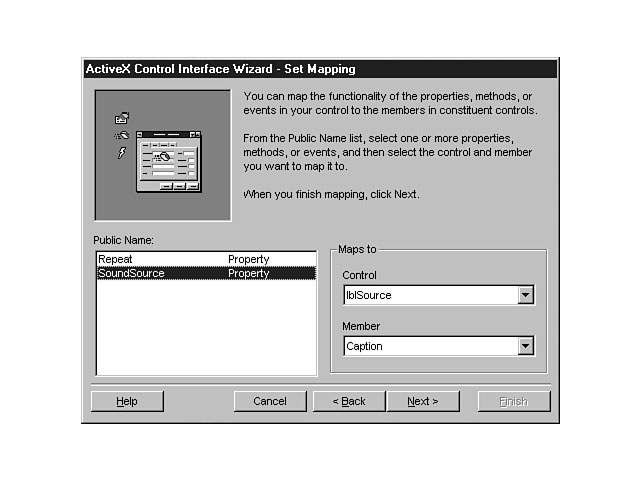
After you have created the custom properties for your control, click the Next
button to go to the Set Mapping dialog window. You can use this dialog window to
associate the custom properties, methods, and events you have designed for your control
to those of the constituent controls, which represent the existing controls you used
to construct your custom control.
For this example, choose the SoundSource property in the Public Names
listbox and select lblSource from the Control drop-down listbox. Once you have selected
the lblSource control, all of its pre-defined members appear in the Member drop-down
listbox. Choose Caption from the list of member items. This two-step process associates
the caption on the label with the SoundSource property, which is used to
enter a directory path and filename for the background sound. The association needs
to be made so that the control can display the source of the background sound to
the developer at design time. Figure 16.15 shows the end result of this mapping.
Figure 16.15.
Mapping a custom property.
After you have mapped the SoundSource property, click the Next button
to set the attributes for the Repeat property. The Set Attributes dialog
window is displayed, where you set the attributes for any members you haven't mapped
to a constituent control. From this dialog window, you can choose a member and set
its data type and default value. You also can design its runtime and design-time
controls and any arguments it should have. You should define arguments for members
such as methods and events. You also can give a description for the member that tells
a developer about its function and purpose. For the Repeat property, choose
a data type of Integer and set its default value to -1.
Then click Next to complete the process and create the interface members you have
defined for the control. The ActiveX Control Interface Wizard creates a summary report
that outlines the remaining tasks you need to perform to finish developing and testing
your control. You can choose to save this report and refer to it later, as shown
in Figure 16.16.
Figure 16.16.
Reviewing the to-do list.
Implementing the Runtime Text
One of the key differences between an ActiveX control and a Design-time ActiveX
control is that a Design-time ActiveX control doesn't have a visual interface at
runtime. Instead, a Design-time control supplies text that can consist of HTML and
script code that persists at runtime. This runtime text provides the smart logic
for your application, based on the properties and attributes you set for the control
at runtime. So far, the lesson has guided you through constructing your control's
appearance and establishing the available properties. Now you're ready for the final
step of the control creation process, which is providing the runtime text that will
survive, or persist, for your control when the application is executed.
Adding the IActiveDesigner Interface
Design-time controls provide runtime text to an application by using the IActiveDesigner
interface. You can use this interface to publish text that a container can access
when an application is running, even though the control is no longer "alive."
To add this interface, choose References from the Project menu. Next, choose Microsoft
Web Design-Time Control Type Library from the list of items shown in Figure 16.17.
NOTE: If the name of this library isn't
in the list, you can click the Browse button to search for and select the file that
supports the Design-Time Control Type Library. The name of this file is webdc.tlb
and is on this guide's CD-ROM. Once you add this file, you can then select the library
from the list.
Figure 16.17.
Adding the IActiveDesigner reference.
After you add the IActiveDesigner reference to your project, you need
to provide the HTML and script code for the runtime text. This process requires two
major steps. First, add a declaration for the IRunTimeText interface by
double-clicking on the UserControl Designer to display the control's code procedures.
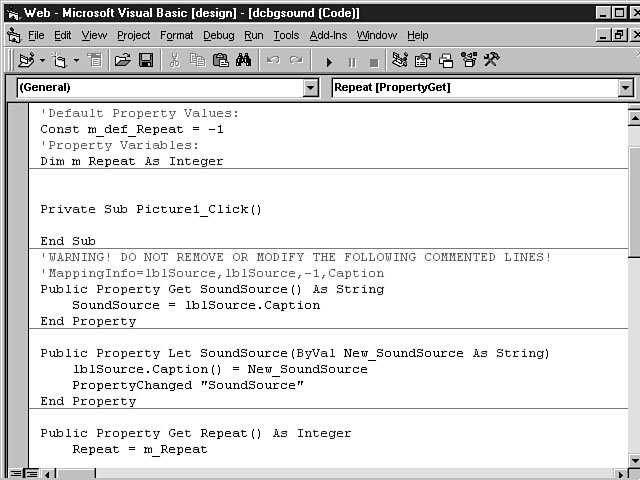
Listing 16.1 shows the code that has been generated so far for the background sound
Design-time control.
Listing 16.1. Reviewing the generated
code.
`Default Property Values:
Const m_def_Repeat = -1
`Property Variables:
Dim m_Repeat As Integer

Private Sub Picture1_Click()

End Sub
`WARNING! DO NOT REMOVE OR MODIFY THE FOLLOWING COMMENTED LINES!
`MappingInfo=lblSource,lblSource,-1,Caption
Public Property Get SoundSource() As String
SoundSource = lblSource.Caption
End Property

Public Property Let SoundSource(ByVal New_SoundSource As String)
lblSource.Caption() = New_SoundSource
PropertyChanged "SoundSource"
End Property

Public Property Get Repeat() As Integer
Repeat = m_Repeat
End Property

Public Property Let Repeat(ByVal New_Repeat As Integer)
m_Repeat = New_Repeat
PropertyChanged "Repeat"
End Property

`Initialize Properties for User Control
Private Sub UserControl_InitProperties()
m_Repeat = m_def_Repeat
End Sub

`Load property values from storage
Private Sub UserControl_ReadProperties(PropBag As PropertyBag)

lblSource.Caption = PropBag.ReadProperty("SoundSource", "... No Sound Source")
m_Repeat = PropBag.ReadProperty("Repeat", m_def_Repeat)
End Sub

`Write property values to storage
Private Sub UserControl_WriteProperties(PropBag As PropertyBag)

Call PropBag.WriteProperty("SoundSource", lblSource.Caption,
"... No Sound Source")
Call PropBag.WriteProperty("Repeat", m_Repeat, m_def_Repeat)
End Sub
Figure 16.18 shows the code window containing the procedure code from Listing
16.1 for the Design-time control.
From this window, you can move through the different procedures for the control
and add the necessary logic. The beginning of this file contains the general declarations
for the control. Add the following definition for the IProvideRuntimeText
interface to the declarations section:
Option Explicit
Implements IProvideRuntimeText
NOTE: One of VBCCE's exciting features
is the Auto List Members function, which gives you a pop-up list of choices
as you type in your code. When you enter the preceding lines of code, notice what
happens after you type the word Implements and as you type IProvideRuntimeText.
You get a list of choices that reacts and changes as you type the letters. You can
select the item from the list at any time during this process and it's inserted into
your code.
This feature is a good time-saver and helps you avoid typing mistakes. VBCCE has
the intelligent code editor that makes this feature and other smart editing features
possible.
Figure 16.18.
Viewing the procedures.
Once you define the interface definition, you're ready for the second step: selecting
the IProvideRuntimeText object from the drop-down listbox in the code window,
as seen in Figure 16.19.
After you select this object, the GetRuntimeText function is created,
and you can add the code in Listing 16.2.
Figure 16.19.
Implementing the procedure.
Listing 16.2. Coding the runtime
text.
Private Function IProvideRuntimeText_GetRuntimeText() As String

Dim strText As String
Dim strQuote As String

strQuote = Chr$(34)
strText = "<BGSOUND SRC=" & strQuote & lblSource.Caption & strQuote
strText = strText & " LOOP=" & strQuote & Repeat & strQuote & ">"
IProvideRuntimeText_GetRuntimeText = strText

End Function
The code in this example declares two variables used to format the runtime text,
which must be sent to the container as a string. The strQuote variable stores
the ASCII character for a quotation and is used to enclose the values that appear
in the runtime text in quotes. The strText variable is used to store the
runtime text for the control, which includes the <BGSOUND> tag, the
label's caption, the LOOP attribute, and the value of the Repeat
property. The last statement of the code block sets the function name equal to the
strText variable. Do you know why a function is used instead of a subprocedure?
Refer back to the section on functions and subprocedures in the lesson on Chapter 7,
"Extending Your Web Page Through Client-Side Script," if you need help
answering this question.
After you include the code for the runtime text procedure, you're ready to compile
the Design-time control and test the results. Choose Make Web.ocx from the File menu
to create your Design-time control. This action compiles the code for your control
to create an OCX file and, when done, automatically registers the control on your
machine. You can then integrate and use the control in your applications.
Integrating the Control into Your
Application
In the preceding section, you developed and compiled the code to build the OCX
Design-time control. This section shows you how to integrate the control into your
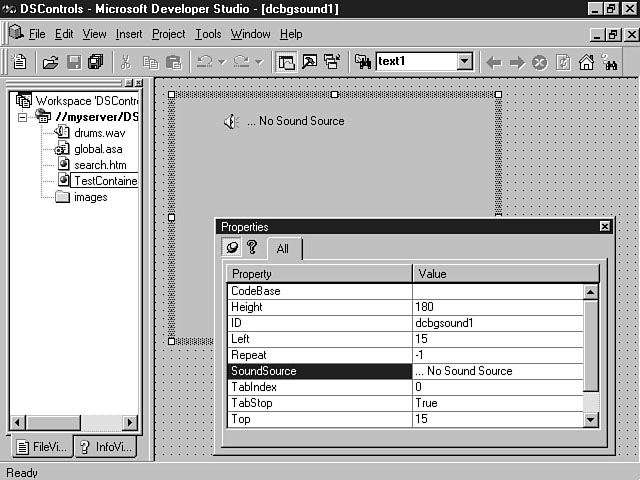
application and test its functionality. You can create a Visual InterDev project
and insert the control into a web page. The control appears in the Insert ActiveX
dialog window so you can select it from the list. Next, design the properties for
your control by using the Object Editor, as shown in Figure 16.20.
Figure 16.20.
Inserting the Design-time control.
Using the Object Editor, you can set the Repeat and SoundSource
properties and close the ed-itor. The object and its runtime text are inserted into
the web page, as shown in Figure 16.21.
Figure 16.21.
Viewing the results.
Notice that the runtime text is formatted properly, as though you had entered
the code in the web page yourself. This simple example shows how easy it is to construct
a Design-time control. You can create powerful, useful controls in a short time with
a tool like the VBCCE.
A Final Thought on Testing
The example in this lesson taught you how to design and build a Design-time control.
The control you built was targeted specifically for a Web-based application, which
is why you used Visual InterDev to integrate and test the control. Also, because
the control was a Design-time control, you needed to actually see how the control
worked. You can use the VBCCE to create regular ActiveX controls, which do have visual
components that persist at runtime. You can create standard Visual Basic projects,
as mentioned earlier, to test the implementation of your controls. These projects
enable you to construct a form, insert the ActiveX control into the form, and then
build an executable application to test the results. You also can save this test
application project with the ActiveX control project as a VBCCE group project. This
feature enables you to bundle a related group of projects, thereby associating the
control project and its test application.
Summary
The lesson toChapter has given you many reasons for creating your own custom ActiveX
and Design-time ActiveX controls. The simplified process and tools, plus the ability
to meet your application's needs, are compelling reasons to develop your own custom
controls. It's easy to see why Visual Basic is continuing to take the development
world by storm. Its straightfoward, user-friendly environment makes developers' jobs
much easier.
Now review what you learned toChapter. First, the lesson explained why you should
build Design-time controls. You discovered that developing ActiveX and Design-time
ActiveX controls is as easy as baking cookies. Next, you learned about the tools
available to build these controls. Specifically, the lesson gave you an overview
of two of the more popular tools for ActiveX control development: Visual C++ and
Visual Basic Control Creation Edition. Next, you got an introductory tour into the
world of VBCCE. You learned about its features and functions and how they can help
you to construct ActiveX controls.
The latter part of the Chapter's lesson focused on constructing and testing a Design-time
ActiveX control. You learned step by step how to build a Design-time control. The
lesson covered everything from designing the control's appearance to implementing
the runtime text for the control. Next, you learned how to integrate the control
into an application. The last section gave you a final thought on testing an ActiveX
control.
Q&A
- Q How does an ActiveX control created with Visual Basic work?
AActiveX controls developed with Visual Basic work much like Java applets because
these controls are interpreted by the virtual machine on the client computer. The
virtual machine (MSVBVM5.DLL) is automatically downloaded and installed when a user
accesses a web page containing a Visual Basic ActiveX control. Controls that use
a newer version of the virtual machine also cause the virtual machine to be downloaded
and installed to the user's client machine.
Q What are the main differences between VBCCE and Visual Basic Enterprise Edition
AVisual Basic Control Creation Edition includes the new intelligent code editor,
the ability to create forms, an interactive debugger, and the ability to create ActiveX
and Design-time ActiveX controls. The full version of Visual Basic 5.0 has these
features as well as other features not found in the VBCCE. These additional VB features
include the JET database engine, report writing, and version control through Visual
SourceSafe. VBCCE is included as part of the Visual Basic product but is also available
as a separate product.
Workshop
ToChapter's lesson gave you an opportunity to develop a Design-time ActiveX control.
For toChapter's workshop, you get a chance to build an ActiveX control so you can see
what it's like to design a visual control that persists at runtime. This workshop
helps you understand the differences between constructing an ActiveX control and
a Design-time ActiveX control. The advantage to this workshop is that you get to
design the ActiveX control of your choice. You should take this opportunity to implement
and extend the features of an existing ActiveX control. Think about the new super
control you want to develop and then use VBCCE to design and develop it.
Quiz
- 1. What interface enables your Design-time control's text to persist at
runtime?
2 What unique VBCCE feature do you use to create custom properties for your control?
3.What is the UserControl object?
Quiz Answers
- 1. IActiveDesigner.
2. The ActiveX Control Interface Wizard.
3. Every ActiveX control created with Visual Basic consists of the UserControl
object, which provides a visual designer for creating your control and a code shell
to include your control's functionality.
|


 MS Access
1109
MS Access
1109
 C++
1222
C++
1222
 HTML
584
HTML
584
 JavaScript
616
JavaScript
616
 Vbscript
873
Vbscript
873
 Oracle
473
Oracle
473
 VC++
875
VC++
875
 SQL
2959
SQL
2959
 XML
514
XML
514
 Java
814
Java
814
 Perl
455
Perl
455
 Linux
451
Linux
451


