Web based School
Red Hat Linux rhl23


- A Brief Introduction to Window Managers and Motif
- Getting Motif for Linux
- General Installation Procedures
- Getting Started with X Window
- Starting X and mwm
- Working with Motif Windows in mwm
- Using the Window Menu
- Using the Keyboard in X and the Meta Key
- Using the Root Menu
- Working with Motif Clients
- Other Types of Widgets
- Customizing with Resources
- Defining Resources
- Customizing Motif
- Listing an Application's Resources
- Using the .mwmrc File
- Customizing Your Desktop with Clients
- Useful Command Line Options
- Logging into Remote Machines
- Colors
- Fonts
- Where to Go from Here
- Summary
23
Using Motif
In this chapter, you will cover the following topics:
- Installing Motif on your Linux machine.
- Some of the basic concepts required for using X Window. Displays, windows, screens, and the Client Server Architecture in X are introduced.
- An introduction to window managers, specifically the Motif Window Manager (mwm).
- Navigating in mwm windows with the keyboard and mouse.
- Widgets and their characteristics.
- Customizing your desktop with resource files and client applications, and how to set your environment to your liking.
- Using some standard X tools available in Linux.
The following assumptions are made about you, the reader, as we go further into this chapter:
- You have completely read Chapter 21, "Installing X Window on Linux," and have the X11R6 version of X Window, called XFree86, installed on your machine.
- You have played at least a little with Linux or UNIX, and know the syntax of using some basic UNIX commands such as find, cpio, tar, and ln.
As you did with XFree86, please read this entire chapter thoroughly before proceeding with the installation.
A Brief Introduction to Window Managers and Motif
How the windows in an X session are arranged is a function of a special program called the window manager. The window manager controls the look and feel of all the windows on a particular display. The window manager enables the user to move, restack,
resize, and iconify windows (that is, reduce windows to an icon).
X Window comes with three window managers by default. These managers are called the Freeware Window Manager (fvwm), the Tab Window Manager (twm) and the Open Look Window Manager (olwm). The twm is also referred to as Tom's Window Manager, after its
author, Tom LaStrange. Earlier versions of X also offered the Universal Window Manager (uwm); however, this is no longer offered because it does not conform to the X Consortium's Inter-Client Communications Conventions Manual (ICCCM) standards. Please see
Chapter 24, "OPEN LOOK and OpenWindows."
Window managers in X are different from other windowing system managers because you are allowed to choose whichever manager you like. As long as a manager follows the ICCCM standard, it can serve as your window manager.
The most prevalent commercial Linux (or UNIX-based) window manager today is the Motif Window Manager (mwm) from the OSF/Motif distribution. In fact, if you use fvwm, you see the similarities between fvwm and mwm. The Motif Window Manager is more
important now than ever before, because it has been adopted by Common Open Software Environment (COSE) as the standard interface for future UNIX GUIs. It's most famous for its borders around all the windows it displays.
Motif applications look more like a Mayan temple than a menu system. Almost every item on the screen is rectangular. A rectangular button rests on a rectangular menu bar, which may rest on another rectangular form, which sits on a square window. We will
discuss Motif in great detail in this chapter.
The latest version at the time of writing was Motif 2.0. There are several updates to Motif (1.2.3, 1.2.4, and so on), but Motif 2.0 is a major release from the last major release 1.2.4. The 2.0 release includes a lot of bug fixes, and adds Widgets to its list of convenience functions. Get an upgrade if you are running an older version, and you may be surprised to see some of your existing bugs disappear!
Getting Motif for Linux
Unlike most of the software for Linux, Motif is not free and is not shareware. You have to pay for a Motif license. The cost is approximately $150. I have listed three vendors here that can sell you Motif for Linux. Due to lack of time before going to
press, there was no time to research other vendors; you can check the Internet resources listed in Appendix A, "Linux FTP Sites and Newsgroups," for more information.
Metrolink Incorporated
4711 North PowerLine Rd.
Fort Lauderdale, FL 33309
(305) 938-0283
sales@metrolink.com
SWiM $149.95 (US)
ACC guidestore
136 Riverside
Westport, CT 06880
(800) 546-7274
orders@acc.corp.com
MOO-TIFF
InfoMagic
11950 N. Highway 89
Flagstaff, AZ 86004
(520) 526-9565
orders@infomagic.com
General Installation Procedures
Each Motif distribution has its own distinct installation procedure. The documentation provided by each vendor should give you enough to get started. By reading about one vendor's installation procedure, you can get an idea of how other distributions
are installed. For this description, I use the MetroLink installation guidelines. Other distributions may follow a different installation procedure, but you will know what to look for when you are done with the installation.
General software requirements for Motif include the following:
- XFree86 2.1 or later
- C library version of libc 4.4.4 or later
- ld.so runtime linker/loader
The Motif version on the CD-ROM at the back of the guide satisfies these requirements for you. However, if you have installed from another source, you should confirm that you meet these requirements before installing Motif.
You must do all the installation as root. Be sure that you are root before proceeding.
Motif requires the following directories to exist in the X11 installation on your machine.
/usr/lib/X11

/usr/bin/X11

/usr/include/X11
If these directories do not exist, you must create links to them from where equivalent XFree86 directories are kept. The XFree86 distributions are kept in the following directories:
/usr/X11R6/lib/X11

/usr/X11R6/bin/X11

/usr/X11R6/include/X11
In some cases, the installation program creates the required links to these directories for you. However, if you do not see these directories, you can create them with the following steps:
# ln -s /usr/X11R6/lib/X11 /usr/lib/X11

# ln -s /usr/X11R6/bin/X11 /usr/bin/X11

# ln -s /usr/X11R6/include/X11 /usr/include/X11
Check to see whether you have /lib/libXm.so.1 or /lib/libXm.so.1.2.2 installed on your machine. Remove these files before proceeding.
Also check and remove, if present, the directory (and its contents) /usr/lib/X11/Motif before you start the installation process. This way you will avoid keeping old files around.
The MetroLink distribution consists of five 3.5-inch, high-density disks. They are labeled as follows:
- Runtime 1 and 2
- Developers Disk 1, 2, and 3.
The floppy disks on Linux are addressed by a syntax that describes how to read and write them. For example, a 3.5-inch, high-density floppy disk in drive A is addressed as /dev/fd0H1440. For a 5.25-inch, high-density disk in drive B, you have to use /dev/fd1H1200. (The fd0 implies the fast floppy disk as a high-density, 3.5-inch, 1.44MB floppy disk drive. For a 5.25-inch, high-density drive as the second drive you would use /dev/fd1H1200.)
Most Motif distributions come on 3.5-inch, high-density floppy disks, so you should use /dev/fd0H1440 or /dev/fd1H1440 for drive A and B, respectively.
Now insert the first Runtime disk into your floppy drive, and issue the following commands if you are using drive A.
# cd /tmp

# cpio —extract —verbose —block-size=32 -I /dev/fd0H1440
The cpio program prompts you for the second disk. Replace the disk and press the Enter key to continue.
After cpio is finished with the extraction, you have a large file in the tmp directory. This file is called run.tar.z. Now, you have to extract all the files from file into your directory tree. Issue the following commands:
# cd /

# gzip -dc /tmp/run.tar.z | tar -xvf -
The gzip -dc command extracts all files in the compressed archive and passes the resulting tar file to the tar program. This tar program extracts (x) all the files it receives on its standard input (-), and lets you know what it's doing by being verbose
(v) while extracting each file.
Now, remove the temporary file with the following command:
# rm /tmp/run.tar.z
Do the same procedure for the developers disks. Use cpio to copy the dev.tar.z file into the tmp directory. The use the gzip command as before for the runtime libraries, except use the name dev.tar.z instead of run.tar.z.
Getting Started with X Window
On some systems, you may have to start X from the command line after you log in. On other systems, you may have to interface through the xdm client. Let's start with the easy case of the xdm manager already running on your system.
The first thing to remember is that X is very flexible. You can customize almost anything in X. Therefore, be warned that even though I attempt to describe the most common features of X, they may not work exactly as described. This is the price of flexibility. This is especially true for all the different versions of X and window managers offered in X.
Starting X and mwm
If you do not see any windows at all, and you do not see a cursor, you do not have the X server running. In this case, you have to start X yourself.
There are several steps to take before you start X.
- Confirm that startx exists in your PATH. Use the echo $PATH command to see whether /usr/X11R6/bin is in your path.
A sample startx is shown in Listing 23.1.
- Look for a file called XF86Config in /usr/X11R6/lib/X11. This file contains very hardware-specific information about your system. Read Chapters 21 and 22 to ensure that you have installed X correctly.
- Type the command startx at your prompt.
- Wait a few seconds (or minutes, depending on your hardware). You should see several messages whisk by, and the screen should change to that of a session without a window manager.
- At this point, you can run a crippled windowing system without a window manager, or you can start a window manager. For example, to get the Motif Window Manager, use the following command in an xterm. (Of course, you can use fvwm, or whatever manager
you fancy and have installed.)
mwm &
Always make a copy of XF86Config and save it away before you modify it. Do not edit this file while you are already in X.
Listing 23.1. A sample startx file.
$ less /usr/X11R6/bin/startx

#!/bin/sh

# $Xconsortium: startx.cpp,v 1.4 91/108/22 11:41:29 rws Exp $

# $Xfree86: xc/programs/xinit/startx.cpp,v 3.0 1994/05/22 00:02:28 dawes Exp $

#

# This is just a sample implementation of a slightly less primitive

# interface than xinit. It looks for user .xinitrc and .xerverrc

# files, then system xinitrc should probably do things like check

# for .Xresources file and merge them in, startup in a window manager,

# and pop a clock and serveral xterms.

#

# Site administrators are STRONGLY urged to write nicer versions.

#

userclientrc=$HOME/.xinitrc

userserverrc=$HOME/.xserverrc

sysclientrc=/usr/X11R6/lib/X11/xinit/xinitrc

sysserverrc=/usr/X11R6/lib/X11/xinit/xserverrc

clientargs=""

serverargs=""

if [ -f $userclientrc ]; then

clientargs=$userclientrc

else if [ -f $sysclientrc]; then

clientargs=$sysclientc

fi

fi

if [ -f $userserverrc ]; then

serverargs=$userserverrc

else if [ if $sysserverrc ]; then

serverargs=$sysserverrcfifiwhoseargs="client"

while [ "x$1" != "x" ]; do

case "$1" in

/''*|\.*) if [ "$whoseargs" = "client" ]; then

clientargs="$1"

else

serverargs="$1"

fi ;;

—) whoseargs="server" ;;

*) if [ "$whoseargs" = "client" ]; then

clientargs="$clientargs $1"

else

serverargs="$serverargs $1"

fi ;;

esac

shift

done

xinit $clientargs — $serverargs
By the way, you can run any ol' manager you have, fvwm, twnm, olwm, and so on. I am simply using mwm as an example. Also note that you are running the mwm in the background. If you do not do this, you can't issue any commands to the xterm. See Figure
23.1 for what your display might now look like. Keep in mind that your display may look quite different from the picture in Figure 23.1 because your startup code has different applications.
Figure 23.1. A typical Motif session.
If you are in the bash, KORN, C, or any other common shell at this point, and you forgot the &, type Ctrl-Z to put the job in the background. If you are not running the Korn or C shells, you can kill mwm with Ctrl-C, and then restart it with the ampersand.
Congratulations! You are now running Motif.
Note that a lot of things can go wrong while getting to this point. Here are a few of the most common problems:
- You cannot find the correct files. Ensure that the path includes /usr/X11/bin or the like.
- You moved the cursor into the window, but now you have to click to be able to type commands to your xterm. By itself, X Window gives the focus to a window when a cursor is moved on to it. mwm, on the other hand, requires that you actually click the
left mouse button (Button1) for that window to get focus. Focus means that all user input (keyboard and pointer) is now be sent to that window. mwm changes the color of the window border to show that it has received focus.
- There is not enough memory to run the system. This is especially true if you are on a PC-based platform. Typically, you can get away with 4MB of dynamic RAM for a simple X Window system, but you almost certainly need 8MB or more to be able to get a
reasonable response time on a PC. The memory upgrade to 8MB is well worth it, given the performance on a 4MB machine. Only the patient can live with 4MB.
- The configuration does not look right. You have to modify the default startup parameters. See the "Customizing Motif" section.
- Exiting the last command in your .xinitrc file terminates your entire X session. If your last command was an xterm and you logged off that xterm, your entire session is terminated. Generally, the last command in your .xinitrc file would be the window
manager so that terminating the window manager will also terminate your session.
Working with Motif Windows in mwm
Look at the typical xterm window in Motif, shown in Figure 23.2.
Figure 23.2. A typical xterm window.
The Title bar is the wide horizontal band on the top of the window. This contains the title for the application itself. In this case, this is the application itself, xterm. You can modify it to your needs. Try the following:
xterm -name "I am here" &
The minimize button is used to iconify this xterm. The maximize button can be used to resize the window to occupy the entire display area. All corners can be used to resize the window by using the mouse. Note the pseudo—three-dimensional appearance
of the borders.
Using the Pointer
You will now work with some of the Motif windows that you have on the screen. Typically, you work with a mouse for the pointer, so the text refers to mice at times. However, you can always substitute your device name for the word mouse or pointer, and
not lose any meaning of the discussion.
Pointers in the mwm environment typically use three buttons, called Button1, Button2, and Button3. As an affront to left-handed individuals, Button1 is usually referred to as the left button because it is the most used button of the three. The left
button on a mouse is the one that is pressed with your right index finger. When you take the pointer to an item and press a button, you are clicking the button.
If you are left-handed, you can map your mouse or pointer buttons differently. See the section entitled, "Help for Left-Handed Users," later in this chapter.
Icons and Windows
The minimize button enables you to iconify an application. An icon is a small symbol that represents an inactive window. The contents of that window are not visible, although they may be updated internally by its process. Icons can be moved around on a
screen, but they cannot be resized. Inactive windows that become active may hide icons. Icons save valuable screen space when you're using applications that do not require your constant attention.
Iconifying a Window
Move the cursor to the minimize button, and press the left button on the mouse. The window is removed from the screen, and a smaller icon is seen somewhere on the left of the screen. The minimize button is the one with the smaller square near the right
side of the frame. The maximize button is the one with the bigger square and can be found on the right side of the frame.
To restore an icon to a screen, move the cursor to the icon and click on Button1 twice in quick succession. This is known as double-clicking the mouse. Some Motif icons are shown in the bottom left side of Figure 23.3.
Figure 23.3. Typical Motif icons.
Maximizing a Window
Move the cursor to the maximize button, and press Button1. This enlarges the window to the size of the root window. This way, you can have a huge clock on your screen. Some applications, such as older versions of calc, do not adjust their internal
graphic areas when their frame is resized. This leads to annoying blank space on a screen.
Use the maximize button as a toggle. Clicking on an already maximized window causes it to revert to its size and position (also known as geometry) before it was maximized. Clicking on it again remaximizes it.
Avoid resizing a window when running a vi session under an xterm. This leads to unpredictable results and may cause vi to behave very strangely.
Sizing a Window
The entire frame on a Motif window is a control that enables you to resize the window. See Figure 23.2 for the size controls. The four corners enable you to stretch the window by each corner. The four long bars let you move the edges of the window with
the mouse.
To stretch the window using a corner, move the mouse to that corner. Press Button1 and, while keeping it pressed, move the mouse. You should see the cursor change its shape to a double-headed arrow, and a thin border will appear, indicating the size and
orientation of the current stretch operation. Size the window by moving the mouse with Button1 pressed. Release the button when you have achieved the desired size.
Note that some applications do not have these sizing controls enabled. An example is the cute, but not very useful, pointer tracking program called xeyes, or the clock program called oclock. (See Figure 23.4.)
Figure 23.4. The oclock program has a window without resize borders.
To move the edges of the window, move the mouse to that edge. You should see your cursor change shape to a vertical double-headed arrow if you are on a horizontal edge (top or bottom of window). As you move the pointer, a thin border will appear
indicating the size and orientation of the current stretch operation. If you are on a vertical edge, the double-headed arrow is horizontal. Press Button1 and, while keeping it pressed, move the pointer around. This moves the edge along with your pointer.
Release the button when you have the edge where you want it.
While you are resizing this window, you see a small box come up in the center of the display. This box contains the size of the window in pixels if it's a graphics image, or in rows and columns (in number of characters) if it's an xterm. On some
systems, you can use the arrow keys on your keyboard to achieve precision when resizing your windows. Remember to keep the button pressed while you use the arrow keys on your keyboard to do the precise adjustment.
Focus and Selecting a Window
You can select a window or icon to get focus by moving the pointer to that item and pressing the left button. This moves the window or icon to the top of the stack. This way, the window or icon isn't obscured by any other screen item.
When a window has focus, it collects all the user input from the pointer and the keyboard. There are two types of focus for a window: click to type and explicit. The click to type focus requires a user to click a pointer button in a window for it to get
focus. The explicit focus requires only that the cursor be in the window for the window to get focus. Explicit focus is sometimes referred to as real estate driven focus.
In some cases, you want to have the focus where the mouse is, without having to click the pointer button. Sometimes this is not useful for touch typists, because a single movement of the pointer can have the keystroke sent to the wrong window.
Sometimes it's a good idea to click on the frame to get focus to a window because clicking in the window might accidentally press a button or other control in the window.
After you give the focus to a client, it collects all typed or graphics information until the user clicks elsewhere.
Getting focus also raises the window to the top of the stack. The window frame color changes at this point. You can set the focus to an icon too by selecting it with a mouse. The name of the icon expands at that point, and you see the window menu for
that icon. You can move the mouse away from the menu, but the icon retains the focus until you click elsewhere.
The color change scheme depends on your site's default colors. In some cases, you may not see any color change at all if the focused and out-of-focus colors are the same.
Moving a Window or Icon
In order to move a window's location on the screen, complete the following steps:
- Move the cursor on top of the title bar.
- Press and hold down pointer Button1.
- Move the pointer to the desired location. You should see an outline of the window border move with your pointer.
- Place the outline at the part of the screen where you want your window to be. This is referred to as dragging the window.
- Release Button1. The window now appears at the new location. It is also the window with the focus by default.
This procedure can be duplicated for an icon. In the case of an icon, you click and drag with the cursor in the icon itself.
While you are moving the window, you see a small box in the center of the screen with two numbers in it. These are positive X and Y offsets of the top left corner of the window from the top left corner of the screen. This is very useful information when
trying to precisely place a window on the screen.
You can achieve some fine precision by pressing the arrow keys on the numeric keypad to move the window one step at a time. You must keep the pointer button pressed while you use the arrow keys.
Adding a New Window
Say you want to add a calculator to your screen. Type in
$ xcalc &
at the prompt in an xterm window. The calculator should appear on the screen. To get another xterm, type the following command:
$ xterm &
Depending on your site, this can appear anywhere on the screen. Typically, the new window is placed in the upper left corner (x=0,y=0) of the root window, or in the center of the root window.
The size and location of a window is referred to as the window's geometry.
The reason why you launch applications with an ampersand (&) at the end of the command is to run the application in the background and free up the xterm from which the application is being run. If you do not type the ampersand, the xterm will not accept input until that application is either suspended or killed. Also, the use of the ampersand allows the application to run even after the xterm from which it was run is killed.
Window Geometry
Almost all clients accept the -geometry command line option. This option tells the window manager where to locate the window on the screen. If you do not specify any geometry, the window manager uses its defaults.
The coordinate system for the root window is as follows:
- The origin is top left (0,0).
- The number of display units is in pixels for graphics.
- The number of display units are in character sizes for xterms.
A pixel is the smallest unit available on a screen. Usually, screens are displayed in 1024´768 pixels, 2048´2048 pixels, or something similar. The size of a pixel on screen is very much hardware-dependent. A 200´200 window appears as
different sizes on monitors with different resolutions.
The geometry parameter is of the following form:
widthxheight[{+-}xoff{-+}yoff]
The height and width are usually given in pixels. In the case of xterms, height is given in lines, and width is given in characters per line. It is common to have a 24´80 xterm.
The xoff and yoff are offsets from the start of the left and top edges of the screen respectively. These represent the location of the window on the root window. The curly braces represent either the — or the + character, but not both.
| +xoff | A positive offset from the left edge of the screen to the left edge of the window. |
| -xoff | A negative offset from the right edge of the screen to the right edge of the window. |
| +yoff | A positive offset from the top edge of the screen to the top edge of the window. |
| -yoff | A negative offset from the bottom edge of the screen to the bottom edge of the window. |
A visual representation of the geometry is shown in Figure 23.5. For example, the line
xterm -geometry -50+50 &
places the xterm on the top right corner, 50 pixels from the right edge of screen and 50 pixels from the top of the screen.
The following parameters specify the edges of the screen:
| -0-0 | Lower right corner |
| -0+0 | Upper right corner |
| +0-0 | Lower left corner |
| +0+0 | Upper left corner |
Using the Window Menu
Using the window menu requires you to have the focus on a window. Let's look at a typical window menu. This also may be different on your screen, but the basic functionality listed here should exist for all later versions of Motif. Take the cursor to
the window menu button, and press the left button. The following menu (or something close to it) should appear:
Restore alt-F5

Move alt-F7

Size alt-F8

Minimize alt-F9

Maximize alt-F10

Lower alt-F3

Close alt-F4
Using the Keyboard in X and the Meta Key
It's important to bring this point up about the keyboard and its special keys under X. Keyboards come in different types, and the most important key for using keystrokes in X can be radically different from one keyboard to another. On PC-based
keyboards, it is usually the Alt key; on Macintoshes, it is the Command key; on Suns, it is Left, Alternate; and other keyboards use other keys. The list goes on.
In short, the Meta key is the special key for your keyboard. For a PC-based keyboard, this is the Alt key. So, do not look for a key called Meta on your keyboard. Where it says Meta, use Alt, Command, or whatever key your keyboard is mapped to.
Now you can invoke any item on this window menu in one of two ways:
- Use the pointer. This way, you click on the window menu and press Button1. Now, move the cursor to the item you want, and release Button1; or, press the Meta key and the character that is underlined in the menu. For moving a window, you press Meta-M.
Note that this does not work on some Motif distributions.
Alt-key combinations may not always work. In Metro's version of Motif 1.2, the Meta-F7 key allows moving a window, but the Meta-M key does not work at all. You may have a completely different experience with your keyboard.
- While the window has focus, press the Meta-function key combination. Then use the arrow keys on your keyboard to simulate the movement of the cursor, or just use the pointer.
Note that some of these functions may not be available for a menu shown for an icon. You might not be able to size or minimize an icon, but you can move, maximize, or close it.
Using the Root Menu
Click Button3 while the cursor is in the root window. You see a menu pop up on top of all the windows. This is known as the root menu. Keep in mind that this menu is very customizable, and may look radically different on your machine. You will learn all
about creating your own menu later in this chapter in the "Customizing Motif" section.
A typical root menu may list the following items. (Your system may have a different list depending on the type of Motif you purchased.)
"Root Menu"

New Window

Shuffle Up

Shuffle Down

Refresh

Utils >

Restart

Exit
While holding down Button1, move the cursor down the list to the item you want to select. When you get to the menu item you want, release the button. If you do not want to select any items, move the cursor off the menu and release the button.
In the previous list, the functionality can be set to the following:
- New Window starts a new xterm and sets focus to it.
- Refresh redraws the entire screen and all windows.
- Restart kills mwm and restarts it.
- Exit kills mwm and leaves you without a window manager. If this is the last command in your startup script, your windowing session terminates.
- Shuffle Up and Shuffle Down shuffles the stacking order of the windows up or down. The current window with focus is moved down to the bottom when shuffling down, and the next highest window is given the focus. The last window in the stack is brought to
the top and given the focus when shuffling up.
- The Utils item brings up another submenu with more choices to select from. See the "Customizing Motif" section, later in this chapter, for details on how to set your menu items.
Now, let's work with Motif clients.
Working with Motif Clients
Most programmers find the X Window system libraries too basic to work with, so they use the next building block called toolkits. The most common interface toolkit is the XtIntrinsics toolkit from MIT. This is called Xt. On top of Xt, you can have other
toolkits such as Motif or the Open Look Interface Toolkit (OLIT). When you are working with Motif, you are working with a Motif toolkit. In Motif, you are working with Motif Widgets.
Widgets help developers program consistent user interfaces in Motif. By using Widgets, programmers can quickly put together interfaces that have the same look and feel of all Motif applications.
Some Widgets display information. Some Widgets collect user input (mouse or keyboard) information. Some Widgets react to user input by changing their appearance or performing some programmed function. Some Widgets are simply containers for other
Wigdets. All Widgets can be customized in one form or another, whether it is appearance, font size or style, colors, or whatever other parameter is required.
All Widgets of the same type have two data structures with information that describes their attributes: class and instance. The instance data structure contains information for a specific Widget on the screen. The class information contains information
required for all Widgets of the class.
Widgets are grouped into several classes. Each class depends on the type of functionality offered by the Widget. Normally, the internal functions of a Widget are hidden from the applications programmer (encapsulation). A Widget class shares a set of
functions and data structures for all Widgets in that class. A new Widget class can be derived from an existing Widget class. The newly derived class can inherit all the data structures and functions of the parent class. A Widget is created and destroyed
during a Motif program execution.
The destruction of a Widget is a bit more complicated, and will be discussed in detail in the next chapter.
This should sound familiar to C++ programmers. True polymorphism is somewhat harder to find in Widgets. This is all done in C. For C++ programmers, the class data structure is to the class for an object, as the instance data structure is to the instance of an object.
A Widget is really a pointer to a data structure when viewed in a debugger. This data structure is allocated on the creation of a Widget, and is destroyed when a Widget is destroyed.
Let's look at a typical application screen to see some Widgets in action. You will work with a demo application called xmdialogs, shown in Figure 23.6. The Widgets shown here will be described later in this chapter. The xmdialogs application can be
found in the /usr/bin/X11 directory. If you do not have this application, you can still learn about working with Widgets by applying these concepts to different applications.
Don't worry if you cannot find this application on your machine. There are plenty of other applications just like this one. If you have the Motif 1.2.3 release or later from Metro Link, you will have this application in your /usr/bin/X11 directory.
Figure 23.6. The xmdialogs demo application.
Figure 23.6 shows a Menu bar, a File selection list with scrollbars, an Option button, some Radio and Toggle buttons, some Push buttons, some Labels, and a Text display dialog box.
The Actions and Help items are shown on a menu bar. By moving the pointer to either of these items and pressing Button1, you are presented with a menu of options very similar in operation to the window and root menu.
Underneath this menu bar is a list of items in a scrollable list. This Widget is of the type XmList. The XmList lets you keep a selection of items in a visible list. It has scroll bars to enable the user to scroll the list if the entire list isn't
visible. A programmer can set the number of items that are visible at one time. If you resize the window, and if the list box sizes itself proportionately with the window, the number of visible items in a list may change.
To select an item, move the pointer to the item of your choice and press Button1 once. The item is highlighted in a darker color. Some lists enable you to select more than one item, and others, just one item. In this application, you only select one
type of dialog box. (Figure 23.6 shows the bulletin board item to be the selected item.)
The scroll bars on the side of the list Widget are of the class XmScrollbar. A scroll bar is either a horizontal or vertical rectangle. There is a raised box in the rectangle called the slider box. This slider moves within the larger rectangle. The
movable space for the slider bar is called the scroll region. The ratio of the size of the slider bar to the scroll region is proportional to the size of the work area to the total area being viewed.
The XmScrollBar rectangle has two arrows at each end. The arrows point outward relative to the rectangle, and in opposite directions. The arrow keys can be used to move the slider bar within the scroll region.
- Move the mouse to the slider bar arrow.
- Click on Button1.
- The slider bar should move closer to the arrow. The slider moves as close as possible to the arrow being clicked in the scroll area.
- Release Button1.
Users can also move the slider bar by dragging it with the mouse:
- Move the pointer on to the slider bar.
- Press the Button1.
- Move the pointer up or down for a vertical scroll bar.
- Move the pointer left or right for a horizontal scroll bar.
The contents of the work area, as well as the slider bar, scroll with the movement of the pointer. The viewable portion is the work area.
- Release Button1 when the list area contains the desired viewing data.
Now move your cursor to the selection item of the resize policy button. When you click on this button, you are presented with a pop-up menu of the types of resize policies for the dialog box you want to create. When you press the button, a menu pops out
and presents you with a list of options. You make the selection with your pointer by moving the pointer to that button and releasing it. The menu disappears, and your selection is displayed in the box. In Figure 23.6, shown previously, the resize policy is
set to any. This is known as an option button.
Note the diamond-shaped buttons and selections below this current menu. This is a list of one of four possible selections for the dialog box. One of the items is shown in a lighter gray color. This is known as grayed out, meaning that the option is a
not a valid option at the time. The option for the Work Area is disabled. You can select one of the three options. These items are grouped together with a rectangular frame drawn around them. Usually, buttons are grouped together this way in Motif when
their functionality falls in the same group of actions. The actions are similar to the buttons on a radio: push one button and the rest of the buttons in the row all come up. This is why these are referred to as radio buttons.
Look at the two buttons: auto manage and default position. These are toggle buttons for this application. When you select one button, the other is not influenced at all. The functionality provided by each button is completely independent of the other.
Do you see the difference between radio buttons and toggle buttons?
Sometimes a scrollbar is used on each side of a drawing area. This is called a Scrolled Window, and belongs to the XmScrolledWindow class. This Widget can hold graphics instead of a list of items. The XmScrolledWindow is used primarily to view large
graphic items in a small window, whereas XmList is used to show items for the user to select from.
Under the toggle buttons, you see four push buttons. When a push button is pressed, the colors on the border of the button reverse. Also, the color of the pressed rectangle changes to show the user action. Push buttons are used to invoke some sort of
action. When you select the file selection dialog from the list and press the push button to manage it, the display shown in Figure 23.7 appears. This is the standard file selection box under Motif, and you should see it for most applications.
Figure 23.7. A typical File Selection dialog box.
To see a more detailed picture of what types of Widgets are available within Motif, run /usr/bin/X11/periodic. (See Figure 23.8.) Note that the menu item for this application can be removed to become a separate application, by dragging on the dashed
line. The menu is shown as torn off in Figure 23.9.
Figure 23.8. The Periodic Table of Widgets.
Figure 23.9. A tear-off menu torn off.
Other Types of Widgets
The Motif toolkit also supplies the following Widgets. Please refer to the items in the periodic table in Figure 23.8 to see what each Widget should like on screen.
XmArrowButton This is a directional arrow with a border around it. A programmer can modify the arrow's direction, thickness, and border color by setting the Widget's parameters. Look at the ends of a scrollbar to see two examples of such a Widget.
XmDrawnButton A drawn button provides a rectangular area with a border for the programmer. The programmer can size, redraw, or reposition text or graphics within this window. This Widget provides hooks to set parameters for its border appearance, as
well as to attach functions for accepting user input.
XmLabel This is a rectangular box consisting of either text or graphics. It is instantiated, but is also used as a base class for all button Widgets. A label's text can be multiline, multifont, or even multidirectional. In the xmdialogs example, this
would be the labels Active Dialog and the Motif Dialog Widgets strings.
Many features of the labels can be modified. This includes the fonts, foreground and background colors, and alignment (left, center, or right justification); in fact, this can even store a pixmap graphic image.
XmPushButton This is a text label or pixmap with a border around it. This Widget accepts keystrokes or mouse button presses. In the smdialogs example, these are the create, destroy, manage, and unmanage buttons. When a button has focus, it draws a heavy
border around itself.
When you press the Enter key or a pointer on a button, the button has focus. Move the cursor to the button. Press a key or button and hold it down. You have armed the button. The color on the button should change, and the border colors should reverse.
This gives the impression that the button has been pressed inward. When you release the button, the button reverts to its original state. When a mouse button is pressed in this Widget the foreground and background colors of the Widget usually also invert.
XmSeparator This is used to create a line between functional sections of a screen. There is really not much that users can do with this Widget except position it on the screen.
XmText This is used to create a fully functional multiline text editor on a screen. The user can select text by dragging the mouse from one location to another while Button1 is pressed. Users can also click anywhere on the Widget to mark the insertion
point. If the text Widget is enabled for user input, the user can type at the insertion point and insert the text into the text Widget.
Pull-down menus These are rectangular areas in the window that enable users to select from a number of items. The items are generally laid out in push buttons. Users can select a push button either by moving the mouse to that selection, or by pressing
Alt-K, in which K is the letter of the alphabet that is underlined in the menu button. In the xmdialogs function, the Meta-F key selected the file item, and Meta-H selected the Help item.
Pop-up menus The Motif root window menu is a good example of a pop-up menu. When you press the mouse button, a menu is displayed. You can select an item in the menu by moving the cursor onto the item and pressing Button1.
Scale Widgets The scale Widget is used to display the value of a data item between two extremes. It can also be used to accept user input. A scale Widget has a scroll region that is very similar to the scroll bar. However, it does not have the arrow
buttons at each end.
XmScrolledWindow This is a combination of a horizontal scroll bar, a vertical scroll bar, and a drawing area. If the size of the drawing area fits within the window, you can't see the scrollbars. If the size of the drawing area is greater than the
visible area of the scrolled window, you see the horizontal or vertical scrollbars, or both. You can then use the scrollbars to move the visible portion on top of the drawing area. This is known as panning the window.
XmFrame This is a simple Widget used to put a consistent border around one single Widget. Frames can only hold one Widget at a time.
XmRowColumn This is a general-purpose Widget organizer. The Widget can layout its Widget collection in a variety of ways, including the following:
Row major In this case, all Widgets on this Row Column Widget are stored until one row fills up, and a new row is created when another Widget is added that doesn't fit on this Widget. The creation of a new row is sometimes called wraparound.
Column major This is the same as a row major, but it wraps around in a columnar fashion.
In conjunction with this, you can specify the width of each column to be that of the widest Widget; you can also specify the number of fixed columns, the packing (whether all Widgets should be packed as closely as possible), or that the individual
Widgets specify their own positions.
There are several other Widgets available in the Motif Widget set. You can see the complete listing and their options in The Programmers Reference Manual from the Open Software Foundation.
Gadgets
Motif Widgets create a window in X Window. A complex Motif application can create several X windows very quickly. Each window uses X resources in the server, and many windows can slow your overall system performance.
Gadgets are windowless versions of a Widget. Most Gadgets have the same names as Widgets, but have the string Gadget appended to their name. So, XmLabel has an XmLabelGadget counterpart.
Gadgets do not have all the features of Widgets. For example, Gadgets share the foreground and background colors of their parent. Also, some Gadgets actually turn out to be slower than the Widgets they are trying to replace. Given the troubles that you
can get into by using Gadgets, you may be better off not using them.
Customizing with Resources
Now that you are familiar with Widgets, let's talk about the parameters that affect them—resources.
What Are Resources?
As you saw in the previous sections, you can customize some aspects of an application from the command line prompt. X enables you to modify the aspects of an existing application every time a client runs that application. X does this by setting control
variables for that client. These control variables are called resources and have a value associated with them.
For example, consider the case of an xterm. An xterm's resources are its font size, its pointer shape, the foreground color for all displayed text, its background color, and so on. These are only a few of the resources for an xterm. Most of these
resources exist as predefined defaults for all the common clients in a system.
You can specify resources on an application-specific basis, or for all applications on your system. These resources are normally stored in an ASCII file called .Xresources, in your home directory.
This file affects only those applications that you run. This file normally contains only those options that you would like to customize over those values that are set in system files.
You can always override the defaults specified in the system-wide file with defaults in your .Xresources file. In turn, your command line options for a single client override those in the .Xresources file. Keep in mind, however, that the command line
default applies only to a specific client. The .Xresources default setting becomes the default for all your clients.
Also, remember that the command line operations override any default resources set in a file. Normally, you set how you want your application to look under normal circumstances, and then override the changes via command line options.
In some systems, the .Xresources file can also be called .Xdefaults.
To make your resource specifications available to all clients, use the X resource database manager program, xrdb. This stores the resources directly on the server and makes the resource available to all clients on the system. This step takes some care
because your change will affect all your clients, regardless of what platform they are running on.
Defining Resources
A resource definition file is basically a line-by-line list of all the resources in the file. Each line consists of two entries: one for the resource type, and the other for the value for the resource. The two entries are colon-separated.
The simplest syntax for a resource definition is as follows:
client*variable: value
client is the name of the client. The variable for that client is set to the value. Note that the colon follows the variable without any spaces.
Let's look at the resource declaration for an xterm client.
XTerm*foreground: white

XTerm*background: blue

XTerm*font: 10x20

...
If you do not already have an .Xdefaults file, you can create one yourself with a text editor.
The values can be Boolean, numeric, or string. Values can be specified for Widgets in an application as well. For example, if you want to set the background color for all PushButtons in an application, myWorld, you set the following resource:
myWorld*PushButton.background: red

myWorld*background: blue
Note that the asterisk represents the Widgets in between the actual myWorld application and all PushButtons in that application. If you specify
myWorld.mainForm.PushButton: blue
only the buttons on the Widget mainForm, which in turn must exist on myWorld, are affected. This is tight binding. Using the asterisk (*) is loose binding because it allows for multiple levels of Widget hierarchy between the objects on either side of
the asterisk. If this has a hierarchy of
myWorld.mainForm.subForm.PushButton
the first two of the following declarations affects the PushButtons on the subForm, and the last does not:
myWorld*PushButton.background: red

myWorld*background: blue

myWorld.mainForm.PushButton: blue
Another example is the settings for an xterm. If you attempt to set the scrollbars using
xterm.scrollbar: true
it probably won't work. Most likely, there is a Widget hierarchy between the top-level application and the scrollbar Widgets. In this case, it works if you use the following:
xterm*scrollbar: true
When you use a very general setting for a Widget in your resource files, say *labelString, you affect all such occurrences of labelString in all files. Be careful!
After you have modified the .Xresources file, you probably expect to see the changes occur immediately. Not so. You now have to inform the server of your defaults by using the xrdb command. Use the following command:
xrdb -load .Xresources
This reflects the changes for all subsequent executions of your client. These remain in effect until overridden, or until your session terminates. If you save your .Xresources file in your login directory, these changes are loaded whenever you start X
with the following command:
xrdb -load .Xresources
This command is useful when creating .Xresources for the first time in a session. That is why, in most cases, this command is run when the windowing system is first created. If you want to keep the previous settings, use the -merge command option
instead of -load, like so:
xrdb -merge .myOwnResources
Also, you can use the exclamation point as the comment character at any point in the input line before text begins. So, the following lines are comments:
! This is a comment

! another one

! commented*labelString: This resource is not used.
You can also use the cpp preprocessor's directives #if, #ifdef, #else, and #endif. This is running through xrdb only. The cpp preprocessor is not run when the .Xresources file is parsed. You can override the run through cpp by using the -nocpp parameter
on the command line. No other parameters are required. If you want to remove a resource, use the -remove operation.
xrdb -remove .myOldResources
User and Class Resource Files
There are two types of resource files: user and class. User files apply to each instance of all applications. These are the resources you set in the .Xresources file. Class files pertain to all the instances of a particular class. These exist in files
usually in your home directory or your path. The name of this file is the name of the class. The class name is the name of the application class with the first letter capitalized.
For example, all xterms belong to the class XTerm. Note that the class name is the name of a type of application with the first letter capitalized. XTerm is an exception in this regard because it has XT capitalized instead of only X.
Let's look at setting the resources for a particular class of an application:
*labelString: Hello World
This command sets the labelString resource to Hello World for all Widgets in every application in your session. This may not be exactly what you want.
Xapp*labelString: Hello World
This command sets the labelString resource to Hello World for all Widgets in every Xapp application in your session. This doesn't affect Widgets within other applications. This effect may be desirable if you are trying to set only one type of
application resource.
You can also specify your own class for setting resources. This is done by setting the -name option on a client. For example, you can define all the resources for an xterm with 10´20 font to be of class hugeterm. Then, whenever you run
xterm -name hugeterm &
it uses the resources in the class hugeterm. Now you can set the foreground color to whatever you want for xterms with a name of hugeterm.
Note that the name resource cannot contain the * or . characters. These values cause your resource setting to be ignored. The mwm environment simply ignores bad syntax, instead of informing the user about these errors.
Customizing Motif
Customizing Motif is very similar to customizing the X resources. However, Motif offers a far greater set of features, and enables the user to customize just about every item on the screen. Without changing a line of code, the resources here can be set
to maintain a consistent set of interfaces for all applications. For example, it's easy to change the background color of all the forms in your applications by simply editing the resources file, rather than editing each source file individually. Here are
some more methods for setting resources:
- Hard code resource settings.
- Use command line parameters.
- Use the environment variables to specify class files.
Hard-Coded Resource Setting
You can set resources by hard coding the values in your application source code. See Chapter 32, "Motif for Programmers."
Hard coding resource settings is justifiable in the following cases:
- When you do not want to give control to the end user for application-critical resources. A good example is the locations of all buttons on a data entry form. An end user is liable to shuffle them around to the point that the entry application may
become unusable.
- When you do not have to worry about locations of resource files. The application is completely standalone.
- When you also do not have to worry about user intervention in your program code.
- When you want to shield users from modifying their UNIX environment variables and having to learn the customization syntax.
Using the Command Line
This was discussed earlier when we talked about customizing X applications and listed some of the resources that can be set from the command line. Motif applications usually list their options in man pages. See the section on appres later in this
chapter.
Use the -xrm command line option to set or override a particular resource. The usage of this option is as follows:
xclient -xrm "resource*variable: value"
Note that you can concatenate several resource settings using the \ operator.
xclient -xrm "resource*variable: value" \

-xrm "resource*variable: value" \

-xrm "resource*variable: value"
So, how do you know which resources to set? Look in the OSF/Motif Programmers Reference Manual for the description of a Widget's resources.
Looking at the Label Widget, you see resources grouped by the class and all its inherited resources. Some of the resources are declared under the class Core, some under Manager, and so on. Let's look at some of the resources for a XmPushButton Widget.
You see these listed with the letters XmN in front of them. These letters signify that it is a Motif resource.
XmNacctivateback XcCallback XtCallBackList

_ NULL C XmNarmColor XmCarmColor Pixel Dynamic

_ CSG XmNarmPixmap XmCArmPixmap Pixmap

_ XmUNSPECIFIED_PIXMAP CSG

XmNdefaultButtonThickness

XmCdefaultButtonShadowThickness Dimension 0 CSG

....
Note the letters CSG for the access description.
* The C signifies creation. This tells us that

* the resource can be set at creation.

* The S signifies that this value can be set at runtime.

* The G signifies that it can be read (get) at runtime.
So, in the case of the previous PushButton Widget, the XmNactivateCallback class can only be set at the time it is created: once, at runtime. This is usually done in the code section, where an address to a pointer is set for this Widget.
The other values can be set at runtime. For example, XmNarmColor can be set from a resource file because it does have the S set for it. Likewise, when programming Widgets, this resource can be read from an application because the G value is specified
for this resource.
Using Environment Variables
Motif uses several environment variables to hold its pointers to locations for resource files.
The XENVIRONMENT environment variable can hold the complete path to a file that holds the resource file. This must be the complete path of the application. If this variable is not set, the Xt toolkit looks in .Xresources-HostName, in the applications
home directory.
The XUSERFILESEARCHPATH is a pointer to the locations of application resource files. This is a colon-delimited string. Each field is expanded into meaningful names at runtime. The following are some of the most common fields:
%C Customize Color

%l Language part

%L Full lanuguage instruction

%N Application class name

%S Suffix
The RESOURCE_MANAGER variable is set by xrdb. This xrdb is executed at runtime. This usually happens at startup.
The XFILESEARCH environment variable holds a colon-delimited list of directories for the app-defaults file. Usually, these defaults are in the /usr/lib/X11/app-defaults directory.
Note that some of the classes in the directory have the first two letters of their names capitalized, instead of just one (XTerm, XDbx, XMdemos). So, if your class resource settings do not work as expected, look in this directory for some hints on what
the resource class name might look like. Again, the contents of this directory depend on your installation of Motif and X.
The search for the missing .Xresources occurs in the following order:
Check in XUSERFILESEARCHPATH,

if not successful or XFILEUSERSEARCHPATH not set,

Check in XFILESEARCHPATH,

if not successful or XFILESEARCHPATH not set,

Check user HOME directory
Now that you have all this information, keep this advice in mind: In all but the most unavoidable cases, you should not rely on environments to set your application resources.
The methods are too complicated to learn, especially for the end user. However, they can be a very powerful customization tool. Editing resource files is hard enough on the programmer; it's even worse on the user. However, in order to be a good Motif
user, you should know about the environment variables that affect applications that come from other vendors.
Listing an Application's Resources
There are two Motif applications that can assist you in determining an application's resources: appres and editres. Here is the appres program's syntax:
appres Class [instance]
This lists all the resources in a given class for the named instance of an application. Listing 23.2 shows the manual options of the command appres XTerm for advanced users.
Listing 23.2. Manual options for advanced users.
$ appres XTerm

*VT100*font5:

*VT100*font5: 9x15

*VT100*font3: 6x10

*VT100*font4: 7x13

*VT100*font2: 5x7

*VT100*font1: nil2

*VT100*font6: 10x20

*tekMenu*vtshow*Label: Show VT Window

*tekMenu*tektextsmall*Label: Small Characters

*tekMenu*vtmode*Label: Switch to VT Mode

*tekMenu*tektextlarge*Label: Large Characters

*tekMenu*tekpage*Label: PAGE

*tekMenu*tekreset*Label: RESET

*tekMenu*tektext2*Label: #2 Size Characters

*tekMenu*tekhide*Label: Hide Tek Window

*tekMenu*tekcopy*Label: COPY

*tekMenu*tektext3*Label: #3 Size Characters

*tekMenu.Label: Tek Options

*fontMenu*font5*Label: Large

*fontMenu*font6*Label: Huge

*fontMenu*font2*Label: Tiny

*fontMenu*fontescape*Label: Escape Sequence

*fontMenu*fontdefault*Label: Default

*fontMenu*font3*Label: Small

*fontMenu*fontsel*Label: Selection

*fontMenu*font1*Label: Unreadable

*fontMenu*font4*Label: Medium

*fontMenu.Label: VT Fonts

*SimpleMenu*menuLabel.font: -adobe-helvetica-bold-r-normal—*-120-*-*-*-*- _iso8859-*

*SimpleMenu*menuLabel.vertSpace: 100

*SimpleMenu*Sme.height: 16

*SimpleMenu*BackingStore: NotUseful

*SimpleMenu*HorizontalMargins: 16

*SimpleMenu*Cursor: left_ptr

*mainMenu*terminate*Label: Send TERM Signal

*mainMenu*securekbd*Label: Secure Keyboard

*mainMenu*suspend*Label: Send STOP Signal

*mainMenu*continue*Label: Send CONT Signal

*mainMenu*allowsends*Label: Allow SendEvents

*mainMenu*kill*Label: Send KILL Signal

*mainMenu*interrupt*Label: Send INT Signal

*mainMenu*logging*Label: Log to File

*mainMenu*quit*Label: Quit

*mainMenu*hangup*Label: Send HUP Signal

*mainMenu*redraw*Label: Redraw Window

*mainMenu.Label: Main Options

*vtMenu*hardreset*Label: Do Full Reset

*vtMenu*scrollbar*Label: Enable Scrollbar

*vtMenu*scrollkey*Label: Scroll to Bottom on Key Press

*vtMenu*scrollttyoutput*Label: Scroll to Bottom on Tty Output

*vtMenu*jumpscroll*Label: Enable Jump Scroll

*vtMenu*clearsavedlines*Label: Reset and Clear Saved Lines

*vtMenu*allow132*Label: Allow 80/132 Column Switching

*vtMenu*reversevideo*Label: Enable Reverse Video

*vtMenu*tekshow*Label: Show Tek Window

*vtMenu*cursesemul*Label: Enable Curses Emulation

*vtMenu*autowrap*Label: Enable Auto Wraparound

*vtMenu*tekmode*Label: Switch to Tek Mode

*vtMenu*visualbell*Label: Enable Visual Bell

*vtMenu*reversewrap*Label: Enable Reverse Wraparound

*vtMenu*vthide*Label: Hide VT Window

*vtMenu*marginbell*Label: Enable Margin Bell

*vtMenu*autolinefeed*Label: Enable Auto Linefeed

*vtMenu*altscreen*Label: Show Alternate Screen

*vtMenu*appcursor*Label: Enable Application Cursor Keys

*vtMenu*softreset*Label: Do Soft Reset

*vtMenu*appkeypad*Label: Enable Application Keypad

*vtMenu.Label: VT Options

*tek4014*fontLarge: 9x15

*tek4014*font2: 8x13

*tek4014*font3: 6x13

*tek4014*fontSmall: 6x10

XTerm.JoinSession: False
The appres application sometimes does not run under Motif, use twm.
The second command is a menu-driven GUI program, editres, which enables you to edit the given resources for an application. This is available for X11R5 and later. The program displays a tree-like representation of all the Widget classes in a program,
and enables the user to move through the tree node by node. Search your release for this file. If you do not have this file, don't despair; use the find command. See Figure 23.10 for an editres session.
Figure 23.10. The editres application.
Using the .mwmrc File
Create this file from the system.mwmrc file by copying it into your $HOME directory as .mwmrc, and then edit it. (Look in the /var/X11R6/lib directory, and search for the system.mwmrc file using the find command.)
Listing 23.3 shows a sample .mwmrc file. As I stated earlier when working with .Xresources, comments are started with a ! character on a line. Note that, depending on your version of Motif, your listing may look very different than the one shown here.
However, you will be able to see the general information presented here.
Listing 23.3. A sample .mwmrc file.
!!

!! $HOME/.mwmrc

!! Modified system.mwmrc for personal changes. kh.

!!

!!

!! Root Menu Description

!!

Menu DefaultRootMenu

{

"Root Menu" f.title

"New Window" f.exec "xterm &"

"Shuffle Up" f.circle_up

"Shuffle Down" f.circle_down

"Refresh" f.refresh

"Pack Icons" f.pack_icons

! "Toggle Behavior..." f.set_behavior

no-label f.separator

"Restart..." f.restart

! "Quit..." f.quit_mwm

}

Menu RootMenu_1.1

{

"Root Menu" f.title

"New Window" f.exec "xterm &"

"Shuffle Up" f.circle_up

"Shuffle Down" f.circle_down

"Refresh" f.refresh

! "Pack Icons" f.pack_icons

! "Toggle Behavior" f.set_behavior

no-label f.separator

"Restart..." f.restart

}

!!

!! Default Window Menu Description

!!

Menu DefaultWindowMenu

{

Restore _R Alt<Key>F5 f.restore

Move _M Alt<Key>F7 f.move

Size _S Alt<Key>F8 f.resize

Minimize _n Alt<Key>F9 f.minimize

Maximize _x Alt<Key>F10 f.maximize

Lower _L Alt<Key>F3 f.lower

no-label f.separator

Close _C Alt<Key>F4 f.kill

}

!!

!! Key Binding Description

!!8

Keys DefaultKeyBindings

{

Shift<Key>Escape window|icon f.post_wmenu

Alt<Key>space window|icon f.post_wmenu

Alt<Key>Tab root|icon|window f.next_key

Alt Shift<Key>Tab root|icon|window f.prev_key

Alt<Key>Escape root|icon|window f.circle_down

Alt Shift<Key>Escape root|icon|window f.circle_up

Alt Shift Ctrl<Key>exclam root|icon|window f.set_behavior

Alt<Key>F6 window f.next_key transient

Alt Shift<Key>F6 window f.prev_key transient

Shift<Key>F10 icon f.post_wmenu

! Alt Shift<Key>Delete root|icon|window f.restart

}

!!

!! Button Binding Description(s)

!!

Buttons DefaultButtonBindings

{

<Btn1Down> icon|frame f.raise

<Btn3Down> icon|frame f.post_wmenu

<Btn3Down> root f.menu DefaultRootMenu

}

Buttons ExplicitButtonBindings

{

<Btn1Down> frame|icon f.raise

<Btn3Down> frame|icon f.post_wmenu

<Btn3Down> root f.menu DefaultRootMenu

! <Btn1Up> icon f.restore

Alt<Btn1Down> window|icon f.lower

! Alt<Btn2Down> window|icon f.resize

! Alt<Btn3Down> window|icon f.move

}

Buttons PointerButtonBindings

{

<Btn1Down> frame|icon f.raise

<Btn3Down> frame|icon f.post_wmenu

<Btn3Down> root f.menu DefaultRootMenu

<Btn1Down> window f.raise

! <Btn1Up> icon f.restore

Alt<Btn1Down> window|icon f.lower

! Alt<Btn2Down> window|icon f.resize

! Alt<Btn3Down> window|icon f.move

}

!!

!! END OF mwm RESOURCE DESCRIPTION FILE

!!
There are several key features here:
- Key bindings
- Button bindings
- Menu items
A binding is a mapping between a user action and a function. The key bindings map keystrokes to actions, and the button bindings map button presses and releases to actions. Menus display the menu items for the user, and let you organize action items
into sections.
The format for all the items is as follows:
Section_type Section_Title

{

.. definitions..

.. definitions..

}
In this format, Section_type can be Menu, Keys, or Buttons. The Section_Title is a string defining the variable name. It's a name that can be used to refer to this section in other portions of the file.
The functions shown in the sample file begin with an f. keyword. Some actions are fairly obvious: f.move, f.resize, f.maximize, f.minimize, f.title, f.lower and so on. Some actions are not so obvious: f.separator (displays a line on the menu item),
f.circle_up (shuffles window stacking order up), f.circle_down (shuffles window stacking order down).
See Table 23.1 for all the features available for you to work with.
| Function | Description |
| f.circle_down[icon|window] | Shuffles window stacking order down. |
| f.circle_up[icon|window] | Shuffles window stacking order up. |
| f.exec or ! [command] | Executes command. |
| f.focus_color | Sets colormap focus of a client window. |
| f.focus_key | Sets keyboard input focus to a window or icon. |
| f.goto [x|y] | Hops to a different location on the virtual desktop. |
| f.kill | Terminates a client window. |
| f.lower [-client|within|freeFamily] | Lowers a window to the bottom of the stack. |
| f.maximize | Maximizes a window. |
| f.menu | Associates a pull-right menu with the menu pane. |
| f.minimize | Minimizes a window to an icon. |
| f.move | Enables the interactive movement of a window. |
| f.move_constrained | Similar to f.move but restricts movement of the window to within the boundary of the screen. |
| f.next_cmap | Changes the colormap of the current window to the next colormap in the list. |
| f.next_key[icon|window|transient] | Sets keyboard focus to the next window/icon. |
| f.nop | No operation. It's a filler only. |
| f.normalize | Restores a window to original size. |
| f.normalize_and_raise | Restores a window to original size and brings to top of stack. |
| f.pack_icons | Rearranges the icons on a desktop. |
| f.pan[dx|dy] | Pans the view of the virtual canvas. |
| f.pass_keys | Enables/disables (toggles) key bindings. |
| f.post_wmenu | Posts the window menu. |
| f.prev_cmap | Changes the colormap of the current window to the previous colormap in the list. |
| f.prev_key[icon|window|transient] | Sets keyboard focus to the previous window or icon. |
| f.quit_mwm | Terminates Motif. |
| f.raise[-client|within|freeFamily] | Raises a window to the top of the stack. |
| f.raise_lower[within|freeFamily] | Raises a window to the top of the stack if it is partially obscured, or lowers it if not at all obscured. |
| f.refresh | Redraws all windows. |
| f.refresh_win | Redraws only a specific window. |
| f.resize | Enables the interactive sizing of a window. |
| f.restore | Restores the state of an icon/window to its normal state. |
| f.restore_and_raise | Restores and raises a window to the top of the stack. |
| f.restart | Restarts mwm. |
| f.screen | Jumps cursor to a specific screen, or to the next, previous, or last visited screen. |
| f.send_msg message_number | Sends a client message. |
| f.separator | Draws a line. |
| f.set_behavior | Restarts Motif, toggling between default or custom behaviors. |
| f.title | Names the menu. |
| f.track_pan | Moves the canvas interactively. |
You can get more information from the OSF/Motif Reference guide. In my humble opinion, it's dry but informative; the guide will supply you with all the information you could possibly want about these commands.
Adding Your Own Menu Items
Let's see about defining your own menu items. The following could be a sample menu item:
Menu MyGames

{

"Kamran Games" f.title

no-label f.separator

"Tetris" f.exec "xtetris &"

"Mahhjong" f.exec "xmahjongg &"

"Chess" f.exec "xchess &"

}
The f.title action specifies a heading for the submenu. The f.separator draws a line under the title. The f.exec fires up the command shown in double quotes.
Note the ampersand in f.exec for starting these tasks in the background. Do not start a task that may never return and thus hang up your mwm session.
Now, you can add this new menu to the root menu by adding the following line in your DefaultRoot-Menu definitions:
"Utils" f.menu MyGames
More on Button and Key Bindings
The key and button bindings work in the same way as menus. The first obvious difference is the extra column with the words icon, frame, window, and root in it. These words force the bindings on the context. The root applies to any location of the
pointer on the root window, the frame or window keywords apply binding only when the pointer is in a window or its frame. The icon bindings apply to icons.
In your .Xdefaults file, refer to these key bindings for the class Mwm:
Mwm*keyBindings: DefaultKeyBindings
Here are some of the descriptions in the key bindings:
Shift<Key>Escape window|icon f.post_wmenu

Alt<Key>space window|icon f.post_wmenu

Alt<Key>Tab root f.menu DefaultRootMenu
The syntax for a keystroke binding is
modifier<Key>key
in which modifier is Alt, Control, or Shift. The key can be a keystroke, function key, and so on. The first two declarations describe the same action: show the window menu, but with different keystrokes. The third key binding shows a method for
displaying the root menu.
The button bindings are the bindings for your buttons. The three important bindings to remember are as follows:
Buttons DefaultButtonBindings

Buttons ExplicitButtonBindings

Buttons PointerButtonBindings
In your .Xresource or .Xresources file, refer to one of these button bindings for the class Mwm as
Mwm*buttonBindings: DefaultButtonBindings
or
Mwm*buttonBindings: ExplicitButtonBindings
or
Mwm*buttonBindings: PointerButtonBindings
Customizing Your Desktop with Clients
This is done by using some of the client software that comes with your X11R6 distribution. We will cover the following applications:
* xsetroot

* xset

* xdpyinfo

* xmodmap
There are several more utilities in the /usr/bin/X11 directory for you to play with: bitmap, xmag, xcalc, and so on. Check each one out to customize your desktop. The ones described here are not so intuitively obvious.
xsetroot
This client customizes the root window characteristics. Here are some of the options available:
- -cursor cursorfile maskfile This option changes the cursor to a displayed mask value. See the sidebar for creating your own cursor using bitmap.
- -cursor_name name This is the name of the standard cursors in the X11 protocol.
- -bitmap filename This option creates a tiled surface on the root window with a bitmap. Check the /usr/lib/X11/bitmaps directory for a list of the standard bitmaps.
- -fg color foreground This option sets the color for the bitmap on the root display.
- -bg color background This option sets the color for the bitmap on the root display.
- -gray or -grey This option sets the background to a pleasant (for some) gray background.
- -rv This option reverses the foreground and background colors.
- -solid color This option sets the root window to a solid color; for example, -solid red will set a red background.
Look in the /usr/lib/X11 directory of the file called rgb.txt for a list of colors, and look at the later section on colors in this chapter for more information.
See the man pages for additional features for xsetroot.
The cursorfile is an ASCII file with arrays of characters. You create a bitmap using the bitmap utility. Then, run this bitmap through bmtoa to convert a bitmap to arrays. There is a reverse utility called atobm to convert existing arrays to bitmaps, for use with the bitmap editor.
Using xset
This command sets up some of the basic options on your environment. Some of these options may not work on your particular system. It's worth it to check these out.
Set your bell volume with this command:
xset b volume frequency durationInMilliseconds.
For example, the command
xset b 70 4000 60
sets the keyboard bell to about 70 percent of maximum, a frequency of 4000 Hz, and on for 60 milliseconds.
To turn on the speaker, use the following command:
xset b on
To turn it off, type this:
xset b off
Turning the speaker back on will return the volume to its default.
Use xset c volume to set the keyclick volume in percentages. A volume setting of 0 turns it off. Any other number (1 through 100) turns it on for that percentage. Of course, for this command to work, you must have your speaker turned on.
To set the mouse speed, use the following command at the prompt:
xset m acceleration threshold
The acceleration is the number of times faster than the threshold that each mouse movement travels. This way, you can zip across the screen with a twitch. Use care in setting this feature unless you are very dexterous.
Invoking the Screen Saver
Use xset s seconds to enable the screen saver. You can turn off the screen saver with the off option. The default option reverts to system default time for blanking the screen.
For more options type in xset.
Using Fonts
For example, to load your own fonts, use the following command:
$ xset fp /user/home/myfont,/usr/lib/X11/fontsdir

$ xset fp rehash
The rehash command forces the server to reread its systems files for your command to take effect.
To restore to normal, use the following command:
$ xset fp default

$ xset fp rehash
See the section, "Fonts," later in this chapter.
Getting More Information about Your Display xdpyinfo
The xdpyinfo utility gives you more information about your X server. It is used to list the capabilities of your server and all predefined parameters for it. Some of these include the following:
- Name of display
- Version number
- Vendor name
- Extensions
The list is too exhaustive to included here, and will be different for your installation. Pipe its output to a file, and review it for information about the server. Your output may look different. (See Listing 23.4.)
Listing 23.4. Output from xdpyinfo.
$ xdpyinfo

name of display: :0.0

version number: 11.0

vendor string: XFree86

vendor release number: 2110

maximum request size: 262140 bytes

motion buffer size: 0

bitmap unit, bit order, padding: 32, LSBFirst, 32

image byte order: LSBFirst

number of supported pixmap formats: 2

supported pixmap formats:

depth 1, bits_per_pixel 1, scanline_pad 32

depth 8, bits_per_pixel 8, scanline_pad 32

keycode range: minimum 8, maximum 134

focus: window 0x200000d, revert to Parent

number of extensions: 6

XTestExtension1

SHAPE

MIT-SHM

Multi-Buffering

XTEST

MIT-SUNDRY-NONSTANDARD

default screen number: 0

number of screens: 1

screen #0:

dimensions: 800x600 pixels (270x203 millimeters)

8 resolution: 75x75 dots per inch

depths (2): 1, 8

root window id: 0x29

depth of root window: 8 planes

number of colormaps: minimum 1, maximum 1

default colormap: 0x27

default number of colormap cells: 256

preallocated pixels: black 1, white 0

options: backing-store YES, save-unders YES

current input event mask: 0x30003c

ButtonPressMask ButtonReleaseMask EnterWindowMask

LeaveWindowMask SubstructureRedirectMask FocusChangeMask

number of visuals: 6

default visual id: 0x20

visual:

visual id: 0x20

class: PseudoColor

depth: 8 planes

size of colormap: 256 entries

red, green, blue masks: 0x0, 0x0, 0x0

significant bits in color specification: 6 bits

visual:

visual id: 0x21

class: DirectColor

depth: 8 planes

size of colormap: 8 entries

red, green, blue masks: 0x7, 0x38, 0xc0

significant bits in color specification: 6 bits

 (... this is a very long listing ... )

***END LISTING
Help for Left-Handed Users xmodmap
If you are a left-handed user, it might a bit uncomfortable to use the "left" button with your third or second finger. The X designers kept you in mind. If you want to swap the functionality of the pointers on your mouse or pointer, use the
xmodmap command. First, display the current mappings like so:
xmodmap -pp
You see the following display:
Physical Button

Button Code

1 1

2 2

3 3
This shows you that button code 1 is mapped to physical button 1, button code 2 is mapped to physical button 2, and button code 3 is mapped to physical button 3.
Now issue this command:
xmodmap -e 'pointer = 3 2 1'
This reverses the mappings on the buttons. Now, physical button 1 is mapped to button code 3, and so forth. To confirm this, retype the xmodmap -pp command.
Physical Button

Button Code

1 3

2 2

3 1
You can always revert to the default with xmodmap -e 'pointer = default'.
Useful Command Line Options
Some other standard input parameters that can be used to change the behavior of a window from the command line are as follows:
| -borderwidth or -bw | Border width of pixels in the frame. This may not be available for all clients. |
| -foreground or -fg | The foreground color. For example, this can be the text color for an xterm. |
| -background or -bg | The background color. For example, this can be the text color for an xterm. |
| -display | Display on which the client runs. |
| -font or -fn | The font to use for a particular text display. |
| -geometry | Specifies the geometry. |
| -iconic | Starts the application in an iconic form. |
| -rv or -reverse | Swaps foreground and background colors. |
| -title | The title for the title bar. |
| -name | The name for the application. |
Of course, the man pages on an application can give you more detailed information than one chapter in a guide. Explore a little. For example, you can call one terminal name editor, and set your resources in the .Xresources file for name editor.
-display nodename:displayname.ScreenName
This starts up a remote session on another node. The displayname and ScreenName are optional and default to zero if not entered.
Logging into Remote Machines
You can log into remote machines by using the xterm -display option, provided you have set your Linux machine up for networks. The remote system must allow you to open a display on its machine. This is done with the xhost + command on its machine. The
xhost + command is dangerous because it allows anyone to access your machine, so use it cautiously.
When you want to open an xterm on the remote machine, alma, run this command:
xterm -display alma:0.0 &
The format for the option into the display parameter is as follows:
[host]:[server][:screen]
If you are given permission to open a display, you are logged into the remote machine. You can verify this with the uname command. Check the DISPLAY with the echo $DISPLAY command.
When you log out with the exit command, the remote session and the xterm are terminated.
One of the most common reasons for not being able to open a remote terminal is that the remote host does not allow you to open windows there. Ask the remote users to use the xhost command at the remote machine as a part of their login.
Colors
All the colors in the X Window system are located in the /usr/lib/X11/rgb.txt file. This file consists of four columns. The first three columns specify red, green, and blue values; the last entry specifies the name that you can use in your parameters.
A partial listing of the rgb.txt file is shown in Listing 23.5.
Listing 23.5. Excerpt from rgb.txt file.
255 250 250 snow

248 248 255 ghost white

248 248 255 GhostWhite

245 245 245 white smoke

245 245 245 WhiteSmoke

220 220 220 gainsboro

255 250 240 floral white

255 250 240 FloralWhite

253 245 230 old lace

253 245 230 OldLace

250 240 230 linen

250 235 215 antique white

255 239 213 PapayaWhip

255 235 205 blanched almond

255 235 205 BlanchedAlmond

255 218 185 peach puff

255 218 185 PeachPuff

255 222 173 navajo white

255 228 181 moccasin

255 248 220 cornsilk

255 255 240 ivory

255 250 205 lemon chiffon

255 250 205 LemonChiffon

255 245 238 seashell

240 255 240 honeydew

245 255 250 mint cream

255 240 245 LavenderBlush

255 228 225 misty rose

255 228 225 MistyRose

255 255 255 white

0 0 0 black

47 79 79 dark slate grey

47 79 79 DarkSlateGrey

105 105 105 dim gray

105 105 105 DimGray

105 105 105 dim grey

105 105 105 DimGrey

112 128 144 slate gray

112 128 144 SlateGray

112 128 144 slate grey

112 128 144 SlateGrey

119 136 153 light slate gray

119 136 153 LightSlateGray

119 136 153 light slate grey

119 136 153 LightSlateGrey

190 190 190 gray

190 190 190 grey

211 211 211 light grey
Because red, green, and blue have 256 values each, the number of possible colors is 16,777,216. Not many workstations can display that many colors at one time. So, X uses a facility to map these colors onto the display, called a colormap. A color
display uses several bits for displaying entries from this map. The xdpyinfo program gives you the number of bits for the display. This is a frame buffer. A 1-bit frame signifies a black-and-white display. An 8-bit frame buffer signifies 2 to the power of
8 entries, or 256 possible colors.
Unfortunately, due to different phosphors on different screens, your color specification on one monitor may be completely different on another monitor. Tektronix provides a tool called xtici, an API, and docs to counter such problems by using the
international CIEXYZ standard for color specifications. This is called the Color Management System (CMS), which uses a model called HVC (Hue-Value-Chroma). In the X11R5 (or later) release, look for Xcms for more details, or contact Tektronix.
Fonts
Fonts in the X Window system are designed for maximum flexibility. The following are two good utilities to help you sift through some of the 400 or so font types on a basic system:
| xlsfonts | Lists the fonts in your system. |
| xfontsel | Enables you to interactively see what fonts are available on your system and what they look like on the screen. |
Using xlsfonts
First, let's examine the font names themselves. Use the xlsfonts command to list the fonts on your system. Type the command on an xterm, and because the listing from xlsfonts is very long, be sure to pipe to a text file for review. You should see a
listing in which each line is of this form:
-foundry-family-wt-sl-wd-p-pts-hr-vr-sp-ave-charset-style
The foundry is the company that first developed the font. The most common ones are misc, Adobe, Bitstream, and B&H. You may see more on your system from the results of your xlsfonts command. A foundry of misc implies a font with fixed width and
height per character; the rest were donated by their respective manufacturers.
The family is the general type of font: Courier, Helvetica, New Century Schoolguide, Lucida, and so on. Some families are monospaced, meaning that all their characters have the same width. The other families are proportionally spaced, meaning that each
character has a separate width. Courier and Lucida are monospaced fonts. New Century Schoolguide is proportionally spaced.
Use monospaced information for tabular information or running text. This makes your text line up cleanly in running displays. Proportionally spaced fonts are helpful for text in buttons or menu items.
The wt and sl parameters stand for weights and slants, respectively. The common weights are bold and medium. Bold text is drawn with a thicker pen than the normal pen. The common slants are (r) roman, (o) oblique, and (i) italic. The roman text is drawn
upright, and oblique text has characters sheared to the right. The italic text is similar to oblique text, but the characters are touched up to show a smoother effect. You may also have reverse oblique (ro) and reverse italic (ri), which make the text lean
to the left instead of the right.
The p stands for the point size, which traditionally is 1/72 of an inch. Most monitors support only 75 or 100 dots per inch (dpi) resolution. Because X fonts are bitmaps, it seems logical that the most common fonts within X are of two types: 75dpi and
100dpi.
This number is found in the two fields hr and vr, which stand for the horizontal and vertical resolution, respectively. In almost all cases, you specify either 75 or 100 in each of these fields.
The sp refers to the spacing between two characters on the screen. This can be m for monospaced, p for proportional, or c for fixed fonts that have each character occupy a fixed box.
The ave is 1/10 of the average width of all the characters in the set.
The character set and style is usually set to ISO8859-1. This refers to the ISO Latin-1 character set, which includes characters found in ASCII and other European character sets.
Now that you've seen the large number of options that can define a font, you can rely on using wildcards to specify most of the options for a font. The server matches the first font name that matches your specification with a wildcard. In other words,
you only have to specify the parameters you want to change, and use the asterisk for the rest.
For example, *courier-roman gets the first specification for the roman-weighted Courier font. However, *courier gets the bold Courier font. This is because the bold specification exists before the roman specification in the fonts file.
Use the xset fp=fontpath command to set the directory (75 or 100 dpi) you want searched first in the front of the font path. This guarantees that the correct dpi size directory is searched first.
The font search path is the path used by the server to search for the fonts in your system. This path is usually set to the following value:
/usr/lib/X11/fonts/misc,/usr/lib/X11/fonts/75dpi,/usr/lib/X11/fonts/100dpi
In each of these directories is a file called fonts.dir. This is a list of all the fonts in the directory, and has two entries per line. The first entry gives a font filename; the second entry gives the complete font description. The first line in the
file gives the number of entries in the file.
Font names are not case-sensitive. New Century Schoolguide is the same as new century schoolguide.
You can create another file in the font path to alias your own font names by using the file called fonts.alias. The server uses only the first one it finds in its path, so just keep one such file in the first directory in your font path. The fonts.alias
format is very similar to the fonts.dir file, except that the first entry is not a filename; it is an alias for a font name. So, if you want to specify a special font type for all your editor xterms, you need the following line:
editterm *lucida-medium-r-*-100*
Then, you can invoke your xterm with this command:
xterm -fn editterm &
This gets an xterm window with the desired font, and is a lot better than typing in the full font specification. Also, by changing the alias once, you can change it for all scripts that use this alias, rather than modifying each script individually.
A good place to start is the /usr/lib/X11/fonts/misc directory, where a fonts.alias exists from your initial X installation. This file has the fixed and variable aliases defined for you to work with.
Using xfontsel
The xfontsel program helps you get a better feel for some of the parameters of a particular font. (See Figure 23.11.)
Figure 23.11. Using xfontsel.
You can move your pointer to any one of the parameters in the first line and click Button1. As you move the pointer on a field, it draws a box around itself to show that it has focus.
If any fonts options exist for your selection, you are presented with a pop-up menu to select from. Move the mouse to a selection, and click on the selection. You see your selection displayed in the font specification string, as well as a sample of what
the font will look like on the fonts display screen below that.
Where to Go from Here
In Chapter 32, "Motif for Programmers," you will learn how to program your application.
If you want more information about specific vendors, you can get a wealth of information from the Internet about the latest releases and sources to shareware utilities. Listed in Table 23.3 are some of the newsgroups that can provide you with more
information about vendors.
Newsgroup Focus comp.sources.x Sources for X Window system comp.windows.x.apps X Window applications comp.windows.x.motif Motif programming issues comp.os.windows.x.i386 XF86 discussions.
A good starting point for progammers is the site at arachnid.cs.cf.ac.uk/Dave/X_lecture/X_lecture.
Summary
In this chapter, you have learned the following:
- How to install Motif on Linux.
- How to start an X Window session from the prompt.
- How to use Widgets and the characteristics of these Widgets. This provides the basis for learning how to program your own applications in the Motif environment.
- The basics of the Motif Window Manager, mwm.
- How to move about in mwm and control windows with the keyboard and mouse.
- How to customize your desktop with resource files and client applications.
- How to set your environment to your liking with resources.
- How to use some standard tools available in X to further set up your desktop.
Where to look next for more information.

Popular Tutorials
-
 MS Access
1109
MS Access
1109
-
 C++
1222
C++
1222
-
 HTML
584
HTML
584
-
 JavaScript
616
JavaScript
616
-
 Vbscript
873
Vbscript
873
-
 Oracle
473
Oracle
473
-
 VC++
875
VC++
875
-
 SQL
2959
SQL
2959
-
 XML
514
XML
514
-
 Java
814
Java
814
-
 Perl
455
Perl
455
-
 Linux
451
Linux
451


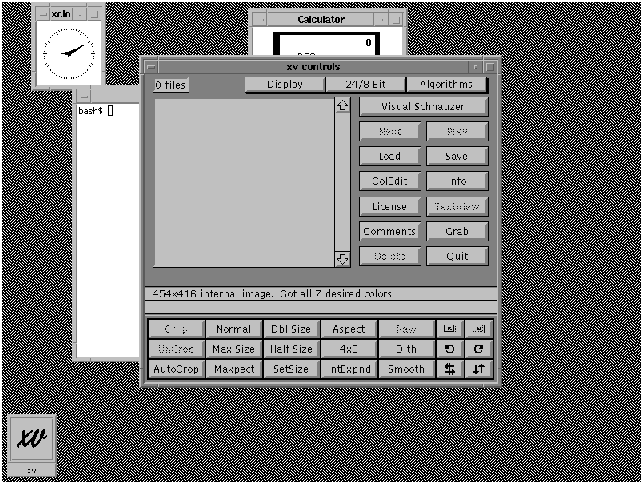
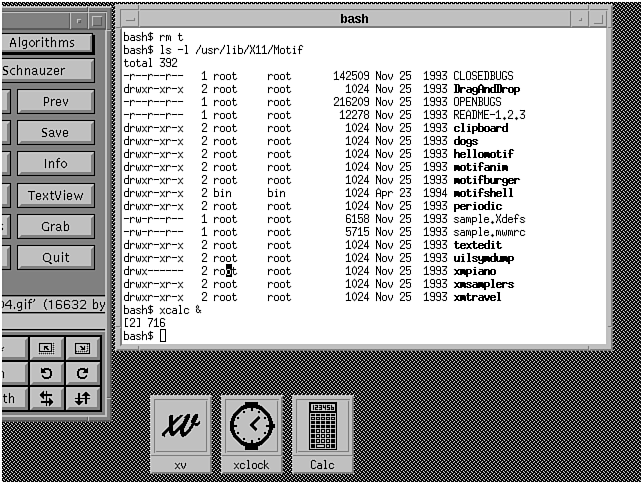
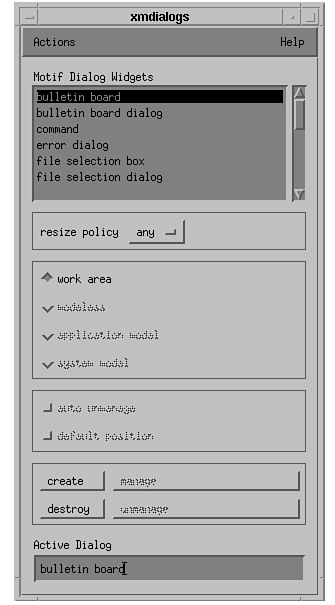
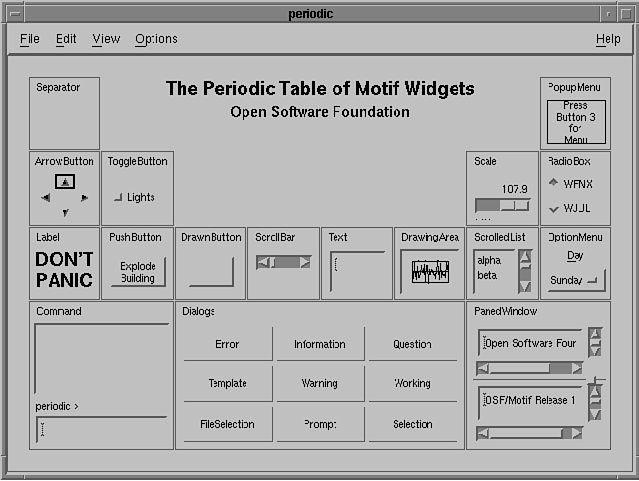
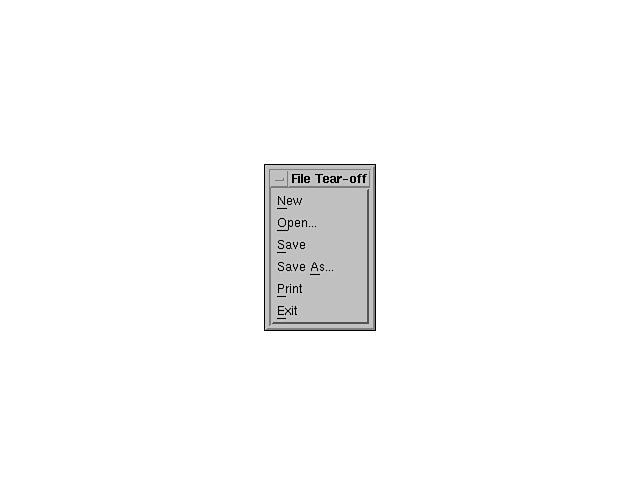