Web based School
Chapter 9
More Intrinsic HTML Form Controls
CONTENTS
- The Radio Button Control
- The Check Box Control
- The Password Control
- Intrinsic HTML Form Controls at a Glance
- Summary
- Q&A
- Workshop
- Quiz
On Day 8, "Intrinsic HTML Form Controls," you saw some of the simple controls available for your use with VBScript. Today you will see the rest. The first two controls presented today are useful when you need to present a series of choices to the user of your Web page. The first control, called the radio button, enables the user to select one of several choices-but only one. The next control, called the check box, allows the user to select one or more choices-not just one. The last control presented in this lesson is called the password control. This control enables the user to enter text such as a password into a text box. The actual text the user enters appears as a series of asterisks. This feature serves to protect the user from someone who might look over her shoulder as she enters a password, credit card number, or other sensitive piece of information. You will see all these controls in action today, and rest assured, you're likely to use all of them sooner or later in the Web pages you develop.
The Radio Button Control
The first control discussed today is the radio button. The radio button control is useful when you want to present several choices to the user, but you only want the user to choose one of those choices. For example, you might want the user to specify whether he or she is male or female. You intend for the user to choose one or the other, but you certainly don't want him to choose both. The radio button control makes it easy to require the user to only choose one option. Take a look at how this works.
Figure 9.1 shows a Web page that uses radio button controls. This Web page, radio.asp, is available on the CD-ROM that comes with this guide.
Figure 9.1 : A simple example that uses the radio button control.
In this example, the user must click the radio button designating his sex. Usually, one of the two values is selected as a default for the user; in this case, it's Male. If the user clicks Female, the Male button will automatically become lightened, or deselected, and the Female button will become darkened, or selected. Both buttons cannot be selected at the same time. Sometimes, you might have a list of choices where you don't mind if the user chooses more than one option. In that case, you would not use the radio button control. You'd instead use the check box control, which is discussed in the next section.
How do you put radio buttons on a Web page? The syntax is not difficult to understand. You need to use the HTML INPUT tag because this control accepts input from the user. The following line shows the syntax for the radio button:
<INPUT TYPE="RADIO" NAME="name" VALUE="value" LANGUAGE="VBScript"
OncLICK="procedure">
The NAME parameter enables you to set the name of the radio button control. As you will see in a moment, if you want to create a group of radio button controls where only one can be selected, you must assign the same name to each of the controls in the group. VALUE is an optional parameter you can use if you embed the control in a form for submission to a Web server. It specifies a unique value for that particular control so that the server can recognize which button was clicked in a group of radio button controls. The OncLICK parameter is another optional parameter that enables you to call a VBScript procedure when the button is clicked. But you need to make sure you also include the LANGUAGE attribute and set it to "VBScript" so that the browser knows the language embedded in the control definition. This is the way to interface VBScript with the radio button controls on your Web page. You can also include the chECKED attribute in the list if you want the button to appear checked automatically when the Web page loads. To do this, you simply use the following syntax:
<INPUT TYPE="RADIO" NAME="name" VALUE="value" chECKED LANGUAGE="VBScript"
OncLICK="procedure">
Figure 9.1 shows a Web page with two radio buttons labeled Male and Female. These two buttons are grouped together because the programmer wants the user to select one button or the other, but not both. You need to put all the buttons in your list of choices in the same group. To do that, you simply give each button in the group the same name.
If you intend to submit the form to a Web server, you should also assign each of the buttons in the group a different value so the server can tell them apart. If your radio buttons are contained in a form and that form is submitted, the browser will submit the name of the radio button group within the form, as well as the value of the button that is currently selected in each group on the form. Because I'm not concerned with interacting with the server at this point, I'll omit the VALUE attribute from the radio button controls.
Listing 9.1 shows the code for the Web page in Figure 9.1 and illustrates how you put the buttons on the Web page.
Listing 9.1. Using radio button controls.
<HTML>
<HEAD>
<TITLE>The Radio Button Control</TITLE>
</HEAD>
<BODY>
<H1>
<A HREF="http://w3.softlookup.com"><IMG ALIGN=MIDDLE
SRC="../shared/jpg/samsnet.jpg" BORDER=2 HSPACE=20></A>
<EM>The Radio Button Control</EM></h1>
<HR>
<P>This Web page demonstrates how to place a simple group of
radio button controls on a Web page. When the user clicks on
a radio button, VBScript calls a subroutine that
tells you which button the user has selected.
<P>
<INPUT TYPE="RADIO" NAME="optGender" LANGUAGE="VBScript"
OnClick="SetGender('male') "> Male<BR>
<INPUT TYPE="RADIO" NAME="optGender" LANGUAGE="VBScript"
OnClick="SetGender('female')"> Female<BR>
<P>
<INPUT NAME="txtResult" SIZE="50">
<HR>
<center>
From <em>Teach Yourself VBScript in 21 Days</em><br>
by <A HREF="../shared/info/keith.asp">Keith Brophy</A> and
<A HREF="../shared/info/tim.asp">Tim Koets</A><br>
<br>
Return to <A href=Back09.asp>content overview</A><br>
1996 by SamsNet<br>
</center>
<SCRIPT LANGUAGE="VBScript">
<!--
Sub SetGender(Gender)
txtResult.Value = "You have selected " & Gender & "."
End Sub
-->
</SCRIPT>
</BODY>
</HTML>
Notice in Listing 9.1 that both buttons have the same name, optGender. You can use the prefix opt to make the control more easily recognizable in your code. It's not required, but it does help make your code more readable.
| Note |
See Day 13, "VBScript Standards and Conventions," for more information on control naming conventions. |
Both buttons call the same subroutine, SetGender, when clicked. Notice that each button passes a different parameter into the subroutine-in this case, the gender that the button represents. These arguments are simple strings, but they could just as easily be any other value. When the user clicks either button, the subroutine is called and the text control gets the appropriate sentence about which option the user selected.
Earlier in this section, you learned that you must place radio buttons in the same group to force the user to choose only one of several buttons. To accomplish this, each button control must have the same name. To see what would happen if you didn't follow this rule, take a look at the Web page shown in Figure 9.2. This Web page is also on the CD-ROM as badradio.asp.
Figure 9.2 : An example of two radio buttons not grouped together.
In this example, notice that the user has selected both the male and female radio buttons! Obviously, this is not what you intend in your program. What's the problem? You haven't placed the buttons in the same group. Placing them in the same group makes VBScript realize that only one button in the group can be selected at a time. When you select one, all the others in the group are deselected. In this case, you have effectively placed both buttons in their own groups, which means that the user can click on both. The section of incorrect code is shown here:
<INPUT TYPE="RADIO" NAME="optMale" LANGUAGE="VBScript"
OnClick="SetGender('male') "> Male<BR>
<INPUT TYPE="RADIO" NAME="optFemale" LANGUAGE="VBScript"
OnClick="SetGender('female')"> Female<BR>
It's easy to make this mistake because each of the other controls except the radio button must have a unique name. With radio buttons, however, duplicate names are allowed and must be applied to properly group them.
What's the value of groups? Why can't all the buttons on a Web page behave like one big group? Sometimes you might want to put more than one group of radio button controls on a page. Suppose that you not only want the user to select his gender, but you also want him to indicate the age group he belongs to. In this case, you would have two groups of radio buttons to present to the user.
Figure 9.3 shows a Web page that accomplishes that task. The Web page is also on the CD-ROM as radiogrp.asp.
Figure 9.3 : An example using two radio button groups.
This Web page consists of two groups of radio buttons: one for the user's age and another for his gender. Whenever the user clicks a button, the appropriate script-level variable changes: one for age, the other for gender. The code in Listing 9.2 makes this more clear.
Listing 9.2. Using two radio button groups to set variables.
<HTML>
<HEAD>
<TITLE>The Radio Button Control</TITLE>
</HEAD>
<BODY>
<H1>
<A HREF="http://w3.softlookup.com"><IMG ALIGN=MIDDLE
SRC="../shared/jpg/samsnet.jpg" BORDER=2 HSPACE=20></A>
<EM>Effectively Grouping Radio Button Controls</EM></h1>
<HR>
<P>This Web page demonstrates how to place a simple group of
radio button controls on a Web page. This page includes two
groups of radio buttons, one for the user's gender, the other
for the user's age group. Both can be selected and, when the
user clicks on "Show Choices", the options the user has
selected are shown.
<P>
<OL>
<LI>Please select your gender.<BR>
<INPUT TYPE="RADIO" NAME="optGender" chECKED
OnClick="SetGender('male' )"> Male<BR>
<INPUT TYPE="RADIO" NAME="optGender"
OnClick="SetGender('female')"> Female<BR>
<LI>Please select your age group.<BR>
<INPUT TYPE="RADIO" NAME="optAge"
OnClick="SetAge('under 5' )"> under 5 <BR>
<INPUT TYPE="RADIO" NAME="optAge"
OnClick="SetAge('5-20' )"> 5-20 <BR>
<INPUT TYPE="RADIO" NAME="optAge" chECKED
OnClick="SetAge('20-40' )"> 20-40 <BR>
<INPUT TYPE="RADIO" NAME="optAge"
OnClick="SetAge('40-80' )"> 40-80 <BR>
<INPUT TYPE="RADIO" NAME="optAge"
OnClick="SetAge('80-100' )"> 80-100 <BR>
<INPUT TYPE="RADIO" NAME="optAge"
OnClick="SetAge('over 100')"> over 100 <BR>
</OL>
<P><INPUT NAME="txtResult" SIZE="50"
VALUE="The user is a male and is 20-40 years old.">
<HR>
<center>
From <em>Teach Yourself VBScript in 21 Days</em><br>
by <A HREF="../shared/info/keith.asp">Keith Brophy</A> and
<A HREF="../shared/info/tim.asp">Tim Koets</A><br>
<br>
Return to <A href=Back09.asp>content overview</A><br>
1996 by SamsNet<br>
</center>
<SCRIPT LANGUAGE="VBScript">
<!--
Dim Age
Dim Gender
Gender = "male"
Age = "20-40"
Sub SetGender(NewGender)
Gender = NewGender
Call ShowStatus
End Sub
Sub SetAge(NewAge)
Age = NewAge
Call ShowStatus
End Sub
Sub ShowStatus()
txtResult.Value = "The user is a " & Gender & " and is " &_
Age & " years old."
End Sub
-->
</SCRIPT>
</BODY>
</HTML>
This example defines two script-level variables titled Age and Gender. When the Web page first loads into memory, these two variables are initialized to their default values of 20-40 and Male, respectively. Two groups of radio buttons are defined on the Web page. In the first group, each button is labeled optGender. Notice that the first button has the chECKED attribute specified in the tag and that, when clicked, it calls the procedure SetGender and passes it the string argument male. The SetGender function, when called, sets the script-level Gender variable equal to the string passed to it. This is how the user can change the gender. Likewise, the second button calls the same procedure and passes the string female to it. You could just as easily pass a numeric value to the procedure and, based on that value, change the gender variable. In other words, you have a great deal of flexibility in the ultimate implementation you decide to make.
The second group of buttons enables the user to specify his or her age group. Every button in this group is named optAge. Again, you must assign the same name to each of the radio buttons associated in the same group. The default value assigned to the script-level Age variable was 20-40, so the radio button that sets the age to 20-40 is checked as a default. When the user clicks any of these buttons, the procedure SetAge is called and the appropriate argument is passed to the procedure. As with the gender, the procedure sets the script-level variable Age to whatever argument was passed to the procedure.
Both SetAge and SetGender then call the procedure ShowStatus, which displays the values in the text control txtResults. Whenever the user clicks a button, the text control gives the user a printed description of his latest choices. To make the default choice appear when the Web page is loaded, set the VALUE attribute of the text control to display what would appear if the user clicked the buttons for the default choices.
It's fairly easy to use radio button controls. You simply group radio button controls together, assign the same name to them, and assign an OnClick procedure to each so you can set variables or perform actions in your code when the user clicks each of the buttons. You can assign each button a separate procedure or assign them all the same procedure, or you can assign some to separate procedures and others to the same. You don't need to set the VALUE attribute of the radio button control unless you are sending the data within a form to a Web server. Communicating with Web servers will be discussed in more detail on Day 19, "Dynamic Page Flow and Server Submittal." Again, you have a great deal of flexibility. Your only limitation is your own creativity in building a solution.
In addition to the properties and events already discussed, there are other properties that may be useful to you. You can figure out what form a radio button control belongs to by referencing the Form property. You can also set the Enabled property to True or False if you want to prevent the user from activating the control. The radio button also has Focus and Click methods to cause the browser to give a radio button focus or to simulate a mouse click of the control. Finally, the radio button control supports the OnClick and OnFocus events. You have already seen the OnClick event in action, and you can also establish an OnFocus event for each individual radio button in a group.
The Check Box Control
The next control discussed today is the check box control.
Check boxes are similar to radio buttons, with two notable exceptions.
The first is that a radio button is circular, whereas a check
box is a square that, when checked, is marked with a checkmark
or an ¥. The most significant
difference between the two is that check boxes don't follow the
"one selection only" rule. In other words, you use check
boxes when you want the user to select one or more choices,
not just one. Radio buttons, when grouped, only allow one selection
of many possible choices. Check boxes, on the other hand, do not
follow the same rule; you can check as many as you want without
deselecting any of the others.
To see how this works, you will see the same type of application
first introduced when in the discussion on radio button controls.
The first radio button example allowed the user to select his
or her gender. If Male was selected, Female was deselected, and
vice versa. Only one choice of several was allowed. When working
with check boxes, the user can select more than one at the same
time. The gender choice would therefore not be appropriate for
check boxes. What would be appropriate, however, is the list of
choices the user can make on the Web page shown in Figure 9.4.
Figure 9.4 : A simple example of using check box controls.
This Web page, named chkbox.asp,
is on the CD-ROM that accompanies this guide. As you can see, a
checkmark appears in each box selected. Here, the user has clicked
the Show Selections button to see the choices he selected. Notice
that he can make more than one choice. In this case, radio buttons
would not be appropriate because it's okay for the user to select
more than one choice.
Listing 9.3 shows the source code for this Web page.
When you look at Listing 9.3, you can see a series of four check
box controls using
If you want the check box to appear checked initially, you can
use the syntax
In both cases, name
refers to the name of the particular check box control. You
can prefix your check box controls with the chk
convention to help distinguish the type of control when you see
it in your code. In the example shown in Listing 9.3, VBScript
refers to a special property of the check box control called the
Checked property. The Checked
property does not exist for the radio button control, which is
why the OncLICK attribute
is used to trap information about which radio buttons a user clicks.
The check box control, however, has the useful Checked
property to work with. It turns out that you can also use the
OncLICK attribute for the
check box.
Consider a modified version of the Web page that was just presented.
Figure 9.5 shows the new version. This Web page is named chkboxoc.asp
on the CD-ROM that accompanies this guide.
Figure 9.5 : Using the OncLICK attribute with check box controls.
Listing 9.3. Using a set of check box controls to make selections.
<HTML>
<HEAD>
<TITLE>The Radio Button Control</TITLE>
</HEAD>
<BODY>
<H1>
<A HREF="http://w3.softlookup.com"><IMG ALIGN=MIDDLE
SRC="../shared/jpg/samsnet.jpg" BORDER=2 HSPACE=20></A>
<EM>The Check Box Control</EM></h1>
<HR>
<P>This Web page demonstrates how to place a simple series
of
check box controls on a Web page. When the user clicks
on the
'Show Selections' button, VBScript calls a subroutine that tells
you which selections the user has currently chosen.
<P>
Please check the guide categories that interest you.<BR>
<INPUT TYPE="chECKBOX" NAME="chkSuspense"
> Suspense<BR>
<INPUT TYPE="chECKBOX" NAME="chkMystery" >
Mystery<BR>
<INPUT TYPE="chECKBOX" NAME="chkRomance" >
Romance<BR>
<INPUT TYPE="chECKBOX" NAME="chkNFiction"
> Non-Fiction<BR>
<P>
<INPUT TYPE="BUTTON" NAME="cmdResults"
VALUE="Show Selections">
<INPUT NAME="txtResult" SIZE="60">
<HR>
<center>
From <em>Teach Yourself VBScript in 21 Days</em><br>
by <A HREF="../shared/info/keith.asp">Keith Brophy</A>
and
<A HREF="../shared/info/tim.asp">Tim Koets</A><br>
<br>
Return to <A href=Back09.asp>content overview</A><br>
1996 by SamsNet<br>
</center>
<SCRIPT LANGUAGE="VBScript">
<!--
Sub cmdResults_OnClick()
Dim Result
Result = "You have selected: "
If chkSuspense.Checked Then
Result =
Result & " suspense "
End If
If chkMystery.Checked Then
Result =
Result & " mystery "
End If
If chkRomance.Checked Then
Result =
Result & " romance "
End If
If chkNFiction.Checked Then
Result =
Result & " non-fiction "
End If
txtResult.Value = Result
End Sub
-->
</SCRIPT>
</BODY>
</HTML>
the INPUT tag. The syntax
for a check box control is
<INPUT TYPE="chECKBOX" VALUE="value"
NAME="name">
<INPUT TYPE="chECKBOX" VALUE="value"
NAME="name" chECKED>
| Note |
In other languages, such as Visual Basic 4.0, code can directly query a Checked property of the radio button just as it can for the check box. At the time of this writing, VBScript only enables you to look at a check box's Checked property. You cannot perform a similar query on the radio button's Checked property to see if it's on or off, as you might expect. |
As you can see, this Web page has no Show Selections button. Otherwise, it appears the same. Look at Listing 9.4 to discover what else is different.
Listing 9.4. Using a set of check box controls and OncLICK.
<HTML>
<HEAD>
<TITLE>The Check Box Control</TITLE>
</HEAD>
<BODY>
<H1>
<A HREF="http://w3.softlookup.com"><IMG ALIGN=MIDDLE
SRC="../shared/jpg/samsnet.jpg" BORDER=2 HSPACE=20></A>
<EM>The Check Box Control</EM></h1>
<HR>
<P>This Web page demonstrates how to place a simple series of
check box controls on a Web page. When the user clicks on a
check box, VBScript calls a subroutine that tells you which
selections the user has currently chosen.
<P>
Please check the guide categories that interest you.<BR>
<INPUT TYPE="chECKBOX" NAME="chkSuspense" LANGUAGE="VBScript"
OncLICK="ShowResults" > Suspense<BR>
<INPUT TYPE="chECKBOX" NAME="chkMystery" LANGUAGE="VBScript"
OncLICK="ShowResults" > Mystery<BR>
<INPUT TYPE="chECKBOX" NAME="chkRomance" LANGUAGE="VBScript"
OncLICK="ShowResults" > Romance<BR>
<INPUT TYPE="chECKBOX" NAME="chkNFiction" LANGUAGE="VBScript"
OncLICK="ShowResults" > Non-Fiction<BR>
<P>
<INPUT NAME="txtResult" SIZE="60">
<HR>
<center>
From <em>Teach Yourself VBScript in 21 Days</em><br>
by <A HREF="../shared/info/keith.asp">Keith Brophy</A> and
<A HREF="../shared/info/tim.asp">Tim Koets</A><br>
<br>
Return to <A href=Back09.asp>content overview</A><br>
1996 by SamsNet<br>
</center>
<SCRIPT LANGUAGE="VBScript">
<!--
Sub ShowResults()
Dim Result
Result = "You have selected: "
If chkSuspense.Checked Then
Result = Result & " suspense "
End If
If chkMystery.Checked Then
Result = Result & " mystery "
End If
If chkRomance.Checked Then
Result = Result & " romance "
End If
If chkNFiction.Checked Then
Result = Result & " non-fiction "
End If
txtResult.Value = Result
End Sub
-->
</SCRIPT>
</BODY>
</HTML>
Notice that this example uses OncLICK in the check box controls. No button appears in the code. Here, when the user clicks a check box, the subroutine ShowResults is automatically called. The subroutine ShowResults then checks the state of each check box and puts the string in the text box just like before. The only difference is that rather than click a button to see the changes, the user sees the updated text each time the check boxes are changed.
How could this be of value to you? You might need to catch changes made to check boxes right away in your code instead of waiting until some other time to check the controls. The OncLICK attribute gives you the flexibility of going either way. Furthermore, the Checked property is helpful in VBScript because you can not only query the status of the check box, but you can also check and uncheck the check box manually in code by setting the value of Checked to True or False. Don't forget to include the LANGUAGE property when using OncLICK. If you leave out LANGUAGE, the browser might not recognize the scripting language and may produce an error.
Neither of these examples uses the VALUE attribute of the check box because the Web page doesn't concern itself with submitting data to a server. However, if you do use a form and include check box controls inside the form, the browser sends each check box control to the server along with the value of that check box control. HTML will let you get away with giving check box controls the same name, but VBScript will not work properly if you try to reference the Checked property of a check box that has the same name as another. Which would it choose? It takes the first one it finds and ignores all the rest!
The moral of the story: Make sure you give each check box in your page a different name. With radio button controls, you need to give each control within the same group the same name. This tells the browser that the buttons are all grouped together. The downside to this is that you can't use anything like a Checked property because VBScript won't know which radio button you're referring to. As a result, HTML doesn't give radio button controls a Checked property. With the check box control, however, you don't need groups, so you don't need to use duplicate names. If you don't have to use duplicate names, VBScript can use the Checked property because it can distinguish between each check box control. The Checked property is supported with the check box control because it is practical to do so in this case.
The check box control, like the radio button control, also supports the Click and Focus methods, as well as the OnClick and OnFocus events. The check box control has an Enabled property that can be used to enable or disable the control to the user.
The Password Control
The next control discussed today is the password control. This control is almost identical to the text control with one exception. When the user enters text into the control, the actual text he is typing does not appear. Instead, a series of asterisks appears as he types. The advantage of this control is that nobody knows what the user is typing at the moment he enters the text into the control. You might have experience with such a control if you've ever run Windows on a computer network. When it's time to enter your password, you are presented with a box to enter it. When you do, you cannot see what you are typing. If anyone happens to be near you when you're typing it, he won't be able to see your password.
You might have also seen this technique used at your local ATM.
Some ATMs show a series of asterisks on the screen when you enter
your PIN. This tells you that the computer is accepting the digits
you are entering even though you can't see them. That way, if
the person next in line happens to be a bit too nosy, he won't
be able to see what you've entered at
the ATM.
How does the password control work? The syntax is the same as for the text control, except for the TYPE attribute. You can create a password control by entering
<INPUT TYPE="PASSWORD" NAME="control_name" SIZE="size"
VALUE="value" MAXLENGTH="max_length">
where the attributes SIZE, VALUE, and MAXLENGTH are optional. control_name is the name of the control, usually prefixed with the string pwd for easy identification as a password in your code. You can set the SIZE attribute to any size, equal to a width approximately equal to the number of characters you can enter across the control. The VALUE attribute is another optional parameter that gives you the capability to store text in the control by default when the Web page loads into the browser.
MAXLENGTH enables you to restrict the number of characters the user enters in the box. This is often useful with the password control. When the user must enter a password or credit card number, you can restrict these entities to a maximum size. For example, you might require a password to be greater than 5 characters but no more than 10. In this case, you can set the MAXLENGTH attribute equal to 10 to make sure the user doesn't exceed the 10-character limit. You cannot enforce a minimum length here when you're creating the control, but you can use VBScript to enforce it. You'll see an example of this in a moment.
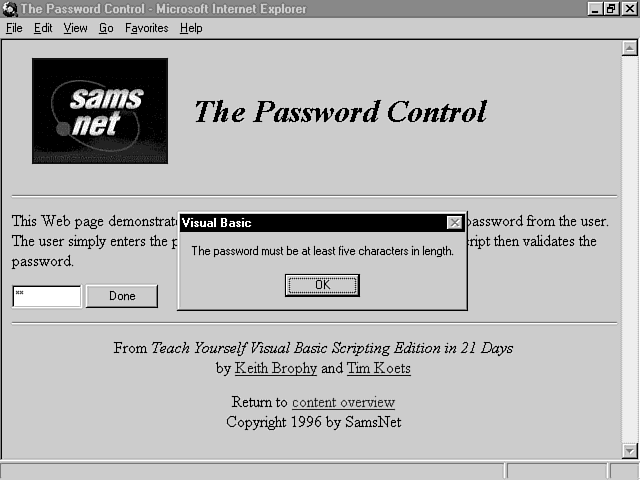
To see the password control in action, check out a simple Web page that asks the user for a password. The password must be no fewer than 5 characters and no greater than 10. Figure 9.6 shows the Web page named password.asp.
Figure 9.6 : A simple Web page using the password control.
Listing 9.5 shows the code for this Web page. VBScript is used to validate the password.
Listing 9.5. Source code for the password control Web page.
<HTML>
<HEAD>
<TITLE>The Password Control</TITLE>
</HEAD>
<BODY>
<H1>
<A HREF="http://w3.softlookup.com"><IMG ALIGN=MIDDLE
SRC="../shared/jpg/samsnet.jpg" BORDER=2 HSPACE=20></A>
<EM>The Password Control</EM></H1>
<HR>
<P>This Web page demonstrates how to use the password control to
accept a password from the user. The user simply enters the
password and clicks on the "Done" button. VBScript then validates
the password.
<P>
<INPUT TYPE="PASSWORD" NAME="txtPassword" SIZE="10"
MAXLENGTH="10" MASK="X">
<INPUT TYPE="BUTTON" NAME="cmdDone" VALUE="Done">
<HR>
<center>
From <em>Teach Yourself VBScript in 21 Days</em><br>
by <A HREF="../shared/info/keith.asp">Keith Brophy</A> and
<A HREF="../shared/info/tim.asp">Tim Koets</A><br>
<br>
Return to <A href=Back09.asp>content overview</A><br>
1996 by SamsNet<br>
</center>
<SCRIPT LANGUAGE="VBScript">
<!--
Sub cmdDone_OnClick()
Dim Password
Password = txtPassword.Value
If Len(Password) < 5 Then
MsgBox "The password must be at least fiveÂ
characters in length."
txtPassword.Value = ""
End If
End Sub
-->
</SCRIPT>
</BODY>
</HTML>
This example uses the MAXLENGTH attribute to restrict the user to 10 characters. As Figure 9.6 shows, the user's password is hidden behind a series of asterisks. The Web page and VBScript know what's hidden behind those asterisks, but the user or any onlookers do not.
When the user clicks the Done button, the event subroutine for that button executes. The contents of the control are assigned to a variable. Then, the script uses a special function called Len to ascertain the length of the string the user has entered. If the length is less then five, the user hasn't entered a valid password and he is notified accordingly. The script deletes the text in the box, and the user must start over. Otherwise, you could submit the password to a server, for example, to see if it is valid.
The password control is very useful to mask characters on the Web page, but beware. When you submit the password to a server, the password is not secure. It is presented to the server in regular text, which means that anyone can intercept the password and read it. The masking effect of the password control is only a visual aid when the user is entering text on the Web page. In light of such risks, developers are paying more and more attention to security on the Web. As security mechanisms are implemented, data on the Web will become increasingly secure. You will learn more about WWW security issues on Day 21.
Intrinsic HTML Form Controls at a Glance
You have seen in today's and yesterday's lessons many of the intrinsic
HTML controls you can use in your Web pages. As this guide went
to print, some of the controls were not implemented yet and others
were implemented, but not fully in the current beta. Table 9.1
represents, to the best of the authors' knowledge, a complete
list of all the intrinsic HTML controls, including their properties,
methods, and events. Check Microsoft's Web site at www.microsoft.com/intdev
for the latest status.
| Button | OnClick | Click | Form, Name, Value | A standard HTML control that the user can click on to cause some activity or activities to take place. |
| Reset | OnClick | Click | Form, Name, Value | A button that resets the Web page to the values it had when it was first loaded into the browser. |
| Submit | OnClick | Click | Form, Name, Value | A button that submits the contents of an HTML form to a Web server. |
| Check box | OnClick | Click | Form, Name, Value, Checked, DefaultChecked | Presents a check box the user can either check on or off. A check box control is used to allow the user to select one or more choices from a list. |
| Radio | OnClick | Click | Form, Name, Value, Checked | Presents a circular button the user can click on or off. Radio controls are used to allow the user to select one choice from a list of possible choices. |
| Text | OnFocus, OnBlur, onChange, onSelect | Focus, Blur, Select | Form, Name, Value, DefaultValue | Presents the user with a single-line box of variable width into which the user can enter text and text can be placed by a scripting program. |
| TextArea | OnFocus, OnBlur onChange, onSelect | Focus, Blur, Select | Form, Name, Value, DefaultValue | Presents the user with a multiple-line box of variable width into which the user can enter text and into which text can be placed by a scripting program. |
| Select | OnFocus, OnBlur, OnChange | Focus, Blur | Name, Length, Options, SelectedIndex | Presents a list from which the user can select one of several items. |
| Hidden | (None) | (None) | Name, Value | Essentially an invisible text control that allows the user to store values within a Web page in these "holding areas" "holding areas" without being seen by the user |
| Note |
The controls presented in Table 9.1 were obtained from the ActiveX SDK help located at www.microsoft.com/intdev. Additional details are also available for each of these controls, including their properties, methods, and events, when you download the ActiveX SDK, and its accompanying documentation. |
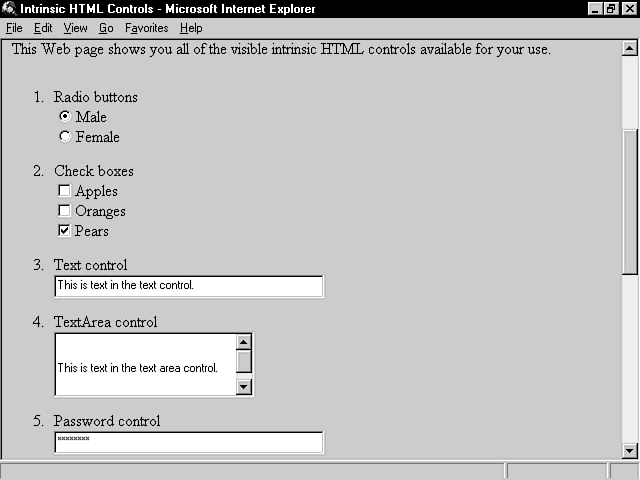
To see a simple example of each control presented on a Web page, see Figure 9.7.
Figure 9.7 : A Web page that shows all the intrinsic HTML controls.
This Web page is named controls.asp and is on the CD-ROM with the rest of the sample programs in this lesson.
Summary
Today's lesson presents you with detailed descriptions of three more intrinsic HTML form controls that you can use along with VBScript to produce useful and powerful Web pages. The remaining HTML controls are also presented and displayed at the end of the lesson. The first two controls are quite similar in that they enable the designer to present a series of choices to the user. The radio button control, which was covered first, presents the user with a series of choices where he can select only one choice at any given time. A circular button appears over the choice, and the moment one choice is selected, the other is deselected. You have learned how to create a group of radio buttons that present the user with a list of choices, and you also learned how to connect those controls to VBScript.
The next control covered today is the check box control. Like
the radio button, this control also presents the user with a list
of choices. In this case, however, the user can make more than
one choice from the list. A square with a check mark or an ¥
inside appears when the user makes a selection. You have also
learned how to place this control on a form as well as how to
integrate it into VBScript.
Finally, you have learned about the password control. The password
control enables the user to enter text but hides the characters
on the screen so that nobody can see what the user is typing.
Although the password control does not ensure security if the
password is transmitted over the Internet, it does prevent onlookers
from seeing what the user enters.
Over the next two days, you will learn about ActiveX controls.
ActiveX controls extend the power of the Web by providing controls
that are even more functional and powerful than the intrinsic
HTML controls you have studied for the past two days. Intrinsic
controls are commonly used in almost every Web page because they
are the "staple" diet of all Web programmers.
Now that you've been exposed to all the intrinsic HTML controls
that work with VBScript, write a Web page for ordering software.
The Web page should retrieve the user's name and address; the
type of computer she uses from a list of choices; whether she
prefers 5.25" disks, 3.5" disks, or a CD-ROM; and several
sentences on what she does for a living in a text area on the
screen. Utilize all of the controls you've learned about over
the last two days:
When you're finished, place form tags around all the controls
and add a submit button so that you could submit the data to a
server. (Day 21 covers this side of the
picture in more detail.)
Q&A
Are all the intrinsic HTML controls supported in VBScript?
No, not all the controls are supported. Intrinsic HTML controls that are not supported by VBScript are probably provided in the ActiveX control suite, which you will learn about over the next
two days. You should check the latest VBScript documentation to see which controls are supported and which are not.
Do ActiveX controls supplement or replace HTML controls?
Intrinsic HTML controls and ActiveX controls complement each other. For instance, one of the ActiveX controls you can use is the label control, as you will see tomorrow. The label enables you to
rotate text and present it to the user in a variety of ways. Such functionality is not available in the HTML control set. On the other hand, the text control is a standard control that a separate ActiveX does not duplicate; it's available as part of the
HTML control set. Therefore, you can use both types of controls together to present your Web page to the user.
How does the user know the difference between radio buttons and check box controls?
The user probably recognizes the difference between these two types of controls based on experience with them in other software, but you can't necessarily make that assumption. It will be
helpful to the user if you add text above a list of choices that makes his responsibilities as clear as possible. Statements such as "Please select one of the following choices" and "Select all the choices that apply" help the user
figure out what he or she needs to do next.
Workshop
Quiz
| Note |
Refer to Appendix C, "Answers to Quiz Questions," for the answers to these questions. |
- What is the primary difference between a radio button and a check box control?
- List all the intrinsic HTML controls supported by VBScript and the reasons you might use them.
- Write a simple program that converts length from feet, inches,
or yards to meters. The page should have one text control for
the unit to be converted, followed by a series of radio buttons
that the user can choose. The units in these radio buttons should
be feet, inches, and yards. The page should also include a button
to launch the conversion, followed by a text control that presents
the result. Use the following rules for performing the conversions:
If user chooses feet, multiply the value by 0.3048 to obtain the result in meters.
If the user chooses inches, multiply the value by 0.00254 to obtain the result in meters.
If the user chooses yards, multiply the value by 0.9144 to obtain the result in meters.


Popular Tutorials
-
 MS Access
1109
MS Access
1109
-
 C++
1222
C++
1222
-
 HTML
584
HTML
584
-
 JavaScript
616
JavaScript
616
-
 Vbscript
873
Vbscript
873
-
 Oracle
473
Oracle
473
-
 VC++
875
VC++
875
-
 SQL
2959
SQL
2959
-
 XML
514
XML
514
-
 Java
814
Java
814
-
 Perl
455
Perl
455
-
 Linux
451
Linux
451


