Web based School
The Tools of the Trade |
The Tools of the Trade
You learned how to build basic HTML pages the manual
way. You also manually inserted scripts and objects into HTML pages. Now it's time to
leave the trusty text editor and study some new tools. First, today's lesson provides a
look at the Internet Assistant for Microsoft Word—a free add-in that enables you to
build HTML pages in the familiar environment of a word processor. Then you will work with
SoftQuad’s HoTMetaL, a tool dedicated to building Web pages. Next you will learn
about the Internet Information Server(IIS) Add-In for Microsoft Access. This free add-in
builds database front ends and reports for your Web pages. Finally, the tour ends with a
look at the ActiveX Control Pad. The ActiveX Control Pad is specifically designed to
integrate ActiveX Objects and scripting into your Web pages. These tools are representative of the two dozen or
so tools available to the HTML developer today—and dozens more are on the horizon.
After today you will have a working knowledge of each of these tools. You will also have a
good foundation for future decisions about which tools to use for all the works that are
going to be generated by ActiveX on the Internet. Overview of the Internet Assistant for Microsoft Word for Windows
The Internet Assistant for Microsoft Word is a free
add-in that gives Word the capability to read and write Web pages. Its biggest advantage
is that it enables you to create Web pages in a familiar environment. To download it, set
your browser to and follow the download instructions. After you have
it downloaded, bring up Word. If you have the toolbars selected, you will see some
eyeglasses on the far left of the toolbar, next to the style drop-down list box, as shown
in Figure 4.1. Figure 4.1. Word with
Internet Assistant added. Press this button to go into Web Browse view. If you
don't have the toolbars turned on, select Web Browse from the View menu. Your screen will
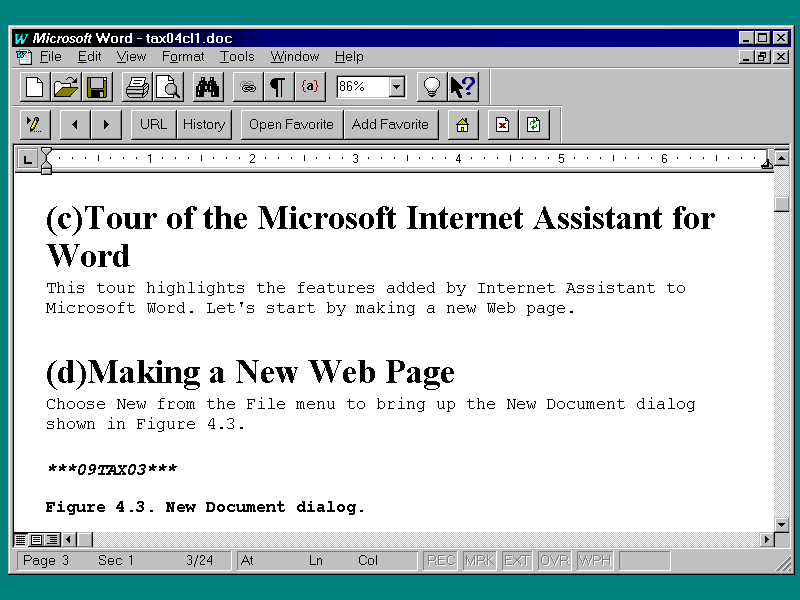
look like Figure 4.2. This is the screen where your tour begins. Tour of the Microsoft Internet Assistant for Word
This tour highlights the features added by Internet
Assistant to Microsoft Word. Let's start by making a new Web page. Making a New Web Page
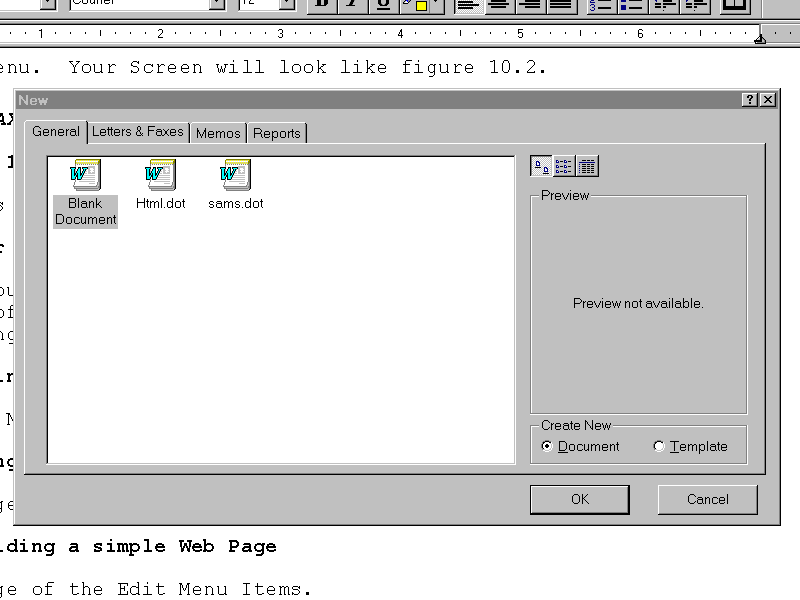
Choose New from the File menu to bring up the New
Document dialog shown in Figure 4.3. Figure 4.3. New Document
dialog. Click Html.dot. This loads the HTML style sheet.
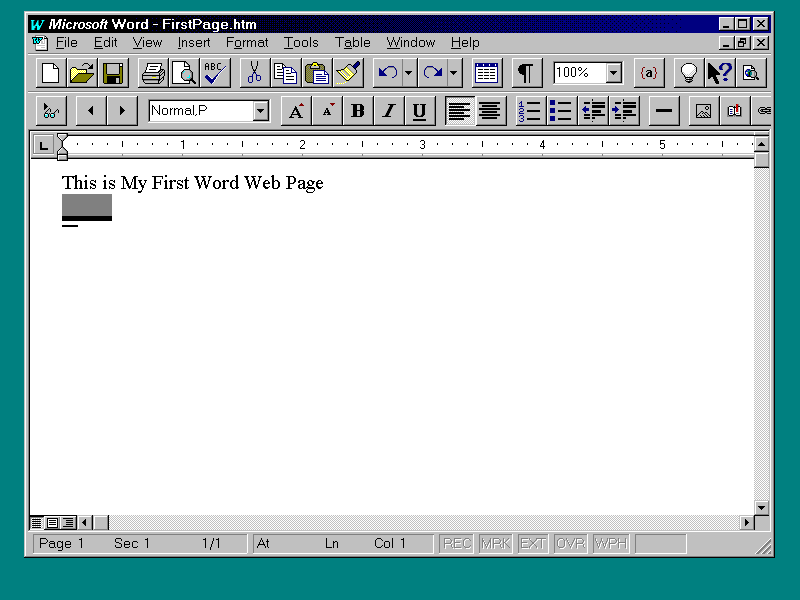
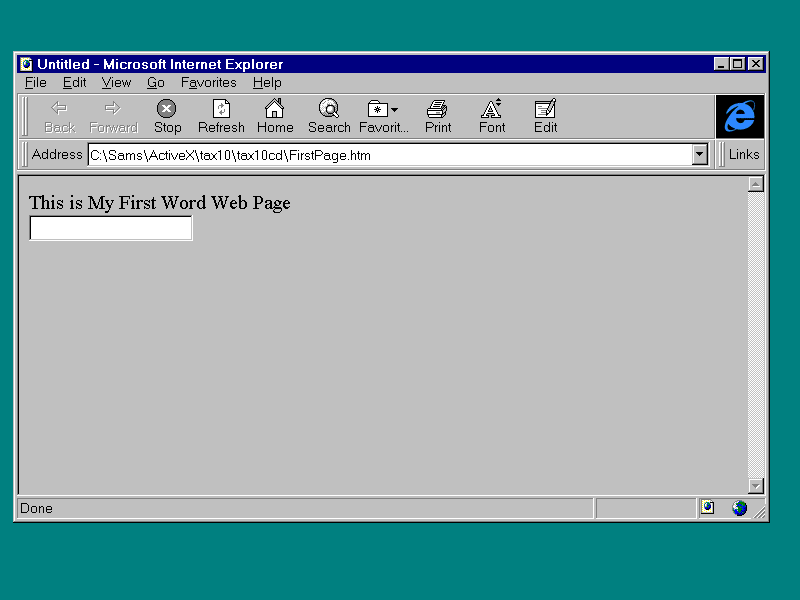
Space down toward the middle of the page and type in the text This is My First Word Web
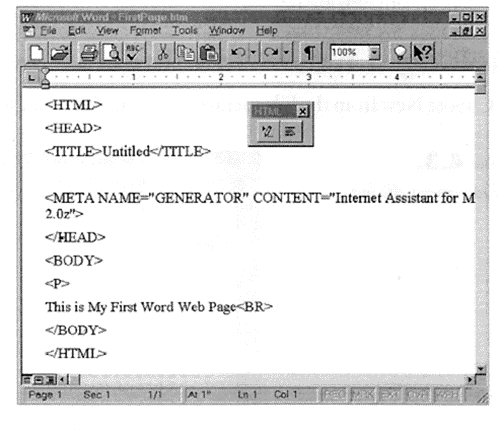
Page. Save it as FirstPage.asp. (Don't fight the default extension Word wants to add.)
Then call it up in your Web browser. Choose View | Source on your browser to see the
Word-generated source code in Listing 4.1. Listing 4.1. FirstPage.asp . Not bad. This code generates all the sections
discussed yesterday: <HTML>, <HEAD>, <TITLE>, <BODY>, and
<P> (although it did use the old-style <P>; you might remember that the one
studied yesterday had the end tag </P>). If you want to see the tags in the
document, go back to Word and choose HTML Source from the View menu. Your screen will
change to look like the one in Figure 4.4. Looks like you are back in the text editor business
from yesterday. Just to check this area out, add the line: Then return to Edit mode by clicking on the Return
to Edit Mode button on the floating toolbar. You should see a screen like the one in
Figure 4.5. Figure 4.5. Added field
viewed in Word. The added field is easier to see if you view it in
the Web browser. You can launch the Web browser from Word. There is a button on the top
toolbar, two to the right of the big light bulb, that will start your Web browser. The Web
page with the <INPUT> tag on it should look like Figure 4.6. Figure 4.6. Added field
viewed in a browser. I tend to use tools that let me drop back to the
source instead of their more automated cousins. Let's take a general look at what you can
add to this page. Use the Bulleted List and Numbered List buttons, Add Image (use the
GoldStar.Gif in the Day 10 sub directory and the Alignment button
to center it and the title), Add Link (Link to the FirstPage.asp you just did), and Add
Title to make your page look something like Figure 4.7. Save it as TestPage.asp. Figure 4.7. Adding other
elements. All of this adding produced the document in Listing
4.2. Listing 4.2. The source for TestPage.asp . This source code produces a Web page that looks like
Figure 4.8. Figure 4.8. TestPage.asp in
the browser. Keep experimenting to find what you can build. On
the whole, the editing capabilities of Word are good, but it doesn't include support for
scripts and objects. Figure 4.9. Word as a Web
browser. If you bring up the same page in your Web browser,
you may notice (if your browser supports animation) that the guide on the Sams home page is
animated. Word shows it as a static picture. The Web browser capability of Word can be
used to preview your pages with a less-capable Web browser to make sure your message gets
across to those still using older Web browsers. Last Word on Word
As you have seen, Word is good at creating simple
HTML pages, but it doesn't include support for scripts and objects. You can put them in
manually, but as you have seen, that can get really complicated really quickly. It does
have a spell checker and that puts it miles ahead of most text editors. I would look for
word processors and publishing programs to keep integrating HTML technologies and to
compete with the specialized programs, like HoTMetL, for a share of the dollars you will
spend on Web publishing . Overview of HoTMetaL
HoTMetaL , from SoftQuad, is a dedicated HTML
editing tool (see Figure 4.10). Information on the three versions—Professional, Lite,
and Free—is available on the Web at Figure 4.10. SoftQuad home
page . Tour of HoTMetaL
This tour covers the highlights of HoTMetaL. It is
not an attempt to cover every aspect of the program, but to give you a feel for how it can
help. Let's start by making a new Web page. Building a Simple Web Page
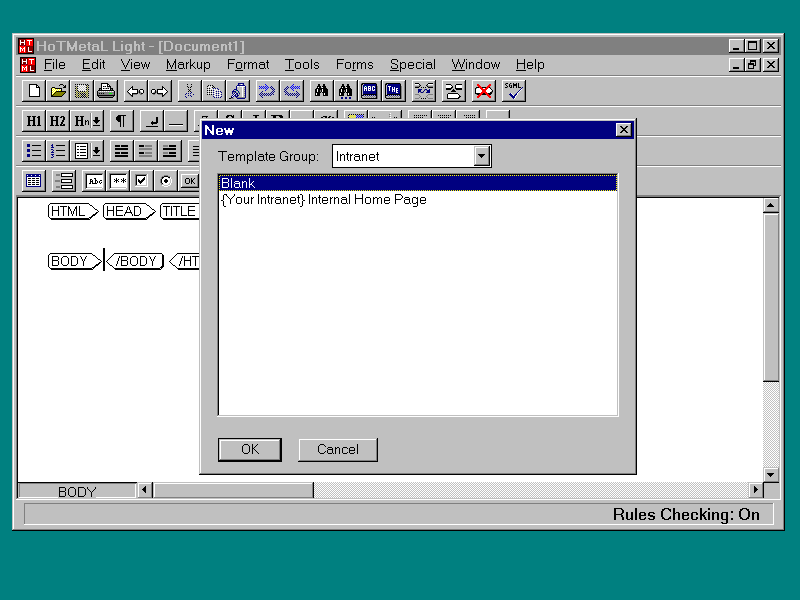
Choose the New entry under the File menu. You will
get a New dialog just like you did in Word, where you can pick from various types of
templates. Choose Intranet/Intranet Home Page. You should wind up with a screen that looks
like Figure 4.11. Figure 4.11. Choosing the
intranet template in HoTMetaL . Listing 4.3 contains the source for this page. Listing 4.3. The source for TestPage . This code is more complex that the code generated by
Word. You will also notice that what you see in the HoTMetaL editing screen is closer to
what you get on the Web browser. Toolbar by Toolbar
The first thing you notice about HoTMetaL are all
the toolbars. There are four: Standard, Common HTML, Other HTML, and Forms. The Standard
toolbar contains the normal stuff (hard to resist saying standard stuff) with the most
interesting button being the last one on the right, SGML Check (see Figure 4.12). Figure 4.12. HoTMetaL's
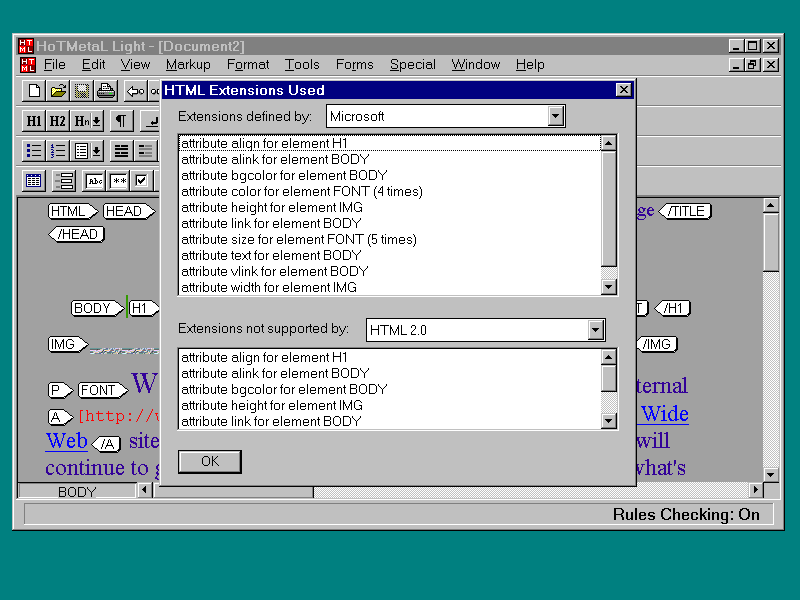
toolbars. As explained yesterday, SGML is what HTML is
descended from. When you click the SGML button, a dialog comes up that shows you what
elements have been used and if they are supported, as shown in Figure 4.13. The next toolbar (see Figure 4.14) contains the
common HTML commands such as headings <H1>, paragraphs <P>, alignment, and
special characters. (Our HTML crash course did not address alignment.) In this menu the
three alignment choices (Right, Left, and Center) are represented by three buttons. To
align text or other elements, select the element you want to align and press the
appropriate button. The last key, Special Characters, is new. Let's see how this works. Figure 4.14. Common HTML
toolbar. Open up a new, blank intranet form. Type the line
Special Math Characters Include:, then push the Special Characters button. It will
give you a floating dialog full of special characters. Choose what look to be special math
characters. Save the form as Math.aspl. Your form should look like Figure 4.15 and show up
in the browser looking like Figure 4.16. Figure 4.15. Math.aspl in
HoTMetaL. Figure 4.16. Math.aspl in
the browser. The Other HTML toolbar (Figure 4.17) starts with
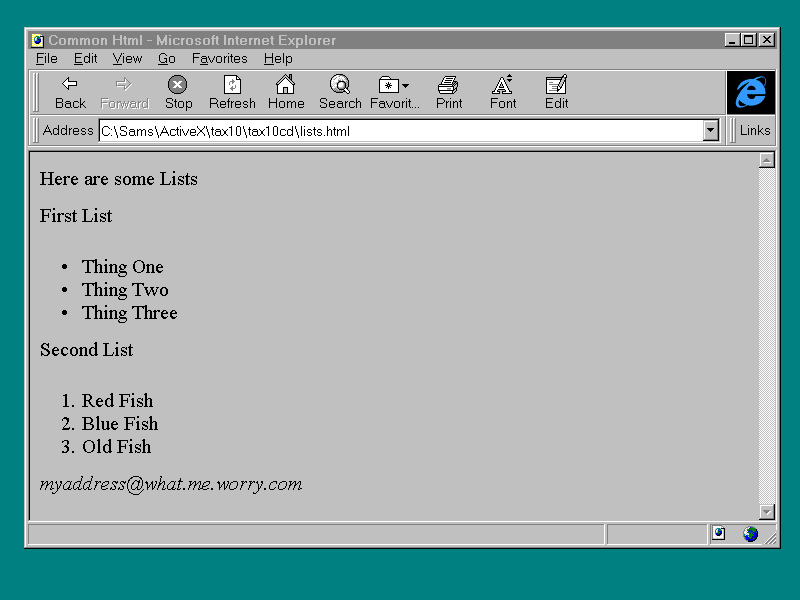
lots of different ways to do lists, then moves on to Address, Comments, Images, and Links.
The last group of blank buttons enables you to launch you Web browser from inside
HoTMetaL. Just to see how this works, start a new form. Then add an ordered and an
unordered list. For good measure add an address at the bottom. Save it as Lists.aspl. The
source code should look roughly like Listing 4.4. Figure 4.17. Other HTML
toolbar. Listing 4.4. The source for Lists.aspl . This source produces a Web page that looks like
Figure 4.18. Figure 4.18. Lists.aspl in
the browser . The last toolbar, Forms (see Figure 4.19), is where
we move from static to interactive. You will find a button to insert a Form section and
then the familiar <INPUT> elements: Text, Check Box, Radio Button, Reset, Submit,
and Hidden. There are a few elements we haven't seen, like Select List, which works like a
drop-down list box, and Multiline Edit, which is just what the name implies. Make a new
form called Form. Add a <FORM>, then add a text box, a check box, and a select list.
You may remember from yesterday that there are many attributes associated with
<INPUT>. How can we set them? Right-click over the Check Box element, choose Element
Attributes from the pop-up menu, and you will get the INPUT Attributes dialog shown in
4.20. The name gives it away. This is where you set the attributes. Figure 4.19. Other HTML
toolbar. Figure 4.20. INPUT
Attributes dialog . When adding the select list, double-click on the
button to bring up a dialog that enables you to add items to it. Your source should look
like Listing 4.5. Listing 4.5. The source for Lists.aspl . This listing might vary from what you get due to the
details of how you set your form up. HoTMetaL also enables you to connect to a CGI script
with the <SUBMIT> button, just like what you did yesterday in the database demo. HoTMetaL Summary
HoTMetaL is for the professional Webmaster, someone
who thinks in HTML rather that word processing terms. I have some friends who edit
newspapers for a living and they are very at home with publishing tools like Adobe Page
Maker, but not as comfortable with a word processor. If they were Web editors (and their
business could go that way), they would be at home in HoTMetaL. Overview of the IIS Add-In for Microsoft Access.
The IIS Add-In for Microsoft Access is a free
download that enables Microsoft Access, in concert with Microsoft Internet Information
Server (IIS, which comes with NT 4.0) to
You can download the IIS Add-In from the following
site:
Tour of the IIS Add-In for Microsoft Access
The IIS Add-In adds itself under the Tools/Add-In
menu. Before you use it, you will need to design your database and add an entry into the
System DSN section of the ODBC Database Administrator. An entry using the sample NorthWind
database that ships with Access is shown in Figure 4.21. Figure 4.21. ODBC
Administrator .
After you have built and installed your database, go
back to Access and select the IIS Add-In from the Add-Ins menu. The IIS will appear in the
form of a wizard, as shown in Figure 4.22. Figure 4.22. Access
Internet Wizard. Notice there are four choices. The first choice,
Static Display Page Wizard, creates a Web page with data from a database. The user will
see the same data every time the Web page is opened, even if the data in the database has
changed. The second option, Dynamic Display Page Wizard, creates a page that is linked to
the data so that when the page is opened, it reflects the most current data in the
database. These two options are interesting but not very interactive. Let's walk through
the third option, Query and Display Page Wizard. The second exercise at the end of the
chapter uses the fourth option, Insert Page Wizard. Query and Display Page Wizard and Shameless Promotion
Choose Query and Display Page Wizard to bring up the
screen shown in Figure 4.23. Figure 4.23. Query and
Display Page Wizard. In this dialog, you type in the name of the System
DSN you set up in the ODBD Administrator and choose a table to work with. Also, notice you
can work with queries. If you are familiar with SQL, you know you could create a view of
several different tables to relate and extract the data you want. For those of you not
familiar with SQL, there are several good guides on the subject, including Teach
Yourself SQL in 14 Days (a guide I co-authored). You are not limited to the data in a
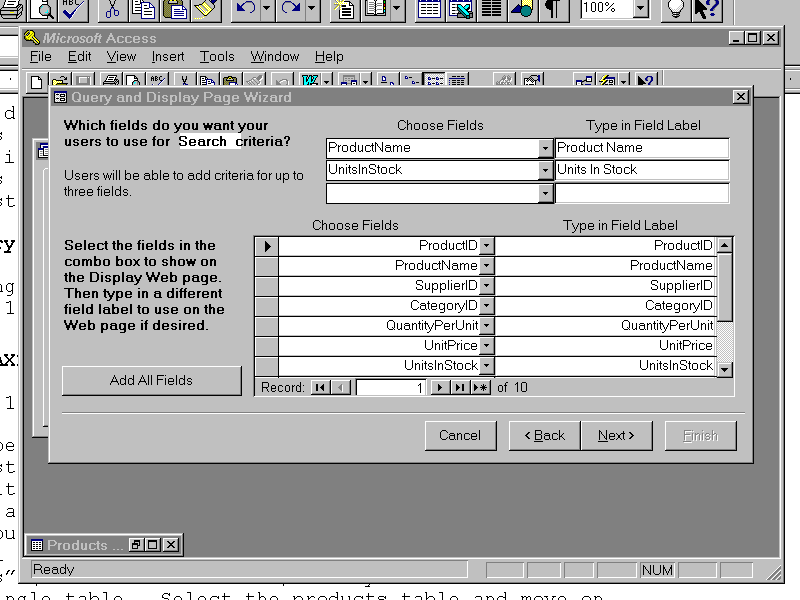
single table. Select the Products table and move on. On the next page choose ProductName and UnitsinStock
to search by and click the Add All Fields button to display all the fields on the form
returned by the search. When you are done, the page should look like Figure 4.24. Verify
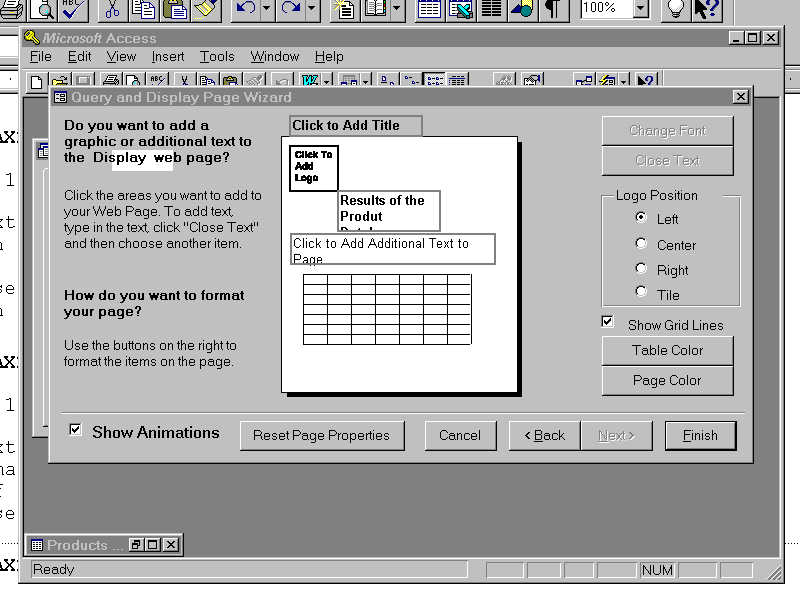
your inputs, then move on to the next screen. The next page gives you some control over the format
of the form. You can add a title and text, and even change the appearance of the data
table. I added the text "This Form Allows you to Search the Product Database by
Product Name and/or Units in Stock," and a title, "Search of Product
Database." Do what you need to do, as shown in Figure 4.25, and move on. On the next and final page of the input sequence of
the wizard, you can format the page returns with the results of the query. Add some kind
of title—I added something about "The Results of the Product Database
Query." Then press the Finish button. After you press Finish, IIS Add-In builds you a
letter, shown in Figure 4.26, telling you what you built and where to put it. Figure 4.26. Summary of
wizardry. What you produced, according to the letter, are
three files: prodsrc.asp, prodsrc.idc, and prodsrc.hdx. The first file, prodsrc.asp, is
your search page and needs to be moved to your Web pages. The next two files, prodsrc.idc
and prodsrc.hdx, are your script and return file templates. They go into the scripting
directory. After everything is in place, call up prodsrc.asp with your Web browser through
your Web server.
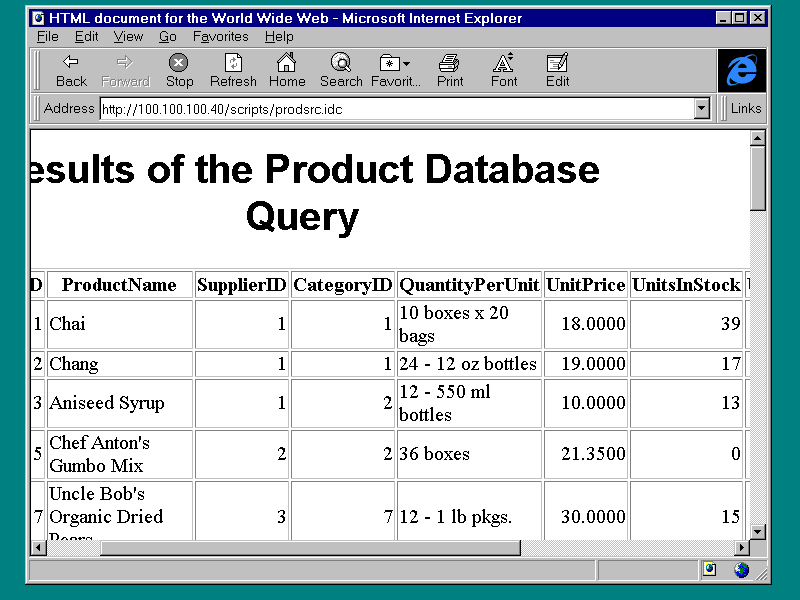
The Search form and its report are shown in the
Figures 4.27 and 4.28. Figure 4.27. Setting up the
search. Figure 4.28. Results of the
search. Hacking the Script File
There is a problem in paradise. Try to search using
the UnitsInStock field. You only get exact matches. This is not very useful. Look at the
source code for the script file prodsrc.idc, shown in Listing 4.6. Listing 4.6. The source for prodsrc.idc . Do you see the problem? In the second to last line,
after the +AND, the field "UnitsInStock" is compared with the variable
UnitsInStock. Assuming these variables are passed as strings (they are) using a text
editor, let's adjust the line to read: Save the file. Make sure you edited the one in the
Internet Information Service script directory. You might think you are done. Think about
it a minute. What is going to happen when you search by ProductName without using
UnitsInStock? You will get an ODBC driver error because the last part of the SQL statement
won't make sense to the driver. Use your text editor and put a value in the <INPUT>
tag that sets up the Units in Stock Query.(I suggest VALUE = "> 0".) Your
source should look like Listing 4.7.
Save your changes, making sure to save them to your
scripts directory. Call up the Search form again. Notice that "> 0" appears
in the Units In Stock field. Run the original search by entering c% in the Product Name
field to make sure that part works. It should. Now blank out the Product Name field (Reset
works well for that) and enter "<= 39" in the Units in Stock field, as shown
in Figure 4.29. Figure 4.29. Finding
products with 39 or fewer items in stock. The results are shown in Figure 4.30. Figure 4.30. The search
result. While you were running the last example, you might
have accidentally left the Units In Stock field blank. If you did, you got the ODBC error
we spoke of earlier. You can't rely on users to be perfect, so how can you fix this
problem? Scripting! As I mentioned earlier, you could use scripting to check the values
before they are sent to the server. Hold this thought for a day or so and bring it up
again, after you learn about specific scripting languages. The IIS Add-In for Access Wrap-up
The IIS Add-In for Microsoft Access is
representative of several products on the market, such as
These tools cost anywhere from nothing to a couple
hundred dollars to thousands of dollars. They provide solutions ranging from your local
intranet page to an Internet serving thousands of users per second. They all work by
binding the Web browser and the Web server together with a database, a process that is now
part of your basic knowledge—a basic knowledge that includes basic HTML and the
common themes of the tools that manipulate HTML. You are now ready for scripting and
objects. Overview of the ActiveX Control Pad
It is good that you are ready for scripting and
objects now because six months ago you would have been working with a text editor. The
ActiveX Control Pad is in the front of a pack of tools that will be competing for your Web
development dollars. Before you go off and spend, or recommend your company spend (my
favorite thing to do), a great deal of money on new technology to support scripting and
objects on the Net, let's see what you can get for free. Point your browser to Download and install the ActiveX Pad Control. Tour of the ActiveX Control Pad
After you have it installed, open up the ActiveX
Control Pad. You will see a screen like Figure 4.31. Figure 4.31. The ActiveX
Control Pad. I can hear some of you saying, "Wait a second!
After all of this build up, I'm looking at another text editor! We've been tricked!"
Just relax for a second. Appearances, in this case, are deceiving. Within a few
paragraphs, I will introduce you to more solutions than you have problems for.(I am only
speaking about programming problems, personal problems are another guide. Probably a big
market for a guide about personal problems brought on by programming...hmmm.) Building a Page
You have already seen the text editor in the ActiveX
Control Pad, and you could use it to make HTML pages using methods you have already seen.
But the ActiveX Control Pad brings many new things to the table. Open the File menu and
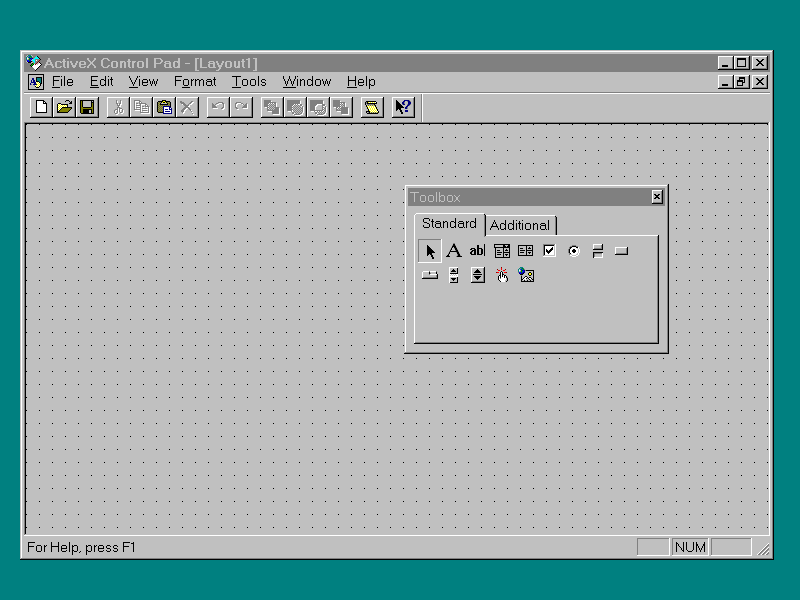
choose New HTML Layout. Your screen will look like Figure 4.32. For those of you familiar with Visual Basic or
Delphi, this will look familiar. One of the most important things ActiveX Control Pad
brings to the table is the capability to design a true What-You-See-Is-What-You-Get Web
page. Remember how hard it was in Word to get your working screen to look like the final
output on your Web browser? HoTMetal was better, but try to put two lists side-by-side.
The ActiveX Control Pad enables you to build a form by selecting an object and dragging it
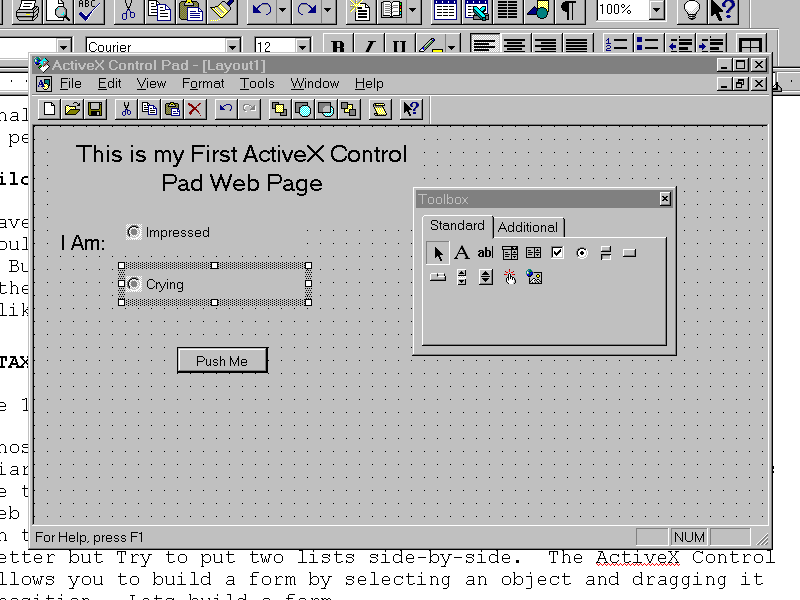
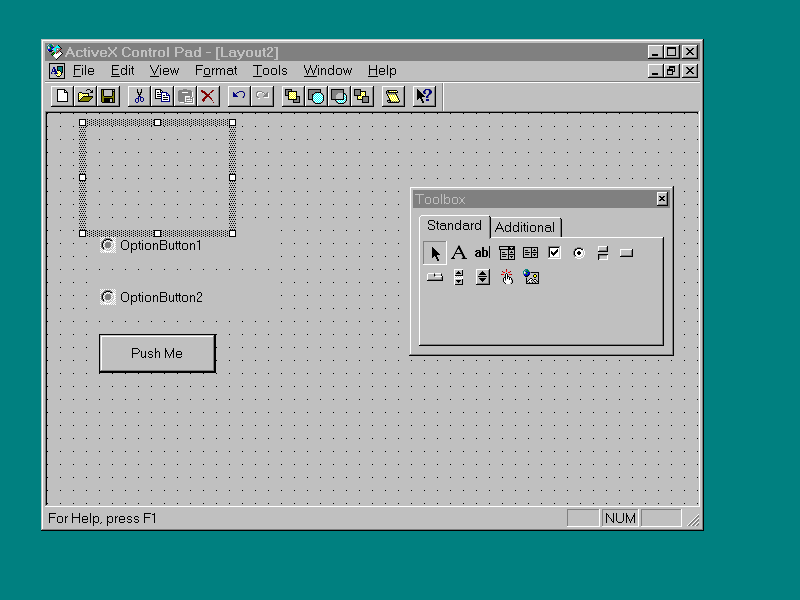
into position. Let's build a form. Add a label, two radio buttons, and a button. Make
your page look like Figure 4.33. Figure 4.33. First ActiveX
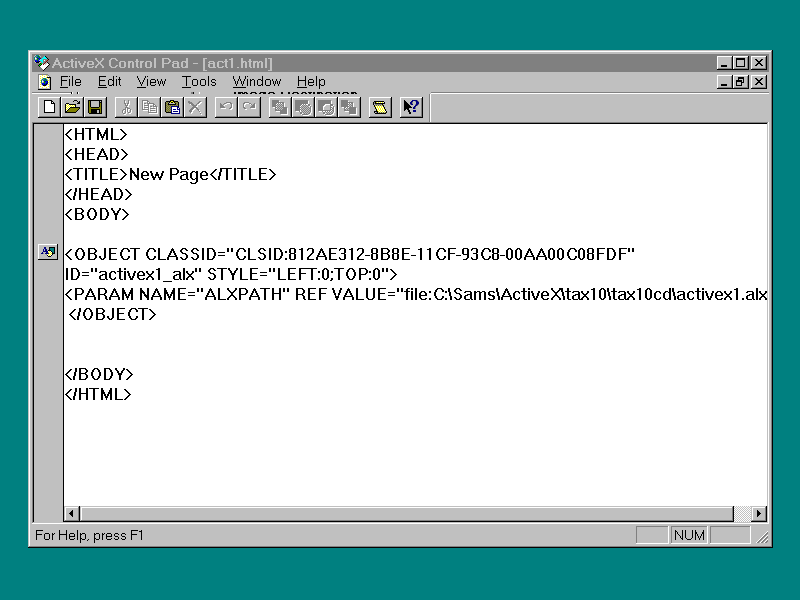
form . Now save it as activex1.alx. Is this some kind of
proprietary format? No, we will look at its structure in a moment. When you create an HTML
layout in ActiveX Control Pad, the results are saved in an ALX file and then inserted into
an HTML page. Close this screen and go back to the screen that looks like a text editor
(Figure 4.31). Your cursor should be between the <BODY> tags. Pull down the Edit
menu and click Insert HTML Layout. Your screen should look like Figure 4.34. Figure 4.34. The Inserted
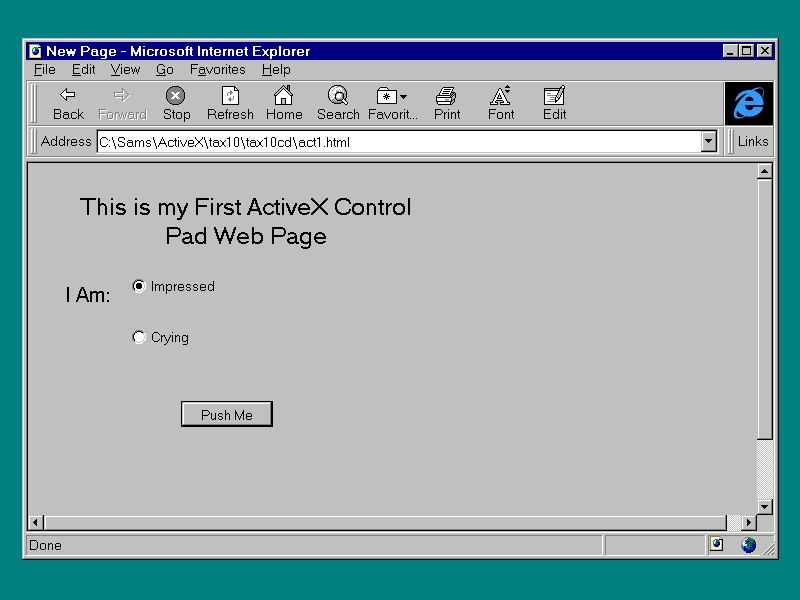
HTML Layout. Let's see what this looks like before we take start
to dissect it. Save the HTML file as act1.aspl. Load the file into your browser. It should
look like Figure 4.35. Figure 4.35. The ActiveX
Form in a browser. Congratulations! I'll bet you are the first one on
your block to use ActiveX controls. Well, maybe the first one in your cubicle. What have
you done here? Let's go back and look. First, put activex1.alx
into a text browser. It looks like Listing 4.8. Nothing very mysterious here. Looks like what we saw
when we looked at the object tags. Look at the Listing 4.9 for our HTML page, act1. Listing 4.9. Source for act1.aspl . Here we see that activex1.alx is not pasted directly
into our screen but is instead fed into the HTML Layout Control. (That file path is
something you might want to watch as you go from development to deployment.) The HTML
Layout Control then takes the form you designed and displays it exactly where you designed
it. Scripting with the ActiveX Control Pad
Aside from the first What-You-See-Is-What-You-Get
(WYSIWYG) method for designing Web pages, the ActiveX Control Pad supports both JavaScript
and VBScript. Design a layout called activex2.alx. Put two radio buttons, an image, and a
button on it. It should look something like Figure 4.36. Figure 4.36. Scripting
example. What I want this program to do is change the picture
in the image according to which radio button is pushed when the user pushes the button.
When you have the form looking like Figure 4.36, select the Script Wizard from under the
Tools menu. As you can see, the Script Wizard already knows what objects are on your form
and what events come with them. Almost takes some of the fun out of this. The Script
Wizard is shown in Figure 4.37. Add the following code to the click event of
commandbutton1: Also, change the GroupName on both the radio buttons
to Choice. This relates the radio buttons. Notice that when you do this, the first radio
button becomes active. Save this layout to activex2.alx. Then insert it in
to a new HTML document, just like you did the first example. Save the HTML document as
act2.aspl. Run act2.aspl though the browser. You should have a screen that initially has
no picture, but when you press the button, a picture appears according to what is selected
in the radio button. (See Figure 4.38.) Figure 4.38. ActiveX and
scripting. You now know how to operate the ActiveX Control Pad!
Summary
Today you have learned about four tools that make
creating HTML pages easier: Internet Assistant for Word, HoTMetaL, IIS Add-In for Access,
and the ActiveX control pad. These tools are the in the vanguard of an army of tools that
will be arriving shortly. You now have a working knowledge of how they work and a good
start toward making an intelligent decision about which tool is right for your job. During
the next four days you will use them often, especially the ActiveX Control Pad tomorrow
when you learn VBScript. Q&A
Workshop
Using Internet Assistant for Microsoft Word, build a
table of name, state, and telephone number for at least three people. Quiz
|
Popular Tutorials
-
 MS Access
1109
MS Access
1109
-
 C++
1222
C++
1222
-
 HTML
584
HTML
584
-
 JavaScript
616
JavaScript
616
-
 Vbscript
873
Vbscript
873
-
 Oracle
473
Oracle
473
-
 VC++
875
VC++
875
-
 SQL
2959
SQL
2959
-
 XML
514
XML
514
-
 Java
814
Java
814
-
 Perl
455
Perl
455
-
 Linux
451
Linux
451


