Use Sundog to play around with chords and basenotes like a breeze, you can also create the optimal harmonic base for the audio samples that you are working on in a versatile and intuitive environment with this tool
Overview
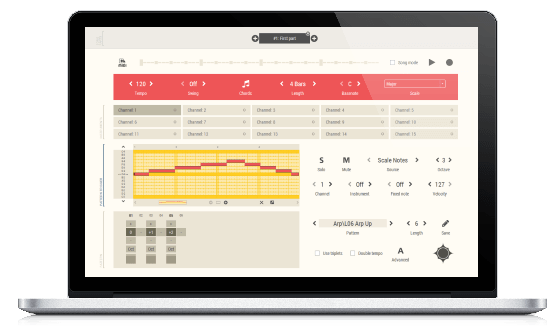
Go from calm, smooth, chill out styles to energetic upbeat tunes in a matter of seconds. In the eventuality that you are composing music with the help of MIDI-compatible devices has its perks, then there is a good chance that you may feel like you want to experiment with new scales, harmonies and samples sometimes. Get rid of writer's block once and for all. Experiment with new scales, harmonies, and melodies easily. Sundog Scale Studio the utility includes an elegant and fresh interface that is neatly structured and suitable for first-time users or those with less technical skills. While you can access the menus and check out the sounds you are working on in the upper section of the GUI, the lower section is mostly dedicated to setting up the values and parameters for the new sound you are trying to discover.
Sundog Scale Studio Features
Boost your chords:
-Find the best fitting triads and four note chords for a scale.
Over 500 chord progressions + progression search engine included.
Create own chord collections and trigger them with one finger.
Work with chord voicings / variations.
Create harmonic melodies quickly:
Draw melodies with your mouse or use the built-in step sequencer.
Let melodic rhythms follow your chord notes automatically.
Use the Pattern Finder to search through over 200 factory rhythms/patterns.
Experiment with new scales and basenotes. Over 300 scales available out of the box.
Many songwriting tools for you:
Scale Finder included: Enter some notes that you already know and let Sundog search scales for you.
Work with different song parts to test progressions, bridges, and variations.
Cure writer's block by experimenting with new harmonies.
Convert MIDI note input (white keys) to scale notes and chords.
Works great with your other studio gear:
Export standard MIDI files - also via drag and drop.
Output: Standard MIDI note data.
Input: MIDI notes, computer keys, mouse.
Runs on Windows and macOS.
Ships with different dark and light themes.
Buy once, get updates forever - for all supported platforms.
How can Sundog assist you?
Sundog is designed to work with all major DAWs. All note output happens via MIDI. As long as you set up a virtual MIDI cable between Sundog and your DAW you are ready to go.
But even without a virtual MIDI cable you can create new songs and phrases, as Sundog contains an own factory soundset with over 100 instruments. And it can export MIDI files directly to other programs.
The first thing you do is choosing a scale and a basenote. Take C Major for example if you want to compose a happy song, or E Minor if you write a sad ballad. Just choose a scale and play some notes. You will quickly get a feeling for the mood of the scale.
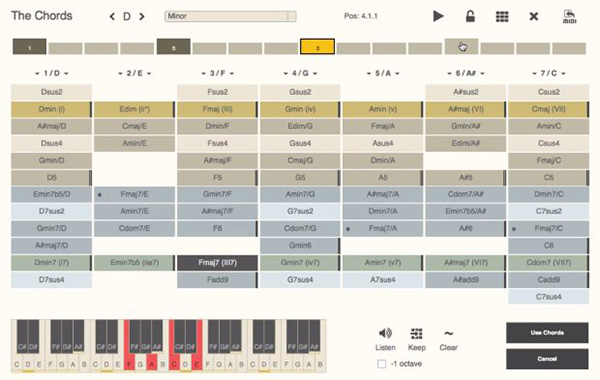
In a second step you switch over to a special chords view. You can listen to chords by just clicking buttons - and they will all fit your chosen scale!
Once you have found some nice chords you can create a chord progression. This will be the harmonic base of your song.
Some of the chords Move the mouse to trigger melodies
Back in the main view the real magic starts. You can use your mouse, your MIDI keyboard, or your computer keyboard to create new melodies. All your input can either be mapped to scale notes - great for leads! - or to the current chord notes.
This way your melodies will always sound harmonic! Now if you go back to the chords view and change some chords all your melodies will get updated at once.
Quick Start
We will show you in the qiuckstart how to use Sundog to build a song. Including chords, bassline, and melody.
Sundog is a standalone software and you can connect it to any DAW or synth to create your melodies. In this tutorial,I use a virtual MIDI cable to connect Sundog to Ableton Live. Different Sundog channels are connected to different Ableton channels via MIDI.
Scale choice
First, we pick a basenote and a scale. Sundog will use this information to make sure that your chords and melodies always stay harmonic.
Writing a melody
Basic setup Pick one of the instrument boxes, then click on "Fill editor with basic sequence". Sundog will create a red line in the Pattern Trigger Editor.
The box above will trigger the pattern below. You can draw lines to control the pitch of the pattern.
Click on a pattern slot to add a note. And click twice to add a stop symbol ("#").
Sundog includes a big list of factory patterns. Click on "Pattern" and you will see them.
You can click on items to hear a preview - and click a second time to stop.
Drum tracks
Let's continue with the drum kit. According to the MIDI standard the MIDI channel 10 is reserved for drums.
Once again, click on "Fill editor with basic sequence". Then click on "Fixed note" and choose a bassdrum.
Chord progressions
Let's take a look at the chords now. Pick an instrument and click on "Chords".
What you see here is a matrix of chords of our scale. You can find triads in the upper part and four note chords in the lower part.
Chords
Let's create a chord progression now. Click on the timeline slots and choose your chords.
Click on "Use chords" when you are ready.
The chord track
Now all we have to do is clicking on "Follow the chords with this instrument".
As you can see, the Source mode is set to "Full Chords" now. For our melody we used "Scale Notes". In "Full chords" mode the pattern will trigger all the chord notes at once.
Writing a bass line
Next step: The bassline. Many basslines will focus on the lowest note of the current chord and play it back with a certain rhythm.
So let's click on "Follow the chord notes with this instrument". Play it back.. and lower the octave a bit.
I will change the length to 8 and make a small pattern variation: Click on "Oct" with your left mouse button to transpose the note one octave higher. Or use your right mouse button to lower the octave.
A quick arpeggio
Basic setup Our final step: Let's create an arpeggio.
Click on "Follow the chord notes". The Source mode is set to "Chord Notes" now.
This means that the zero in the pattern will play back the first note of the chord. The one will play back the second note, and so on.
Final MIDI export
In the end, we can simply export our song to the DAW via drag and drop. Pick the small MIDI symbol and drag it to the DAW.
Quick Setup
Sundog contains a built-in Preview Synth with 128 different instruments. However, you get the most use out of Sundog if you connect it directly to your DAW/synthesizer with a virtual MIDI cable.
Basic Concept: Scales, Chords, Rhythms
The whole idea behind Sundog is to create new harmonic songs from scratch by focusing on the main things that matter: Nice scales, chords, and harmonic rhythms. This is the basic songwriting workflow:
1. To write a great song you don't have to use all the notes that are available.
Scale listConcentrate on a certain set of notes instead that work well together (called a "scale"). For example only use the notes of C Major (C, D, E, F, G, A, B) or C Minor (C, D, D#, F, G, G#, A#).
2. Create a chord progression by choosing chords that only use notes from that scale.
3. Now simply stick to your chord notes most of the time and work rhythmically on them when you write your song.
You can't go wrong with these notes, because if they form a nice chord they also sound nice together when they are played on different instruments.
4. For the lead instrument you can use all the notes of the scale that you like.
Because the background instruments are bound to the chord notes your lead instrument can go wild without sounding chaotic or off. It has all the room it needs to stand out.
Basic Concept: The Sundog Way
The concept Sundog makes it easy to separate the rhythm of the melody from the tone height / pitch.
It's as simple as this:
When you click and hold down your mouse on A, the pattern in B will be triggered and played back. You can either record this input live or draw lines in the trigger editor (C).
This combination of Pattern Trigger and Pattern area can either work on scale notes or chord notes.
Once you get used to this you will be able to write great new melodies, basslines, arpeggios, and chord progressions within minutes.
To cut it short, this is the main workflow:
First, you choose a scale and a base note.
Now all notes that are played will match the scale.
Second, you select some chords. Sundog offers a wide selection of useful chords per scale. You can listen to them by clicking on buttons.
Third, you trigger playback patterns by dragging your mouse or entering notes with your keyboard.
Now all output notes can either get mapped to the currently active chord notes or to the scale notes.
Song parts
Use the top row to organize your song into different song parts. This is both useful to quickly sketch some ideas or to create a whole song. When you click on a "+" button a new song part will be created. The new song part will be a copy of the song part left to the "+".
You can move song parts around by dragging them left or right. A red border will indicate where the song part will move when you drop it (see image above).
Double click on a song part to rename it.
Check the "Song mode" box left to the play button (main view) to turn on the song mode. If this mode is activated, the song parts will be played back one after the other. Otherwise you will have to manually click on song part boxes to switch between them during playback. A striped background will show you which song part will be played back next.
Instruments
Use the instrument boxes to switch between different instruments.
Double click on an instrument box to rename it. Click on the small circle to mute the instrument.
InstrumentsIf you set two instruments to the same MIDI channel and MIDI instrument (e.g. both to channel: 1, instrument: off) you can create very interesting polyphonic melodies. As soon as you export your song as MIDI file, the two - or more - Sundog instruments will be merged into one MIDI track.
Pattern Trigger
The pattern trigger area is the part of the user interface where you control most aspects of the current instrument.
Basic parameters:
- Channel: The MIDI channel.
- Instrument: The MIDI instrument. In many cases it makes sense to set this to "Off", especially when you work with DAWs and softsynths.
- Solo: Click on this if you want to listen to this instrument only.
- Mute: Mute the instrument. Instrument settings
- Octave: The base octave of the instrument.
- Velocity: The maximum velocity.
- Fixed Note: If you set this to anything else than "Off", then this instrument will always play this note. Very useful for triggering drums or samples (P.S.: 10 is the standard drum channel of most MIDI devices).
- Source: This is a very important setting that will indicate on which notes the pattern trigger + pattern will work (see next paragraph).
The different "Source" modes:
- "Scale Notes": The notes of the current scale will be used. Interesting for lead melodies.
- "Chord Notes": The notes of the current chord will be used. Example: If a chord consists of the notes C, E, and G, then a pattern value of 0 will map to C, 1 will map to E, and 2 will map to G. 3 will map to the next C. When the chord changes to D, F, and A, then 0 will map to D, 1 will map to F, and 2 will map to A. Interesting for monophonic "background" instruments like basses or keys.
- "Full Chords": No matter which pattern value is set, the pattern sequencer will always trigger the currently active chord notes together. Set the pattern to "Off" and the chord notes will be triggered as soon as the chord changes.
- "Full Chords+": The same as "Full Chords", but additionally the root note of the chord will be played back one octave lower as well. Interesting to thicken the sound a bit.
- "Chromatic C": This mode consists of the full set of twelve notes per octave and always starts on C.
- "Chromatic R": This one uses twelve notes per octave as well, but starts on the basenote of the scale.
The input editor:
The editorThe input editor is the main element to trigger and control the pattern sequencer.
Click and hold your mouse in the area of the red rectangle and you will hear that the pattern sequencer will start to play. The pitch of the sequence depends directly on the position of your mouse. If you turn on the record button you can also move your mouse and record the movements live.
There are two different tool modes available: "draw" (pencil icon) and "edit" (arrows icon). You can switch between these modes by pressing "b" on your keyboard.
The "draw" mode:
Use your mouse to add or change triggered patterns. The start of a triggered pattern is indicated by a red dot (see the red circle for an example). When you move your mouse over a trigger line, the corresponding step in the pattern area is highlighted as well (attention: does not work with triplets).
Adding lines: Click on a spot in an empty column. Hold down your mouse and drag it to another spot where the line should end.
Deleting lines / silencing line parts: Hold down your right mouse button and move it over existing line parts. Alternative: Hold down Ctrl (or Cmd on Mac) and use the left mouse button.
Re-trigger patterns: Double click on an already filled spot to restart the pattern from this point.
Lengthen or shorten lines: Click and hold on the first or last element of a line and move it left or right.
Changing the pitch of the triggered pattern: Click and hold your mouse in the area of an existing line, and you can quickly draw rising or falling melodies.
The "edit" mode:
Choose this mode to select one or more trigger lines. You can then move, copy, cut, paste, or delete them.
To select lines, you can either click on them or draw a rectangle to fetch several lines at once. Hold down "Shift" if you want to select multiple lines. "Ctrl + A" (Windows) or "Cmd + A" (macOS) selects all lines, "Ctrl + D" (Windows) or "Cmd + D" (macOS) duplicates the selected lines.
As soon as lines are selected, you can drag them around with your mouse or use the arrow keys of your keyboard to move them. When you change the selection (or unselect the lines), the current state of the Pattern Trigger data will get finalized. Hold down "Ctrl" (Windows) or "Cmd" (macOS) and drag a selection with your mouse to create an instant copy of the selection.
While you use the "edit" mode, a black line can be seen in the editor. This line marks the position, where pasted sequences will be inserted. Please note that cut/copy/paste/delete work differently in "pencil" and in "edit" mode: In "pencil" mode, these commands will work on ALL the lines at once, and pasted data will overwrite existing data. This is not the case in "edit" mode.
Double-click on a spot to create a short line at this position. The mode will automatically switch to "draw" then.
Using the Keyboard
Use the keys 1, 2,... , 0 to trigger notes in the main view (or chords in the chords view). 1 will be the basenote.
Space starts and stops songs, R toggles the recording mode (main view).
Tab switches between Main View and Chords View.
S = Solo, M = Mute (main view).
C switches to Chords view, J switches to Jam view.
P stops the song and triggers the MIDI panic action.
L locks the chord progression to prevent accidental changes (chords view).
Use the left and right arrow keys in chords view to change the position within the timeline. If the Song Parts area is active, the arrow keys will switch between song parts.
A = switch to the song part to the left, D = switch to the song part to the right.
Ctrl+F (Windows) or Cmd+F (macOS): Main View -> search patterns. Chords View -> search chord progressions.
Delete: Del (Windows) / Backspace (macOS)
Copy: Ctrl + C (Windows) / Cmd + C (macOS)
Cut: Ctrl + X (Windows) / Cmd + X (macOS)
Paste: Ctrl + V (Windows) / Cmd + V (macOS)
T toggles the Pattern Trigger editor size (main view) or switches between own chords and common chords (chords view).
B toggles between "draw" mode and "edit" mode in the Pattern Trigger editor.
Ctrl + A (Windows) / Cmd + A (macOS) selects all lines in the Pattern Trigger editor.
Ctrl + D (Windows) / Cmd + D (macOS) duplicates the selected lines in the Pattern Trigger editor.
Use the up and down arrow keys in chords view to invert the current chord up or down.
Ins and Ctrl+Del can be used to insert and delete blocks in the chord progression (chords view). Mac: Ctrl+Enter = insert, Ctrl+Backspace = delete.
Triggering chords with a computer keyboard (chords view):
Use the keys 1, 2,... , 9 to trigger triads. Hold down 0 to play four note chords instead. If you activate Ctrl, Sundog will search for the first unused chord in this order: "min / maj / dim / aug / dom", if nothing found yet: "5 / 6 / 9", if nothing found yet: "sus". If you activate Alt, Sundog will search for the first unused chord in this order: "sus", if nothing found yet: "min / maj / dim / aug / dom", if nothing found yet: "5 / 6 / 9". Sundog will only search in those chords that haven't been used before with activated or deactivated Ctrl key.
Trigger chords
Using an external MIDI keyboard:
Make sure that you activate your keyboard in the Sundog preferences - and take care that you don't create feedback loops between your keyboard, Sundog, and your DAW!
Main view: Play the white keys to trigger notes. C# = switch to the song part to the left, D# = switch to the song part to the right.
Chords view: C-2 to B-3 will trigger chords. Hold down A# to play four note chords. F# will work like Ctrl described above, G# will work like Alt. If Chord Mods are active, you can hold down C# and D# to activate the left / right Chord Mod respectively.
Frequently Asked Questions
I purchased Sundog. Where can I get the full version?
There is no separate full version. Just download the demo and enter the serial that you received from share-it (my payment processor).
Where can I enter the serial?
Start the demo and you will see a registration box. Or simply use the menu: Help -> Register.
What are the system requirements?
Screen size should be 1200 x 780 or above. Windows Vista, 7, 8 and up + macOS 10.7 (64 bit processor) and up are supported. Please try before you buy!
What are the demo limitations?
The demo is limited to a few scales (full version: 300+). You can only save songs, chord progressions, and patterns, not load them. There are only six instrument channels available (full version: 15). You can export MIDI files only for a few times per session.
Can I use the same serial for both macOS and Windows?
Yes, you can activate both Mac and Windows versions with the same serial.
Can I use one license to install Sundog on different computers?
Yes, this is allowed - as long as these computers belong to you and you don't use them at the same time. So using Sundog on your Mac in the morning and on your PC in the evening is perfectly fine. Running Sundog on two computers at once would require an additional license though.
Sundog Scale Studio for MAC
Download Sundog Scale Studio 3.4.0 for MAC here!
Windows 10 64-bit / Windows 10 / Windows 8 64-bit / Windows 8 / Windows 7 64 bit / Windows 7 / Windows Vista 64 bit / Windows Vista
Sundog Scale Studio runs on
Windows 10/11
and is available under the
Demo
license
— the installer is 41.3 MB.
We’ve catalogued it under
Audio Video.
Help fellow users decide. Share your experience with Sundog Scale Studio.