PuTTYgen is a key generator tool for creating pairs of public and private SSH keys. It is one of the components of the open-source networking client PuTTY.
Although originally written for Microsoft Windows operating system, it is now officially available for multiple operating systems including macOS, Linux. PuTTYgen.exe is the graphical tool on Windows OS. While on the other side, Linux OS has the only command-line version could be accessible using SSH commands.
PuTTYgen is an key generator tool for creating SSH keys for PuTTY. It is analogous to the ssh-keygen tool used in some other SSH implementations.
The basic function is to create public and private key pairs. PuTTY stores keys in its own format in .ppk files. However, the tool can also convert keys to and from other formats.
Putty Key Generator
The key generation utility – PuTTYgen can create various public-key cryptosystems including Rivest–Shamir–Adleman (RSA), Digital Signature Algorithm (DSA), Elliptic Curve Digital Signature Algorithm (ECDSA), and Edwards-curve Digital Signature Algorithm (EdDSA) keys.
The aforementioned public-key cryptosystems principally focus on secure data transmission and digital signatures.
Although PuTTYgen collects keys in its native file format i.e. .ppk files, the keys can easily be converted to any file format. For Windows, the software interface is PuTTYgen.exe, whereas, for Linux OS the command-line adaptation is available using SSH commands.
How to use PuTTYgen?
PuTTYgen is used to generate public or private key pair for creating SSH keys. Below is the complete guidance about how to generate RSA key in the Windows operating system:
Once you install the PuTTY on your machine, you can easily run PuTTYgen. For the same, go to Windows -> Start Menu -> All Programs -> PuTTY -> PuTTYgen.
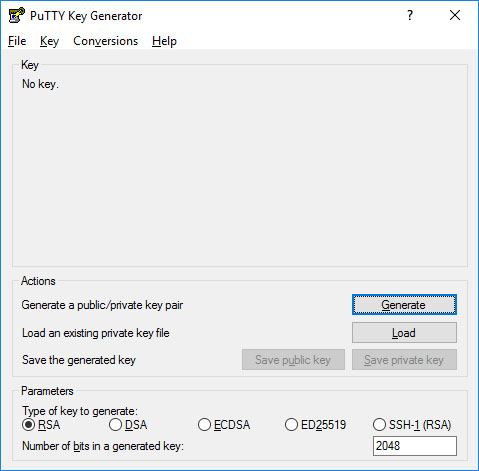
You will see the PuTTY key generator dialog box on your screen
You will find a “Generate” button in that dialog. Clicking on it will lead to generating the keys for you.
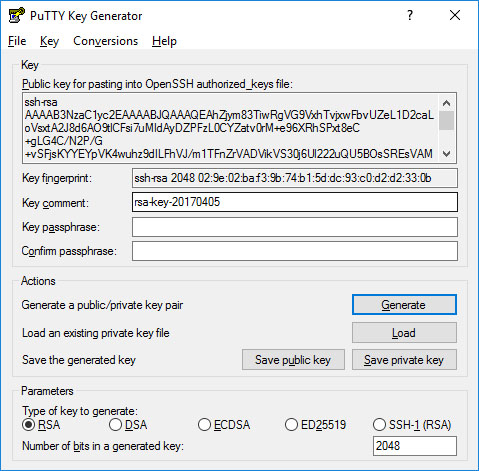
Now you will need to add a unique key passphrase in the Key passphrase and Confirm passphrase field.
Click on the “Save Public Key” and “Save Private Key” buttons to save your public and private keys.
You will see the text starting with ssh-RSA in the Public key for pasting into OpenSSH authorized_keys file field which is located at the top of the window. Copy that entire text to your clipboard by pressing ctrl+c as you will require the key to paste on your clipboard in the public key tool of control panel or directly on the cloud server.
Download PuTTYgen
PuTTYgen being a component of the terminal emulator PuTTY does not have to be downloaded separately, hence, comes with the PuTTY .msi installation package. You can follow the simple steps to download PuTTYgen software for your system. That is the reason why you don’t need to download PuTTYgen separately. Once you download PuTTY software, you will be able to install and run PuTTYgen easily in no time. Below is the complete instruction about how to download and install PuTTY on Windows.
Apart from that, it is also integrated into third-party programs such as WinSCP installation package. Below you can find a complete PuTTYgen download and installation guide for all operating systems.
Download PuTTYgen on Windows
To download PuTTYgen the primary requisite is to acquire the copy of PuTTY installation package. For the 64-bit operating system, one must install the 64-bit version of PuTTY, i.e. putty-64bit-
-installer.msi.Similarly, for the 32-bit operating system, the respective 32-bit version of PuTTY, i.e. putty--installer.msi needs to be installed.
To get PuTTY, go to PuTTY Installation Download page, whereby the complete installation package will be available with setup instructions, installation guide, and download links to all other components of PuTTY such as putty.exe, pscp.exe, psftp.exe, puttytel.exe, plink.exe, pageant.exe and putty.zip.
Download PuTTYgen for Mac
Below is the detailed guide to download PuTTYgen on Mac operating system. Mac OS has a built-in command-line SSH client known as Terminal. To utilize it, go to Finder and then opt for Go -> utilities from the top menu. After that find the terminal which supports SSH connections to remote servers.
However, to run PuTTYgen for mac, the first one must have to install PuTTY. There are multiple ways to install PuTTY, which are Homebrew or MacPorts. Both alternatives will also install the command-line of adaptations of PuTTYgen.
Ported PuTTY for Mac
Mac has the port of PuTTY which can be installed in various ways described as below:
Installation using Homebrew:
First, install the ‘brew command line’
Once installed use the below-given command to install PuTTY:-
sudo brew install putty
Installation using MacPorts:
First of all, one must install MacPorts and then use the command-line to install PuTTY.
Here is the command to install PuTTY via MacPorts
sudo port install putty
Additionally, a user can also add a shortcut to the desktop by writing the following command line –cp /opt/local/bin/putty ~/Desktop/PuTTY
However, there is an alternative way to install PuTTY on Mac OS. Cyberduck is a widely used Mac OS SSH Client. Once PuTTY installed on the Mac OS, a user can convert PuTTY derived private key format to OpenSSH.
To convert the private key to standard PEM format, type the following command –
puttygen privatekey.ppk -O private-openssh -o privatekey.pem
You can also read the guide to convert .pem file to .ppk using puttygen.
Download PuTTYgen for Ubuntu/Linux
To download PuTTYgen for Ubuntu (Linux) operating system, a user to first install PuTTY. However, in some Linux distributions, the SSH key generation tool – PuTTYgen needs to be installed independently from the PuTTY client.
For example, Debian Linux requires the below-given code to install PuTTYgen:
sudo aptitude install putty-tools
Generate Key Pair for Authentication in Linux
To create the key pair for authentication in Linux use the below command:-
puttygen -t rsa -b 2048 -C "user@host" -o keyfile.ppk
Various Command Line Options of PuTTY in Linux
Below are few important command line options in the Linux operating system for PuTTY:
PuTTYgen [-t keytype [-b bits] [-q] | keyfile]
[-C new-comment] [-P]
[-O output-type | -p | -l | -L]
[-o output-file]
Options:
Keyfile – It is the name of the existing key file to read at the time of changing the current key.
–t keytype – The command specifies the type of key to creating. Its acceptable values are RSA and dsa.rsa1.
-b bits – This command specifies a total number of bit in a particular key. 1024 is the perfect size for DSA key, while 2048 or 4096 are the perfect size for RSA keys.
–q – The command suppresses the message about progress at the time of key generation.
-C new-comment – The command will specify the comment to describe the key. It can be used for the new and/or existing key. Key operation is not affected by a comment. However, it is used to recognize the key owner, it’s not reliable completely as any value can be applied to it.
–P – Using the command will update the passphrase of a key. Passphrase helps to encrypt the private key. As passphrase can’t add or update on a command line, it prompts a new passphrase tool to alter it.
–old-passphrase-file – The old password of the key remains in this file. The command is used when the key is protected by a passphrase.
–new-passphrase file – This command prompts the new passphrase of the key. It comes in the action either at the time of generating a new key or while applying –P command to change the passphrase.
-O output-type – This command defines what to give in output. By default, the private key is the output.
Thus, above are the prominent commands of PuTTYgen in Linux operating system. Besides that, there are many other commands available to perform various tasks from the command prompt in Linux at flank speed.
Types of Keys Supported on PuTTYgen
It is important to know the types of key PuTTYgen supports prior to using it. Below are the key types that it currently supports for SSH-2 and SSH-1 protocol:-
SSH-1 protocol:- For SSH-1 only supports one key i.e. Rivest–Shamir–Adleman (RSA)
SSH-2 protocol: – SSH-2 supports multiple key types that include – Digital Signature Algorithm (DSA), Elliptic Curve Digital Signature Algorithm (ECDSA) and Ed25519.
Download PuTTYgen 32-Bit for windows
Download PuTTYgen 64-Bit for windows
Download PuTTY 32-Bit for windows
Download PuTTY 64-Bit for windows
Download PuTTY for Linux
Creating a new key pair for authentication
To create a new key pair, select the type of key to generate from the bottom of the screen (using SSH-2 RSA with 2048 bit key size is good for most people; another good well-known alternative is ECDSA).
Then click Generate, and start moving the mouse within the Window. Putty uses mouse movements to collect randomness. The exact way you are going to move your mouse cannot be predicted by an external attacker. You may need to move the mouse for some time, depending on the size of your key. As you move it, the green progress bar should advance.
Once the progress bar becomes full, the actual key generation computation takes place. This may take from several seconds to several minutes. When complete, the public key should appear in the Window. You can now specify a passphrase for the key.
You should save at least the private key by clicking Save private key. It may be advisable to also save the public key, though it can be later regenerated by loading the private key (by clicking Load).
It is strongly recommended using a passphrase be for private key files intended for interactive use. If keys are needed for automation (e.g., with WinSCP, then they may be left without a passphrase.
Installing the public key as an authorized key on a server
With both Tectia SSH and OpenSSH servers, access to an account is granted by adding the public key to a ~/.ssh/authorized_keys file on the server.
To install the public key, Log into the server, edit the authorized_keys file with your favorite editor, and cut-and-paste the public key output by the above command to the authorized_keys file. Save the file. Configure PuTTY to use your private key file (here keyfile.ppk). Then test if login works. See configuring public key authentication for PuTTY.
Managing ssh keys
In larger organizations, the number of SSH keys on servers and clients can easily grow to tens of thousands, in some cases to millions of keys. In large quantities, SSH keys can become a massive security risk and they can violate compliance requirements. In the worst case, they could be used to take down a Fortune 500.
The Universal SSH Key Manager can manage PuTTY keys in addition to OpenSSH and Tectia keys. It works with legacy keys on traditional servers as well as dynamic and keyless elastic environments in the cloud. Any larger organization should ensure they have proper provisioning and termination processes for SSH keys as part of their Identify and Access Management (IAM) practice.
Changing the passphase of a key
It is recommended that all SSH keys be regenerated and changed periodically. The Universal SSH Key Manager can automate this. Just changing the passphrase is no substitute, but it is better than nothing. These instructions can also be used to add a passphrase to a key that was created without one.
To change the passphrase, click on Load to load an existing key, then enter a new passphrase, and click Save private key to save the private key with the new passphrase. Be sure to properly destroy and wipe the old key file. Creating a new file with a new passphrase will not help if the old file remains available.
Installing PuTTY on Windows
Once it is successfully downloaded on Windows than follow the following steps to install the software:
Double click on the downloaded .msi file and being with the setup process.
Install PuTTY in Windows
Installing PuTTY in Windows – (step 1)
Click on next and then select the path for the installation.
Installing PuTTY on Windows
Installing PuTTY Release in Windows – (step 2)
Select the product feature you want to be installed in your system and click on install.
Install PuTTY Files
Install PuTTY Files (Step 3)
Click on Finish to complete the setup and close the dialog box.
PuTTY Installed on Windows Operating System
Complete Installing PuTTY in Windows
Voila! You are done with the installation.
Using SSH in PuTTY (Windows)
Following the successful installation, navigate to the location folder where you have installed the application and run the .exe file.
PuTTY Configuration
1. Manage Session in PuTTY
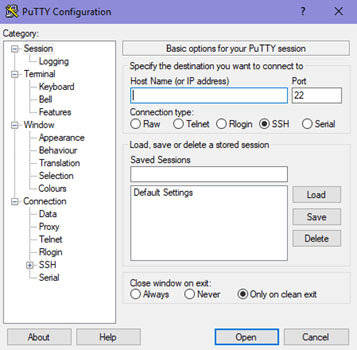
It is the preliminary panel where you get to specify specific options to open a session.
The Host Name (or IP Address) bar is where a user will input the name or IP address of the server they want to connect.
Connection type of radio buttons allows users to choose from the kind of network they are planning to connect.
The Port bar is the section that is filled automatically on selecting the type of connection. However, if you choose the Raw type, the bar stays blank and requires the user to enter the port manually.
Upon selecting Serial as the connection type, the Host Name and Port bars will be replaced by Serial Line and Speed.
The “Load, save or delete a stored session” section is to set some connection setting without having to type all the details again when needed.
Once you save it, it can just select on the saved session and click on Load. The saved settings will appear on their respective boxes in the configuration panel.
The panel permits to modify a saved session by first loading a session, editing everything you want to change and then clicking on “save” button.
Users have the option to delete a session as well.
The Close Window On Exit option helps in deciding whether the PuTTY terminal will close as soon as the session ends or restarts the session on the termination.
2. What is Logging in PuTTY?
This configuration panel saved the log files of your PuTTY sessions which can be used for debugging and analysis purposes. Users can choose the type of data you want to log in this window.
3. What is Terminal in PuTTY?
The section has a variety of options to decide how the texts in the window should appear. Whether you want the text to come in the next line as soon as it reaches the right edge of the window or you want to interpret the cursor position.
4. Configure Keyboard setting in PuTTY.
With the option, users can modify the behavior of ‘backspace,’ ‘home’ and ‘end’ keys, and several other keys to coordinate with the server settings.
5. What is Bell in PuTTY?
It lets PuTTY make an alert sound as and when you want it to function.
6. Features of PuTTY
Users can choose to disable or enable some of the advanced terminal features of PuTTY like disabling cursor keys, etc. using the function.
7. Adjust the size of Window in PuTTY.
The option allows to predefine a fixed size of the PuTTY window and control the scrolling. Many other configurations can be made using this feature.
8. Change the Appearance of PuTTY
Under this panel, the appearance of the cursor, the font in the terminal window or even control the window border can be changed.
9. What is PuTTY Behaviour?
Enables to change the title of the window, control the warning window operation, etc.
10. What is Translation in PuTTY?
The “Remote Character Set” lets you select how to interpret the information received from the server.
11. What is Selection in PuTTY?
Users can change the course of copy-pasting or the actions of mouse-buttons in Unix environment by making appropriate changes in this panel.
12. How to Adjust Colours in PuTTY?
You can control the color of background as well as of the texts using this panel.
13. Configure Connection in PuTTY.
The panel has options that solve any issues when closing of connections while a window is idle. With the option, users can select between the old and new protocols.
14. Manage Data in PuTTY.
The auto-login option dismisses the need to type the username every time. It can also specify the terminal needs using this panel.
15. A proxy setting in PuTTY
Permits configuration of various types of proxies used while making the network connections.
16. What are Telnet, Rlogin, and SSH in PuTTY?
These panels allow configuration of session-related options like changing the mode for negotiation between the server and client, allowing an automated form of login on the server, etc.
Download PuTTY on Linux and Installation Guide
PuTTY, the open-source and free to download software, provides an easy way to access a Unix shell environment from a windows system. Unlike Unix, Windows don’t have any SSH server or client pre-installed. The network file transfer application supports many protocols including the popular SSH and Telnet clients.
PuTTY for Linux
PuTTY is not only limited to Windows OS, but it’s popular among Linux users too. The Linux version is a graphical terminal program which is not pre-installed in most of the Linux distributions.
In various enterprises, many IT projects have their development environment on a remote Linux system where Windows is used as the local system. Why PuTTY? There is already a Linux terminal in the Linux Operating System. Even then, why an SSH tool like PuTTY is preferred?
The interface of PuTTY makes it a favorite choice among the users since most of them are accustomed to operating the application on Windows.
It has the option of connecting to raw sockets and serial ports.
Saving various sessions and loading them in one go is the main highlighting feature of PuTTY that its users swear by since it is difficult to edit sessions whenever logging-in manually.
Install PuTTY on Linux
On a Linux-based system, PuTTY can easily be installed via terminal. Let us look at the steps of installing the server application on a Ubuntu machine.
1. As a prerequisite, it is necessary to make sure whether the universe repository of Ubuntu is enabled or not.
Type the command:
sudo add-apt-repository universe
and hit enter.
2. Generally, PuTTY is already available in the repository of Ubuntu. Before starting with the installation process, update the packages and repositories of Ubuntu using the command:
sudo apt-get update
The command would make sure that Ubuntu installs the latest version of PuTTY, in case, it might install the older versions of the software. The word “sudo” in the command is used to instruct the terminal to run the update command as “root” since a user might not have privileges to get going with the installation and updation. It will prompt you to enter the username and password if you have the required access.
3. Now, run the command:
sudo apt-get install PuTTY
It will complete the installation by installing the application tools.
4. A prompt will asked if you want to continue the installation. Press ‘y’.
5. PuTTY tools will be unpacked and set up in the further process.
6. To confirm if that the installation is successful, run the command:
sudo dpkg -l PuTTY
It will display information about the application such as version, architecture, and description.
Installation of PuTTY on other Linux distributions
In Debian based Linux system, use apt-get or aptitude to install the server application PuTTY. The command is:
sudo apt-get install PuTTY
PuTTY can easily be installed on Arch-based Linux system. The command for installing is:
sudo pacman -S PuTTY
It is also available for installation on Fedora or Red Hat based Linux system, and the default package manager does that job for it. The command is:
sudo dnf install PuTTY
Working on PuTTY on Linux
Now that you have installed PuTTY, working on it is pretty simple too.
Just type the command “PuTTY” on the shell prompt. It will open the PuTTY SSH client application.
After opening it, enter the IP address or the hostname of the computer or any device you want to connect on Hostname field.
Next, select the required connection type, like SSH, Raw, Telnet, Rlogin, Serial, etc.
For security reasons, a prompt will ask to confirm the connection. Just click ‘yes’ to continue.
Now, you will be connected to your remote system. It will further ask for credentials – username and password, to make sure that you are authorized to connect to the system.
In Linux, the application can also be opened by searching in the Computer Box.
The Linux version of the program almost looks and feels exactly like the windows version.
SSH Key Management in PuTTY on Linux
Public key authentication is also supported by PuTTY. Public key authentication is used for interactive and automated connections. It offers a higher cryptographic strength which is difficult to achieve with long passwords. For generating a private key for authentication, the PuTTYgen tool is used.
Open PuTTYgen and run the following command to get public key authentication enabled:
puttygen -t rsa -b 2048 -o thekey.ppk
To get the public key use the following command:
puttygen -L thekey.ppk
Hence, that was all about installing and getting started with PuTTY on Linux based systems.
Download PuTTY for Mac and Installation Guide
PuTTY is a free, highly configurable and open-source SSH client which makes it convenient to connect to a remote server and transfer files over the network. Mainly aimed for the use of programmers and network administrator, it helps establish secure connections when transferring data over the network.
Apart from SSH, the application supports many other protocols like SCP, Telnet, Raw Socket Connection, etc. Additionally, it can also connect to a serial port. While it supports many variations on the secure remote terminal, it also facilitates user control over SSH encryption key and protocol versions.
PuTTY for Mac
Different operating systems (OS) have a different mechanism of installing PuTTY. A Unix-based system has pre-installed OpenSSH, whereas Mac and Windows don’t have a pre-installed client.
Let’s talk about the steps to install PuTTY on a MAC operating system. As a prerequisite, users need the following application installed on the system:
Command-line Tools
X-CODE
MacPorts
Install Putty on a Mac using Command-line Tools
MAC users have this facility to use a Unix toolkit. Users have to use the terminal to access the kit. The tool package gives its users many tools, utilities, and compilers that include GCC, Perl, svn, git, etc. Many of the commands are found on Linux installations by default. Let’s look at the steps to install it.
To begin with, the installation, go to the Apple Developer website.
Login and in the download section and search for Command Line Tools.
Install the .dmg file.
Use X-Code to install Putty for mac
It’s an IDE (Integrated Development Environment) specially designed for MAC OS. It consists of a suite of software development tools for developing software for MAC OS, iOS, WatchOS, and tvOS.
It also supports source codes from programming languages like C, C++, Java, Python, Ruby, etc. It’s available on the app store. So, go to app store, search for “x-code” and click on “get.”
Install Putty for mac using MacPorts
It’s open-source software designed to simplify the installation of other software. One can install some packages by entering a command in the terminal, which will download, compile and install the requested software. It also installs any required dependencies related to the software automatically.
Download MacPorts from here.
A pkg file will be downloaded. Just double-click to install it.
Download PuTTY for Mac and Installation
After installing the tools, let’s get to the PuTTY installation part.
1. You need to accept the Licence Agreement of X-Code before using it. So, open the terminal from the utility section. It’s just like command line on Linux.
2. Type the command:
sudo xcodebuild –license
By running this command, the Xcode License will be viewed/accepted on behalf of all accounts on the Mac.
3. Press enter to view the License agreement and type “agree.” A line on the terminal will say “You can view the license agreements in x-code About box.”
4. Update MacPorts by typing:
sudo port –v self-update
to make sure that x-code is fully installed. Now, the Mac system is ready to install PuTTY.
5. Type the following command
sudo port install putty
in the Terminal and run the command. It will download some of the dependencies of PuTTY.
6. Type:
putty
in the terminal to launch the application. Running the command would open PuTTY in an X11 window.
7. To copy PuTTY to the desktop as a shortcut icon, type the following command
cp /opt/local/bin/putty ~/Desktop/putty
and hit enter.
8. A desktop icon will be on the desktop which opens the PuTTY configuration box.
Following the installation users can start connecting to servers by adding the IP address and the port (depending on the type of connection you want to make) of the server.
Users can even save sessions containing the IP address of the servers, which would need to be accessed multiple times. Once connected, users can create, update or manipulate with the data present on the server, given that you have the necessary rights to perform those actions.
PuTTY client is one of the best SSH clients as it offers a variety of features like logging, cursor formatting, keyboard formatting, alert sound, resizing the terminal window, changing the actions of mouse buttons, configuring proxies, configuring session-related options, auto-login facility and much more.
 Various Ways to Use RSA Key Pair
RSA key pair generated through PuTTYgen is used in two various ways defined as below:
To assign while creating a new cloud server
You can choose the public key from the given list of keys at the time of creating a cloud server. If you don’t find your key in that list, then first add and then assign it.
Assign to an existing cloud server
At the time of connecting to the cloud server, first of all, you need to tell PuTTY to use it for utilizing your newly created RSA key pair.
Basic SSH (Putty) Commands – List of most used Putty commands in Linux
Basic SSH (PuTTY) commands help you to navigate and work efficiently with the files in Linux terminal. In this article, We’d handpicked a list of PuTTY commands, their options, and usage.
What is SSH (PuTTY) Commands?
The Secure Shell (SSH) Protocol lets a user connect to a remotely located computer from one computer. This communication takes place through a secured encryption process. This kind of connection can be used for file transfer and issuing other remote commands. The SSH Protocol follows a client-server model in which connection is established by SSH Client to the SSH server. The SSH client uses public key cryptography to ensure a safe connection to the SSH server. After setting up the connection, the SSH client also ensures that the privacy and integrity of data are maintained throughout the network by using symmetric encryption, asymmetric encryption, and hashing algorithms.
The client-server based model of SSH commands or PuTTY commands allows the authentication of two remotely located systems while encrypting the data that passes through them. By default, SSH operates on TCP port 22, but it can be changed if required. The client connects with the server by performing a TCP handshake with the server, which is for verifying whether the information provided by the user matches with the previous record of information that is stored in an RSA key store file. Before establishing a connection, both the client and the server have to agree upon the encryption standards to ensure safe and secured communication and then the user must perform the authentication check.
use of PuTTY commands, a terminal emulator that connects the client to the server is required. PuTTY is one such emulator which is open-source and free to download. Also, windows don’t have a pre-installed SSH server or client. So, the prerequisites for being able to use SSH (PuTTY) commands are as follows:
- A Linux based server that you would be connecting to.
- PuTTY for facilitating the connection process.
- The server’s IP address that acts as the location of the server to which you are trying to connect.
- Username and Password to make sure that you are authorized to connect to the server.
Connecting through PuTTY
- To connect to the server, enter the IP address of the server to the Host Name or IP address bar as shown in the image and keep the port as 22 and connection type as SSH. You may also save the configuration for further use.
- The PuTTY terminal will now open, asking for username and password to connect.
- You will be logged on the server you are trying to make a connection to.
If you using a Linux or Mac based Operating System, you don’t need a client like PuTTY as Linux has its own SSH terminal. You just need to use the following command to connect to the server:
ssh user@serverip
This command will connect you to a server whose IP address is “serverip”. “User” is the username that is authorized to connect to the server.
On entering the above command, you will be prompted to enter the password.
To close the connection to the remote server, just type “exit” on the terminal window. It will get you back to your local machine.
List of Basic PuTTY Commands
Now, to manage and operate on a Linux server, one must master the basic 17 SSH commands to make the most use out of it. Let us look into some of the basic commands of SSH communication.
- pwd: As soon as you are logged into the server, the first and foremost thing to check would be the present location you are at. The command “pwd” takes care of that. Just type “pwd” and hit enter.
- cd: Now, you are at a location and you want to navigate to another. Type “cd /location” and you will reach that location. It stands for “change directory”.
- “cd .” makes you stay at the same directory you are at.
- “cd ..” makes you shift one directory back. For example, you are at “/home/task/files” and you type “cd..” and hit enter. This will move you to “home/task”.
- “cd -” makes you go to the previous location you were at. For example, you were at “/home” but you moved to “/dir”. Typing “cd-” command will take you back to “/home”.
- “cd ~” will take you to your home directory and “cd /” will take you to root directory.
- mkdir: It stands for make directory and as the name suggest, it helps you with making a new directory with the name you choose at your current directory path.Syntax: mkdir directoryName
- ls: It stands for list command which is used to display all the contents in a folder or directory. “ls /home/folder” will enlist all the content inside the “folder” directory.
- “ls -a” will show you all the files in a directory”.
- “ls -h” will show the files while showing their sizes as well.
- “ls -r” will recursively show the subdirectories of the directory
- “ls -alh” will show you more details about the files contained in a folder. The details include the user permissions, last updated date, date of creation, time and the permission allotted to it like read, write and update.
- cp: It stands for copy command that basically copies a file in Linux.Syntax: cp filename.extension /dir/filename.extensionThe above command will copy the file “filename.extension” (source) and keep it to the location /dir (destination) with the same file name.
- “cp -r” copies all the contents of a folder.
- To copy and rename, use the command “cp filename.extension /dir/filename1.extension”. The file “filename.extension” will be copied to “filename1.extension present at /dir location.
- “cp -f” will force the copy process by deleting the destination file if a file with the same name happens to be there at the destination.
- “cp -i” will give you a warning message before actually proceeding with the copying process.
- “cp -u” will update the file in the destination folder only if the files have different content.
- “cp -n” will first check if the file already exists and if it does, it just won’t copy. It doesn’t overwrite the file.
- “cp -a” will archive the file.
- mv: The move command moves the file from one place to another instead of copying it, leaving no signs of the file in the source folder.Syntax: mv filename.extension /dir/filename.extension.
- To move and rename a file, use the command “mv filename.extension /dir/filename1.extension”.
- You can also move your file one folder back by using the command “mv filename/ ..”.
- touch: Using “touch” command, you can create a new file with any extension you want like text, php, html, etc in your current directory. You can also create a file without any extension at all.Syntax: touch filename.extension
- rm: The remove command lets you delete a file from the server.Syntax: rm filename.extension
- “rm * foldername” will delete all the files or content in a directory.
- “rmdir” will remove the complete directory or folder.
- “rm -r foldername” will delete the folder as well as the folders inside it.
- cat: This command is used to display content of a file on the screen. It copies standard input to standard output. This command also allows scrolling if the displayed text doesn’t fit the screen completely.Syntax: cat filename.extension
- The cat command is also used to concatenate two files and show their content combined as one.
Syntax: cat file1.txt file2.txt > mergedfile.txt
“>” is the output redirection character - The cat command can also be used to create a new file.
Syntax: cat > filename.extension
- head: The head command lets you read the first ten lines of the content inside a file.Syntax: head filename.extension
- You can also give the names of more than one file in the head command and it will show the first ten lines of each file separately.
Syntax: head /dir/file1 /var/file2 - You can also change the number of lines you want to be displayed on the screen rather than the default first ten lines.
Syntax: head -n15 /temp/filename
The above command will display the first fifteen lines of content from the given file.
- tail: Just like the head command gives you the first ten lines, tail command gives you the last ten lines of content from the file.Syntax: tail filename.extension
- Also, you can provide multiple file names to the tail command for it to show last ten lines from each of the mentioned file.
Syntax: tail /dir/file1 /dir/file2 - Similar to the head command, the tail command also allows you to change the number of lines you want to be displayed other than the default number.
Syntax: tail -n15 /temp/filename
The above command will display the last fifteen lines of content from the given file.
- zip: A compression and file packaging utility in unix, zip command compression the file size. It also puts one or more files into a single zip archive.Syntax: zip -r foldername.zip foldername
- Using the command “zip -d filename.zip filename”, you can delete the file from the zip archive.
- Using the command “zip -u filename.zip filename”, the specified list of files can be updated in the zip archive.
- “zip -m filename.zip filename” deletes the original file after creating its zip archive.
- unzip: The unzip command is used to decompress a file.Syntax: unzip filename.zip
- You can unzip multiple numbers of files at a time by using the command “unzip file1.zip file2.zip file3.zip”.
- You can also exclude one or more files from unzipping.
Syntax: unzip filename.zip -x excludedfile.zip
The above command will extract all the files from the compressed archive except excludefile.zip.
- tar: It stands for tape archive. Also used to compress and decompress folders.Syntax: Command for compressing, that creates an archive for “folder”.tar -czvf folder1.tar.gz folderThe command for decompressing
tar -xvf folder1.tar.gz - chmod: chmod stands for change mode. Using this command, you can change permissions of a file or directory. These permissions can be represented either by numbers from 0 to 7 or with alphanumeric characters. 4 represents reading permission, 2 represents writing permission, 1 represents executing permission and 0 represents no permission.Syntax: chmod 754 filename
- In the above command, 7,5,4 represents the permission for the user, group and others wherein 7 is the combination of 4,2 and 1, which indicates all the three permissions are given to the user.
- Similarly, 5 is the combination of 4, 0 and 1, which indicates read, no write and execute permission.
- Also, 4 is the combination of 4, 0 and 0, which indicates read, no write and no execute permission.
- “chmod -r” lets you change the permission of a folder and all the files inside it as well.
- grep: If you want to search for a particular string inside a file or folder, grep is the right command for you. It returns the whole line containing the phrase if it finds the perfect match.
Syntax: grep “string” filename
- The option I in the command “grep -I “string” filename” lets you search for a string case-insensitively in the file.
- You can count the number of appearances of a string in the given file by using the command “grep -c “string” filename”.
- You can display the filename that contains a particular pattern or string using the command “grep -l “string” *”.
- You can also display the line number along with the result using the command “grep -n “string” filename”.
- find: This command searches for a file inside a folder. Files with specific criteria can also be filtered out using this command. You can run find command to find files by permissions, users, groups, file type, size etc.Syntax: find . -name filename.extensionThe above command will find all the files with the name “filename.extension” in the current directory.
- If you want to find a file in some directory, use the command “find /directory -name filename.extension”.
- You can look for any type of file, say a php file by using the command “find . Type f -name filename.php”.
- vi: The vi command lets you enter a text editor.Syntax: vi filename
The above command will open the file on the screen and if the file doesn’t exist, it will create a new one with the same name.
- The escape key lets you cancel any command you have started in the vi editor mode.
- To exit the vi editor, type “:q”, only if you haven’t done any changes to the file.
- If you want to discard the changes you have done to the file, type “:q!” to exit.
So, these are some of the basic SSH (PuTTY) commands that come very handy for a user to manage the basic functionalities and handle files and folders on a Linux web server.
Best PuTTY Alternatives for SSH Clients
PuTTY is an open source network file transfer application that supports various network protocols such as Telnet, SCP, and SSH. The networking client PuTTY enables the user to access another computer within the same network. Although the main program has no inbuilt security features, it can be combined with Secure Shell (SSH) to encrypt connections. Moreover, file transfer can be secured by appending Secure File Transfer Protocol (SFTP) and Secure copy protocol (SCP).
PuTTY Alternatives
PuTTY was originally written for Windows operating system, but now there are versions available for Linux. While PuTTY is one of the finest terminal emulator and serial console, there are some limitations to it. For that matter, we have listed below several alternatives applications to PuTTY.
1. KiTTY
The KiTTY application is a fork of PuTTY, as such, it is coded on the same foundations of PuTTY. In simple words, KiTTY is a better version of PuTTY that not only has all the features that PuTTY has but offers many more.
While, the interface is developed for the Windows operating system but one can remotely access computers that run Linux, Mac OS, and Unix. As KiTTY was built altering the source code of PuTTY, it offers almost the same user interface and user experience.
PuTTY vs KiTTY
However, KiTTY solves one of the basic limitations of PuTTY’s, which is simultaneously representing multiple sessions. Apart from that KiTTY has many different features such as:-
Multiple Session Launcher
Portability
Inbuilt Chat System
Automatic Login Scripts
Text Editor
Includes SCP implementations – pscp and WinSCP
Connect via Telnet and SSH
Therefore, KiTTY is amazing for those who are accustomed to PuTTY interface and are not looking for much change besides the additional features.
Download KiTTY
You can easily download Kitty here. To download KiTTY for windows follow the simple steps.
A new window will pop up.
Click on either download KiTTY Windows Classic or KiTTY windows portable.
Your download will start automatically.
KiTTY software is totally free to use.
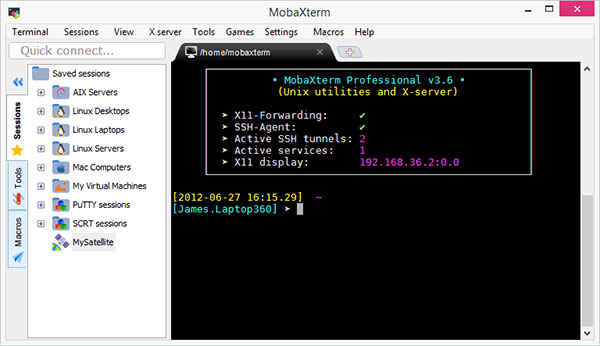
2. MobaXterm
MobaXterm is set of network tools for remote computing that is integrated with X11 – windowing system for bitmap displays. Apart from that, it integrates a number of network clients such as SSH, Telnet, rlogin.
The enhanced terminal application has a number of advanced features such as support for SFTP, offers Remote Session and Desktop Manager. It is an all-in-one network application has an initiative user interface to seamlessly connect remote servers. One of the main benefits of MobaXterm is that the X server makes it easy to manage all the remote applications on the Windows operating system. Moreover, application capabilities can be extended using plugins. Tunneling protocol can be implemented with HTTPS.
PuTTY vs MobaXterm
However, MobaXterm application has two editions – home and professional. The basic version is free while the professional is paid. Some of the additional features that are only available in the professional version are as below:
Simultaneous sessions, while the free only allows twelve.
Graphical SFTP browser
Tunnels, while the free version offer only two SSH tunnels
The home edition allows four macros but the professional permits to set unlimited macros.
Altering profile scripts
Master Password Support
12-months professional support
Lifetime right to use
While the application runs on Windows, the console window will support Unix commands. One of the advanced tools is the ‘’Multi-Execution’. The tool allows the same commands to be executed on different servers simultaneously.
Download MobaXterm
You can download MobaXterm Home Edition v11.1 from here. Basically, there are two versions available to download MobaXterm viz. Portable and Installer.
Download MobaXterm Home Edition v11.1 (Portable edition)
Download MobaXterm Home Edition v11.1 (Installer edition)
3. Solar-PuTTY
Solar-PuTTY is a terminal program that enables users to manage remote sessions. The tool is highly professional and available for free. It is developed by leading network software provider – SolarWinds. One of the main features of the application is the tabbed interface that allows multiple session management from one console.
The secure terminal tool integrates the security of SSH. The program is highly user-friendly as it allows users to save private keys to sessions. Apart from that, the tool has the ability to automate scripts that can establish a connection when a user logins.
Moreover, the tool does not need to be installed and can function by running the executable file. The tool is integrated with Windows Search, which means that users can effortlessly find saved sessions. It will also enable users to search for IP Address, Username, and Tags. The tool also offers color-coded so that each session is easily distinguishable.
Solar-PuTTY is a great alternative as it provides a tabbed interface that is one of PuTTY’s biggest limitation. To securely transfer files, Solar-PuTTY integrates Secure File Transfer Protocol (SFTP) and Secure copy protocol (SCP).
PuTTY vs Solar-PuTTY
Here are some of the main features of Solar-PuTTY:
Tabbed interface
Integrated Windows Search
Credential Saving
Supports multiple protocols – SSH, SFTP, SCP and Telnet
Download Solar-PuTTY
Download Solar-PuTTY
4. Xshell 6 Client
Xshell 6 is a terminal emulator that backs to SSH client, Telenet, and rlogin. The tool works as a great alternative to PuTTY. The tool markets itself as the “The Industry’s Most Powerful SSH Client”. The program has two editions – basic and professional. The basic version is free and sufficient to use for home. While the paid version provides all the advanced features that are required for business.
Some of the advantages that Xshell client offers over PuTTY are dynamic port forwarding and tabbed interface. One of PuTTY’s biggest drawback is unable to provide tabbed windows which most of its alternatives provide. Although the tool only runs on Windows it has the ability to interact with Linux servers.
One of its biggest advantages is that users choose between SSH versions 1 and 2 within the security options. Although the program provides rlogin, it does not integrate it with any encryption. Therefore, it is best to use SSH when using the Xshell 6 tool.
PuTTY vs Xshell
The tabbed interface will allow users to switch between multiple connections simultaneously.
Below are some of the benefits of Xshell offers over PuTTY:
Users can write simultaneous commands across multiple sessions.
Session Manager can help create, edit, and delete multiple connections from one window.
Supports one of the known Public-Key Cryptography Standards – PKCS#11 protocol
Offer a Master Password feature.
Supports Python, Jscript, and VBScript.
Users can use the inbuilt terminal lock.
Download Xshell
Xshell software price is $99 with 1-year support and a Free Licence option for the School or Home use only.
Download Xshell
5. SuperPuTTY
SuperPutty is a Windows Manager that is hosted on GitHub and updated by active developers. The tools are almost similar to PuTTY, and one of its prerequisites is to download PuTTY. Akin to all the alternatives of PuTTY, SuperPutty has multiple session functions that run on the tabbed form. It is an open source tool and therefore entirely free to use. Other than the tabbed interface, SuperPutty also offers customizable UI.
PuTTY vs SuperPuTTY
For secure file transfer, the tool supports SCP and SFTP that allows users to transfer files to the remote host. Below are some of the functions that SuperPutty offers:
Multi-tab support
Allows users to set keyboard shortcuts for the most used commands
Offers tab manipulation, so that users can move tabs vertically or horizontally.
Customizable user interface
Download SuperPutty
6. mRemoteNG
mRemoteNG is an open-source remote connection manager that offers the multi-tab and multi-protocol feature. It is a fork of the mRemote system and is highly reliable as it offers bug fixes and updates regularly. The mRemote signifies that the tool offers ‘multi-remote sessions’. Using the program, users can create a number of terminal sessions and access these via the tabbed interface.
PuTTY vs mRemoteNG
the mRemoteNG primary advantage is that it offers a very basic and clean interface for SSH use. Although it works as a free SSH client, one of the other advantages is that it is integrated with secure file transfer utility and supports SCP and SFTP. Here are some of the basic feature of mRemoteNG:
Easily access data of remote and log sessions.
It allows undocking panels and therefore uses can move the panel to separate screen.
Multiple protocols integrated – HTTP, HTTPS, SSH, RDP, rlogin, Telnet, and VNC
Download mRemoteNG (v1.76.16)
One can easily download mRemoteNG software from the official website or here. There are two versions available to download mRemoteNG (Multi-Remote Next Generation) viz. MSI and ZIP.
Download mRemoteNG MSI
PuTTYgen runs on
Windows 10/11
and is available under the
Freeware
license
— the installer is 600 KB.
We’ve catalogued it under
General.
Help fellow users decide. Share your experience with PuTTYgen.